The Mini, Built by Clover, vs. Lightspeed
on iOS
Retail POS (S-Series) on The Mini, built by Clover, runs on the Android operating system and is similar to the Retail POS (S-Series) on iOS but with a few changes which affect the register menu and settings, transactions, saved sales, and BackOffice settings. Let’s review these differences to help you decide which device will work best for your business.
The 1st-gen Mini no longer supports updated versions of the Retail POS (S-Series) app. If using a 1st-gen device, you can continue to receive app updates by upgrading to a 2nd-gen Mini or other supported register device. Learn which type of Mini you have by visiting Clover support.
Register App
The Retail POS (S-Series) app is where staff run sales, perform returns, and manage register shifts. From the register’s menu to ringing up items, here we cover what’s different about the Retail POS (S-Series) on The Mini, built by Clover, versus the Retail POS (S-Series) on an iPad.
Register Menu
The register’s menu appears after signing in and houses register functions, diagnostics, and settings. Open and close register shifts, perform pay ins and payouts, and access other cashier and manager controls from here. The ‘Support’ tile shows register diagnostics and Customer Care contact information.
Register Menu
Menu item features unavailable on The Mini, Built by Clover, include ‘Register List’. ‘Deactivate Register’ is available on the ‘Support’ screen.
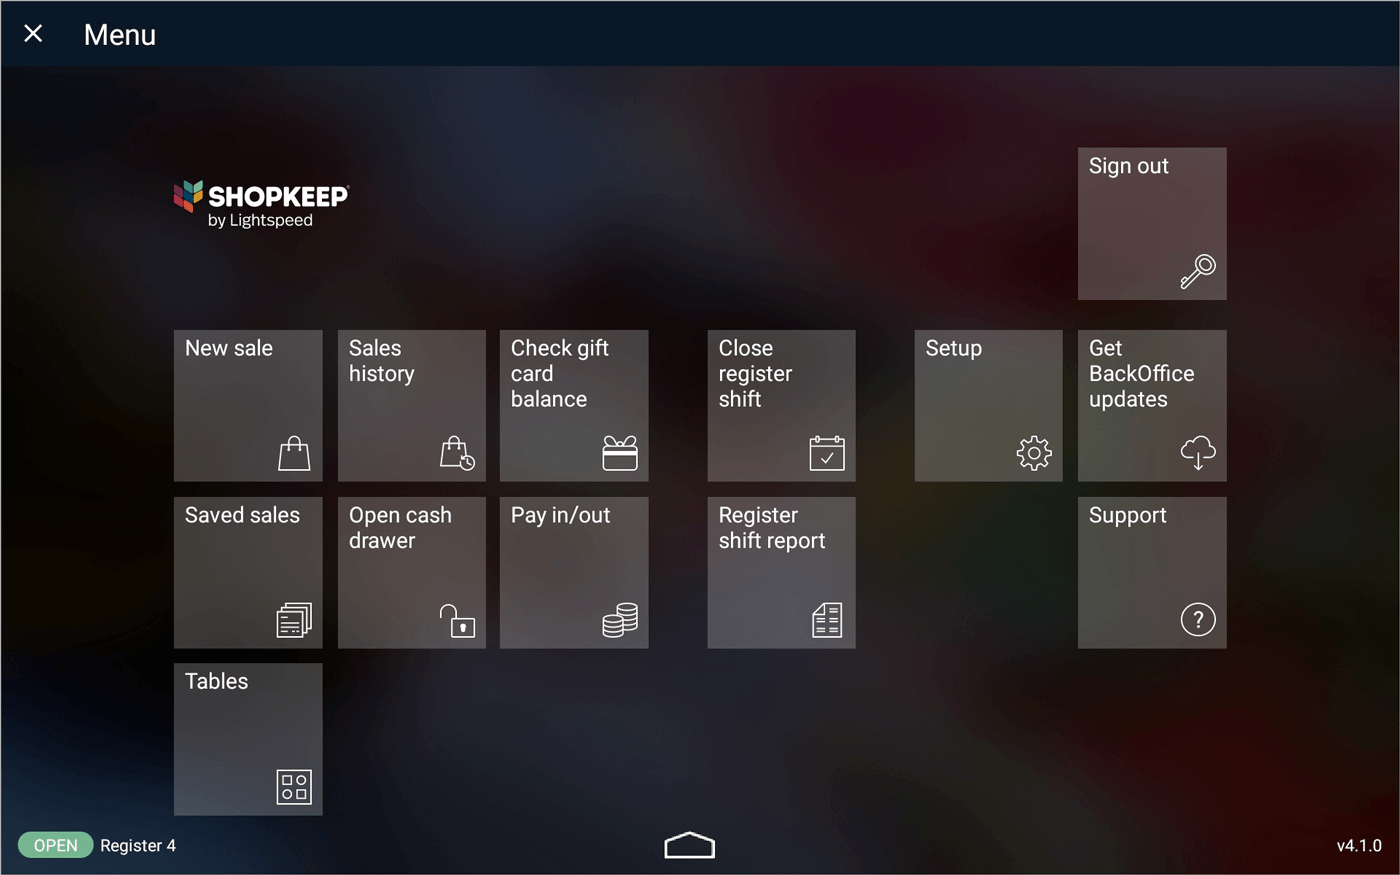
New sale | Ring up a sale. See the Sales and Returns section for more information about this tile.
Sales history | Browse transactions from the current shift, perform returns, and reprint receipts. See the Sales and Returns section for more information about this tile.
Check gift card balance | If using Integrated Gift Cards, check the balance of a customer’s gift card.
Open/Close register shift | Register managers only.Open a register shift to start the day at the register. Close a register shift to end the day.
Setup | Register managers and employees with BackOffice permissions only. Access optional auto signout, payment, saved sales and table layout syncing, online ordering, printer, barcode scanner, and receipt settings. With the relevant BackOffice permissions, staff can also add and edit inventory items and manage item shortcuts. Business Owners have the added ability to update receipt and tip settings. See the Setup Screen section for more information about this tile.
Get BackOffice updates | Register managers only. Used to update the register after changes are made in BackOffice.
Saved sales | View all open saved sales. See the Saved Sales section for more information about this tile.
Open cash drawer | Register managers only.Open a connected cash drawer without ringing up a sale.
Pay in/out | Register managers only.Add or remove money to or from the cash drawer mid-register shift. This automatically opens a connected drawer.
Register shift report | Cashiers can view or print a summary of their transactions for register shifts during which they worked. Register managers can run the Register shift report for individual employees who worked a specific register shift or for all employees. Only register shifts from the last 48 hours can be viewed.
Support | Displays the status of the register and its connected hardware and provides Customer Care contact details. See the section below for more information about this tile.
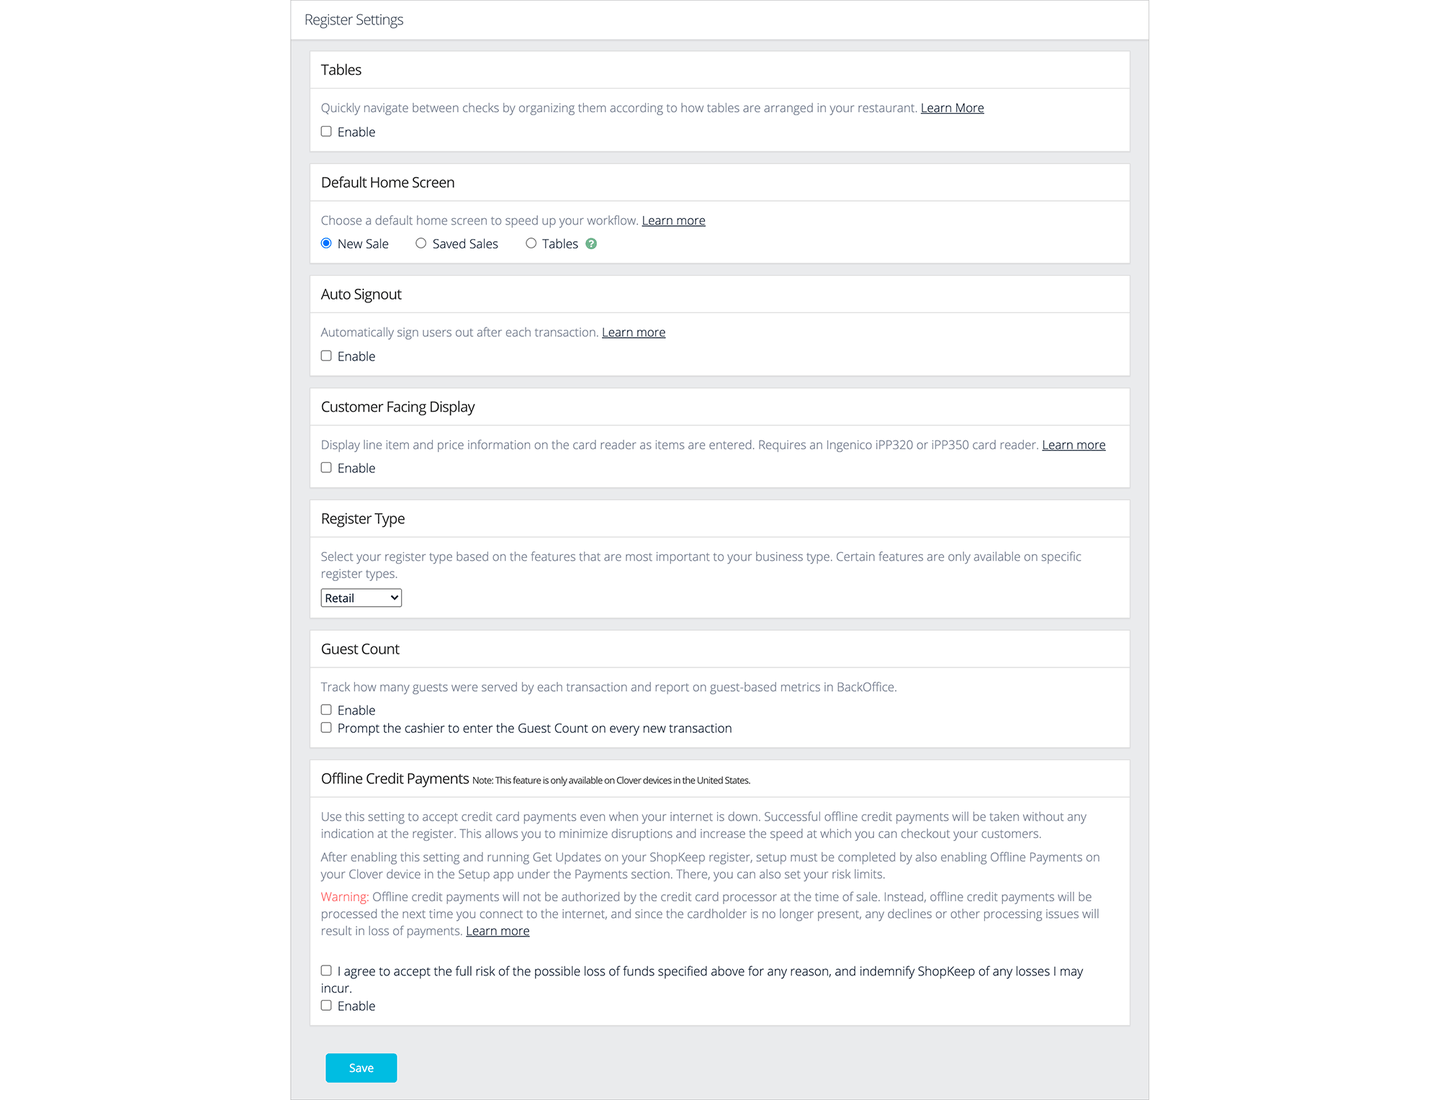
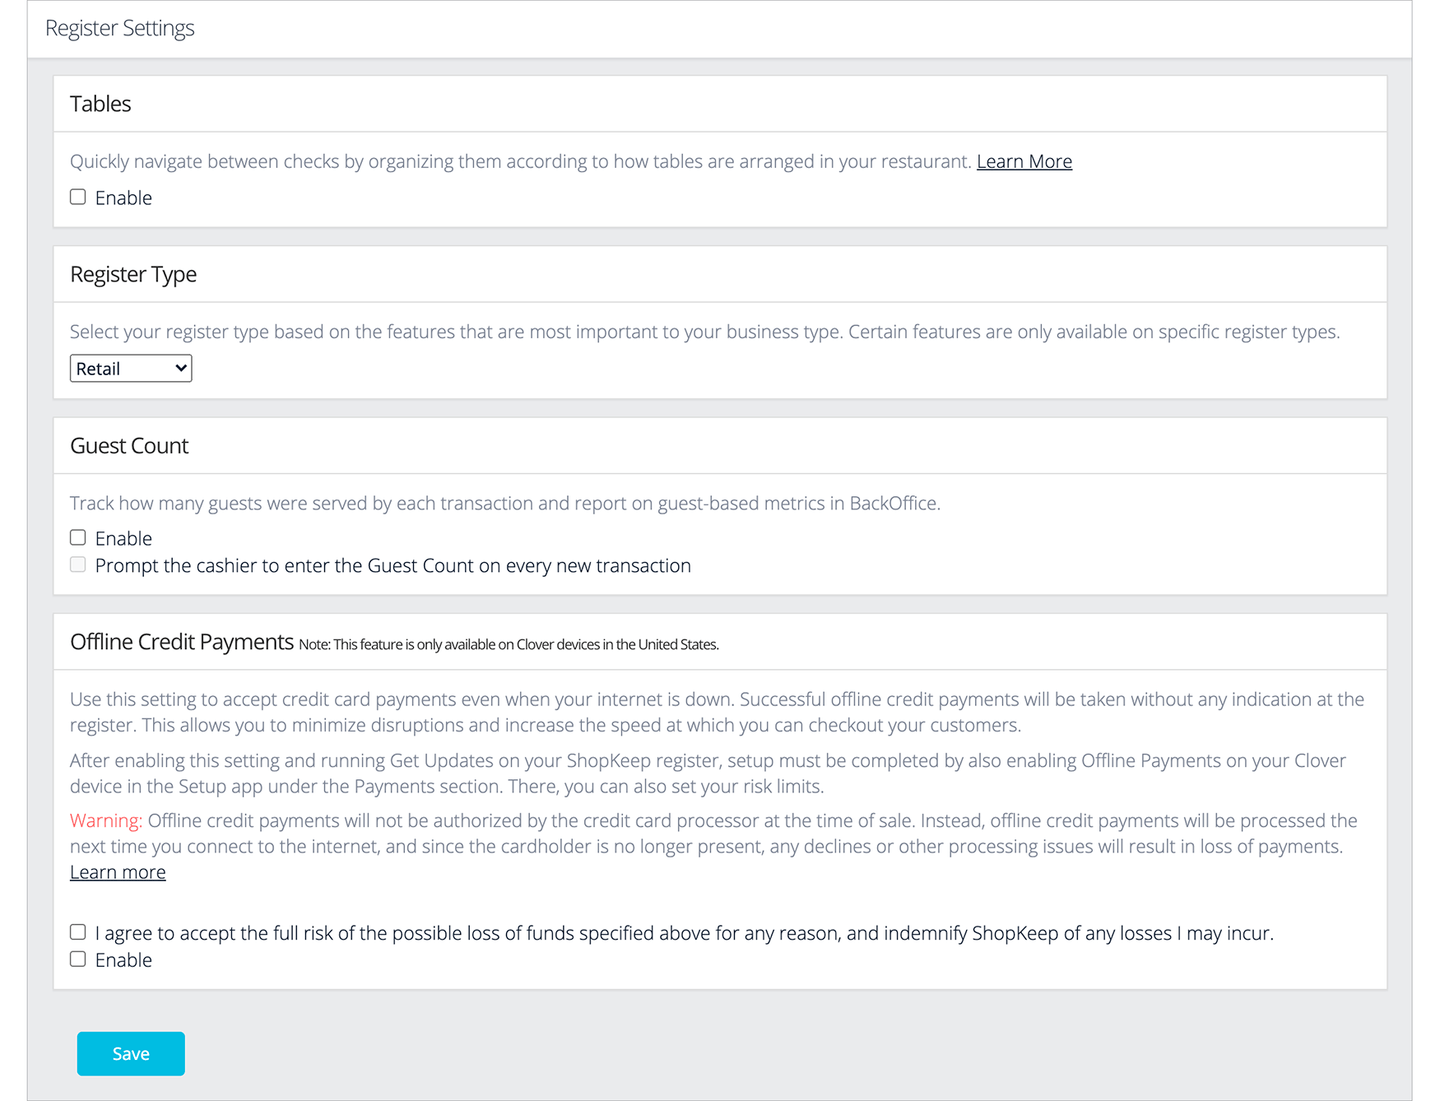
Tables | Create a floor plan of the restaurant or bar, view open and seated tables, and manage orders directly from the table layout. This feature must be manually enabled in BackOffice before it can be used at the register. See the Table Layout article for more information about this tile.
Home button (bottom of screen) | Tap to exit to the Home screen of the device.
Support
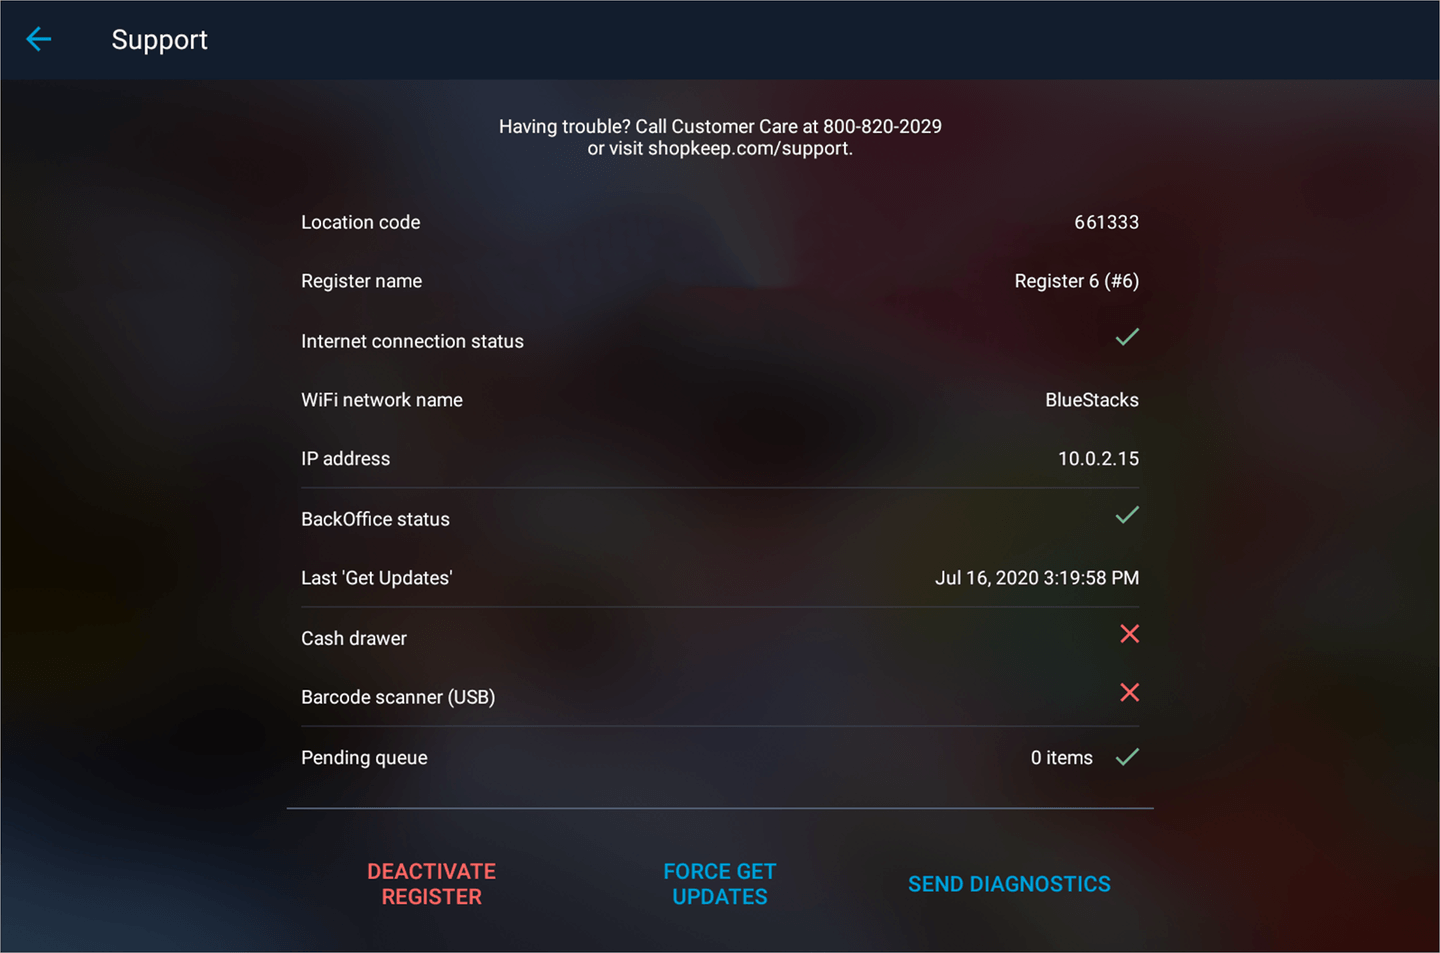
Register name | Register’s name and number. Set this in Register Licenses settings in BackOffice.
Internet connection status | Shows if the register is able to access the internet.
WiFi network name | Name of the WiFi network the register is currently connected to.
IP address | The register’s IP address on the network.
BackOffice status | Indicates if BackOffice is functional and able to communicate with the register. If there is an error, check our status page.
Last ‘Get Updates’ | Last time this register retrieved updates from BackOffice.
Cash drawer | Shows if a cash drawer is connected to the register.
Barcode scanner | Indicates if a USB barcode scanner is connected to the register.
Pending queue | Amount of register information waiting to be sent to BackOffice.
Deactivate Register | Business Owner only. Unlinks the register from your Lightspeed Retail account to allow the Retail POS (S-Series) app to be activated on a different device or a register license to be removed.
Force Get Updates | Register managers only. Pushes data from BackOffice to the register if ‘Get BackOffice updates’ fails to sync.
Send Diagnostics | Sends the register database to Lightspeed Retail. Only needed if asked to use by Customer Care.
Setup Screen
From BackOffice setup to receipt printing options and kitchen printer setup, the ‘Setup’ screen contains features and optional settings for setting up and customizing how the register works.
The ‘Setup’ screen is only available to Register Managers and employees with BackOffice permissions.
Setup Screen
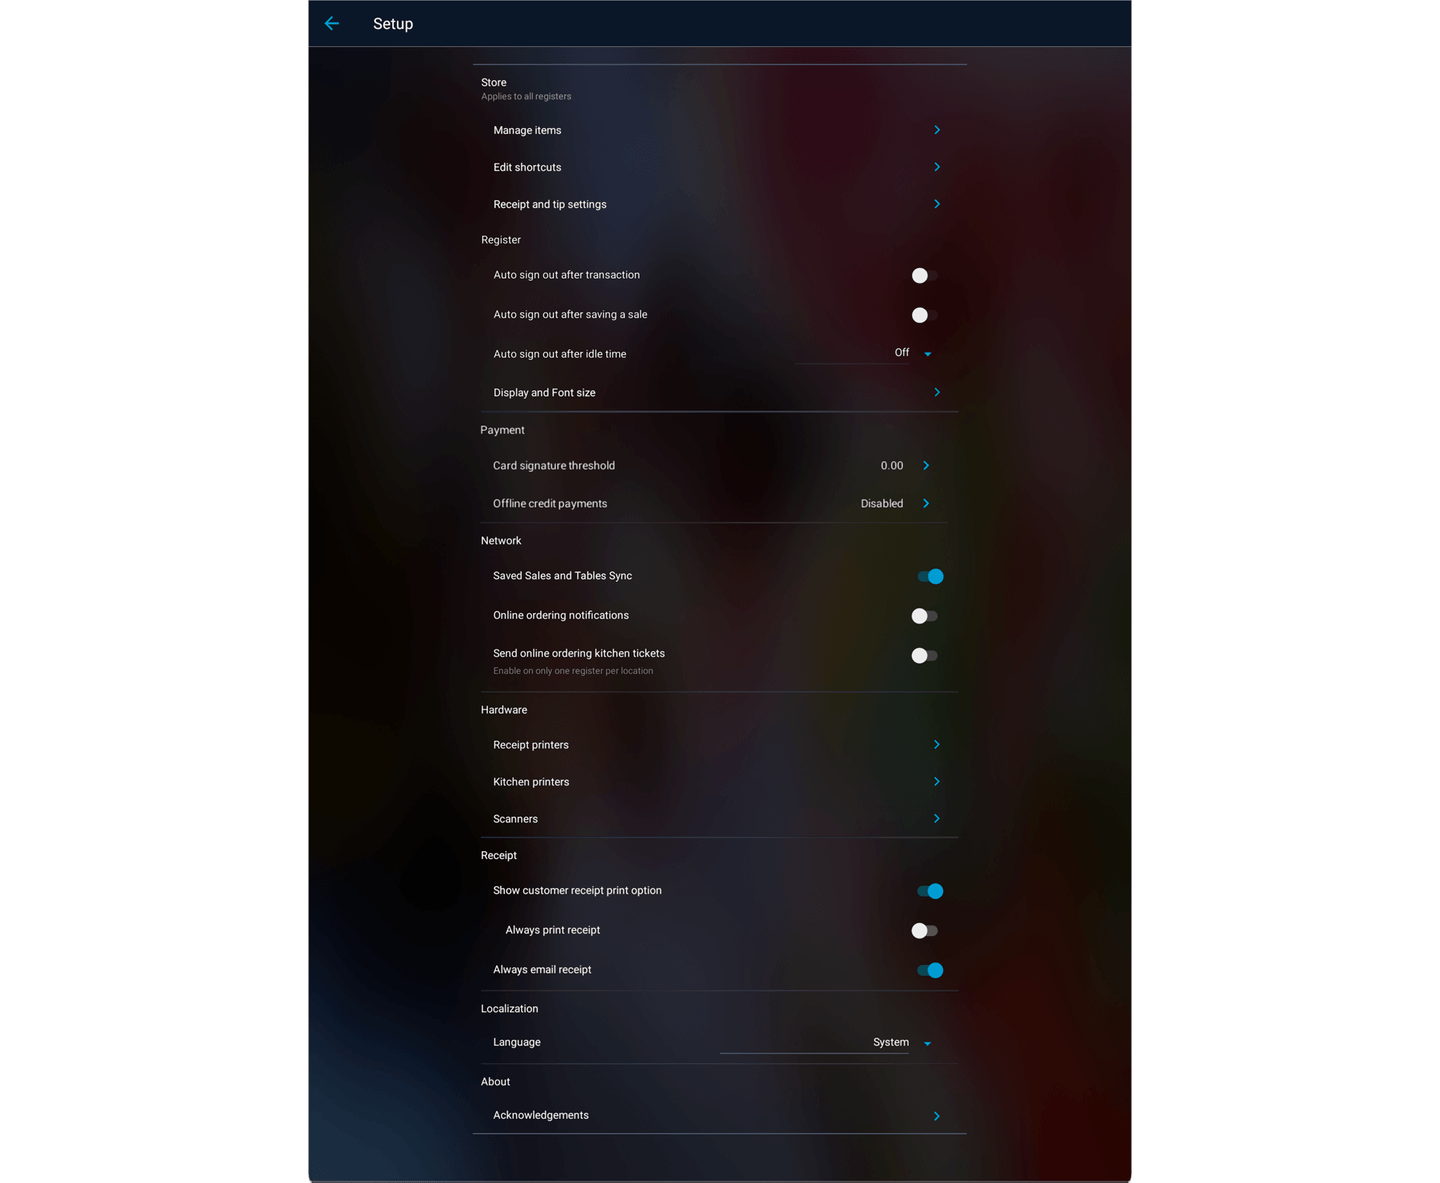
Manage items | Only available to employees with the relevant BackOffice permissions. Add new and edit existing basic inventory items and items with variants.
Edit shortcuts | Only available to employees with the relevant BackOffice permissions. Manage the item shortcuts that appear on the sale and return screens of the register.
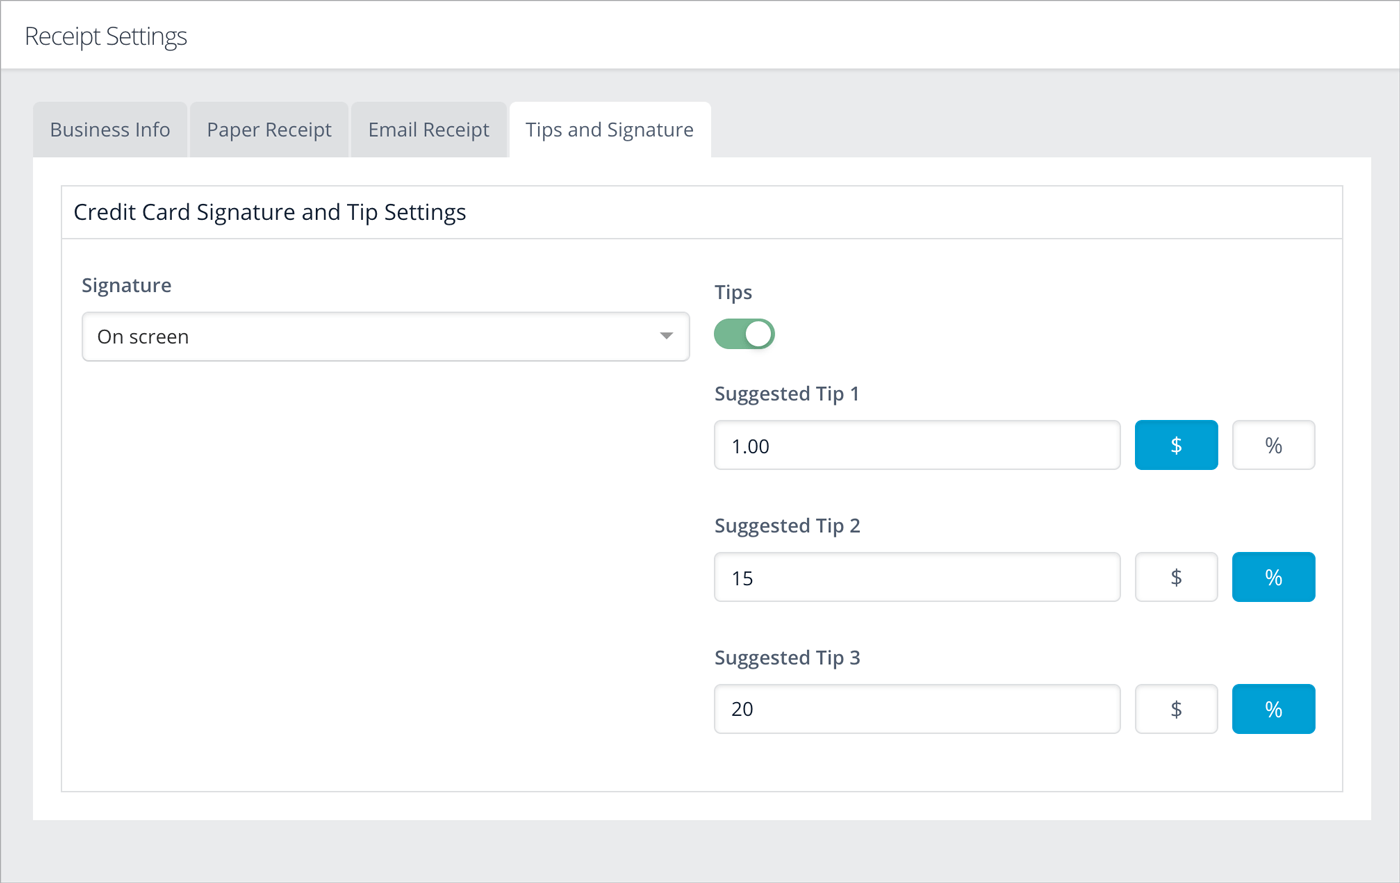
Receipt and tip settings | Only available to the Business Owner of Lightspeed Retail accounts created on or after July 23, 2019. Set up receipts and customize tip settings.
Auto sign out after transaction | When on, employees will be automatically signed out of the register after every transaction they complete. This is disabled by default. This setting is only available if more than 1 employee is set up in BackOffice.
Auto sign out after saving a sale | When on, employees will be automatically signed out of the register after every sale that they save. This is disabled by default. This setting is only available if more than 1 employee is set up in BackOffice.
Auto sign out after idle time | When on, employees will be automatically signed out of the register after being idle for a set amount of time. This is disabled by default. This setting is only available if more than 1 employee is set up in BackOffice. When signed out, items left on the New Sale screen will be saved as a saved sale. Unsaved changes to existing saved sales will also be saved.
Display and Font size | Opens the Settings app to the ‘Display size’ and ‘Font size’ settings used to increase or decrease the size of interface elements and text on the Clover device.
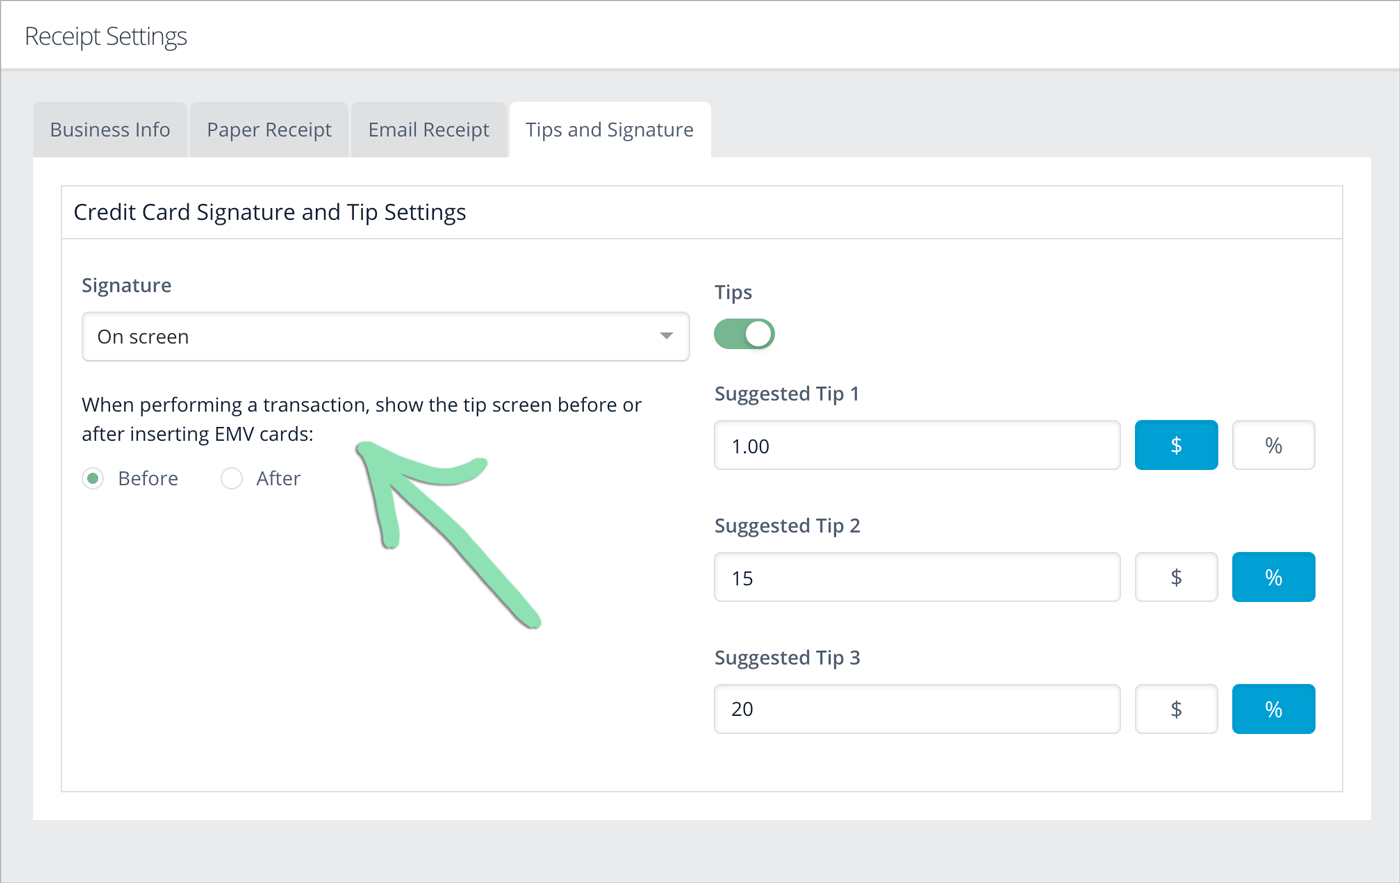
Card signature threshold | The total a credit sale must exceed before a customer signature is required. Tap to open the ‘Setup’ app to change the threshold amount.
Offline credit payments | Shows if the offline payments setting is enabled on the Clover device. Tap to open the ‘Setup’ app to enable offline payments. Please note that BackOffice setup and internet access are required before offline payments can be accepted.
Saved Sales and Tables Sync | When on, saved sales and the table layout automatically sync between registers and are backed up to the cloud. This is enabled by default. Read our Saved Sales Sync article for more information.
Online ordering notifications | When on, a badge will appear on the register menu icon, register menu, and sign in screen to indicate the number of new online orders. After viewing an online order from the Saved Sales screen, the number on the badge will decrease.
Send online ordering kitchen tickets | When on, kitchen tickets will print from this register for online order items assigned to ticket printers. We recommend printing kitchen tickets from 1 register per location and disabling this setting on all others to prevent duplicate tickets. For kitchen tickets to print, online order printing must be enabled for at least 1 register.
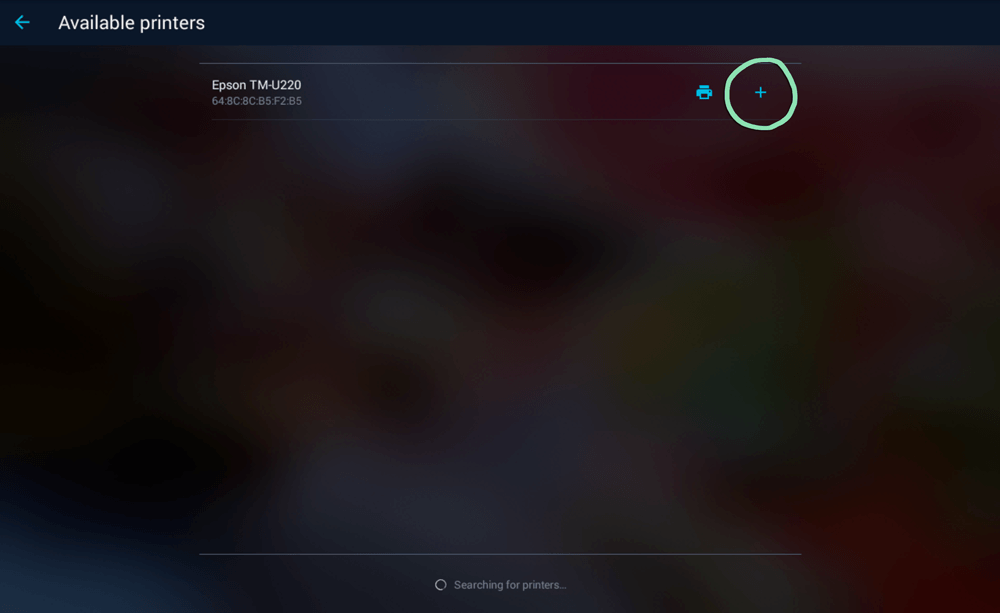
Receipt printers | Set up a new receipt printer, view all available receipt printers, and toggle receipt printers on or off. By default, the built-in printer for the Clover device is enabled.
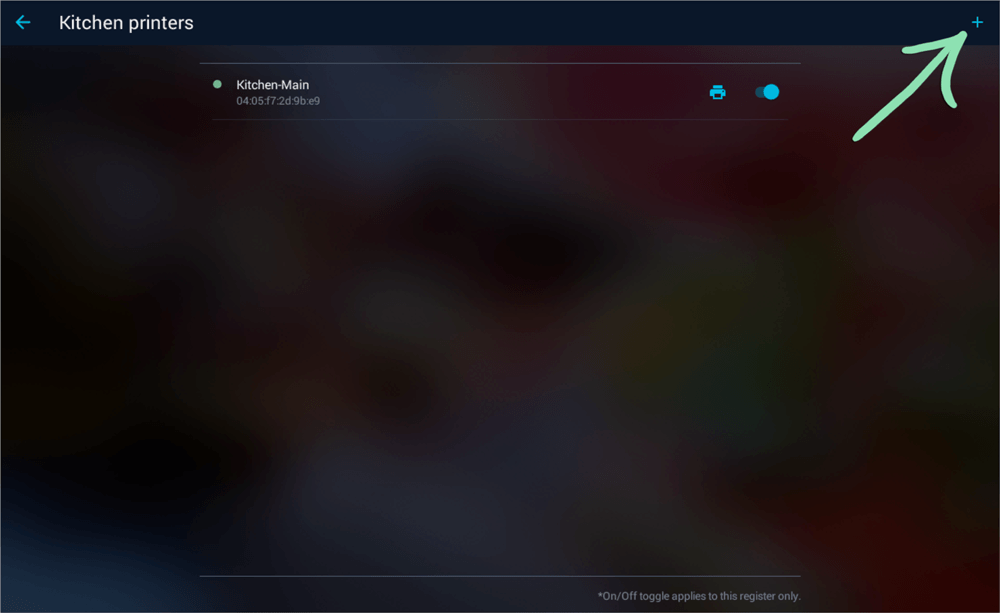
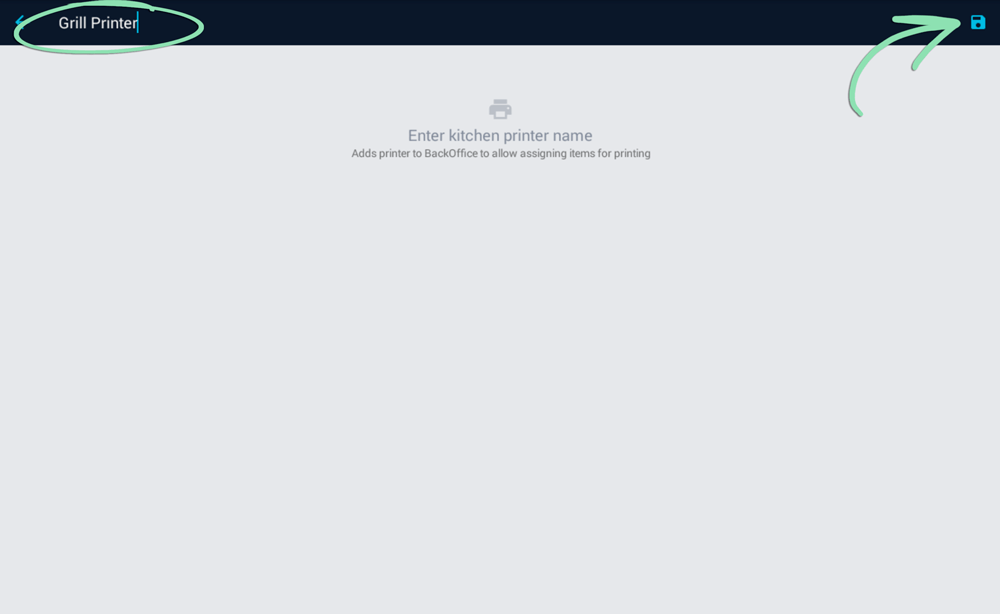
Kitchen printers | Set up a new kitchen printer, view all connected kitchen printers, and toggle kitchen printers on or off. See the section below for more information about kitchen printers.
Scanners | Set up a new Zebra barcode scanner and view all connected scanners.
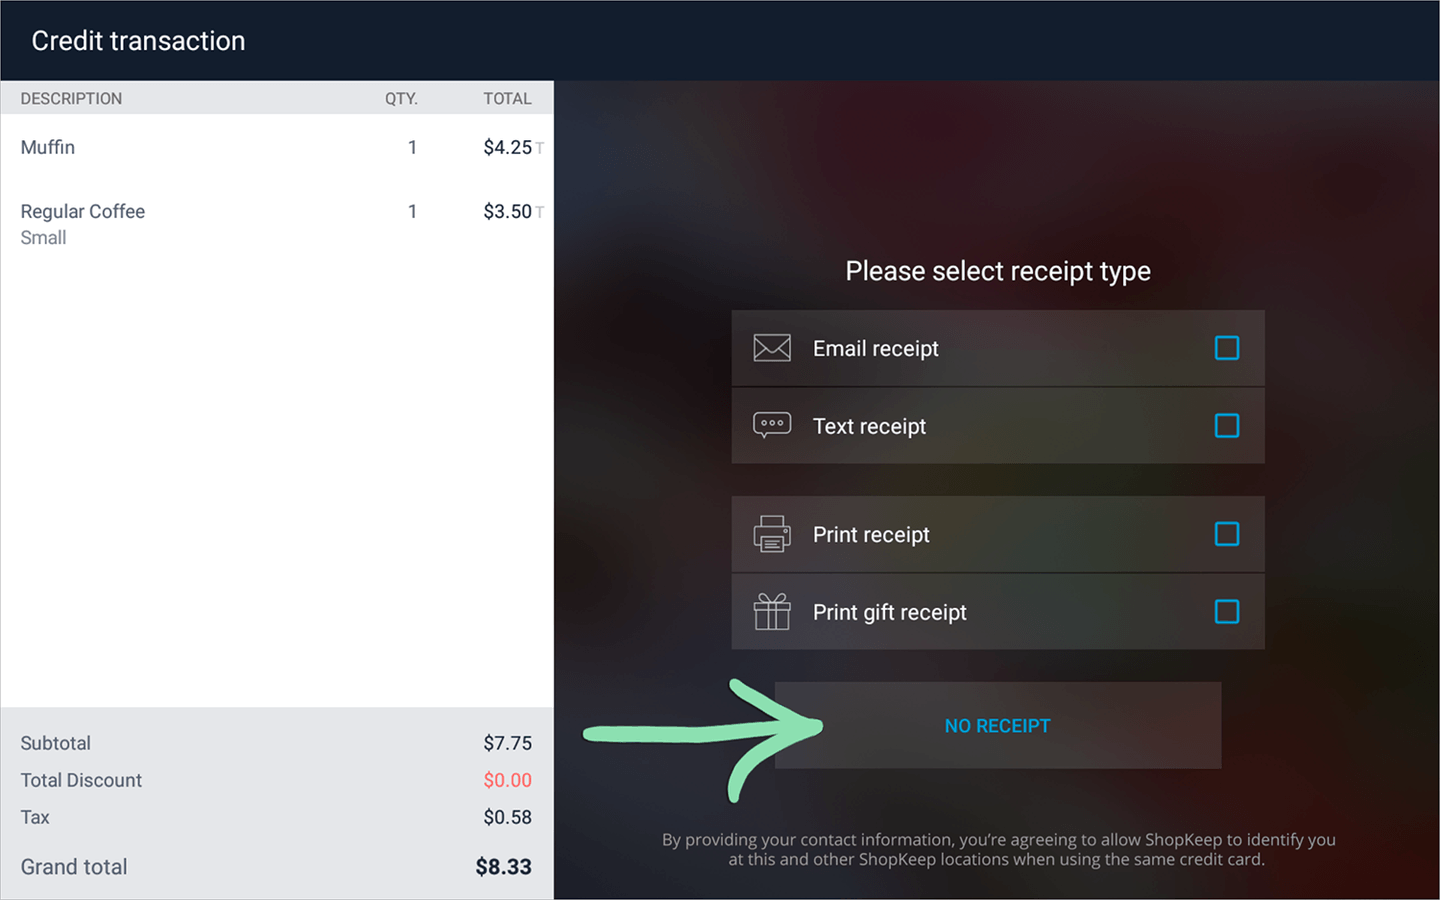
Show customer receipt print option | When off, printed receipt options are hidden on the receipt screen at the end of transactions. This is enabled by default.
Always print receipt | When on, the ‘Print receipt’ option will be automatically selected at the end of every transaction. This is disabled by default.
Always email receipt | When on, the ‘Email receipt’ option will be automatically selected at the end of every transaction tagged to a customer with an email address. This is enabled by default.
Kitchen Printers
Sales and Returns
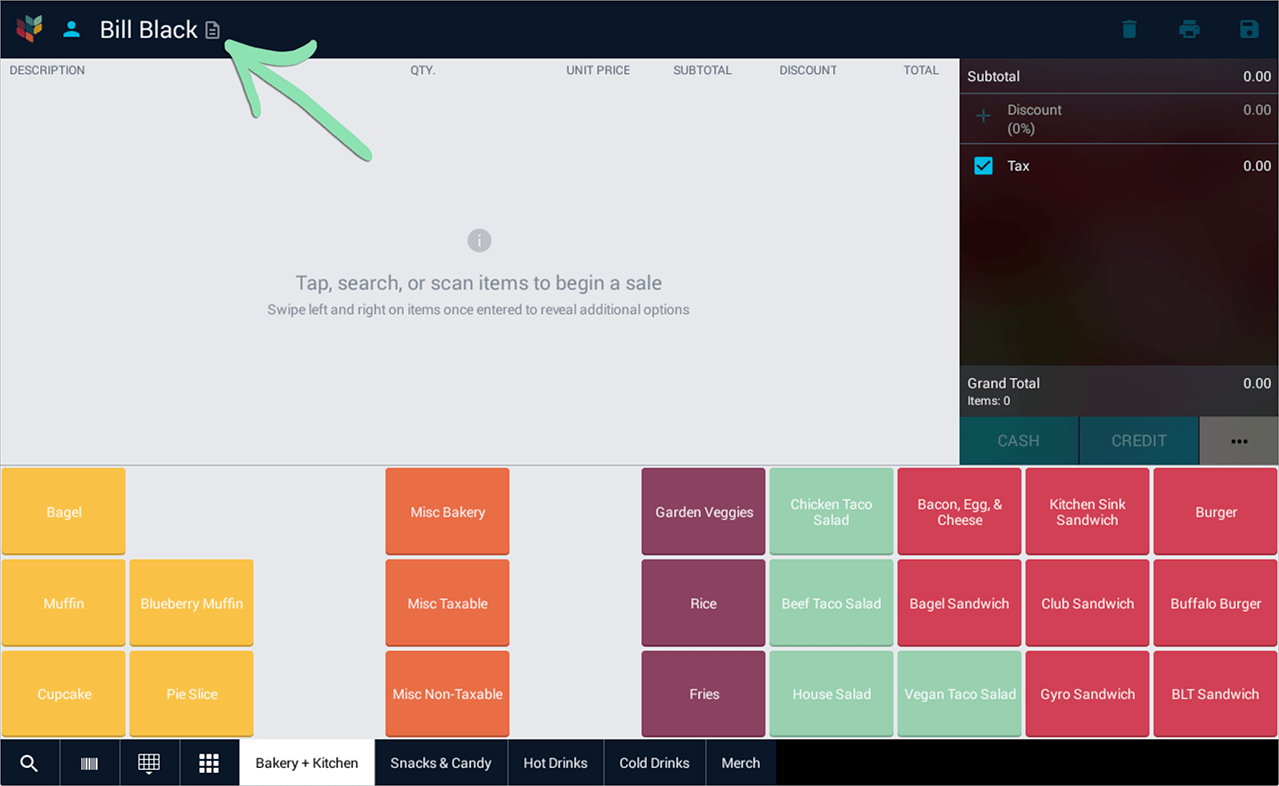
Run sales from the ‘New Sale’ screen and initiate returns from the ‘Sales History’ screen. Both screens are accessed from the register menu.
New Sale Screen
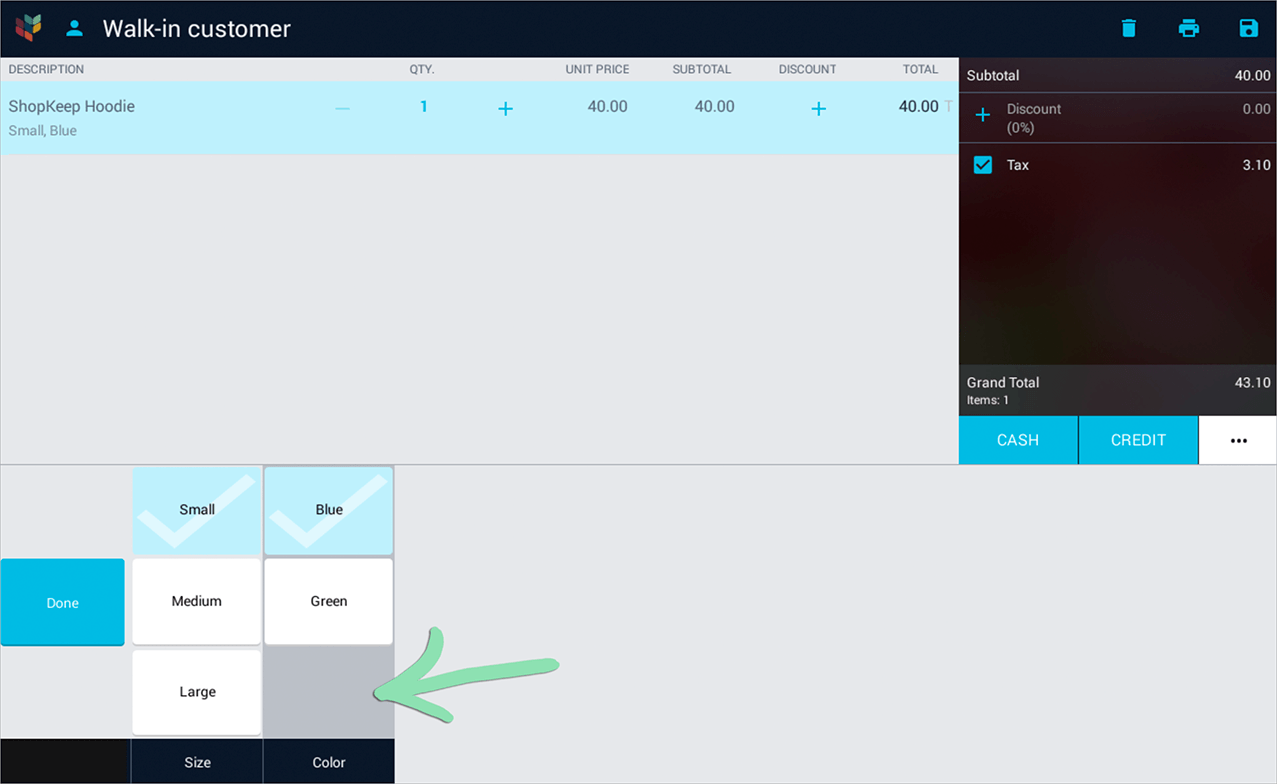
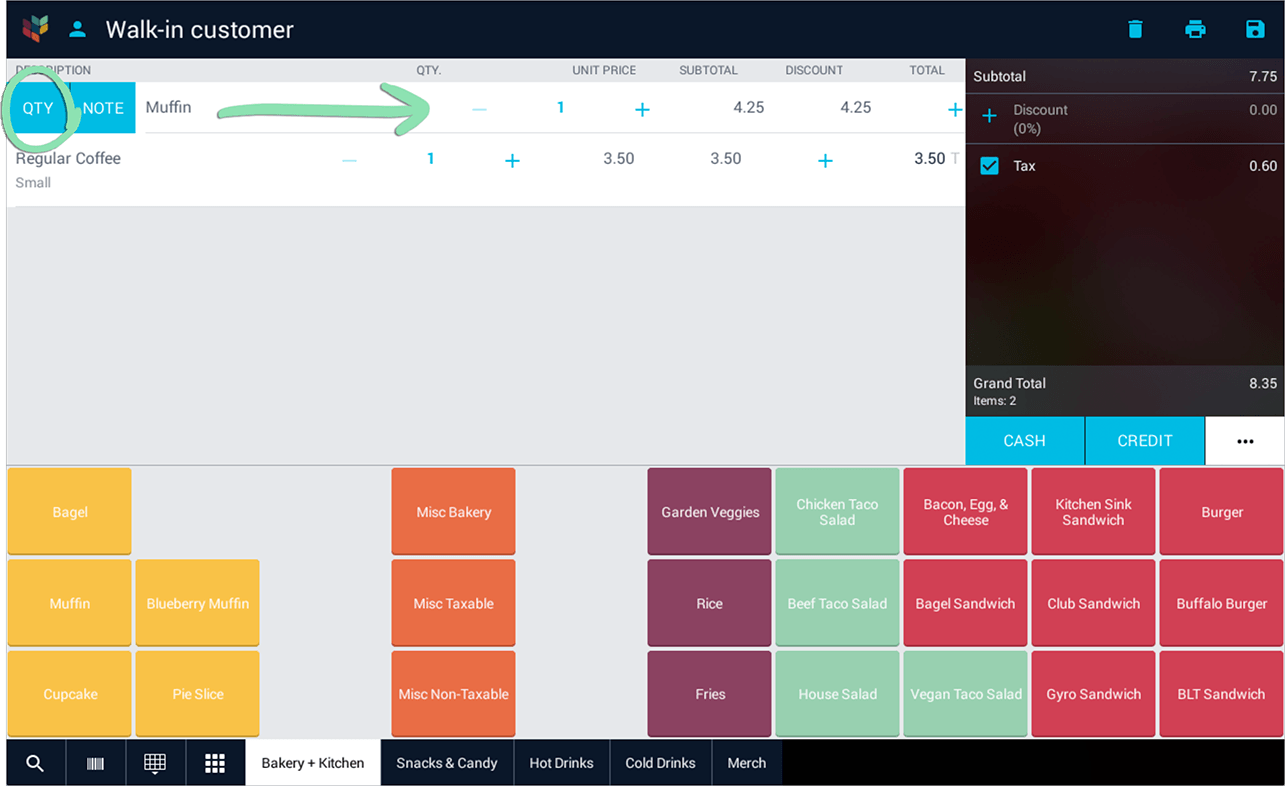
Ringing Up Items

Magnifying glass | Tap to search for an item by name, SKU, or UPC.
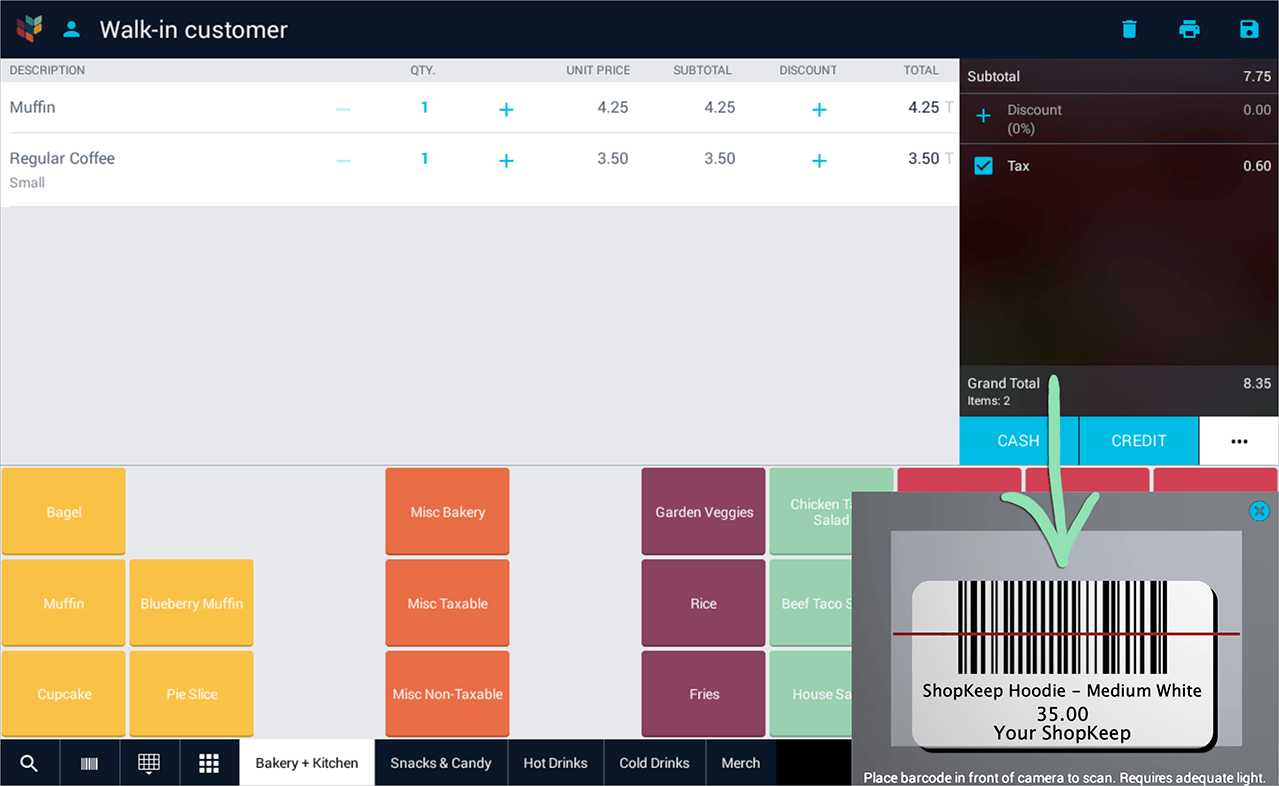
Barcode icon | Tap to use the built-in camera to scan an item’s barcode.

Checking Quantity on Hand
Customers
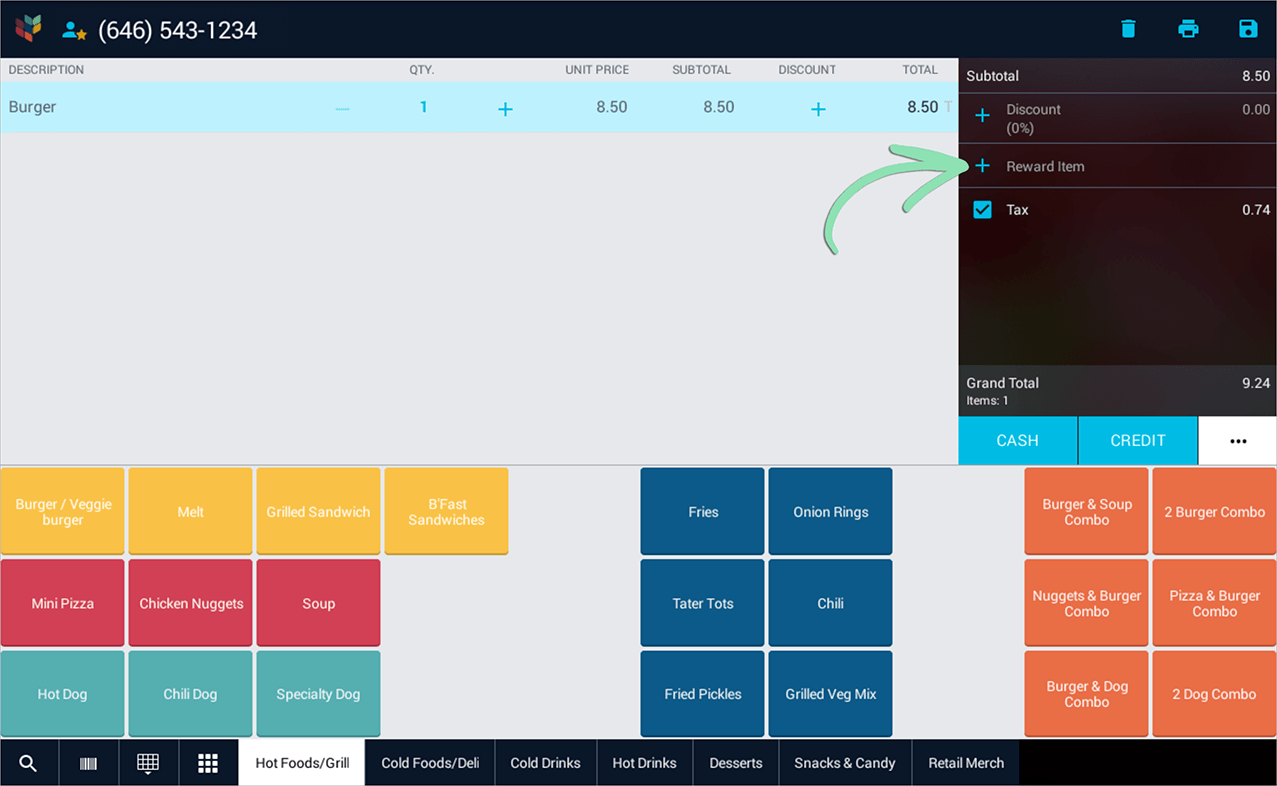
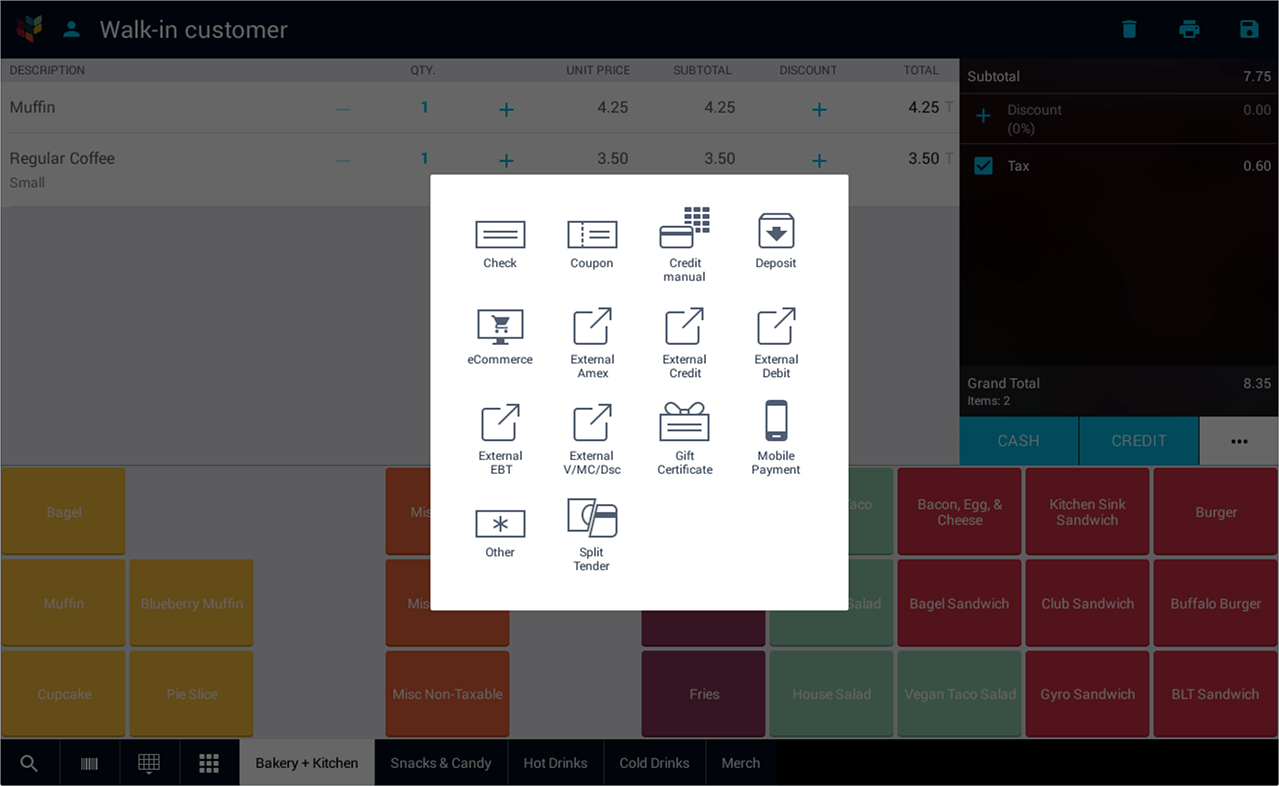
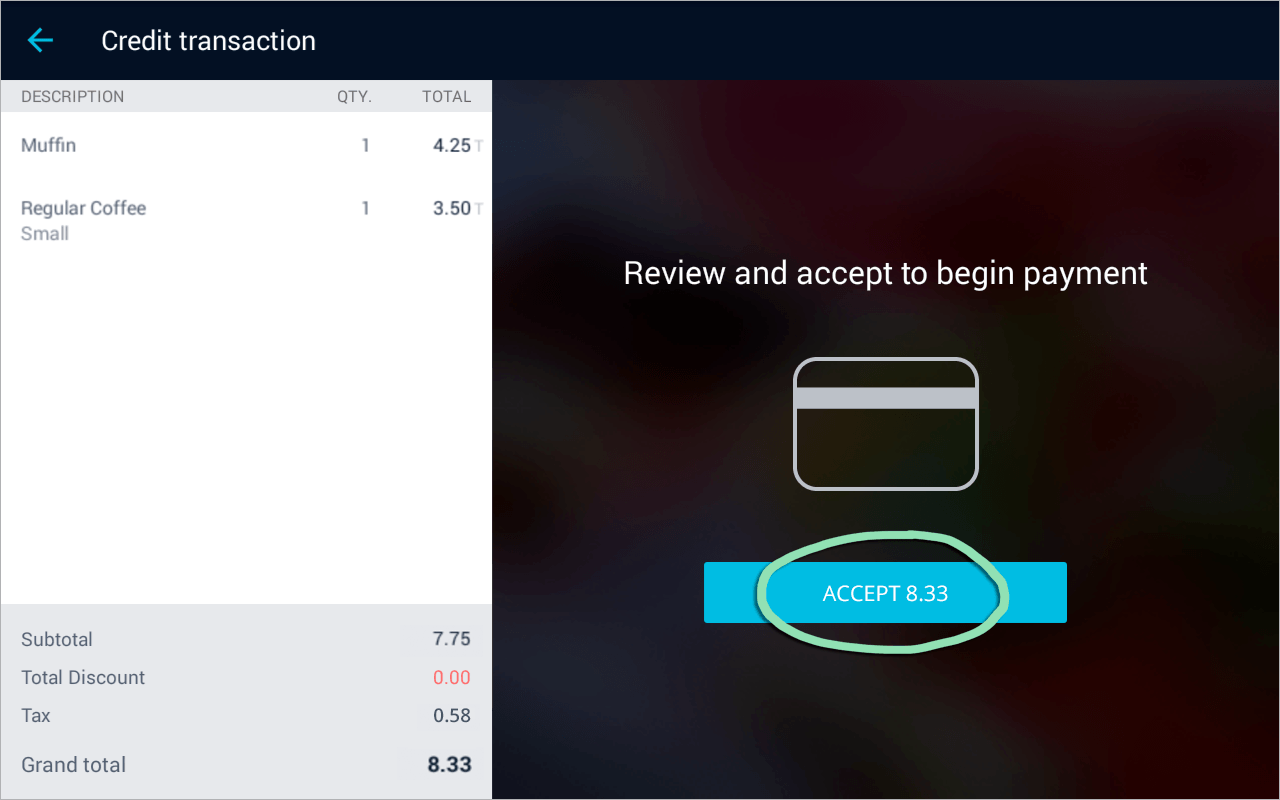
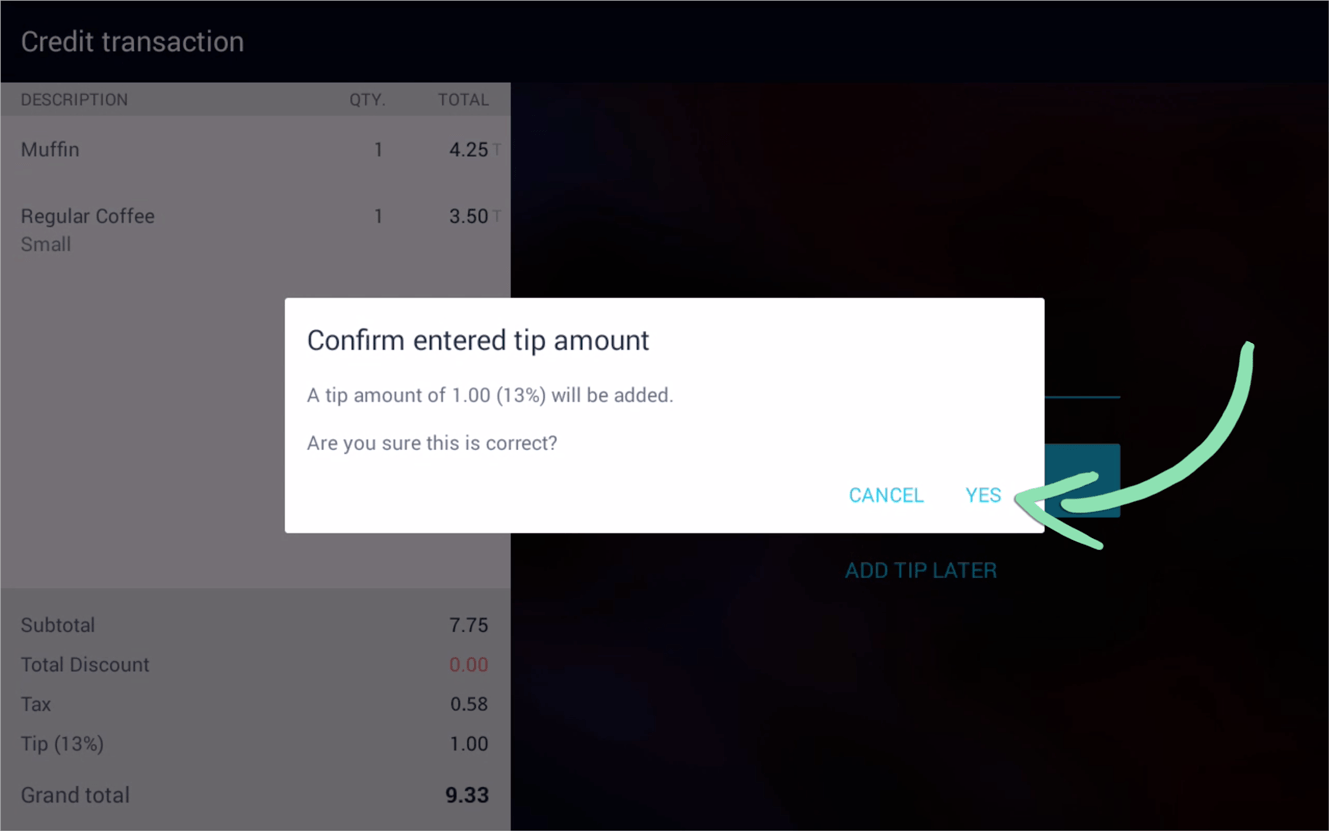
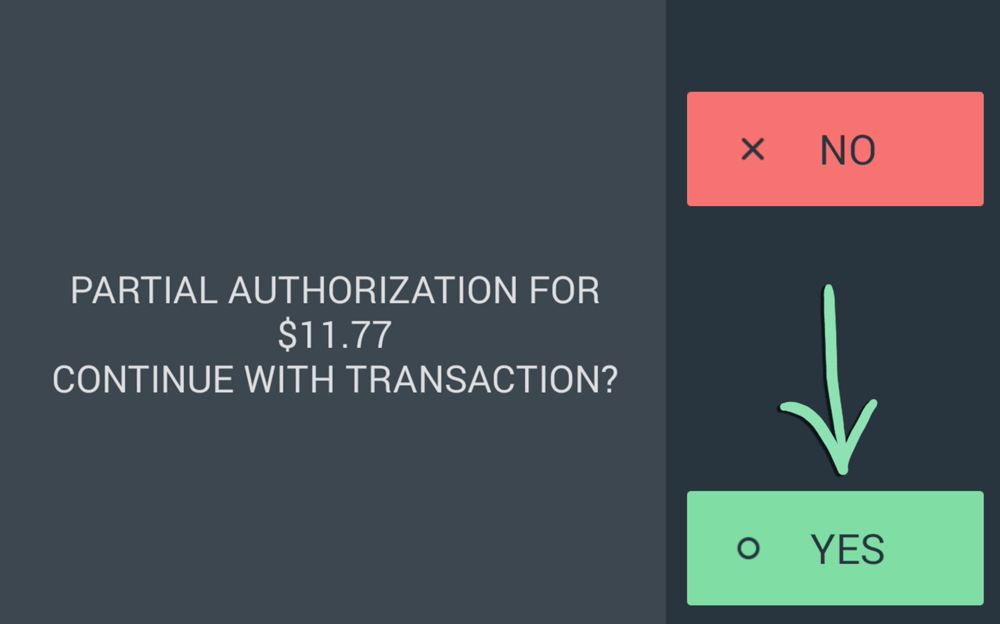
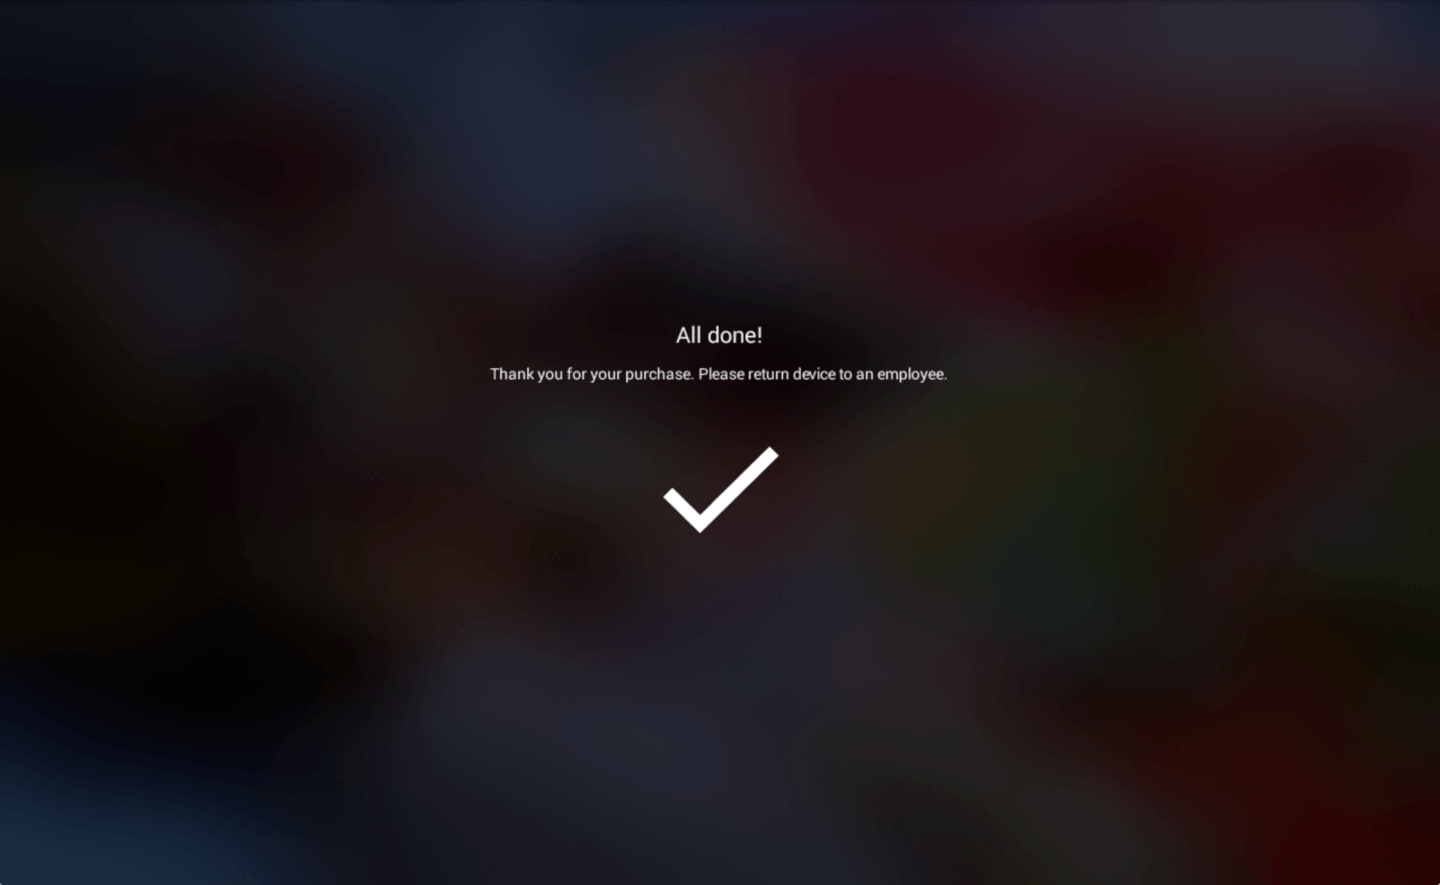
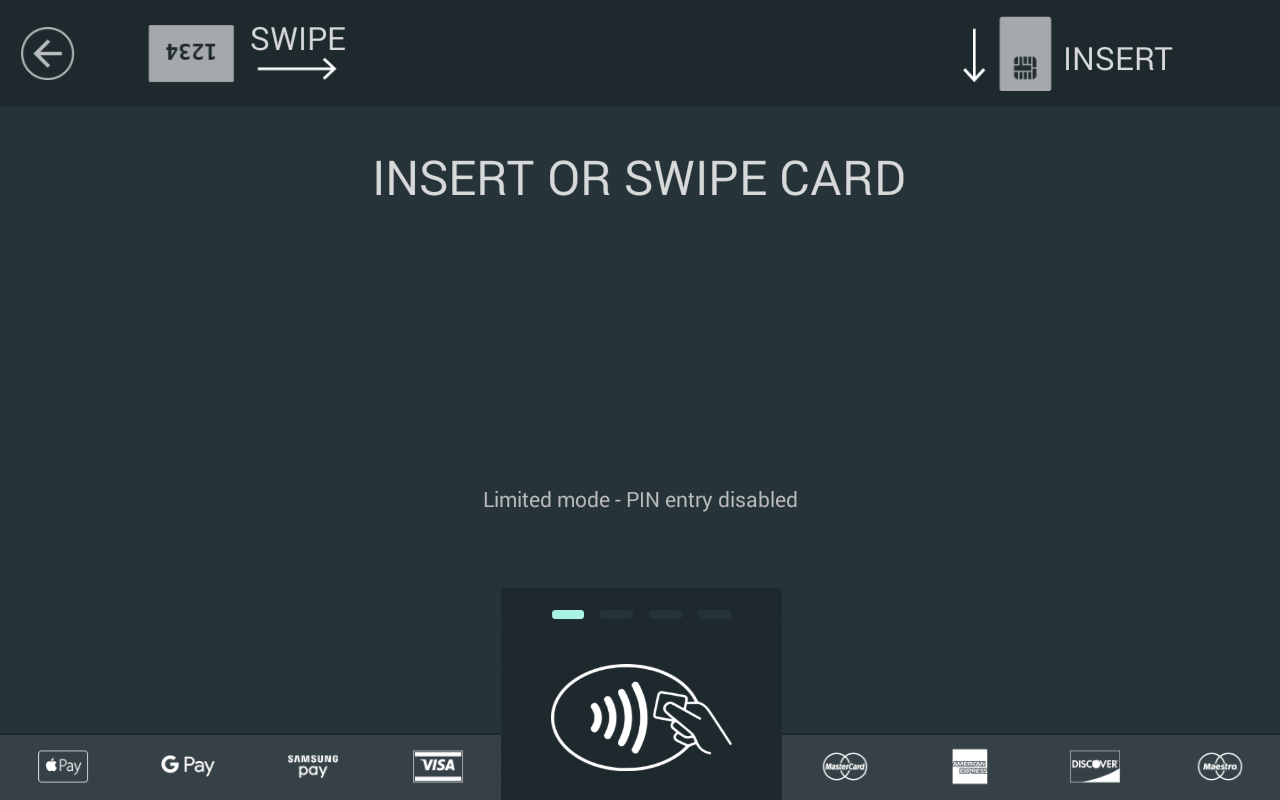
Processing Payments


Not offering printed receipts or don’t have a printer? Hide printed receipt options from the ‘Setup’ screen.

Sales History Screen
Viewing Transactions

Processing Returns

If you have questions about register functions, visit our FAQ.
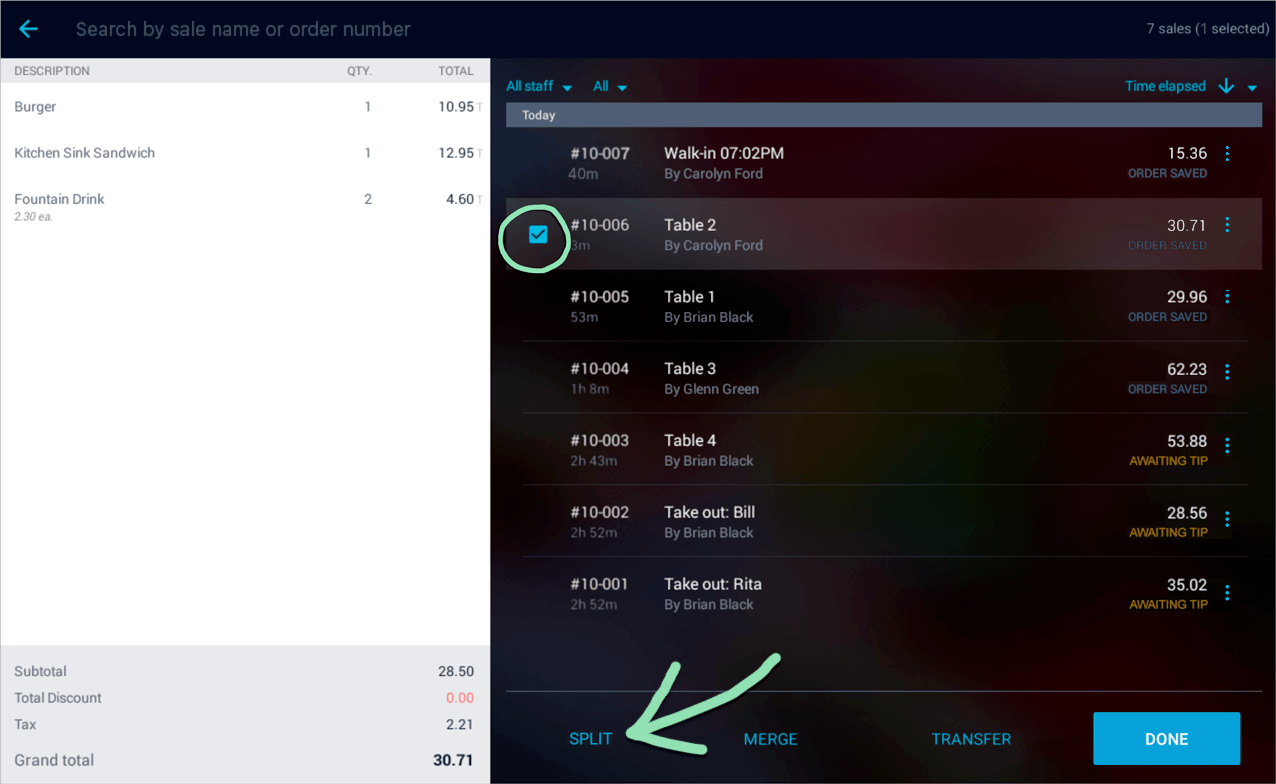
Saved Sales
Saved sales are tabs that allow sales to stay open until they are ready for payment. Save a customer’s order from the ‘New Sale’ screen, then view and manage saved sales from the ‘Saved Sales’ screen.
Saving Sales

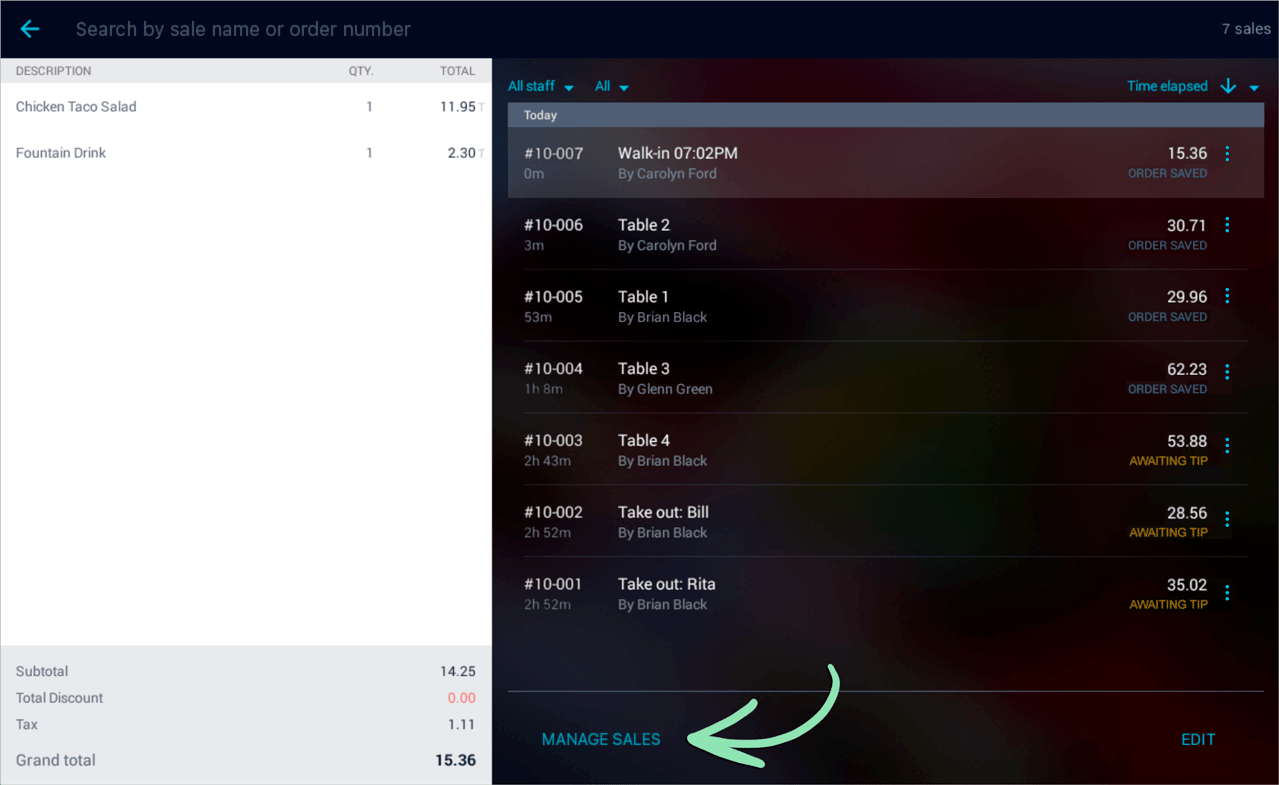
Viewing Saved Sales
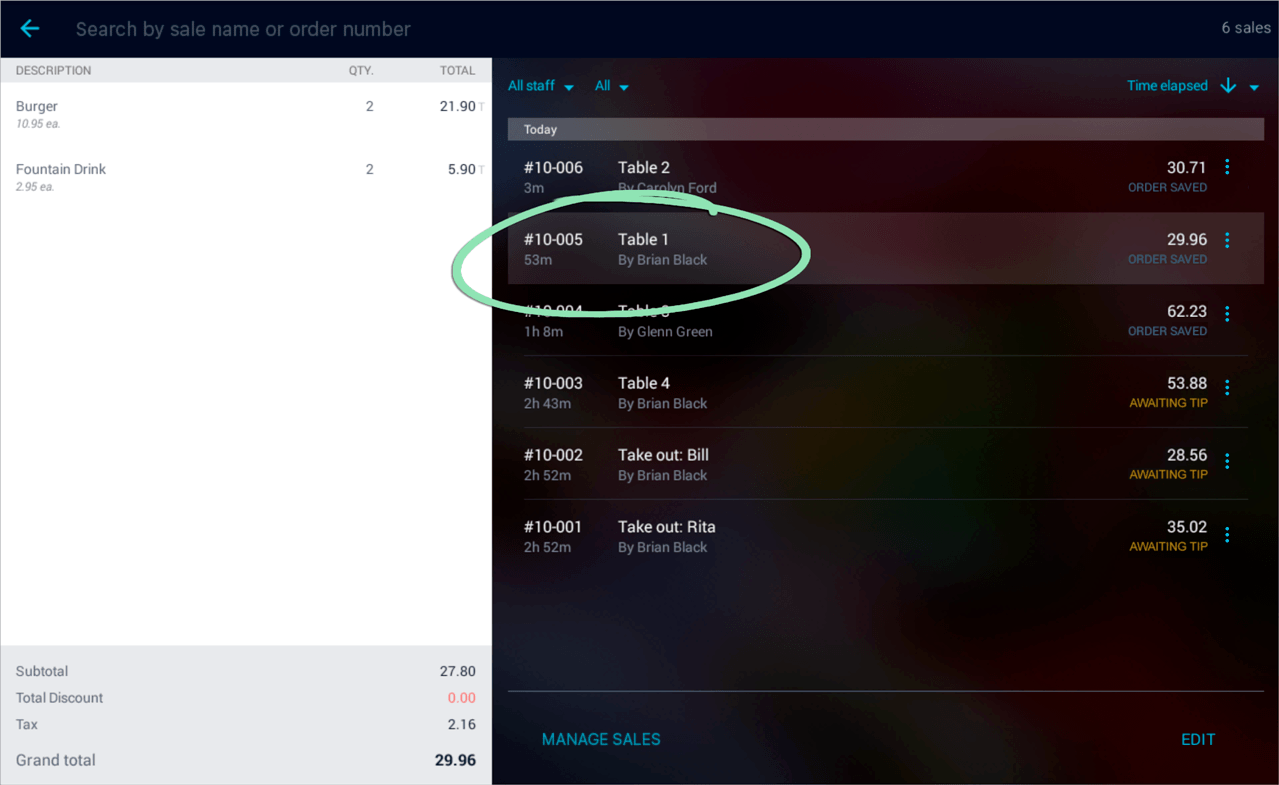
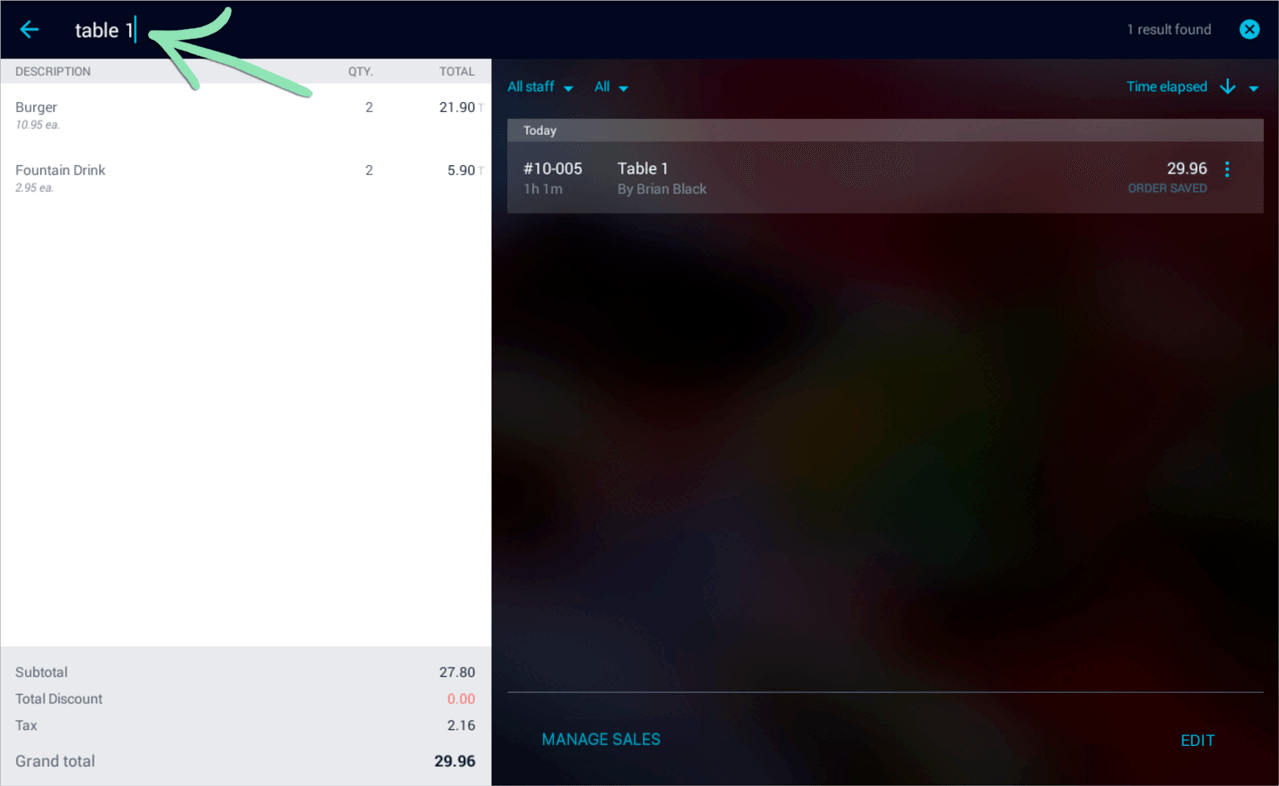
Search bar | Tap to search by sale name or order number.
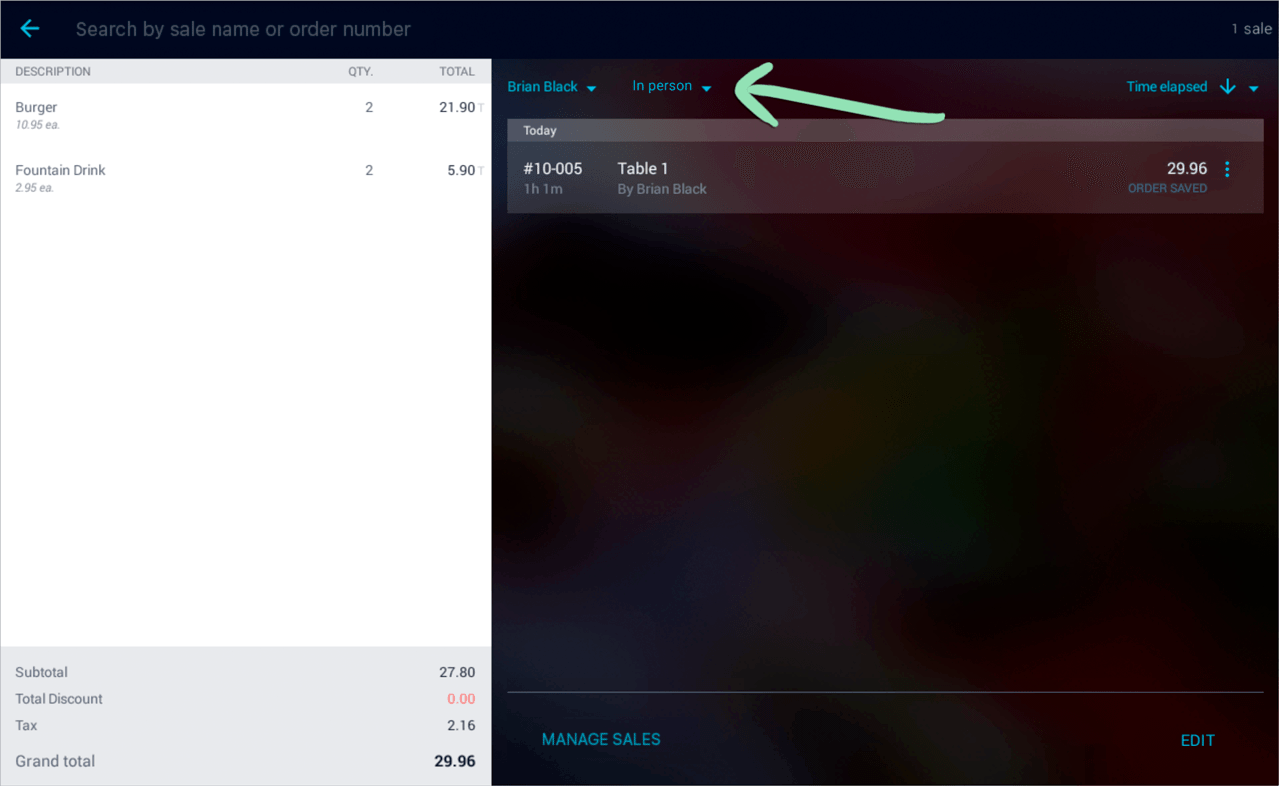
Filter drop-down | Tap to filter saved sales by employee or status (‘In person’, ‘Awaiting tip’, or ‘Online’).
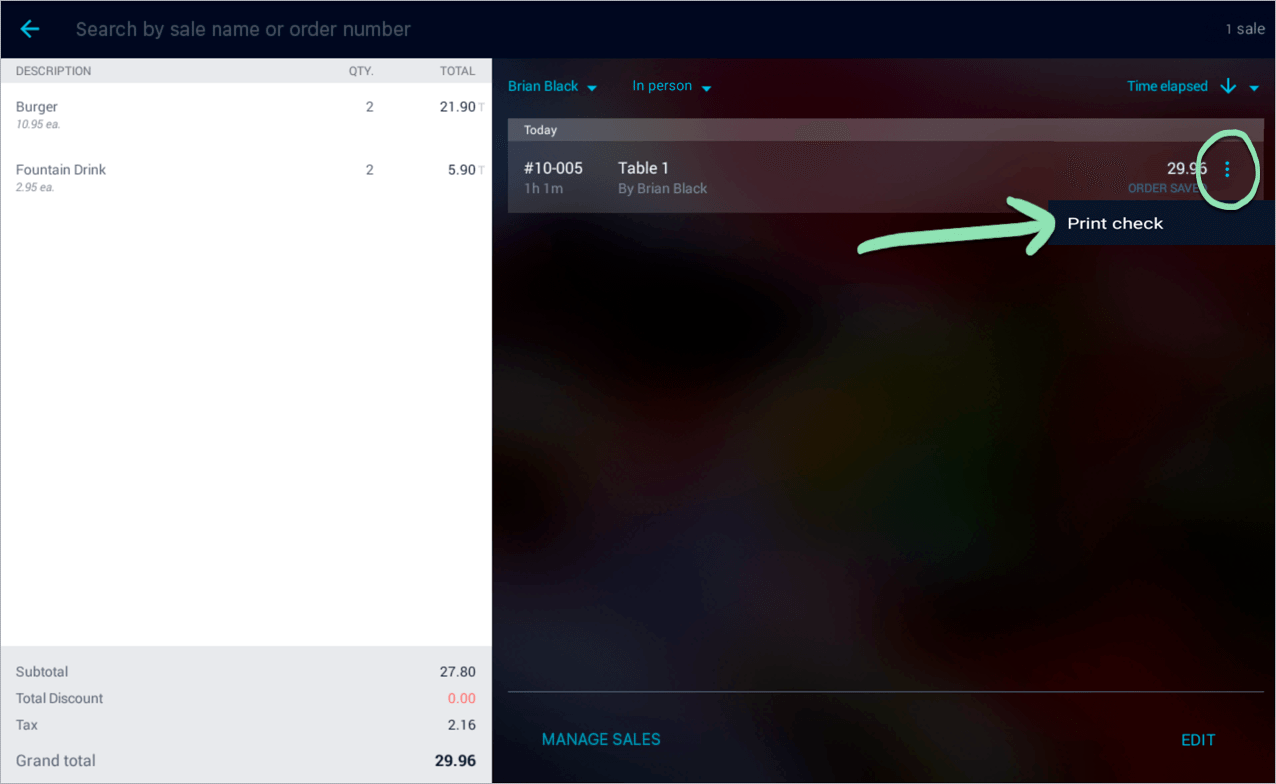
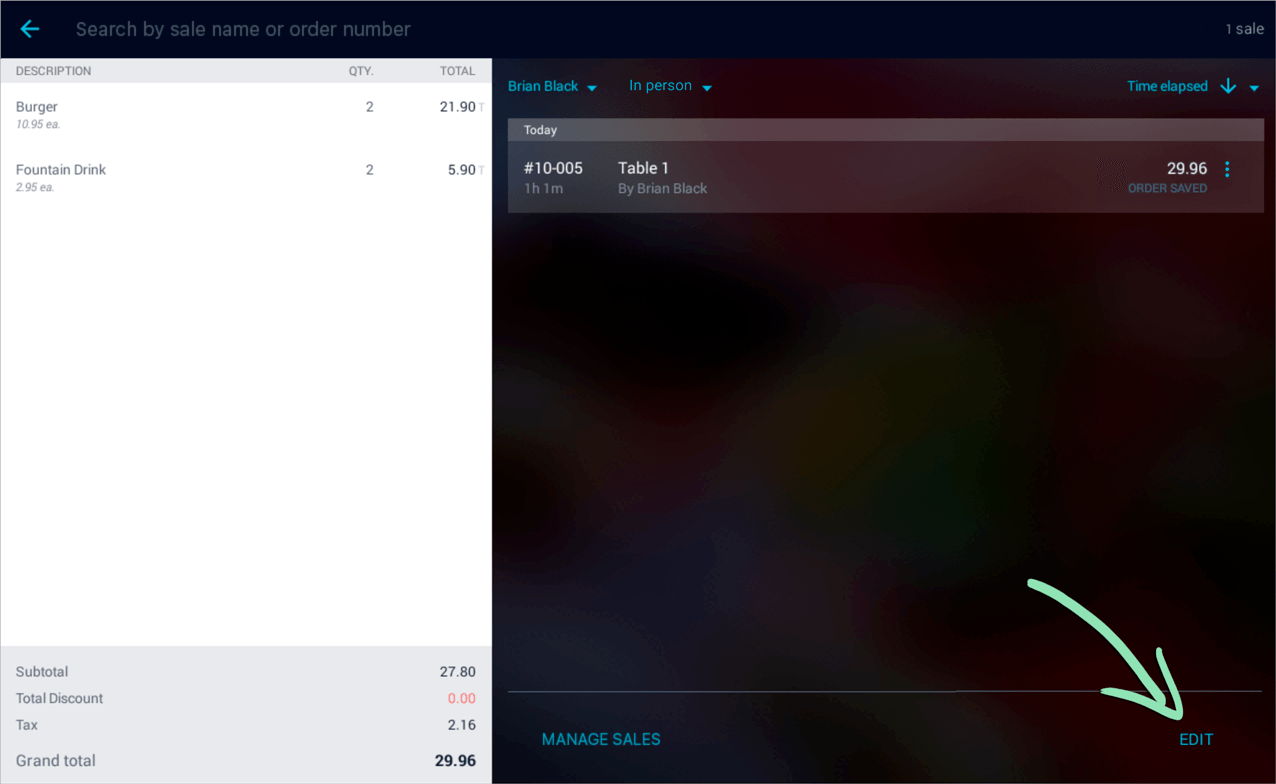
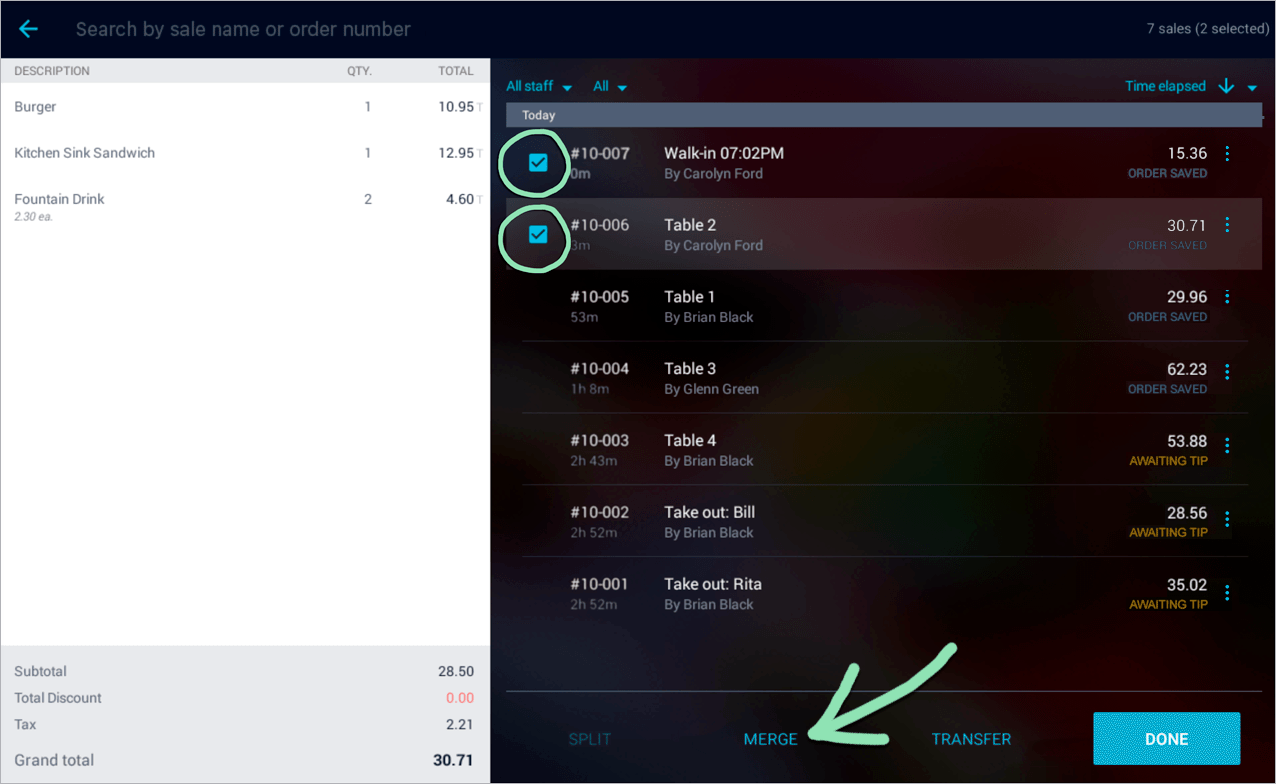
Modifying Saved Sales
Splitting, Merging, and Transferring Saved Sales
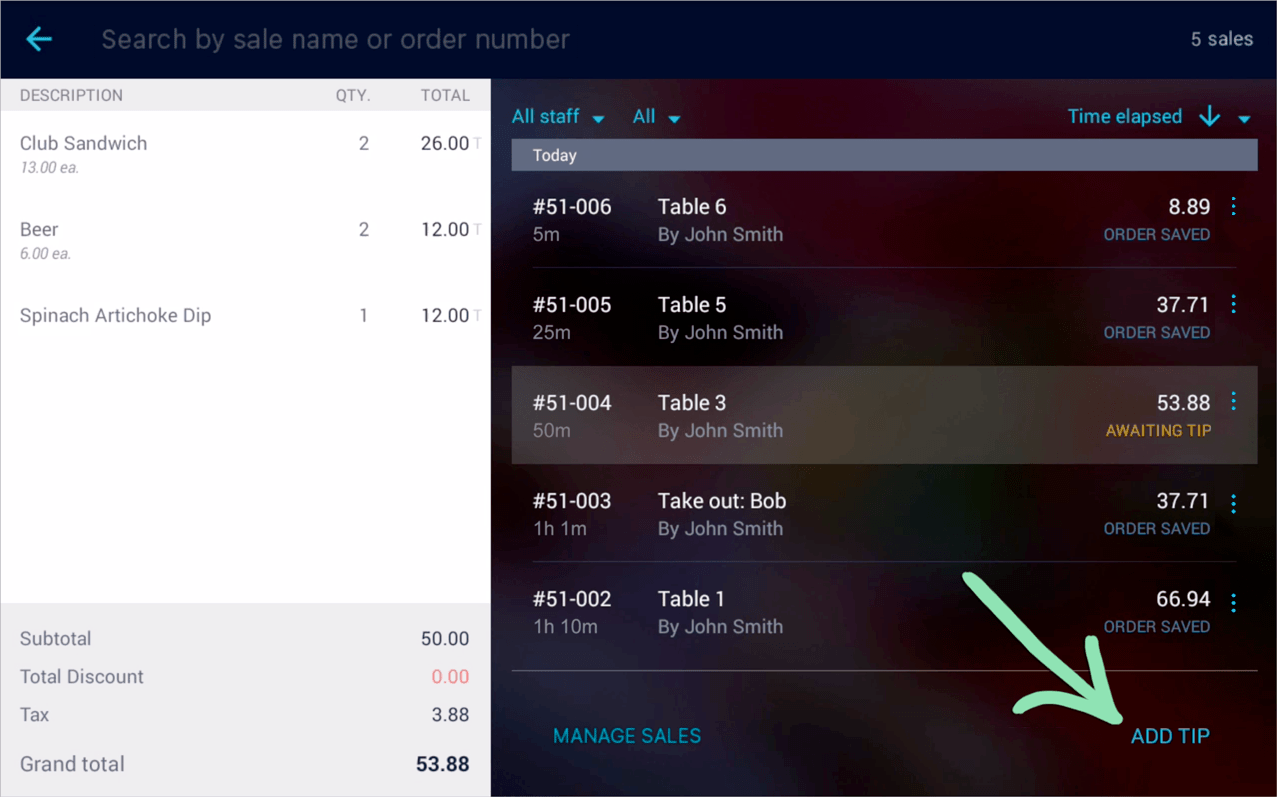
Adding Tips Later
BackOffice
BackOffice is the online portal for customizing account settings, managing inventory, and viewing reports. This section covers BackOffice differences between using Retail POS (S-Series) on iOS and using Retail POS (S-Series) on The Mini, built by Clover.
Settings
If you have questions about BackOffice features, visit our FAQ.