Using the Clover Mini
From running sales to changing payment settings, learn how to use the key features of your Clover All-in-One Credit Card Reader and Printer.
Setting up the Clover All-in-One Credit Card Reader and Printer for the first time? Visit our setup article.
Customer Facing Display
The Clover screen displays transaction details to customers as the Retail POS (S-Series) app for iOS is used by a cashier. Below, we show you what customers see at each step in a sale.
The Clover device shows each sale item along with its quantity, any modifiers or variants, and the total.


As items are added to and removed from the sale, the screen of the Clover device updates accordingly.

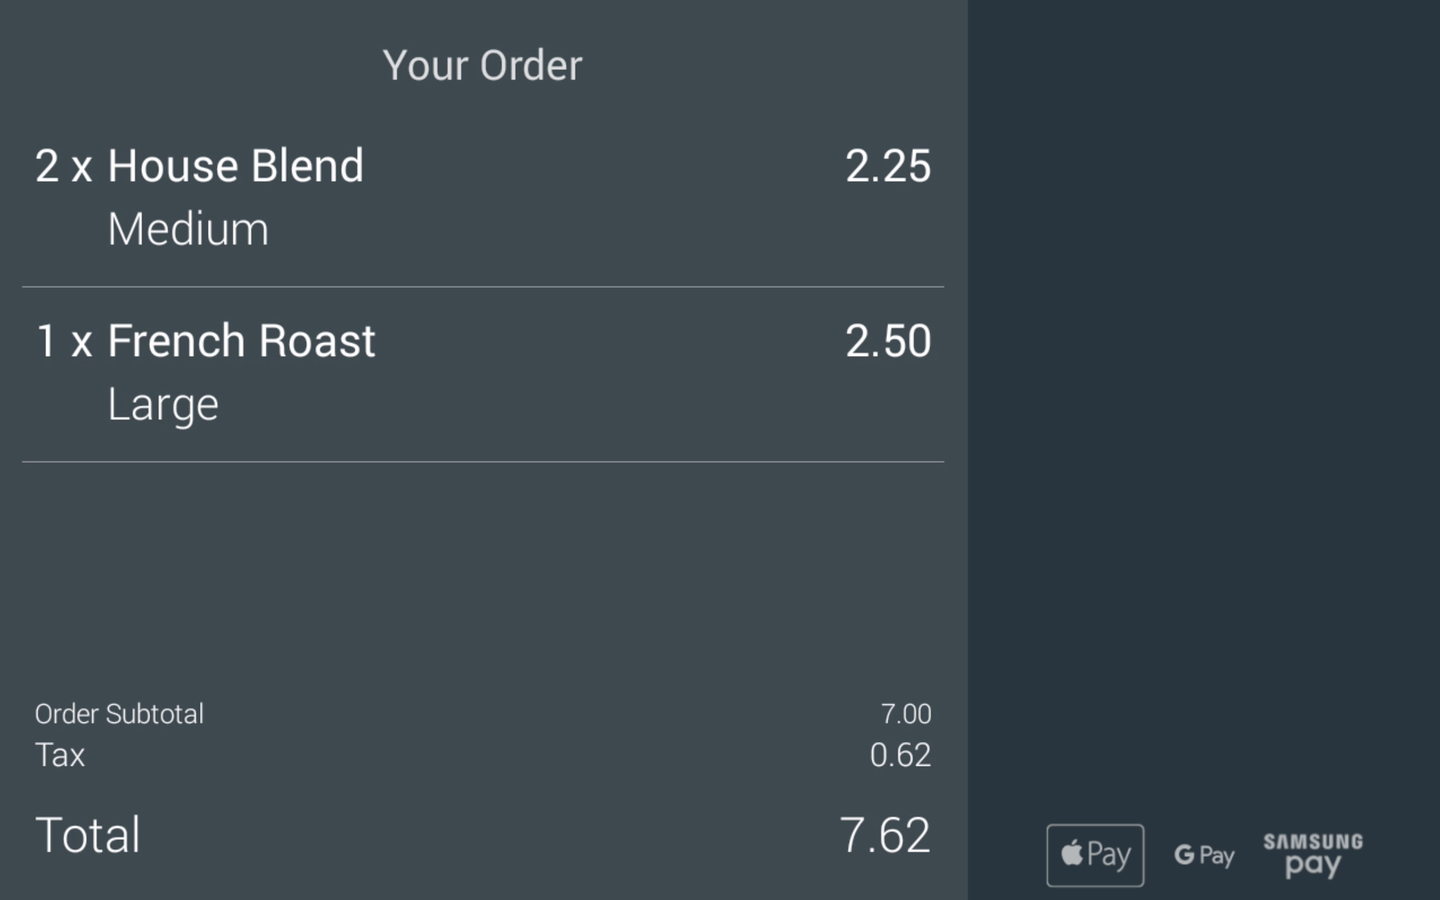
Subtotal, tax, and total due are shown on screen. Discounts are reflected in the subtotal.

Accepting Credit Cards
The Clover device supports multiple types of credit payments. Read below to learn how to accept EMV chip cards, swiped credit and debit cards, contactless payments, and manually entered cards when customers sign and tip on the screen of the device.
EMV
If a customer’s credit or debit card has a chip, run an EMV sale.
- In the Retail POS (S-Series) app, the cashier rings up a sale and taps ‘Credit’.
- On the Clover device, the customer selects a tip option.
Visit the Tips and Gratuity article to learn how to change tip and signature settings, pay out tips to staff, request tip adjustments, and view gratuity reporting.

- If prompted, the customer taps ‘Yes’ to confirm the gratuity amount or ‘No’ to enter a different amount.
This warning appears on the Clover device when the gratuity entered is more than 50% of the sale total.

- The customer inserts their card, chip-end first, into the device.

- When prompted, the customer removes their card.
- If prompted, the customer signs the screen and taps ‘Done’.

- Either the customer or cashier completes the sale.
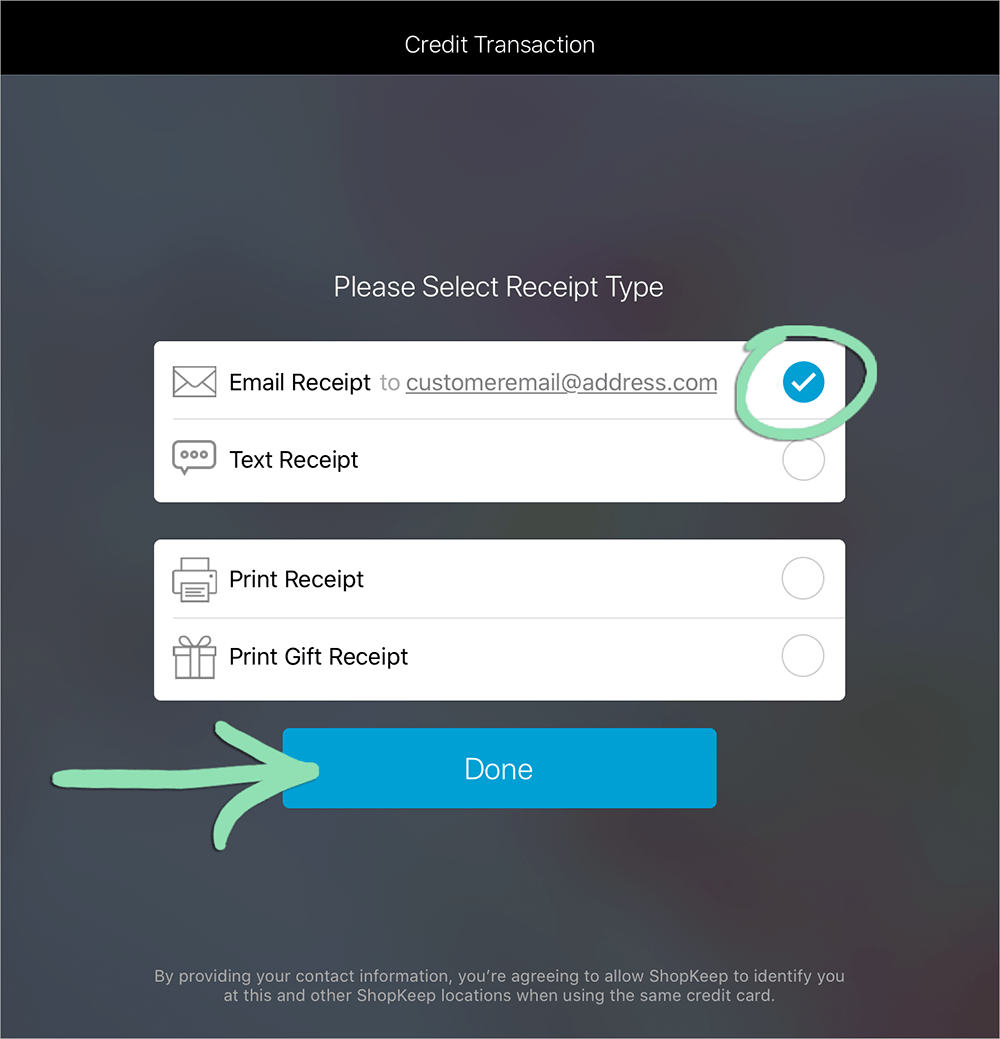
- The customer completes the sale by tapping a receipt option or ’No receipt’ on the Clover device.

- The cashier completes the sale by selecting a receipt option on the iPad and tapping ‘Done’ or by tapping ‘No Receipt’.

Swipe
When a customer has a card with only a magnetic stripe, process a swiped credit or debit card sale.
- In the Retail POS (S-Series) app, the cashier rings up a sale and taps ‘Credit’.
- On the Clover device, the customer selects a tip option.
Visit the Tips and Gratuity article to learn how to change tip and signature settings, pay out tips to staff, request tip adjustments, and view gratuity reporting.
- If prompted, the customer taps ‘Yes’ to confirm the gratuity amount or ‘No’ to enter a different amount.
This warning appears on the Clover device when the gratuity entered is more than 50% of the sale total.
- With the magnetic stripe facing down, the customer slides their card either way through the device.

- If prompted, the customer signs the screen and taps ‘Done’.

- Either the customer or cashier completes the sale.
- The customer completes the sale by tapping a receipt option or ’No receipt’ on the Clover device.
- The cashier completes the sale by selecting a receipt option on the iPad and tapping ‘Done’ or by tapping ‘No Receipt’.
Contactless
For customers who wish to use a contactless payment method, the Clover device supports Apple Pay, Samsung Pay, Android Pay, and contactless credit cards.
- In the Retail POS (S-Series) app, the cashier rings up a sale and taps ‘Credit’.
- On the Clover device, the customer selects a tip option.
Visit the Tips and Gratuity article to learn how to change tip and signature settings, pay out tips to staff, request tip adjustments, and view gratuity reporting.
- If prompted, the customer taps ‘Yes’ to confirm the gratuity amount or ‘No’ to enter a different amount.
This warning appears on the Clover device when the gratuity entered is more than 50% of the sale total.
- The customer holds their card or device within 1" of the contactless symbol on the device.

- Either the customer or cashier completes the sale.
- The customer completes the sale by tapping a receipt option or ’No receipt’ on the Clover device.
- The cashier completes the sale by selecting a receipt option on the iPad and tapping ‘Done’ or by tapping ‘No Receipt’.
Manual Entry
Manual entry allows a customer to enter their credit or debit card information and process their card without swiping, inserting, or tapping it.
- In the Retail POS (S-Series) app, the cashier rings up a sale and taps ‘Credit’.
- The cashier taps ‘Manual Card Entry’.

- On the Clover device, the customer selects a tip option.
Visit the Tips and Gratuity article to learn how to change tip and signature settings, pay out tips to staff, request tip adjustments, and view gratuity reporting.
- If prompted, the customer taps ‘Yes’ to confirm the gratuity amount or ‘No’ to enter a different amount.
This warning appears on the Clover device when the gratuity entered is more than 50% of the sale total.
- The customer enters their card number, CVV code, and expiration date, tapping ‘Enter’ after each screen.

- The customer signs the screen and taps ‘Done’.
- Either the customer or cashier completes the sale.
- The customer completes the sale by tapping a receipt option or ’No receipt’ on the Clover device.
- The cashier completes the sale by selecting a receipt option on the iPad and tapping ‘Done’ or by tapping ‘No Receipt’.
Signature Requirement Setting
The optional ‘Signature requirement’ setting allows you to set a threshold amount for customer signatures. Customers must sign for a sale if its total is over the set threshold.
- Tap all 4 corners to exit the Network Pay Display app.
The corners must be tapped either simultaneously or one at a time in quick succession.

- If prompted, enter the Clover device's passcode.

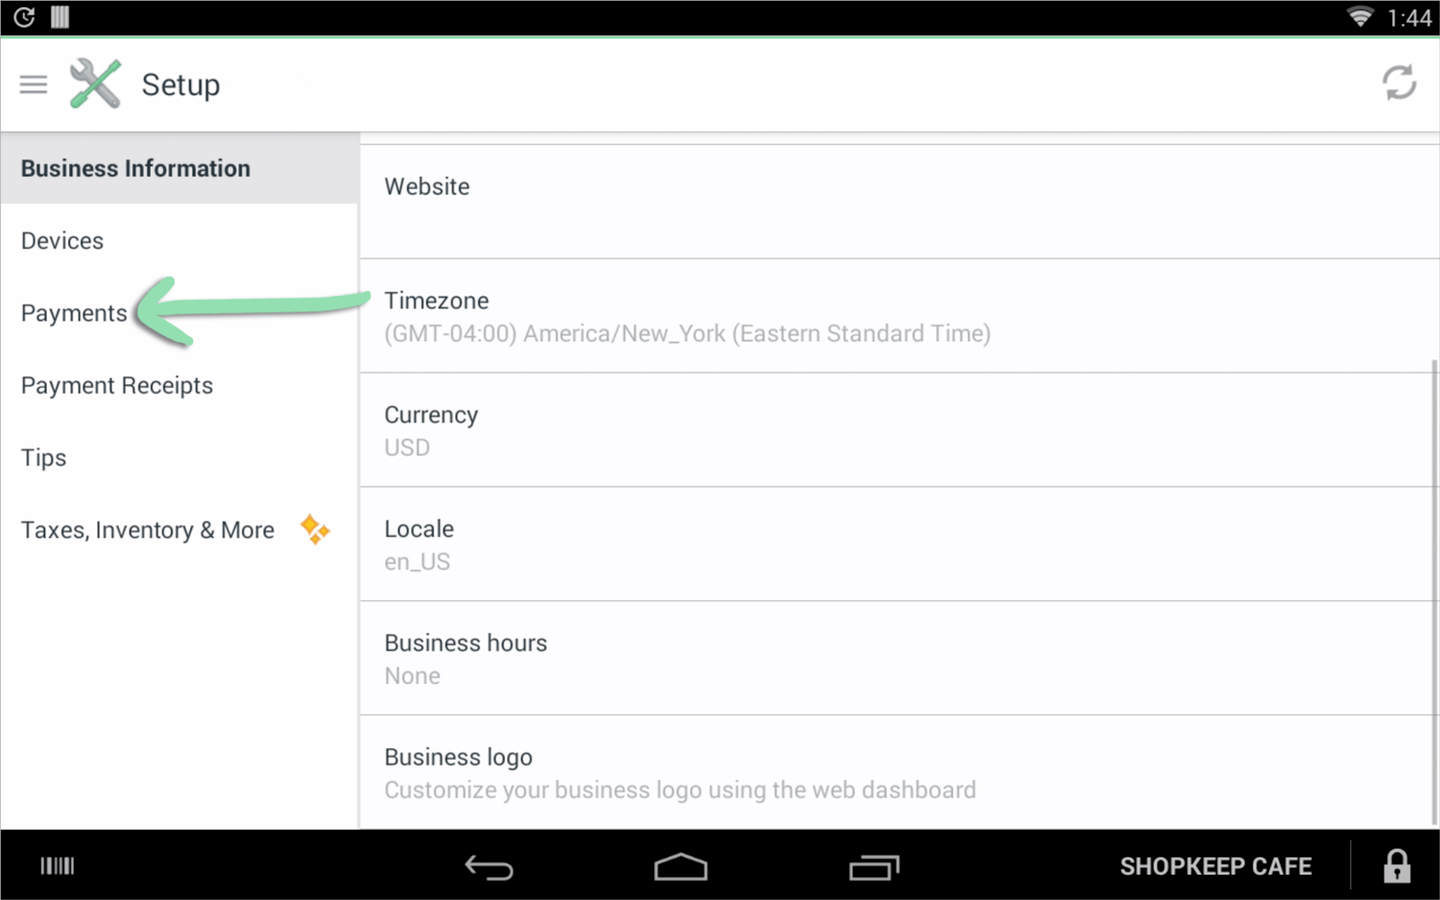
- Open the 'Setup' app.

- Tap 'Payments'.
- Tap ‘Signature requirement’.

- Select a signature requirement option.

- If 'Don't require signature' is selected, enter an amount.
Sales below this amount will not require a signature.

- Tap 'Save'.
- Tap the Home button to exit Setup.

- Reopen the Network Pay Display app to continue using the device with Lightspeed Retail.
