Basic inventory items are goods sold individually without multiple variations. Add new basic items from BackOffice or the Retail POS (S-Series) app to sell them at the register and via other Lightspeed Retail sales channels.
If adding large quantities of basic items, use bulk management to import inventory by spreadsheet.
Creating a basic item
Enter details such as item name, price, and cost to create a basic inventory item from BackOffice or the Retail POS (S-Series) app. Track the item’s quantity, set its register status, and customize other attributes that control how the item works.
Changing the name, department, category, or supplier of an item after creating it will also update this information in some historical reporting.
- Visit the Item List in BackOffice or from the Retail POS (S-Series) app (employees with BackOffice permissions only).
-
In BackOffice, click Items and select Item List.

In the Retail POS (S-Series) app for iOS, tap Manage Items on the Main Menu.
For the Retail POS (S-Series) app for Android, tap Setup on the register menu, then select Manage Items.
Don’t see ‘Manage Items’? Visit our troubleshooting guide for help.
Retail POS (S-Series) app for iOS Retail POS (S-Series) app for Android
-
Click ‘Add New’.

-
Click ‘Create’ under 'Basic Item'.
To learn how to create items with variants, visit our Add an Item with Variants article.

- Enter an 'Item Name' and 'Item Price', then click the relevant option to enter additional item details or save the item as-is.
- To enter additional item details, such as a UPC code, cost, and quantity on hand: click ‘More fields…’, then continue to step 5.
-
To save the item as-is with only a name and price: click ‘Save’, then skip to step 9.

- Fill in the item fields.
- At minimum, required fields marked with an asterisk must be completed. All other fields are optional.
Item Details

- Name: What cashiers see at the register and what prints on receipts. Cashiers can search for items by Name at the register. An item can be given a nickname on the item shortcuts panel.
- Department: General grouping used for organization, ticket printing, and reporting.
- Category: Subgroup within a Department, also used for organization, ticket printing, and reporting.
-
Register Status: If checked, the item will be active and able to be sold at the register. If unchecked, the item will be inactive and unable to be sold at the register.
Shortcuts for inactive items remain on the item shortcuts setup panel until removed. Visit our troubleshooting guide to learn how to remove an item’s shortcut. -
UPC: 2-55 digit product barcode number that can be scanned at the register to ring up the item. Cashiers can also search for items by UPC at the register.
UPCs with letters are not supported. If the product UPC contains letters, print a new barcode label using the item’s SKU via Lightspeed Label Printing to scan the item at the register.
Pricing

- Sales Price: Amount the customer pays for the item at the register. This field is only available if the item’s Price Type is Fixed or Unit Price.
- Discounts: If Discountable, discounts can be applied to the item. If Non-discountable, the item cannot have a discount applied to it.
- Taxable: If Yes, tax will be charged for the item. If No, tax will not be charged.
- Tax Rate: Select an existing tax rate, or create a new one, to override the default tax rate for the item. This field is only active when ‘Taxable’ is set to ‘Yes’.
-
Price Type: How the item’s price is set: Fixed, At the Register, or by Unit Price (lb, oz, etc.).
- Fixed – The price is entered in BackOffice when creating the item.
- At the Register – The cashier enters a price at the register when ringing up the item.
- Unit Price – A unit (lb, oz, etc.) and price per unit are entered in BackOffice when creating the item. At the register, the sales price is calculated based on the amount being sold.
- Cost per Item: How much the business pays to acquire the item.
Track Quantity on Hand

- Track Quantity On Hand: Toggle on to automatically update the item’s Current Quantity after sales and returns. Toggle off to not track the quantity (usually used for services or made-to-order items).
- Current Quantity: Total amount of the item in stock. Once the quantity reaches 0, it becomes negative if the item continues to sell. This field only appears if Track Quantity On Hand is toggled on. Learn how to view an item’s quantity in BackOffice and at the register here.
- Reorder Trigger: Low quantity on hand amount that, when reached, prompts the item to appear on the Reorder Report. This field only appears if Track Quantity On Hand is toggled on.
- Recommended Order: Quantity on hand amount required for the item to be considered fully stocked which appears on the Reorder Report. This field only appears if Track Quantity On Hand is toggled on.
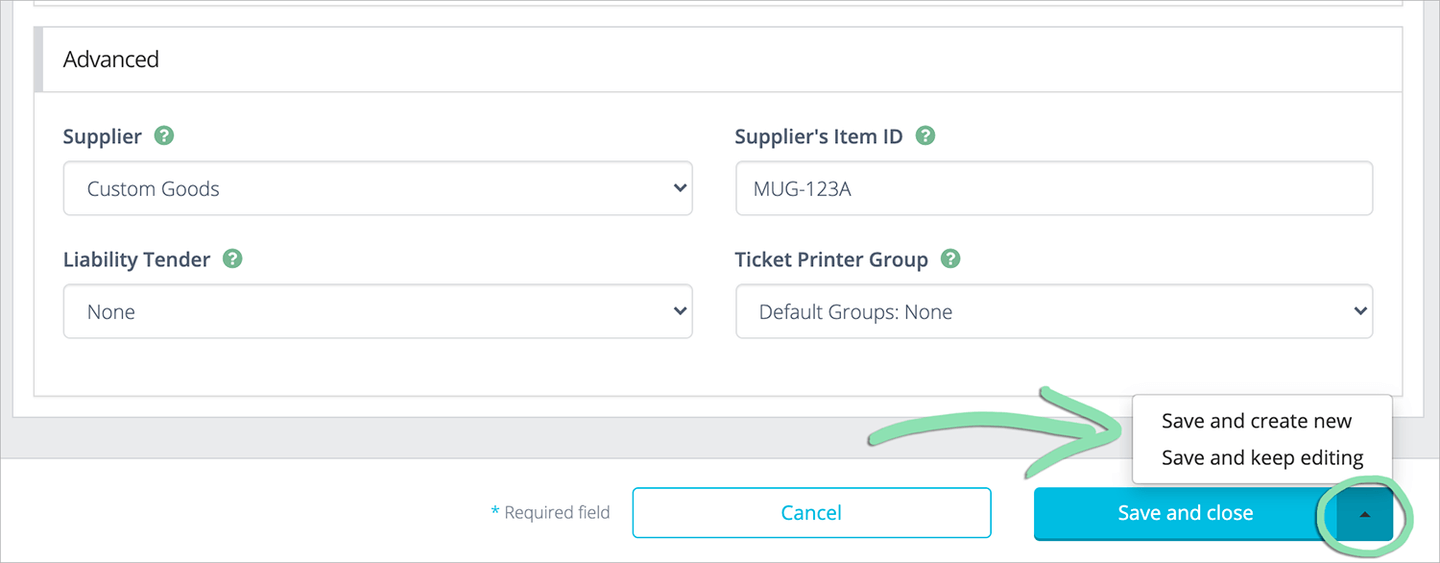
Advanced

- Supplier: Vendor or party from whom the item is acquired. Supplier appears on reports such as Sales by Supplier and the Inventory Reorder Report.
- Liability Tender: Liability items are items that can be redeemed at a later time (e.g. gift cards, gift certificates, and deposits).
- Supplier’s Item ID: Any reorder code associated with the item.
-
Ticket Printer Group: Assign the item to a printer group for ticket printing.
- (Optional for multi-location accounts) Check the box to create the item in all linked locations.
- This option is available in BackOffice for merchants with multiple linked locations and is only visible to the Business Owner.
- In linked locations where the item is created, it is given a quantity on hand of 0, charged the default tax for that location, and not assigned to a printer group. Separate labels must be printed from the BackOffice of each location as the item will have a different SKU in each store.
- In locations where an item with the same name or UPC already exists, the new item will not be created.
-
Liability items cannot be created in all locations and must be manually set up in each store.

- Click the default save option, or click the arrow to select another save option, to finish creating the item.
-
Save options
- Save and create new: Save the current item and create a new basic item.
- Save and keep editing: Save the current item and remain on the details page to make changes. This option is not available when creating an item in all linked locations (step 6).
- Save and close: Save the current item and return to the Item List.
- The last used selection will be remembered as the default save option.
- (Optional) If creating the item in all linked locations, finish setting it up in the other store(s).
- Refresh the Item List to check the status of the item.
- Once created in all linked locations, the blue status bar will disappear when the page is refreshed.

After the item is created, switch to another location.
The following steps are optional. Do only what matches your business needs.
- From the Item List or Bulk Management, update item properties that are different for the new store (e.g. price changes, reorder triggers, etc.)
Items are not synced between stores. Each store’s inventory is separate and must be managed independently from that location’s BackOffice. - Update the quantity on hand of each item to the correct quantity for that location.
- Assign the item to an existing tax rate, or create a new one.
- Assign the item to a printer group.
- Print barcode labels.
- Repeat for each additional location.
If creating items from BackOffice, get updates on the iOS or Android register to sync the changes made to the register.
Receiving an error when getting updates? Visit our Manager Functions Troubleshooting guide for help.
To delete an item and start over, click ‘Delete’, check the box to delete the item in all linked locations (optional for multi-location accounts), and select ‘Continue’. Please be aware that:
- If a deleted item is re-added later, labels printed for the original item must be re-printed.
- Deleted items appear on sales reports, but do not appear on certain other reports. Visit the Inventory FAQ to learn which reports are not supported.
Basic Item FAQ
Below are some common questions about setting up inventory items. If you don’t see your question listed below, check our Inventory FAQ and Setup FAQ for more information.
What are the differences between basic items and items with variants?
Basic items are sold individually or with modifiers. Items with variants are sold in multiple variations, like a single shirt that comes in different sizes.
Should I create a basic item or an item with variants?
Visit our Variants vs. Modifiers article to compare the benefits of using items with variants against using basic items with modifiers to decide which is best for your business.
Is it possible to convert existing basic items to variant items?
No. However, basic items can be recreated as items with variants. Visit our Transition to Items with Variants article to learn how to switch over.
Is there a limit on how many items I can have in my inventory?
No, there is no limit on how many items can be added.
Is it possible to modify or add on to an item at the register?
Yes. Set up modifiers to allow customers to customize items at the register.
Can I create an item at the register?
Yes. Employees with the relevant BackOffice permissions can create and modify items from the Retail POS (S-Series) app.
Is it possible to add an item description that cashiers can see at the register?
No. An item’s Name or its nickname on the item shortcuts panel is its sole identifier at the register. Items do not have additional fields for including descriptions.
How can I view my current inventory?
The Item List shows every item currently in inventory. From the Item List, you can browse all items, customize what information is displayed, search, sort, and filter to find specific items, view details of individual items and item variants, add new items, edit existing items, and download an export of the list.
How can I check an item’s quantity on hand?
Visit our Inventory Tracking & Reorder Report article to learn how to view an item’s quantity both in BackOffice and at the register.
How do I delete an item?
From the Item List, click to edit an existing item and select ‘Delete’. Check the box to delete the item in all linked locations (optional for multi-location accounts) and select ‘Continue’ to confirm the deletion. To delete many items at once from a single location, use Bulk Management.
Please be aware that if a deleted item is re-added later, labels printed for the original item must be re-printed. Deleted items appear on sales reports, but do not appear on certain other reports. Visit our Inventory FAQ to learn which reports are not supported.
What's Next?
After creating a basic item, move on to more advanced inventory topics. Set up item shortcuts for the register, create modifiers to allow on-the-fly customizations, attach raw goods to track an item’s components, and print barcode labels for items without UPC codes.
Item Shortcuts
Item shortcuts are buttons on the register that cashiers tap to ring up items. Visit our Item Shortcuts article to learn how to add shortcuts to the item shortcuts panel and customize how they look.
Modifiers
Modifiers are often used in restaurants to allow customers to customize, add to, or hold ingredients from items on an order. Modifiers print on kitchen tickets to make communicating adjustments to the kitchen easier. Visit our Modifiers article to learn how to set up and use modifiers.
Raw Goods
Raw goods exist separately from inventory items and are used to track the components or ingredients of those items. Visit our Using Raw Goods article to learn when to use raw goods and how to set them up.
Lightspeed Label Printing
Print barcode labels for items without UPC codes to allow cashiers to scan those items at the register. Visit our Lightspeed Label Printing article to learn how to print labels directly from BackOffice.