Multi-Store Management
From BackOffice to Lightspeed Pocket, learn how to log in, link existing stores together, add new locations, and easily manage all locations with a single BackOffice login.
Stores, including terminated ones, cannot be unlinked or deleted after they are linked together.
BackOffice
BackOffice is where the Business Owner and staff manage the business and view reporting. Learn to log in, link existing stores together, switch between locations, add new locations, and use features only available to accounts with multiple linked locations.
Log In
Log in to BackOffice the same way for any of your Lightspeed Retail stores. If you have any questions about logging in, visit our BackOffice FAQ page.
- Visit www.shopkeepapp.com.
- Enter your store name and login details.
Log in as the Business Owner to use multi-location features. The Business Owner login is the email used to create the store. Logins set up after the store was created are either BackOffice Managers or Receive Inventory Users.
- Click 'Log in'.

If you have problems logging in, visit our Login, Access, & Billing Troubleshooting guide for help.
Link Existing Stores
Businesses with multiple storefronts often have a separate Lightspeed Retail store for each location. Link existing stores together so the Business Owner can switch between any BackOffice and view multi-location reporting.
Note that stores, including terminated ones, cannot be unlinked or deleted after they are linked together.
-
Log in to BackOffice with the Business Owner login you want as the master login for all linked stores.
This is the only login that can switch between linked locations. This Business Owner will apply to all linked locations. Visit the Manage Billing article to update Business Owner details.
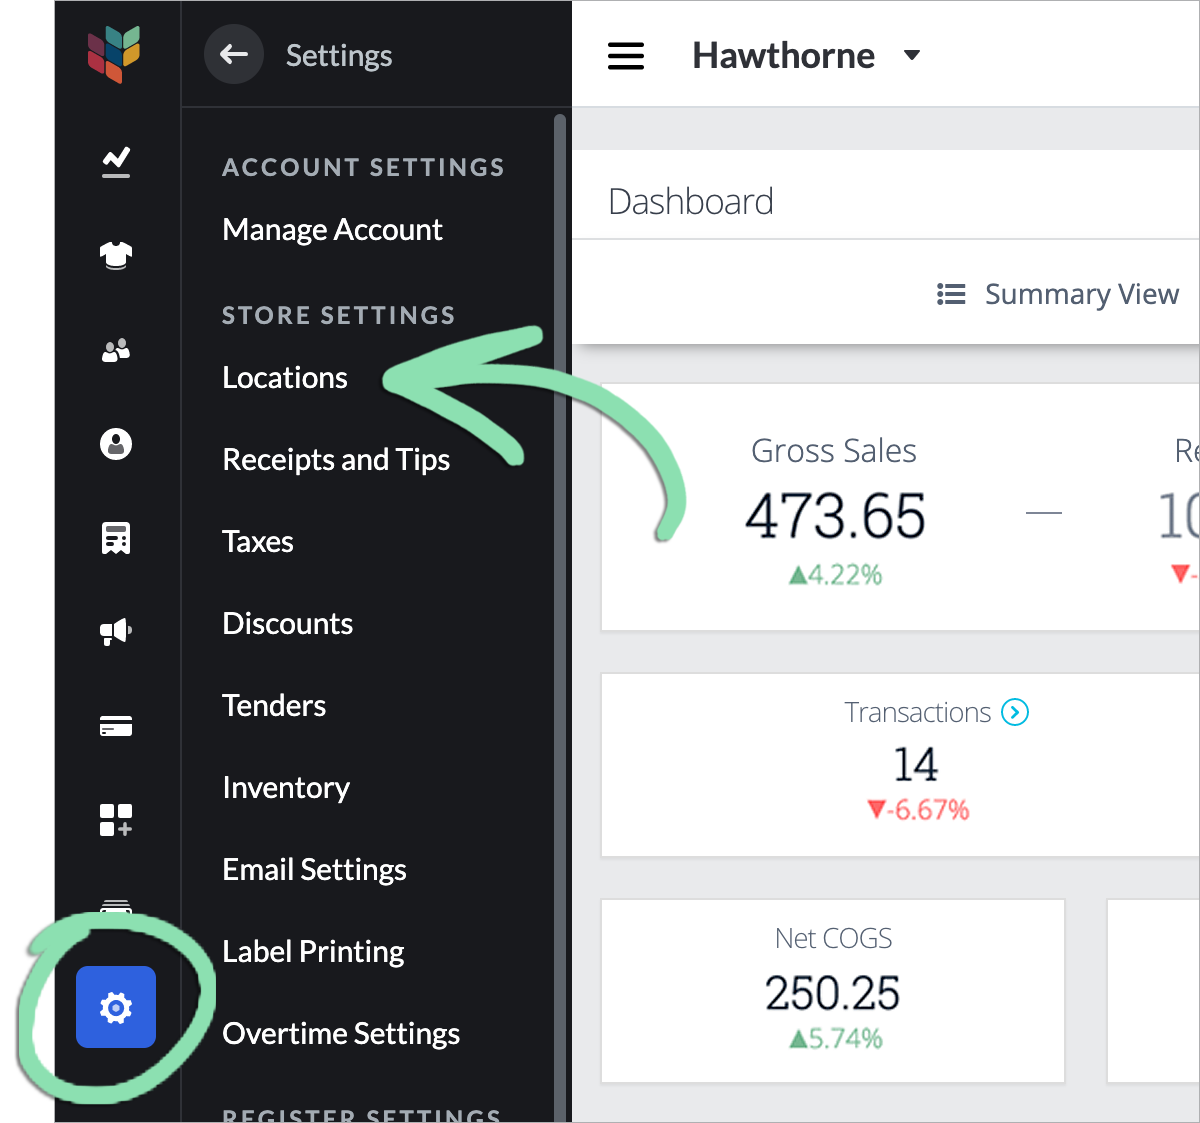
- Click 'Settings' and select 'Locations'.
Don’t see ‘Locations’? Visit our BackOffice Settings Troubleshooting guide for help.
- Click 'Link Stores'.

- Enter the store name and Business Owner login for another store, then select 'Link These Stores'.
If you get an error while linking, visit our BackOffice Settings Troubleshooting guide for help.

- Tap 'Done'.
Or use ‘Link another Store’ to link additional stores.

Back on the Locations page, you can see all currently linked stores.

Manage Location Nicknames
Add or change nicknames of your locations so you can more easily identify each store. A nickname takes the place of the store name on the drop-down menu for switching between stores.
- Click 'Settings' and select 'Locations'.
Don’t see ‘Locations’? Visit our BackOffice Settings Troubleshooting guide for help.
- Choose a store from the list.

- Enter a new location nickname.
Changing the nickname of a location will also update it in historical reporting. To learn more, visit the Sales by Location Report article here.

- Click 'Save' to confirm.
Switch Between Locations
Once logged in to BackOffice, the Business Owner who linked stores together can switch between them without logging out.
This feature is only available to the Business Owner login that originally linked stores. Other BackOffice users must continue to log out of one store and manually log into another.
- Click the drop-down and select another location.

BackOffice loads the Dashboard for the selected location.

- (Optional) Repeat step 1 to view another location or to return to the initial one.
Add a New Location
Opening a new location? Follow the steps below to request a new Lightspeed Retail store be added to your account and linked with your existing location(s).
Adding a new location automatically links a new store to your existing store and allows the Business Owner to view each BackOffice with the same login. Note that linked stores cannot be unlinked.
- Log in to the BackOffice of your existing store as the Business Owner.
- Click 'Settings' and select 'Locations'.
Don’t see ‘Locations’? Visit our BackOffice Settings Troubleshooting guide for help.
- Click 'Add New' to open the additional location setup form.

- Fill out and submit the form to have our team add one or more new locations to your account.
Need help? Visit the New Store article for a full walkthrough.
- Use our New Store Setup guide to learn how to finish setting up the new location, including how to:
- Copy inventory
- Copy customers
- Configure additional settings
Multi-Location Features
Below you will find current inventory and reporting features available in BackOffice for Lightspeed Retail accounts with multiple linked locations.
These features are only available to the Business Owner login that originally linked stores.
Item List – From the Item List, create or delete the same item simultaneously in all linked locations. Learn how to use the Item List here.
Item Shortcuts – Copy the item shortcuts layout from one location to all linked locations. Learn how to manage item shortcuts here.
Bulk Management – Create the same new inventory items in all linked locations at once. Learn how to use Bulk Management here.
Multi-Store Suppliers – Use one set of suppliers for all linked locations. Learn how to manage suppliers here.
Sales by Location – Compare sales performance across multiple linked locations. Learn how to run the Sales by Location report here.
Sales by Department – Analyze sales data by department for a single location or for all linked locations. Learn how to run the Sales by Department report here.
Sales by Item – Track sold items for a single location or across all linked locations. Learn how to run the Sales by Item report here.
Lightspeed Pocket
Keep tabs on your sales data from Lightspeed Retail’s BackOffice servers while on the go with Lightspeed Pocket for iOS & Android. Add each of your stores to the app and navigate between them with just a few taps.
Add Your First Location
After downloading Lightspeed Pocket, use your BackOffice login to link Pocket to your store account on Lightspeed Retail’s BackOffice servers.
- Enter your store name, username/email, and password.
The sign in screen below will appear the first time you open Lightspeed Pocket. If the Dashboard loads instead and you need to add a new location to Pocket, follow the steps here to do so.
Store name | Lightspeed Retail account name, all lowercase with no spaces.
Username/email | The username or email used to log in to your store account on Lightspeed Retail’s BackOffice servers. For the Business Owner, this is the email originally used to create the location. BackOffice Managers must use their assigned login for the location. Receive Inventory Users cannot sign in to Lightspeed Pocket.
Password | The case sensitive password used to log in to your store account on Lightspeed Retail’s BackOffice servers. - Tap 'Sign in'.

- If signing in as the Business Owner, Pocket automatically adds all linked locations. Tap 'Continue'.
If signing in as a BackOffice Manager, you must add other locations individually.

If you have problems signing in, visit our Lightspeed Pocket Troubleshooting guide for help.
Add Additional Locations
If some locations are not linked or you did not sign in as the Business Owner, you can still add additional locations to Pocket to start tracking their sales data.
- Tap the name of the current location.

- Tap 'Add a new location'.

- Enter the store name, username/email, and password, then tap 'Add a new location'.

- Tap 'Done'.
Switch Between Pocket Locations
Quickly toggle from one location to another to view sales data from your store accounts on Lightspeed Retail’s BackOffice servers.
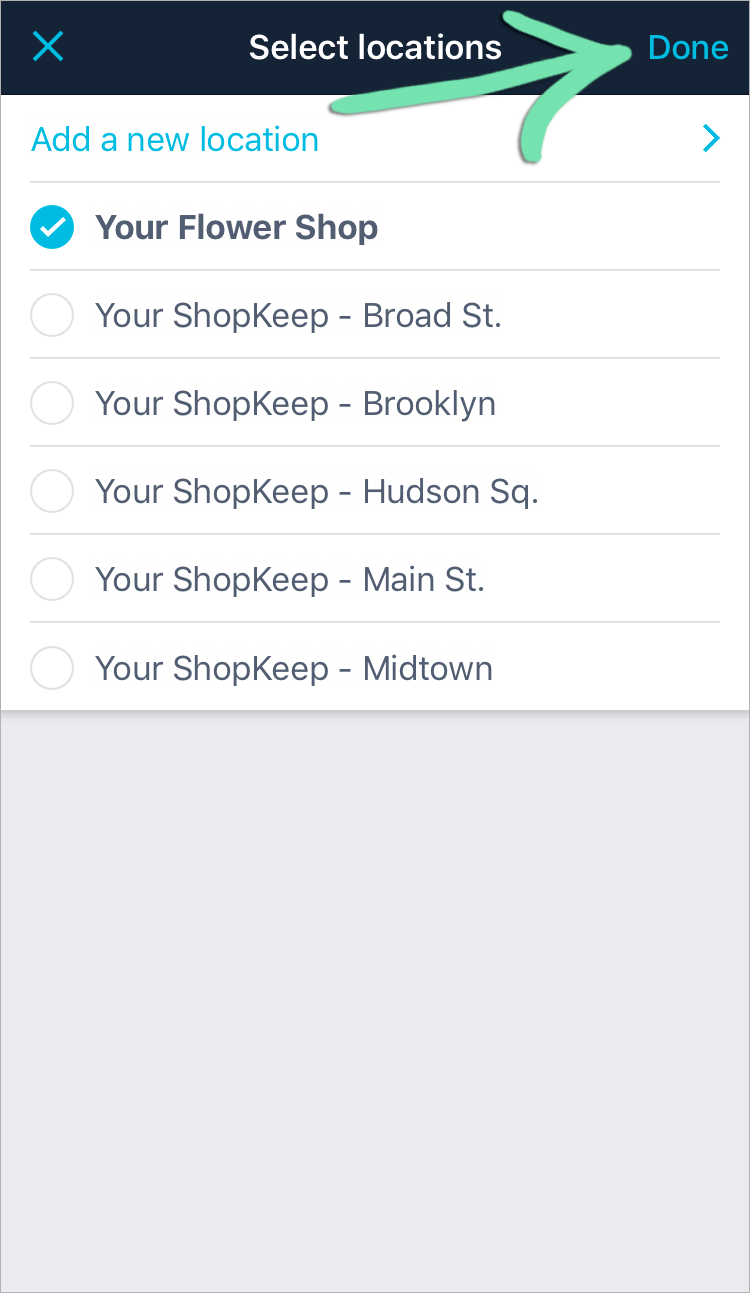
- Tap the location name.
- Select a location to view and tap 'Done'.
