Lightspeed Pocket (S)
for iOS & Android
Download Lightspeed Pocket (S) on an iOS or Android device to monitor your store(s) while away. View sales totals, sold items, guest activity, graphs, and other sales information for your store account on Lightspeed Retail’s BackOffice servers.
For more detail, view a list of individual transactions, download customer receipts, and view top employees by net sales and other measures, and monitor employee clock punches. Real-time notifications keep you updated on important register events, such as register shift opening and closings.
Download Pocket
Get Lightspeed Pocket (S) from Apple’s App Store (iOS) or Google’s Play Store (Android) to connect your device to a store account on Lightspeed Retail’s BackOffice servers.
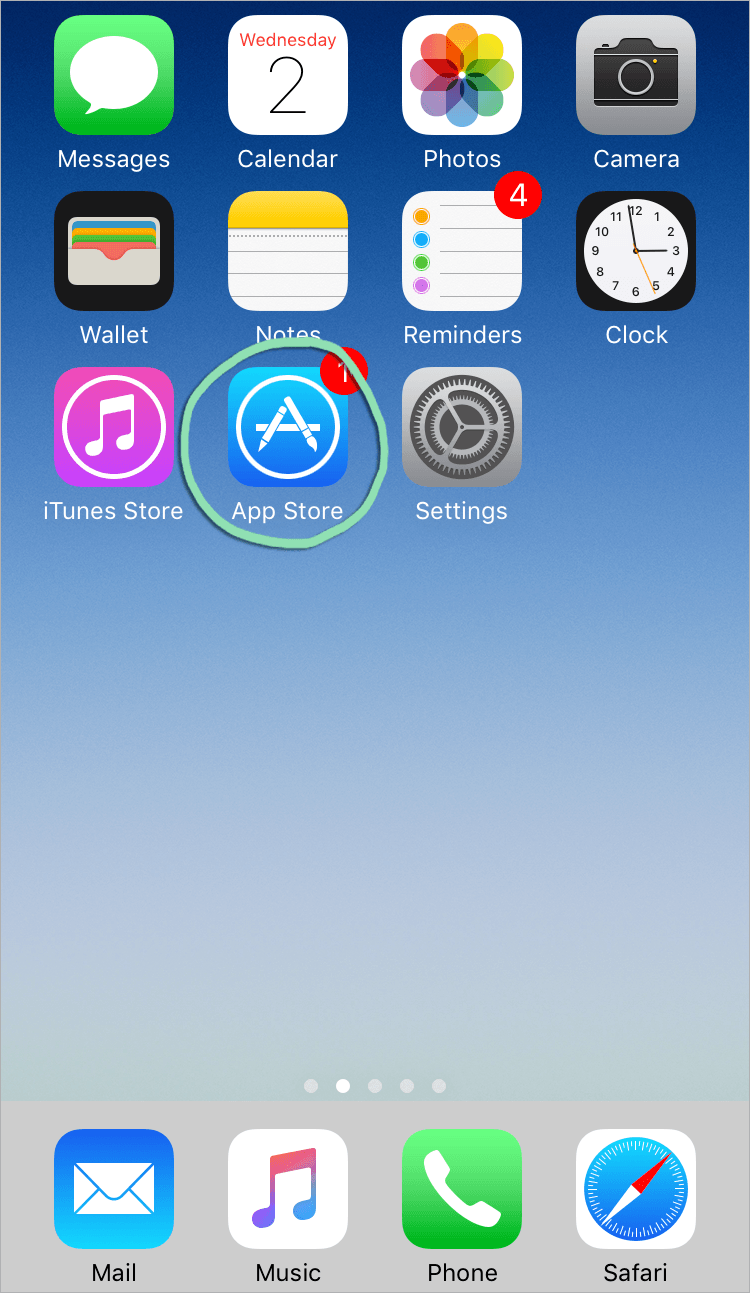
Download Pocket on iOS
- Open the App Store.
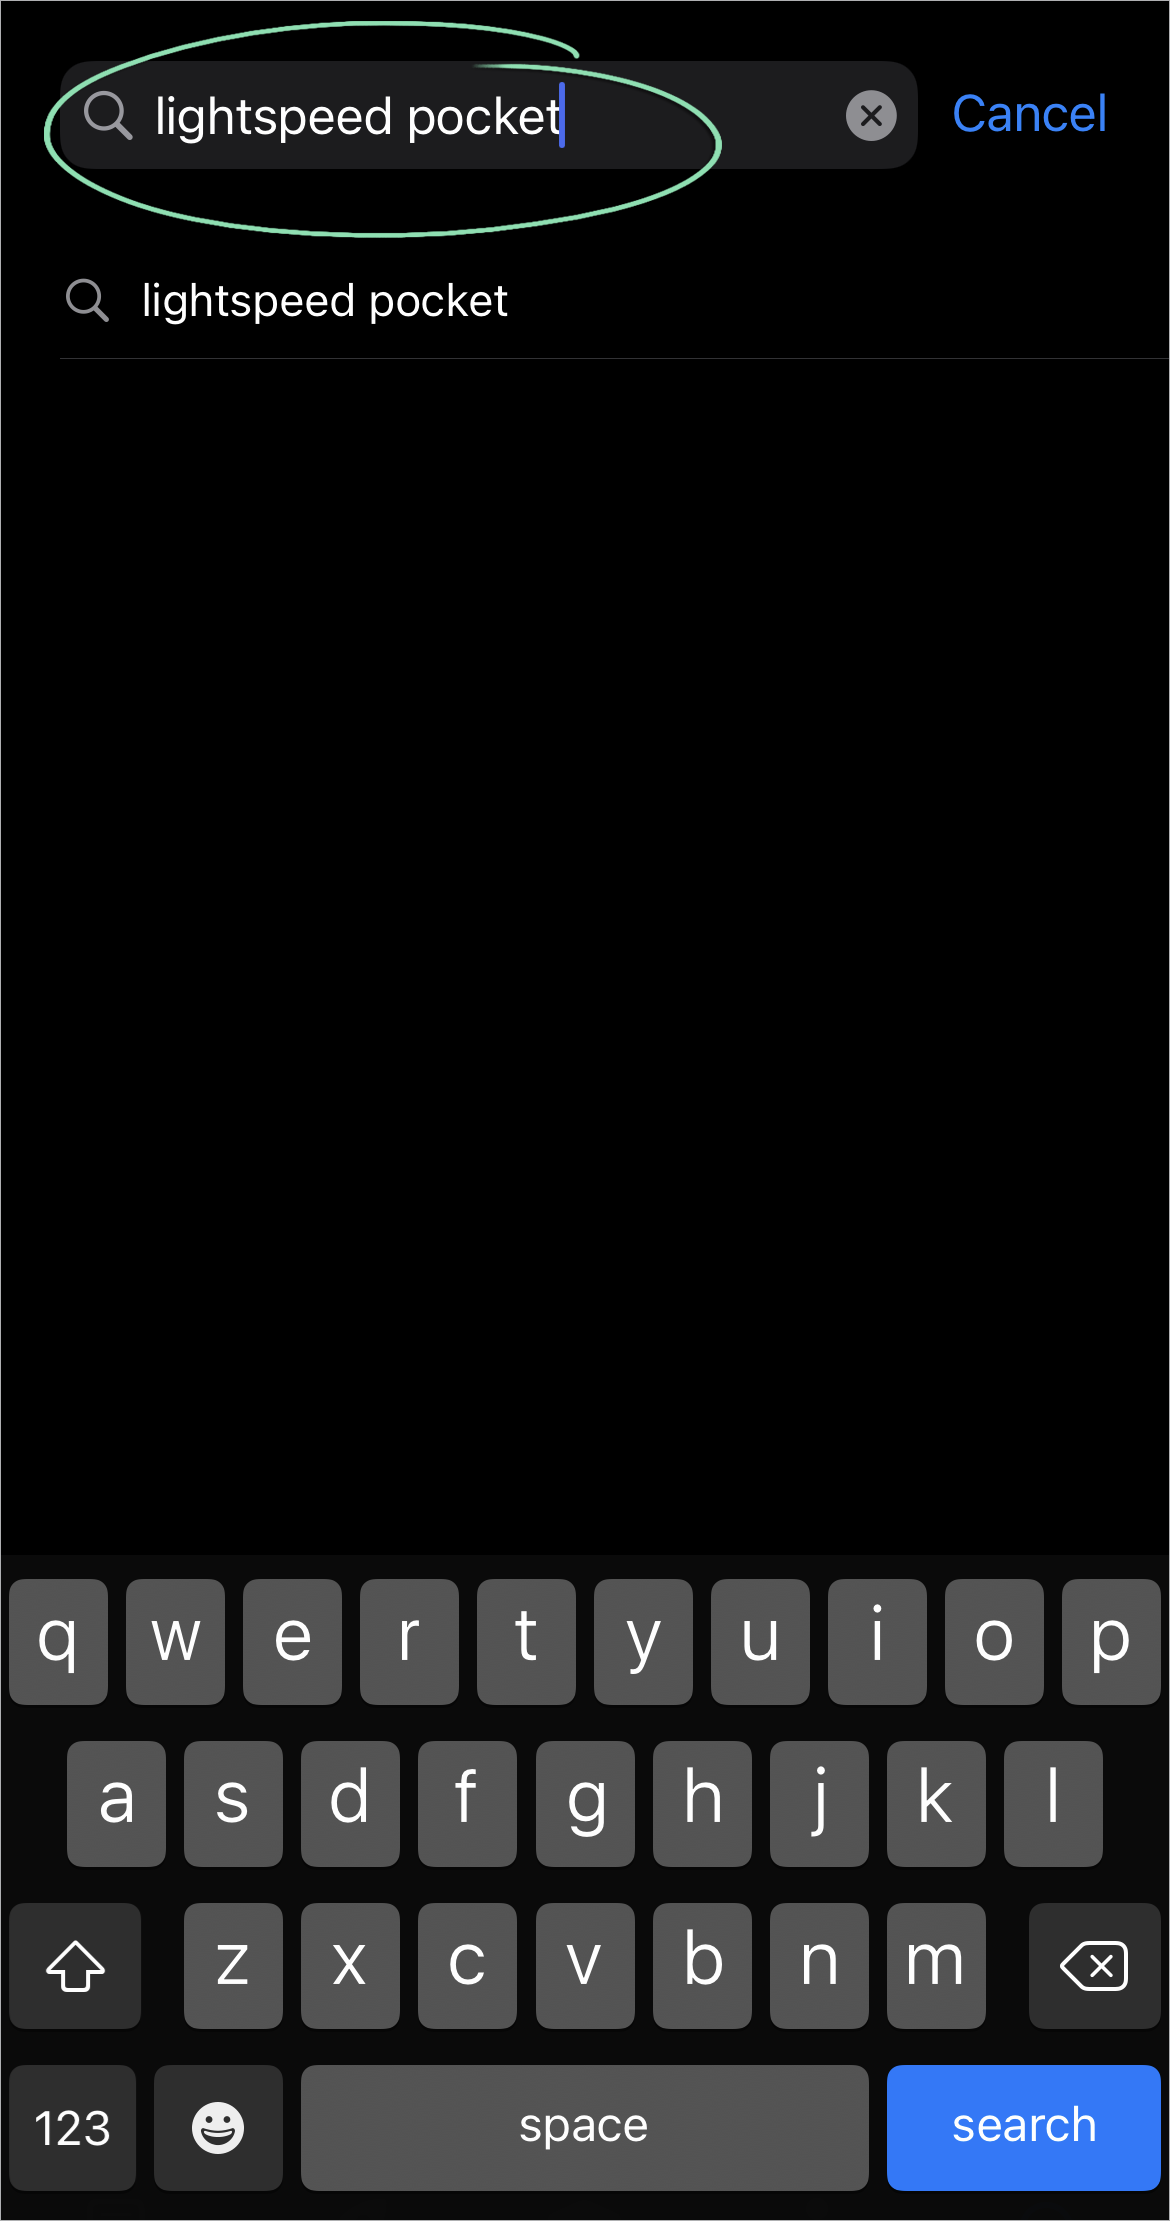
- Tap 'Search' and search for 'Lightspeed Pocket'.

- Tap 'Get' to download Pocket.
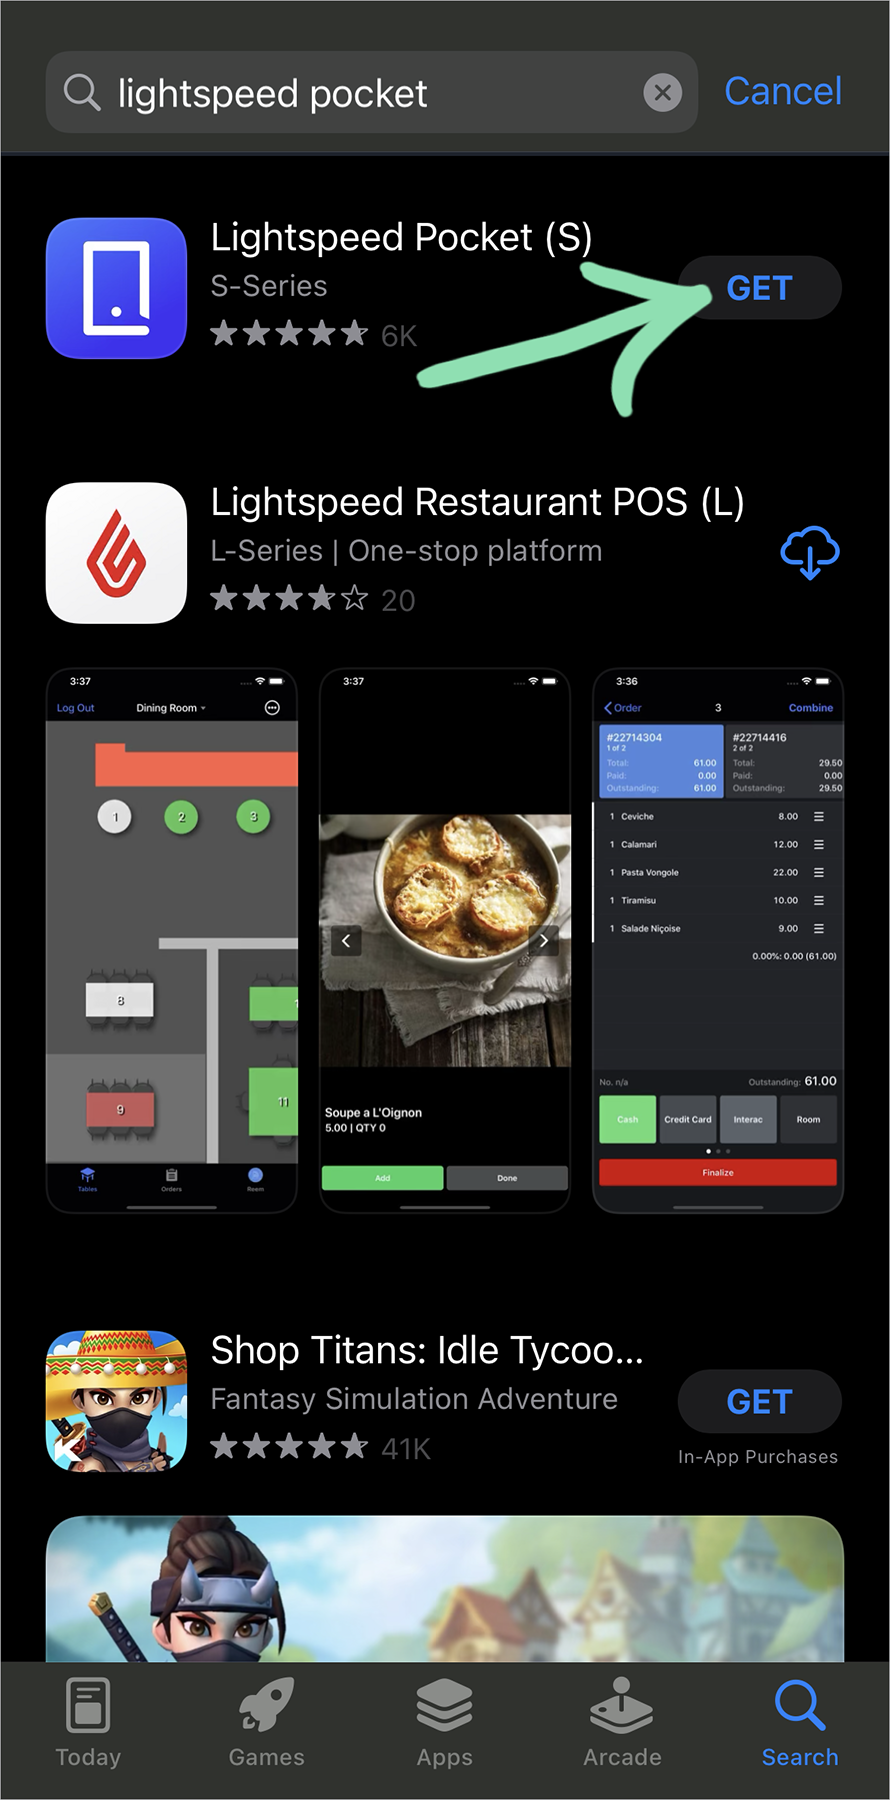
- If prompted, use Face ID, Touch ID, or your Apple ID password to authorize the download.
For help using Touch ID or Face ID, visit Apple Support.
- When the download finishes, tap 'Open' to launch Pocket.
With Pocket downloaded, make sure to update the app when a new version is released. Visit this article to see what the latest version is and learn how to check what version you have installed.
Download Pocket on Android
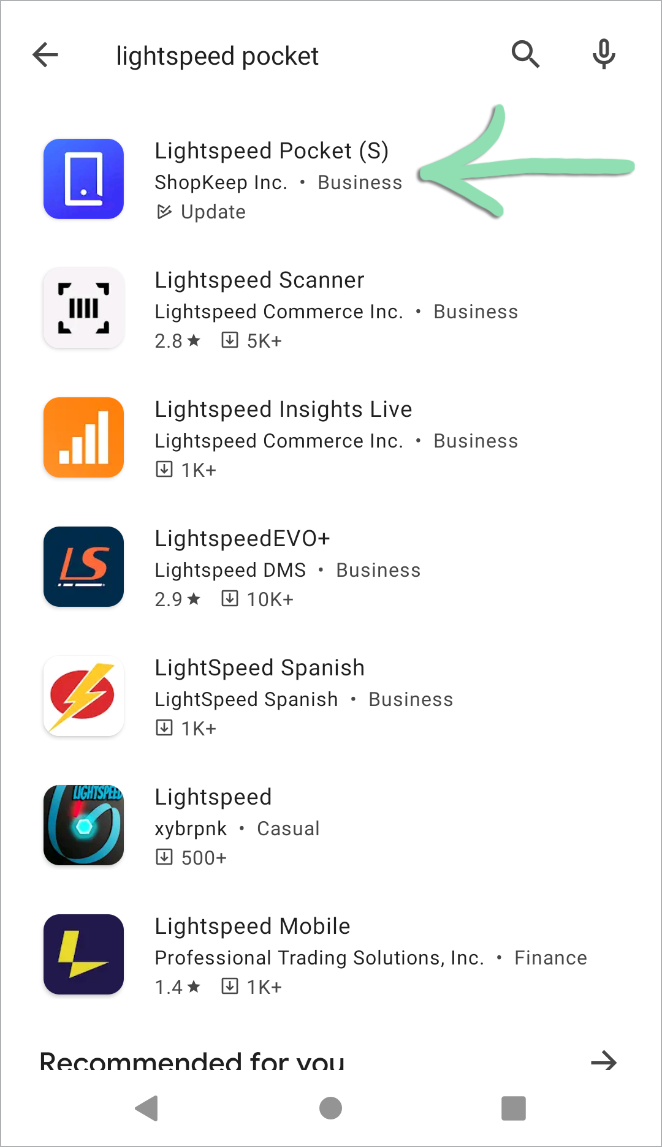
- Open the Play Store and search for 'Lightspeed Pocket'.


- Select 'Lightspeed Pocket (S)' and tap 'Install'.
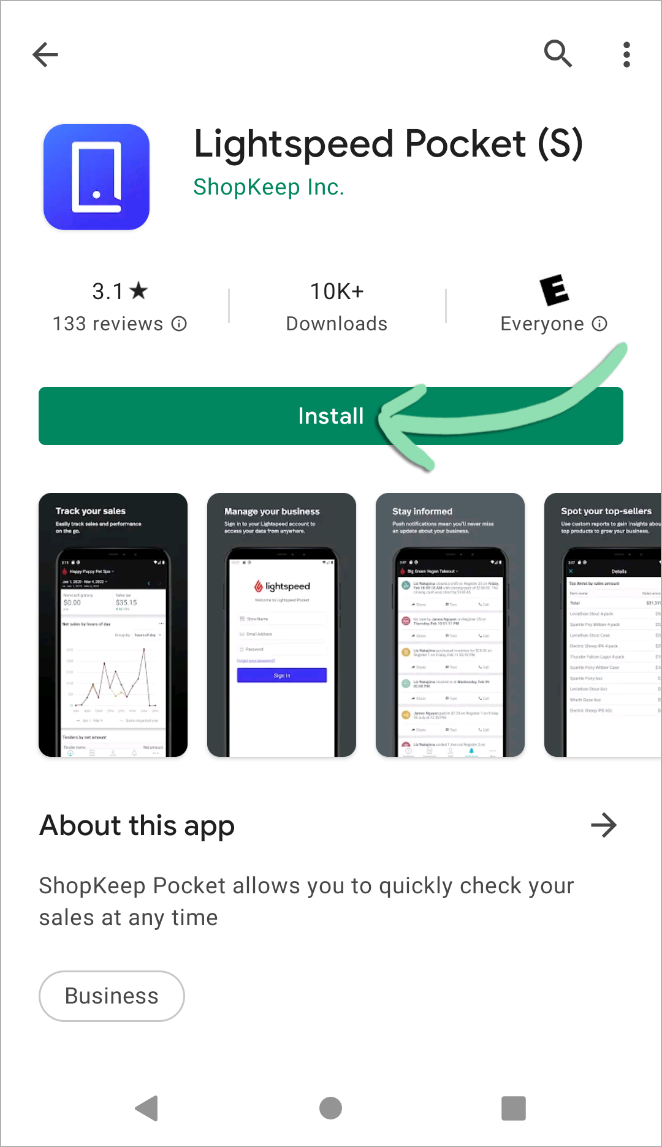
- When the download finishes, tap 'Open' to launch Pocket.
With Pocket downloaded, make sure to update the app when a new version is released. Visit this article to see what the newest version is and learn how to check what version you have installed.
Add Your First Location
With Lightspeed Pocket downloaded, use your BackOffice login to link Pocket with your store account on Lightspeed Retail’s BackOffice servers to view your data on the go.
- Enter the store name, username/email, and password, then tap ‘Sign in’.
The sign in screen below will appear the first time you open Lightspeed Pocket. If the Dashboard loads instead and you need to add a new location to Pocket, follow the steps here to do so.
Trouble signing in? Visit our Lightspeed Pocket Troubleshooting guide for help.
Store name | Lightspeed Retail account name, all lowercase with no spaces.
Username/email | The username or email used to log in to your store account on Lightspeed Retail’s BackOffice servers. For the Business Owner, this is the email originally used to create the location. BackOffice Managers must use their assigned login for the location. Receive Inventory Users cannot sign in to Lightspeed Pocket.
Password | The case sensitive password used to log in to your store account on Lightspeed Retail’s BackOffice servers.
- If signing in as the Business Owner, Pocket automatically adds all linked locations. Tap 'Continue'.
If signing in as a BackOffice Manager, you must add other locations individually.

- (Optional) If using Lightspeed Pocket on an iOS device, tap ‘Allow’ to enable push notifications.
- Notification alerts appear when certain actions are performed at the business. Learn what information is included in Pocket’s notifications here.
- Using Pocket on an Android device? Skip step 5 as notifications are enabled by default.

- To switch between locations, tap the location name, select another location, and tap 'Done'.
If there is an error next to a location, visit our troubleshooting guide for help.


Add Additional Locations
If some locations are not linked or you did not sign in as the Business Owner, you can still add additional locations to Pocket to track their sales data.
- Tap the name of the current location.
- Tap 'Add a new location'.

- Enter the store name, username/email, and password, then tap 'Add a new location'.
Unable to add the location? Visit our troubleshooting guide for help.

- Tap 'Done'.

- To switch between locations, tap the location name, select another location, and tap 'Done'.
If there is an error next to a location, visit our troubleshooting guide for help.

View Your Sales
Use the ‘Dashboard’ tab to monitor sales data from your store account on Lightspeed Retail’s BackOffice servers wherever you have internet. Scroll to view sales activity or trends, tender totals, top items, and active registers for a selected range.
- Tap the 'Dashboard' tab on the bottom navigation to view your sales data.
Date Range & Comparisons
Pocket gives you the freedom to select a preset or customized date range for the app’s sales data. The comparisons feature allows you to see how the selected range performed against a similar period of time.
This feature is only available to Lightspeed Retail merchants on select pricing packages. Merchants on ineligible packages can view sales only from the current day compared to the same day of the previous week.
- Tap the date range.

- Select a preset or custom range.

- (Optional) Scroll down and choose a period of time to compare against the selected date range.

- Tap ‘Done’.

- (Optional) Use the arrows to skip back or ahead by one full range.
For example, if viewing this month’s sales, tap the back arrow to show last month.

Refresh Sales Data
Refresh Pocket at any point to view updated sales data from your store account on Lightspeed Retail’s BackOffice servers.
- Scroll to the 'Sales activity' section and swipe down from the top of the screen.

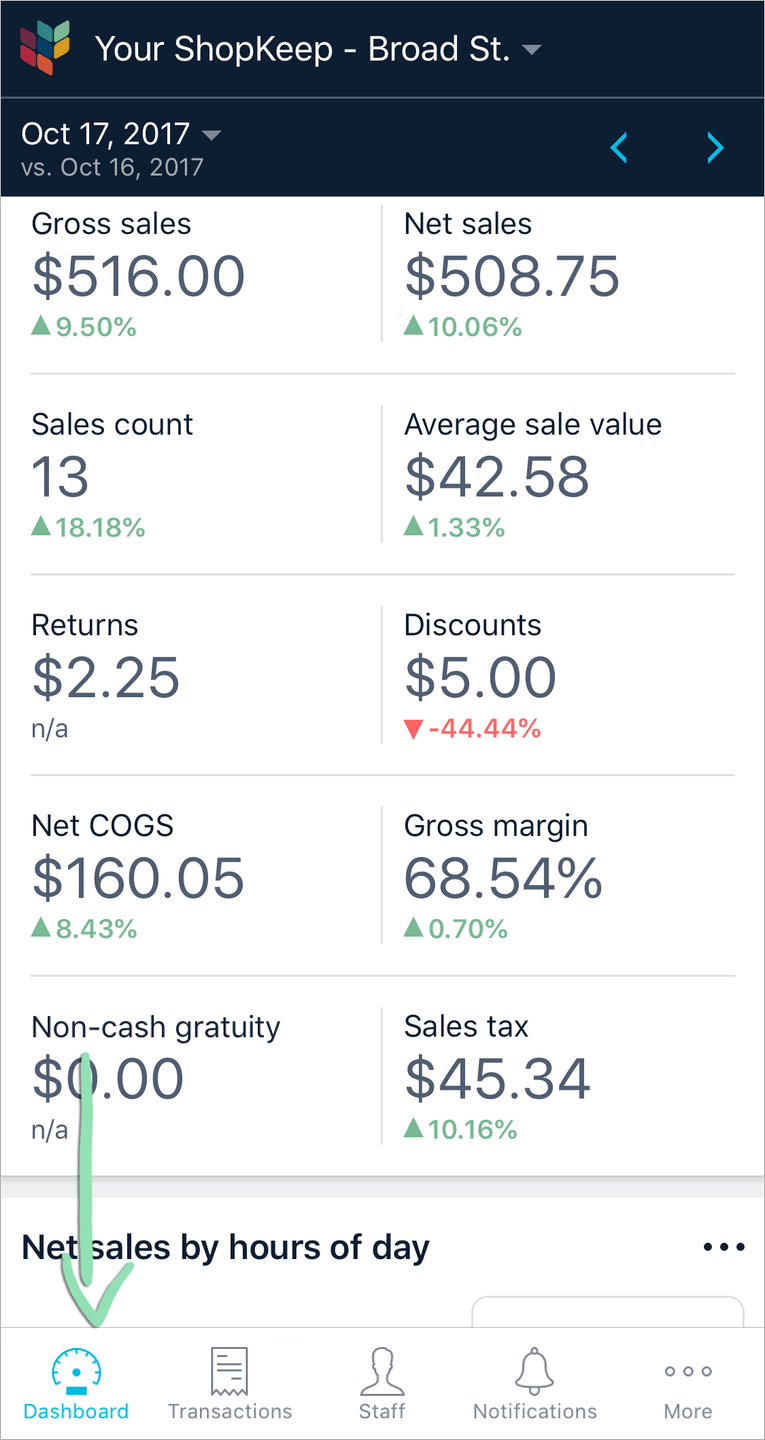
Sales Activity
The Sales activity section gives a high-level summary of all registers for the selected date range.
IMPORTANT: Sales tax figures in reporting are estimates based on how you have configured your tax rates and tax groups in BackOffice. For official filings, always verify your current local rates, then manually calculate tax using net taxable and non-taxable revenues. Be aware that tax laws can change at any time and you should contact a tax professional for specific tax advice regarding your business.
Gross Sales | Total sales before discounts, returns, gratuity, and tax.
Net Sales | Gross Sales minus Discounts and Returns.
Sales Count | Total number of sales and returns performed at the register.
Average Sale Value | Average value of each sale before tax.
Returns | Amount refunded to customers before tax, gratuity, and discounts.
Discounts | Total discounts on sales minus total discounts on returns.
Looking for more detail on discount usage? Try the BackOffice Sales by Discount report.
Net COGS | The business’s cost of items sold minus the cost of items returned.
Gross Margin | Percentage of Net Sales left after accounting for cost.
Non-Cash Gratuity | Total amount of tips left on sales paid for by credit cards and gift cards and tips left on Lightspeed eCom (E) orders*.
*Excludes tips left on orders not paid online by credit card (e.g. cash orders) that are placed while eCommerce online ordering is enabled. To learn more about how tips for online orders appear in reporting, visit our eCommerce Advanced Topics article.
Sales Tax | Total tax amount charged on sales minus tax refunded on returns.
▲ / ▼ | How the current date range compares with your selected comparison period.
Guest Activity
This tile only appears if the Guest Count feature is enabled in BackOffice and the Restaurant Type is set to ‘Restaurant’. It displays the total number of guests served, average guests per sale, and average sale amount per guest. To learn how to enable Guest Count, visit our help article.
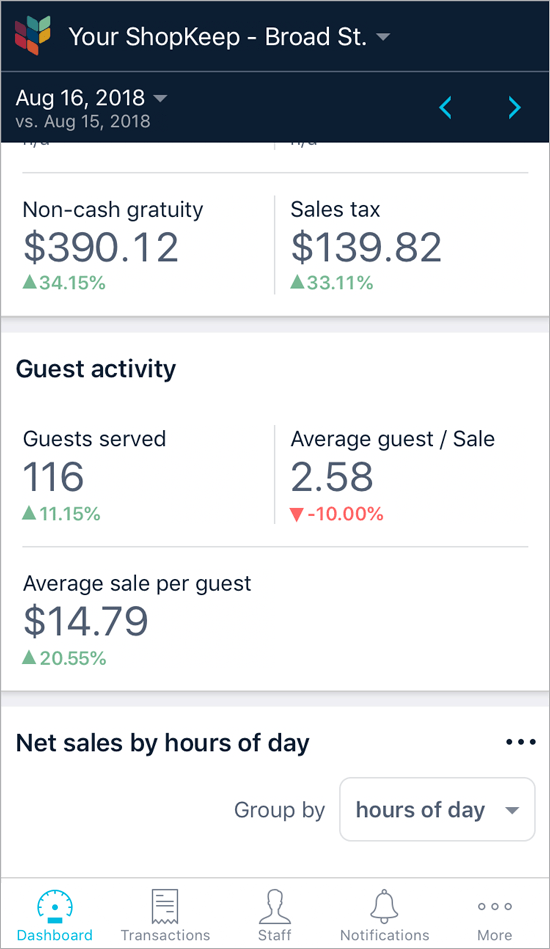
Guests served | Total number of guests served based on the guest count of each completed sale.
Average guest / Sale | Guests served divided by the total number of sales.
Average sale per guest | Total sales (including tax, discounts, and gratuity) divided by Guests served.
▲ / ▼ | How the current date range compares with the selected comparison period.
Sales Graph
The sales graph tile is a visual summary of sales data over time. The default view displays net sales by hours of day but can be customized to show the sales count or to display sales by days of the week.
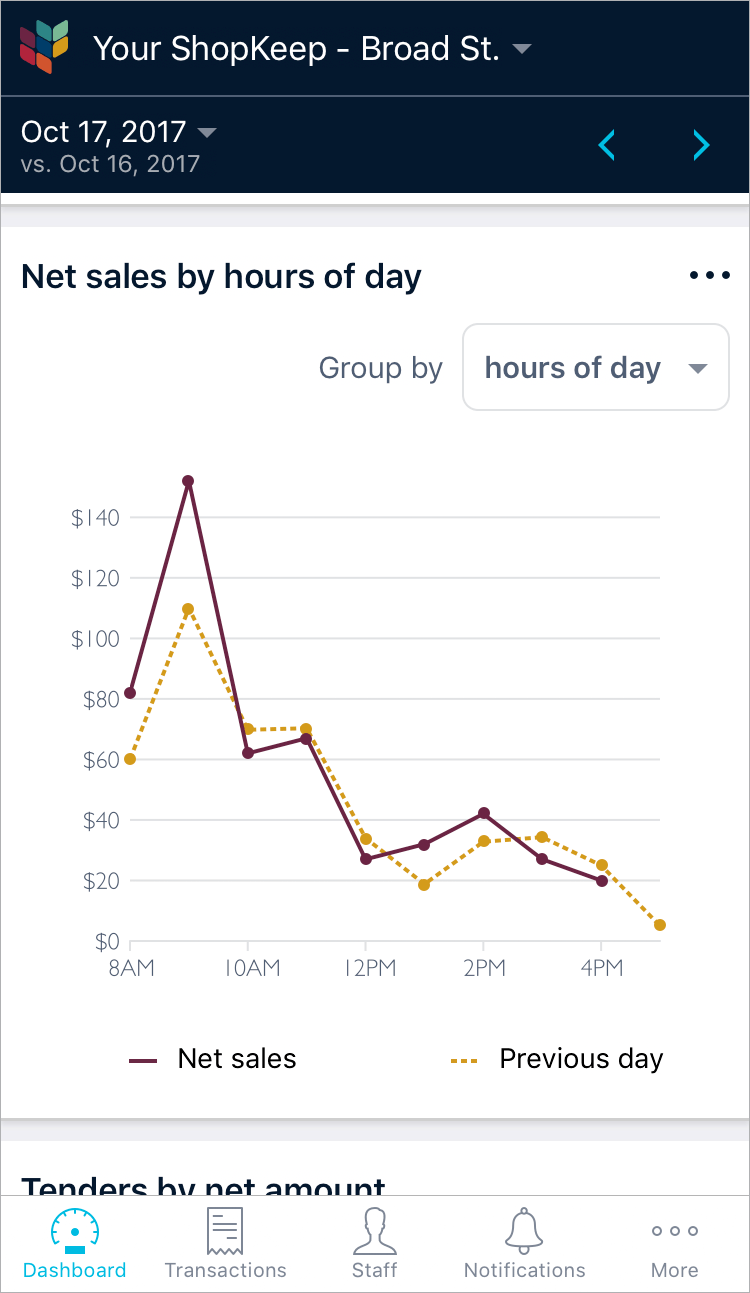
- To set a different time period, tap the ‘Group by’ menu, select a period, and tap ‘Done’.


Hours of Day (default view) | Each position on the graph’s x-axis is one of the 24 hours in a day. The graph displays the total per hour of the day combined for all days in the selected range.
Click to view a sample Net Sales by Hours of Day graphDays of Week | Each position on the graph’s x-axis is one of the 7 days in a week. The graph displays the total per day of the week combined for all weeks in the selected range.
Click to view a sample Net Sales by Days of Week graphHours | Each position on the graph’s x-axis is a sequential hour of the day. The graph displays the total for each hour in the selected range.
Click to view a sample Net Sales by Hours graphDays | Each position on the graph’s x-axis is a sequential day. The graph displays the total for each day in the selected range.
Click to view a sample Net Sales by Days graphWeeks | Each position on the graph’s x-axis is a sequential week. The graph displays the total for each week in the selected range.
Click to view a sample Net Sales by Weeks graphMonths | Each position on the graph’s x-axis is a sequential month. The graph displays the total for each month in the selected range.
Click to view a sample Net Sales by Months graphDay of week | Each position of the graph’s x-axis is a single day of the week that you select from the menu. The graph displays the total for the day of week in the selected range.
Click to view a sample Net Sales by Day of Week graph - To view the sales count, tap the 3 dots, select 'Sales count', and tap 'Done'.


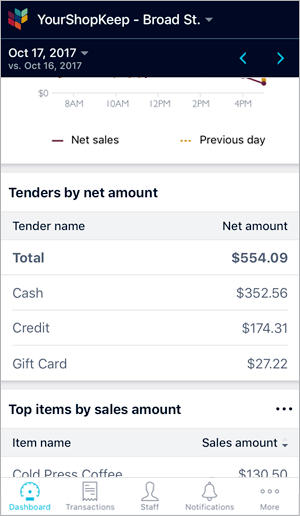
Tenders by Net Amount
View a breakdown of sales by tender type with the Tenders by net amount tile. See the total amount tendered across all registers and view the most popular payment methods by amount.
Top Items
By default, the Top items section shows the top 5 best-selling items by sales amount. Learn how to view the full list of sold items, sort through items, and customize how top items are measured.
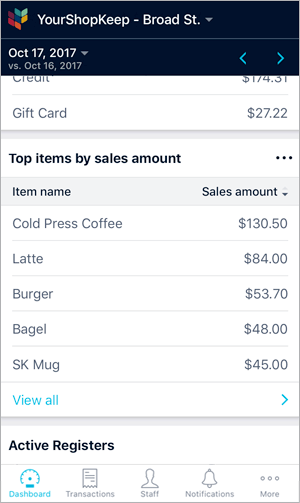
- Tap ‘View all’ to see a complete list of all sold items.

- Tap the measure to sort the items list ascending or descending.

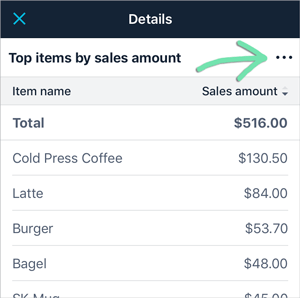
-
To change the top items measure, tap the three dots, select a new measure, and tap 'Done'.

Sales amount | Total sales before discounts, returns, gratuity, and tax.
Sales count | Quantity that was sold.
Returns count | Quantity that was returned.
Returns amount | Total returns before discounts, gratuity, and tax.
Costs | Cost of goods sold minus the cost of returned items.
Discounts | Total discounts applied to sales.
Margin | Percentage of Net sales remaining after accounting for cost.
Net sales | Sales amount minus Returns amount.
Need to export or print your item sales data? Run the BackOffice Sales by Item report.
Active Registers
The Active registers section displays each register, its open/closed status, and a summary of the flow of cash and other tenders during its most recent shift. This tile appears only when Pocket’s date range is set to Today.
To view a similar register overview in BackOffice, try the Shifts Summary report.

Open / Closed | Indicates whether a shift is currently open or closed on that register.
Register Name / Number | Name or number of the register.
Opened / Closed By | Name of the manager who opened and/or closed the shift and the date and time it was opened/closed.
Opening Cash | Opening drawer amount entered when the shift was opened.
Cash / Credit / Additional Tenders | Total amount of each active tender paid by customers for sales minus the amount refunded for returns.
Drops / Payouts / Pay-ins / Purchases | Amount of cash added to or removed from the drawer due to pay ins and payouts.
Expected Cash | Amount of cash expected to be in the drawer.
Actual Cash | Closing drawer amount entered when the shift was closed. This is blank until the shift is closed.
Over/Short | Difference between the expected cash and actual cash. This is blank until the shift is closed.
If you have issues viewing sales in Lightspeed Pocket, visit our troubleshooting guide for help. If you have questions about Lightspeed Pocket reporting, visit our Reporting FAQ.
View Your Transactions
Use the ‘Transactions’ tab to view detailed information about individual transactions from Lightspeed Retail’s BackOffice servers, including a copy of each receipt, right from the Pocket app.
- Tap the 'Transactions' tab on the bottom navigation to view your list of transactions.

Total count | Total number of transactions occurring within the selected date range.
Transaction total | Total transactions amount including taxes and credit tips occurring within the selected date range.
▲ / ▼ | The green or red arrow and accompanying percentage that shows how your current date range compares with your selected comparison period.
Date Range & Comparisons
Select a preset or customized date range to view transaction data occurring within a given time period. Use the comparisons feature to see how the selected range performed against a similar period of time.
This feature is only available to Lightspeed Retail merchants on select pricing packages. Merchants on ineligible packages can view transactions only from the current day compared to the same day of the previous week.
- Tap the date range.

- Select a preset or custom range, then tap 'Done'.

- (Optional) Scroll down and choose a period of time to compare against the selected date range.
If a comparison period is not selected, the default will be applied.

- Tap 'Done'.

- (Optional) Use the arrows to skip back or ahead by one full range.
For example, if viewing this month’s sales, tap the back arrow to show last month.

Measures
Choose a measure to change what data displays on the list located within the ‘Transactions’ tab.
- Tap the three dots to view your available measures.

- Select a measure, then tap 'Done' to apply.

Transaction total | Total transactions amount including taxes and credit tips.
Gross Sales | Total sales before discounts, returns, gratuity, and tax.
Tax | Total tax amount charged on sales minus tax refunded on returns.
Discounts | Total discounts on sales minus total discounts on return transactions.
Tips | Total amount of gratuity left on credit card transactions.
Transaction Details
Choose a transaction from the list to view the transaction details.
- Select a transaction from the list.

- A copy of the printed receipt will appear on screen. Tap the 'X' to return to the list of transactions.
If you receive an error while trying to view a receipt, visit our troubleshooting guide for help.

Staff
Use the ‘Staff’ tab to view your employees ranked by a variety of measures and to see their clock punches. The default employee measure is the amount of net sales they generated according to the sales data from your store account on Lightspeed Retail’s BackOffice servers but many others can be selected to see how your staff is performing.
- Tap the ‘Staff’ tab.
- (Optional) Tap the date to select a new preset or custom date range.
This feature is only available to Lightspeed Retail merchants on select pricing packages. Merchants on ineligible packages can view staff reporting only from the current day compared to the same day of the previous week.

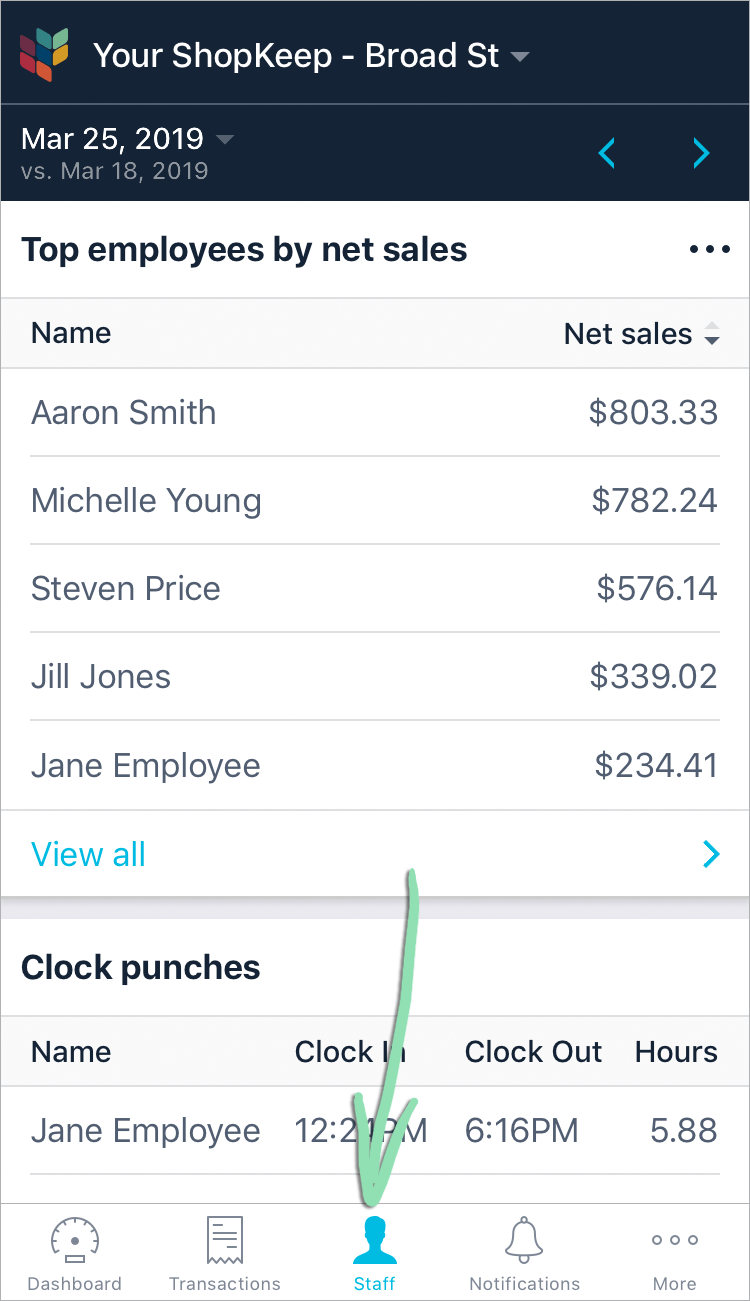
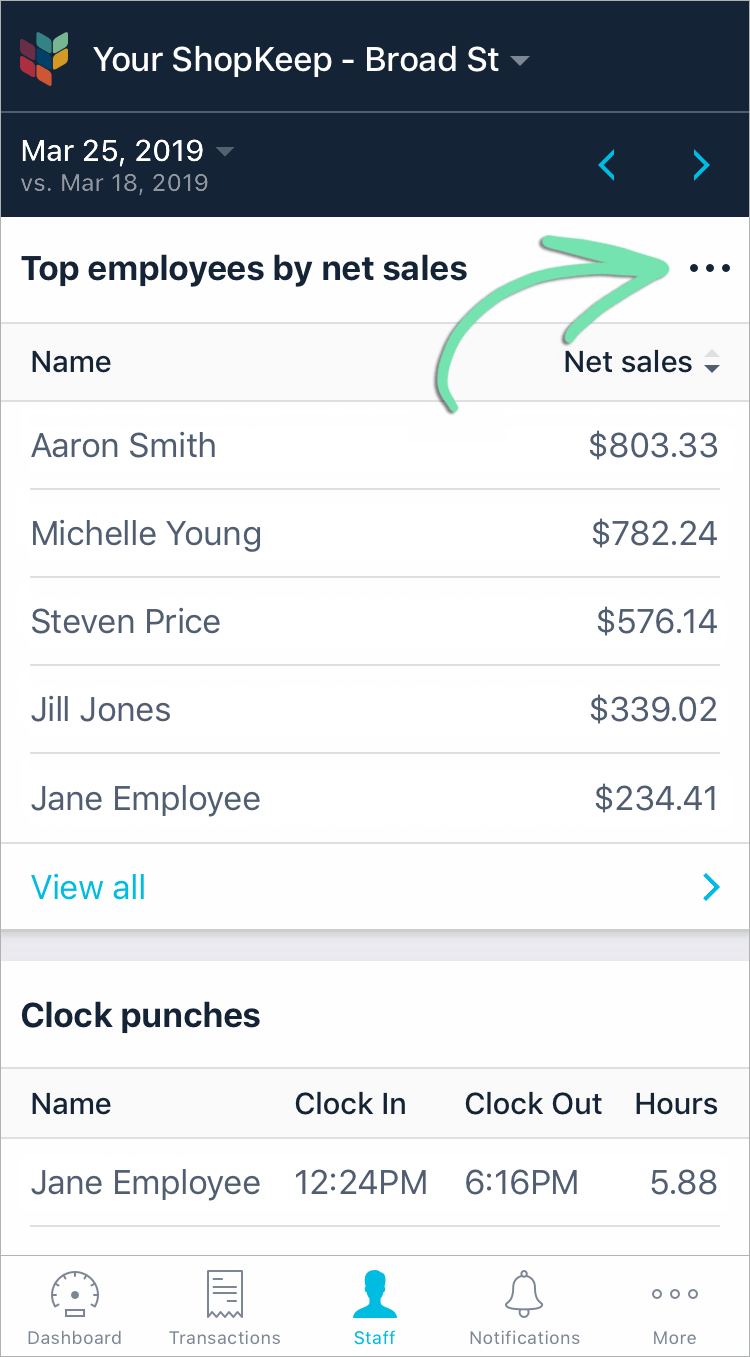
Top Employees
By default, the ‘Top employees’ tile shows the top 5 employees ranked by the net sales they generated. Learn how to change how top employees are measured, view the full list of employees, and sort the list.
-
To change the top employees measure, tap the 3 dots, select a new measure, and tap 'Done'.

Net sales | (default view) Total pre-tax sales rung up by each employee over the selected date range minus their discounts and returns.
Sales count | Total number of sales transactions for the selected date range.
Returns count | Total number of return transactions for the selected date range.
Quantity sold | Total number of inventory items sold for the selected date range.
Sales amount | Total dollar amount received from sales before discount and tax.
Quantity returned | Total number of inventory items returned for the selected date range.
Returns amount | Total dollar amount received from sales before discount and tax.
Costs | Total dollar amount of cost of goods sold.
Discounts | Total dollar amount of discounts applied to sales for the selected date range.
Gross margin | The percentage of net sales revenue that remains after accounting for costs.
Gross profit | The amount of net sales revenue that remains after accounting for costs.
Tips total | The amount of gratuity earned on credit and gift card sales at the register and on Lightspeed eCom (E) orders* for the selected date range.
*Excludes tips left on orders not paid online by credit card (e.g. cash orders) that are placed while eCommerce online ordering is enabled. To learn more about how tips for online orders appear in reporting, visit our eCommerce Advanced Topics article.
Average items per sale | The average quantity of items in a sale, including liability items.
Average sale amount | The average dollar amount of a sale, including discounts but not liability sales or tax. - Tap ‘View all’ to see all employees who rang up sales or returns.

- Tap the measure to sort the employee list.

Clock Punches
By default, the ‘Clock punches’ tile shows the last 5 employees who clocked in over the selected date range, their clock in times, clock out times (if clocked out), and total hours. With the ‘View all’ feature, see clock punches of every employee in the range, starting with the most recently clocked-in employee.
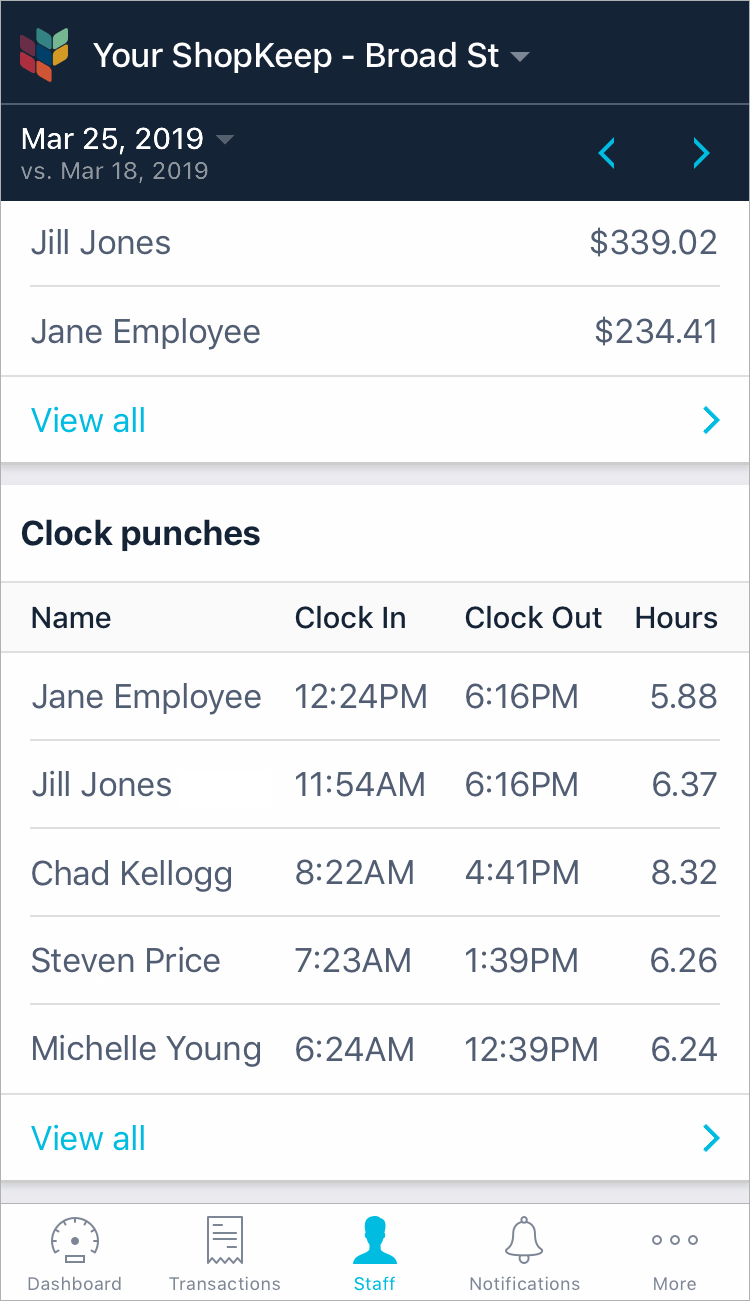
Name | Name of the employee.
Clock In | Time the employee clocked in for their shift.
Clock Out | Time the employee clocked out for their shift. If they have not clocked out, this will be blank.
Hours | If clocked out, the number of decimal* hours worked by the employee during that shift. If not clocked out, the number of decimal hours since the clock in time.
*The decimal in ‘Hours’ represents a fraction of an hour, NOT total minutes. For the number of minutes, multiply the decimal hour by 60. For example, 8.10 hours is 8 hours and 6 minutes (0.10 x 60).
- Tap ‘View all’ to see all employee clock punches over the selected date range.


Notifications
Use the ‘Notifications’ tab to view a list of events occurring at the register, even if push notifications are turned off. Share individual notifications with staff or business partners to follow up on or discuss specific register activity. Text or call, directly from Pocket, the employee who triggered a notification if their phone number is saved in BackOffice.
Low stock alert notifications are available for 7 days after being triggered, then they disappear from the ‘Notifications’ tab.
- Tap the 'Notifications' tab.

- (Optional) Select an option for sharing the notification or contacting the employee who triggered it.
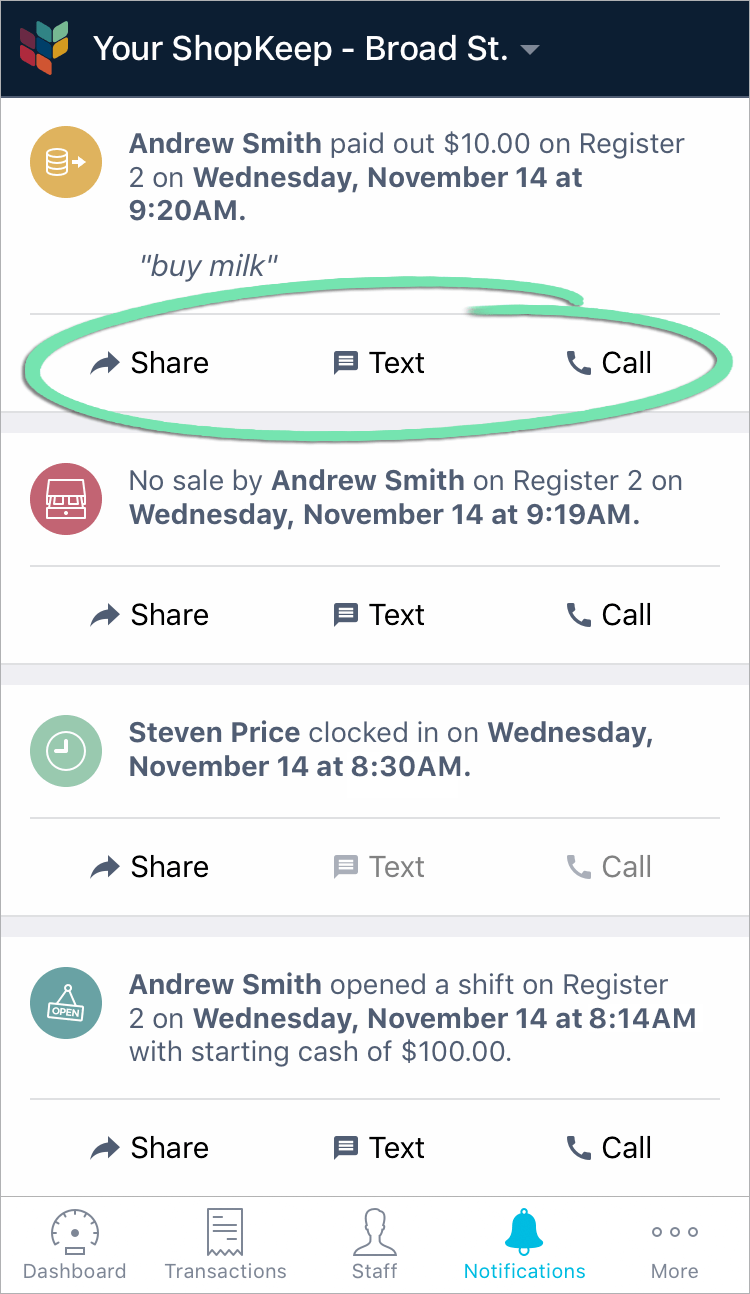
Share | Send the notification to anyone via your device’s built-in sharing options. Most devices support sharing via text message and email, but available sharing options will vary based on your specific device.
Text | Send a text message containing the notification to the employee who triggered it.
Call | Call the employee who triggered the notification.
‘Text’ and ‘Call’ are only available if the employee’s phone number is saved in the BackOffice Staff List.
Push Notifications
With real-time push notifications, stay aware of what’s going on at your business. Notifications alert you when shifts are opened and closed, managers access the cash drawer, staff clock in and out, stock items sell down to their reorder trigger, and items or saved sales are voided.
All notifications contain the nickname of the location where an action is performed. If no location nickname is set, the store name displays.
Shift Open/Close Notifications | Appear when a shift is opened or closed. These contain:
Drawer Access Notifications | Appear when a no sale or pay in / payout is performed, including safe drops, inventory purchases, and non-cash gratuity payouts. These contain:
Clock Punch Notifications | Appear when an employee clocks in or out. These contain:
Low Stock Alert Notifications | Appear when an item’s quantity on hand reaches or falls below the item’s reorder trigger. These contain:
Void Notifications | Appear when a line item from a saved sale or an entire saved sales has been voided at the register. These contain:
If you have issues receiving notifications with Lightspeed Pocket, visit our troubleshooting guide for help.
Additional Features
Use the ‘More’ tab to view our Pocket support article, send us product feedback, contact Customer Care, or change settings for push notifications.
- Tap the ‘More’ tab.

- Select an option.
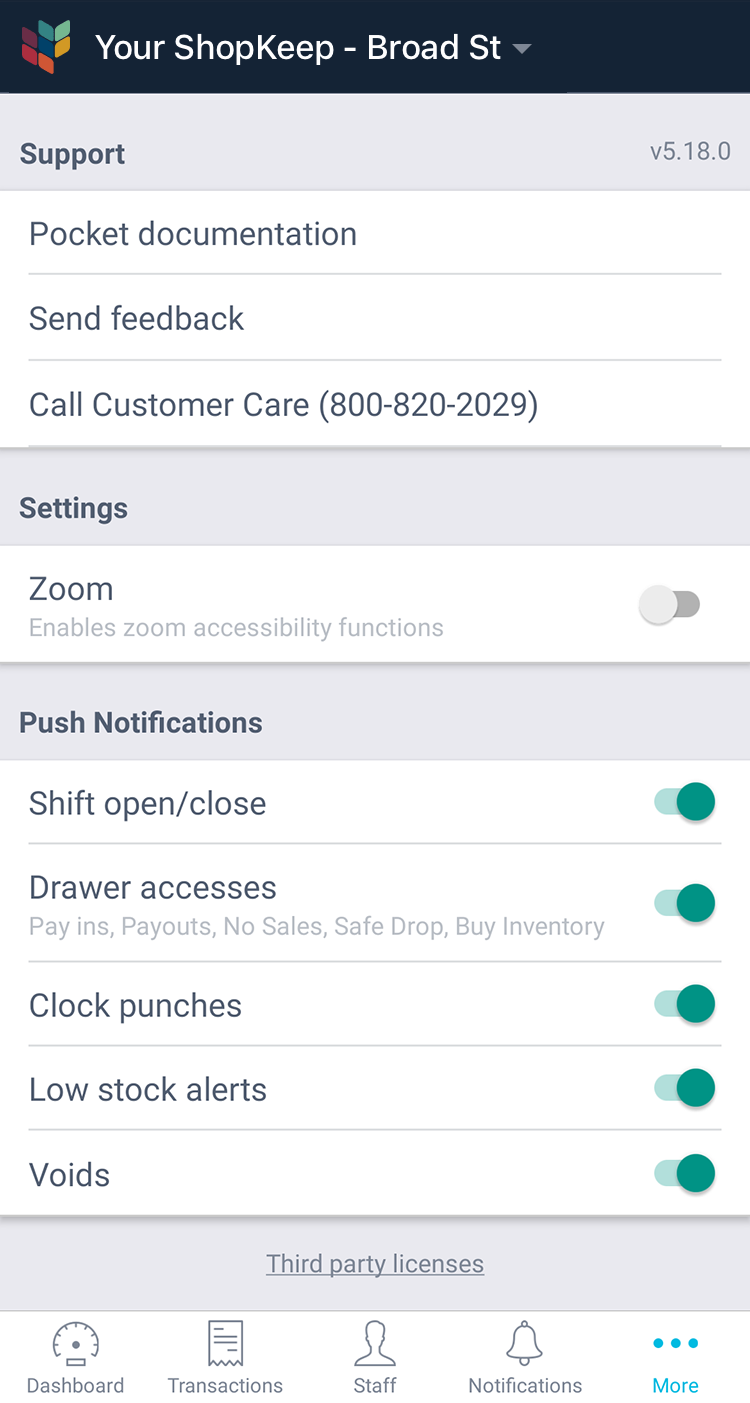
Support
Pocket documentation | Visit this support article from Pocket.
Send feedback | Submit suggestions to our Product team.
Call Customer Care | Call Customer Care for support.Settings
Zoom | Toggle on to allow the use of the accessibility feature to zoom in and out.Push Notifications
Shift open/close | Toggle shift opening and closing notifications off or on by location for this device.
Drawer accesses | Toggle on to receive a notification when the cash drawer is opened for pay ins, payouts, no sales, safe drops and buy inventory.
Clock punches | Toggle on to receive notifications when employees clock in and out at the register.
Low stock alerts | Toggle on to receive notifications when items sell down to their reorder triggers.
Voids | Toggle on to receive notifications when line items are voided from saved sales at the register and when entire saved sales are voided.
If you have problems with Lightspeed Pocket, visit our troubleshooting guide for help. If you have questions about Lightspeed Pocket, visit our Advanced Topics FAQ or Reporting FAQ.