This feature is only available for Lightspeed Retail merchants on select pricing packages.
Lightspeed eCom (E) Integration
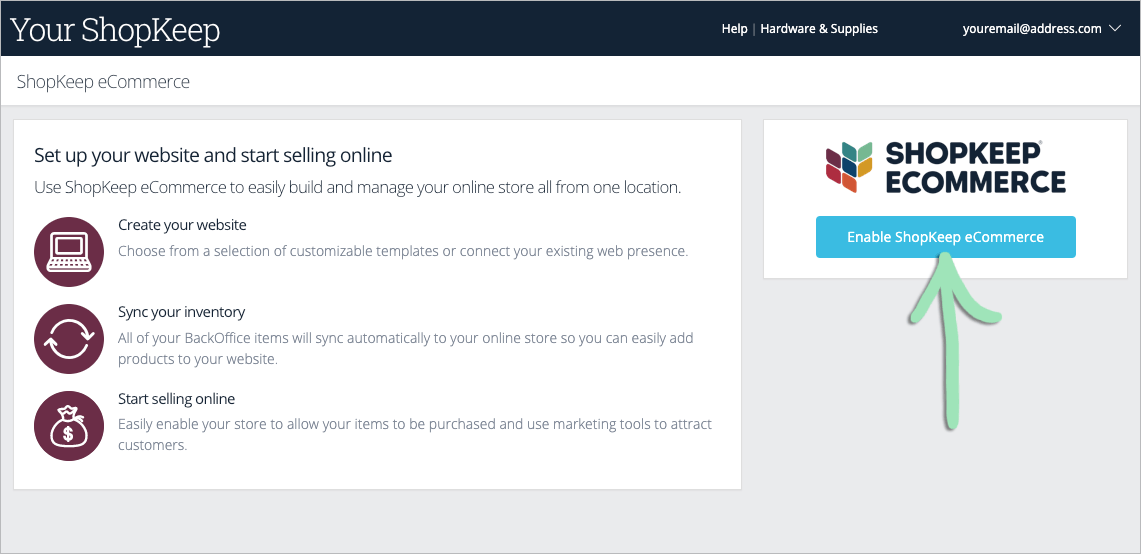
Sell items online with Lightspeed eCom (E), powered by Ecwid, to acquire new customers and grow your business. Items added to BackOffice sync automatically and can be enabled for sale online as desired. After enabling items, configure store settings, such as shipping and payments, and preview the store before sharing it with customers.
Enable eCommerce Integration
Enable eCommerce integration in BackOffice to begin setting up an online store with Lightspeed eCom (E).
- Sign into BackOffice as the Business Owner or an employee with the relevant permissions.
- Click ‘Integrations’ and select ‘eCommerce’.
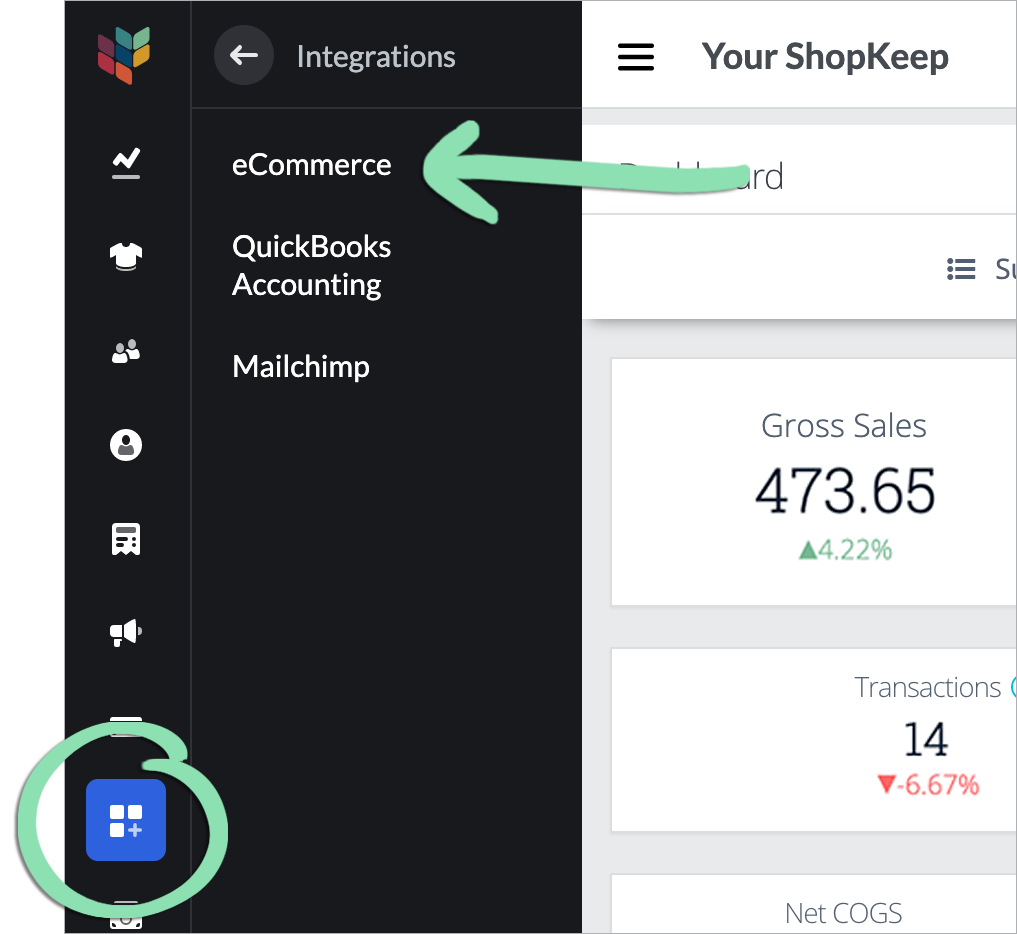
- Click ‘Enable eCommerce’ to set up Lightspeed eCom (E) for the account.
Don’t see the ‘Enable’ button? Click ‘Add eCommerce’ and follow the prompts to upgrade to a pricing package that includes this feature. Only the Business Owner or an employee with ‘Manage Account’ and ‘Manage eCommerce Integration’ permissions can add eCommerce Integration.
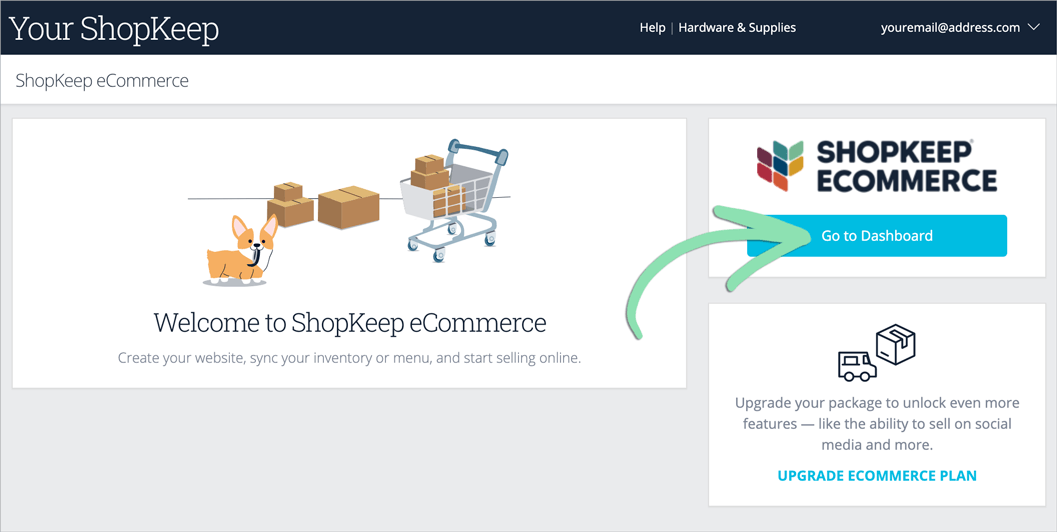
eCommerce Dashboard
Open the Lightspeed eCom (E) Dashboard to access the tools needed to set up and manage your online store. The Dashboard is only available after eCommerce integration has been enabled for your account.
- Sign into BackOffice as the Business Owner or an employee with the relevant permissions.
- Click ‘Integrations’ and select ‘eCommerce’.
- Click ‘Go to Dashboard’.
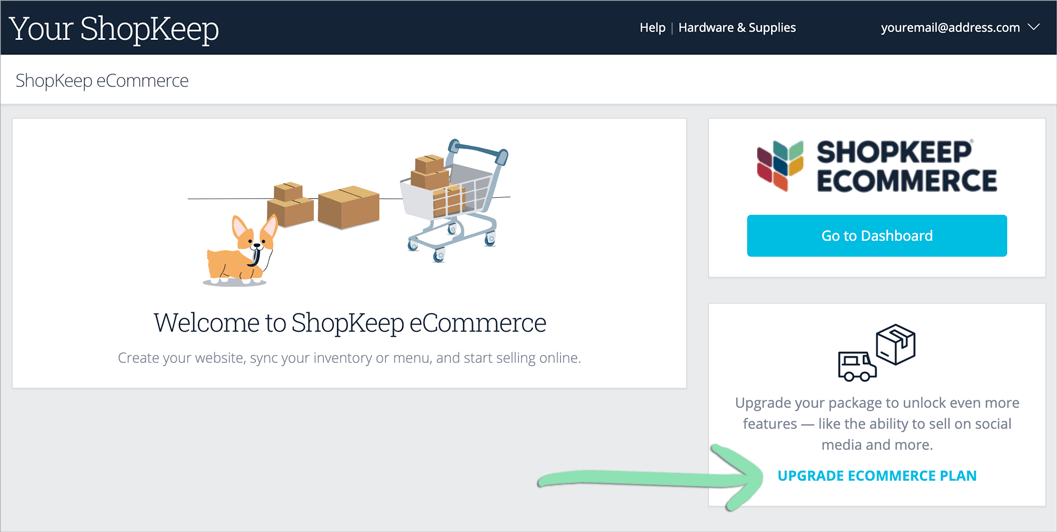
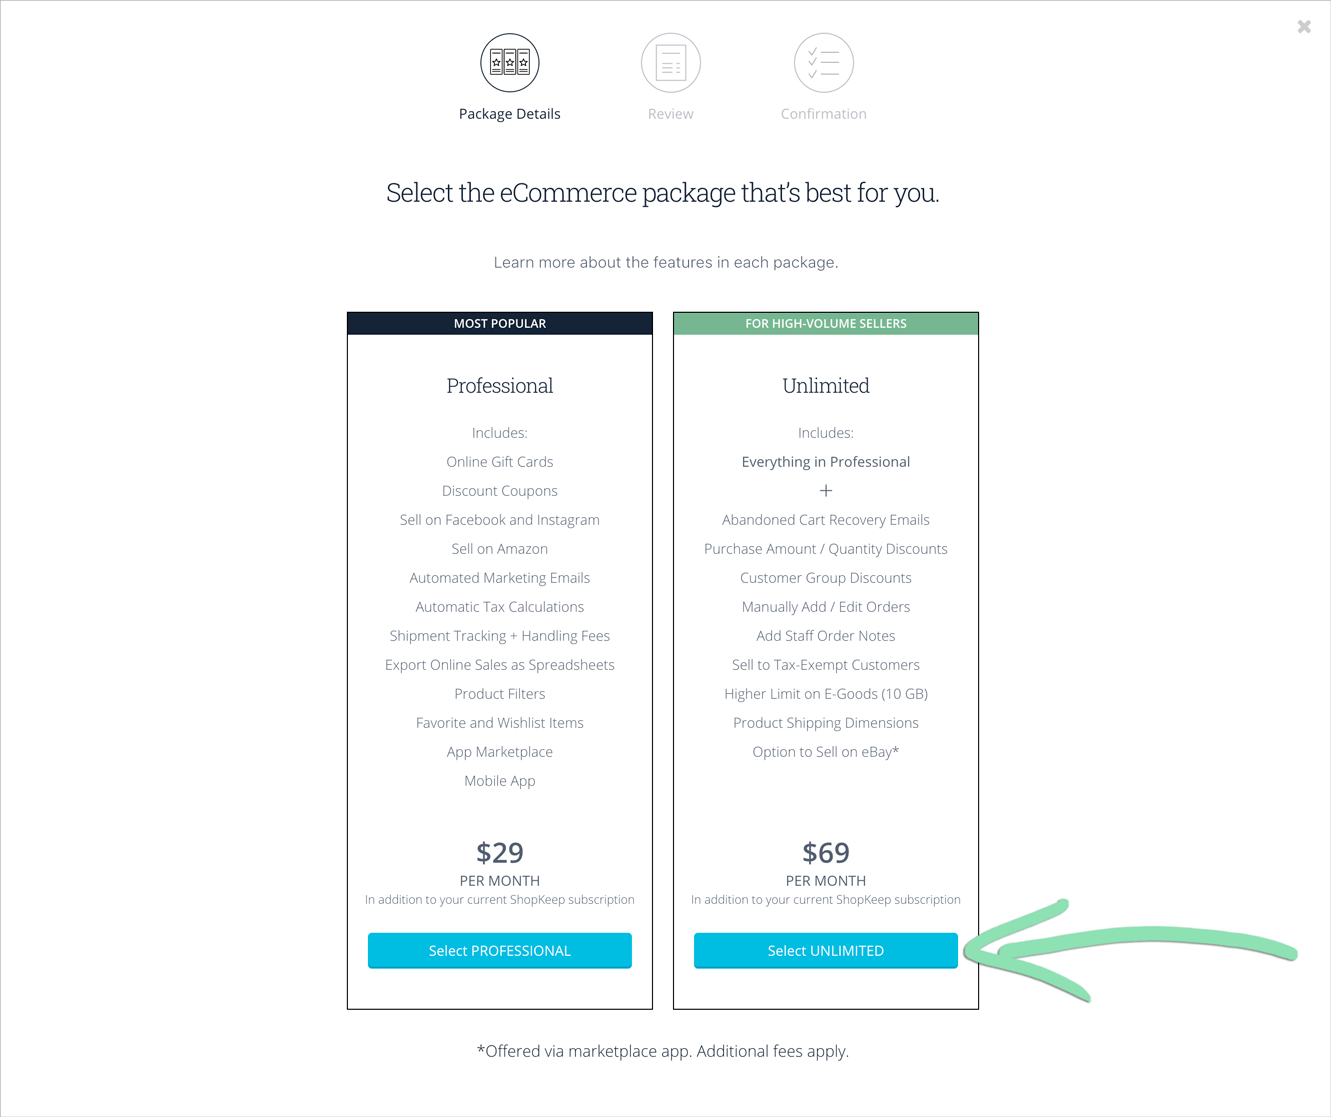
Select a Package
Select a package to upgrade or downgrade your existing Lightspeed eCom (E) subscription plan. Upgrade to access additional features, such as discount coupons and the ability to sell products on social media, or downgrade if you do not need the features available in an upgraded package.
- Sign into BackOffice as the Business Owner or an employee with the relevant permissions.
- Click ‘Integrations’ and select ‘eCommerce’.
- Click ‘Upgrade eCommerce Plan’.
Only the Business Owner and employees with ‘Manage Account’ and ‘Manage eCommerce Integration’ permissions can view and select a package.
- Select a Lightspeed eCom (E) package.
- If upgrading your existing package, you will be charged a prorated fee within 1 – 2 business days for the rest of the current monthly billing cycle. For each following month, the full package amount will be charged.
- If downgrading your existing package, you will immediately lose access to all features not included in the selected package. To downgrade to the eCommerce package included free with select Lightspeed Retail plans, contact us by submitting a case here.
- Review the billing details for the selected package, then click ‘Change Package’.
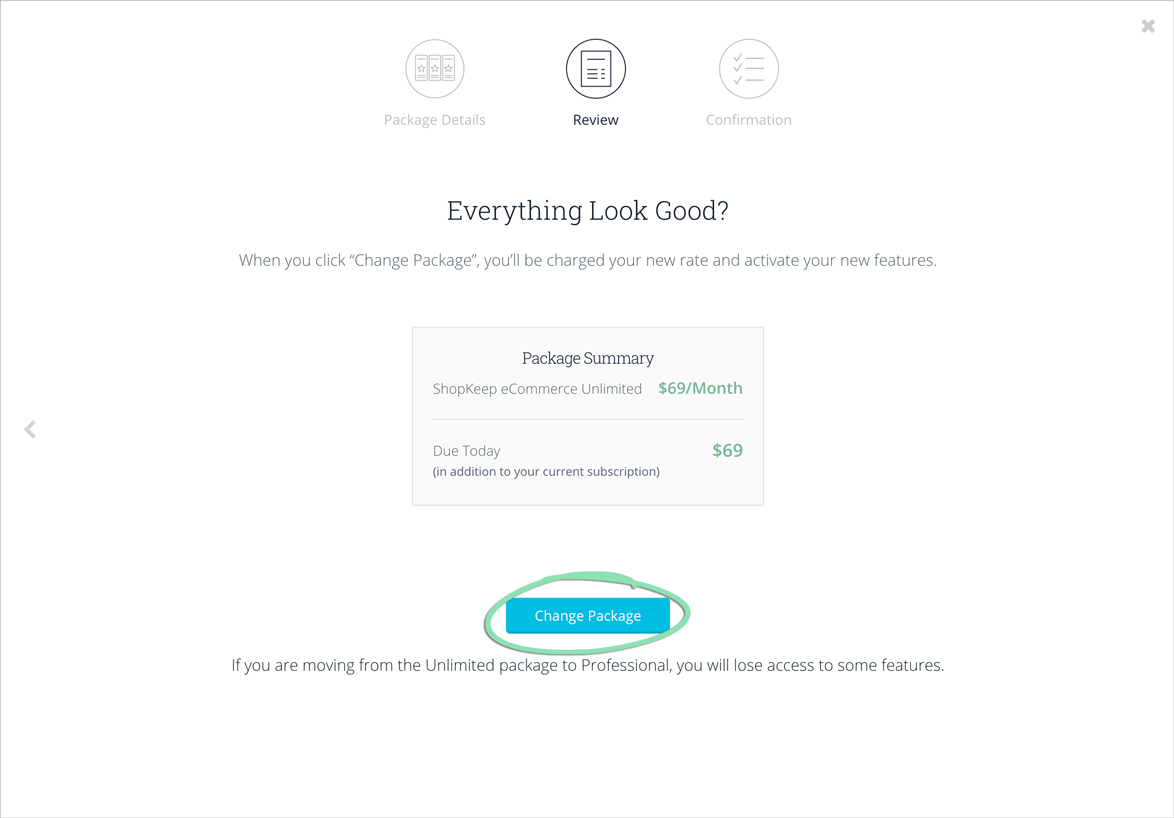
- Click ‘Start Using Your New Features’ to return to the BackOffice eCommerce page.

Item Setup
Most BackOffice inventory items automatically sync to Lightspeed eCom (E), but items must be manually enabled before they will appear in the online store. After reviewing how item syncing works, customize synced items with photos and descriptions, if desired, and enable them for sale online.
Item Syncing
Let’s take a look at how items sync from BackOffice to Lightspeed eCom (E), which item properties sync, and what types of items do not sync to Lightspeed eCom (E)1.
Having issues with items syncing to Lightspeed eCom (E)? Visit our troubleshooting guide for help.
When the integration is enabled, inventory items present in BackOffice automatically sync to Lightspeed eCom (E). After that, new items will automatically sync as they are added to BackOffice. Synced items are initially disabled in Lightspeed eCom (E) and do not appear for sale in your online store until you manually enable them. If you modify or delete items in BackOffice, those changes will also sync. Synchronization is one-way, so items added, modified, or deleted in Lightspeed eCom (E) will not sync to BackOffice. Items deleted via the eCommerce Dashboard will automatically resync to Lightspeed eCom (E) the next time those items are edited in BackOffice.
Quantity on hand of items will update in both BackOffice and Lightspeed eCom (E) as items are sold and returned at the Retail POS (S-Series) app, adjusted and received in BackOffice, and sold online through Lightspeed eCom (E). Quantity on hand will not update in BackOffice if it is manually adjusted in Lightspeed eCom (E) or if an order is canceled or refunded.
Item names, prices, quantities on hand, SKUs, modifiers, and variants all sync from BackOffice to Lightspeed eCom (E).
Unit priced items, open priced items, “NO” option modifiers, and all other item properties not specifically mentioned above will not sync from BackOffice to Lightspeed eCom (E).
Customize Synced Items
Customize synced inventory items to add product photos, descriptions, and shipping weights. Each step is optional, so do only what matches your business needs.
Changes made to items in Lightspeed eCom (E) will not sync to BackOffice. Editing names, prices, quantities on hand, SKUs, modifiers, or variants in Lightspeed eCom (E) will create discrepancies with BackOffice.
- From the eCommerce Dashboard, click 'Catalog' and select 'Products'.
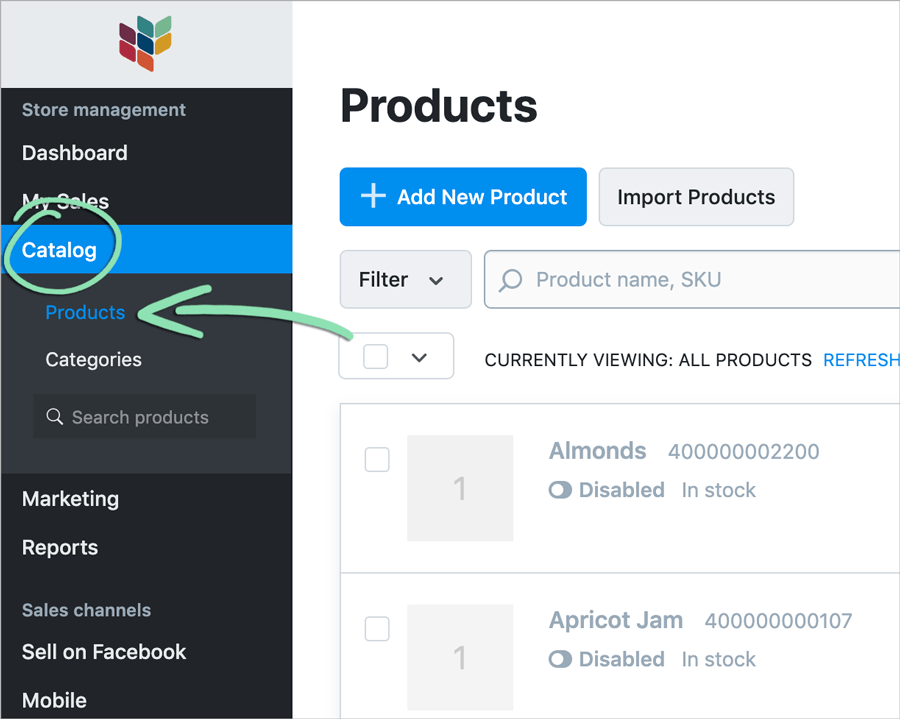
- Click 'Edit Product' next to an item.

- Select 'General'.

- (Optional) To add images to the product page of the item, click 'Upload Images', select one or more image files, and click 'Open'.
Each image file must be less than 20MB.


- (Optional) Enter a description to appear on the product page of the item.
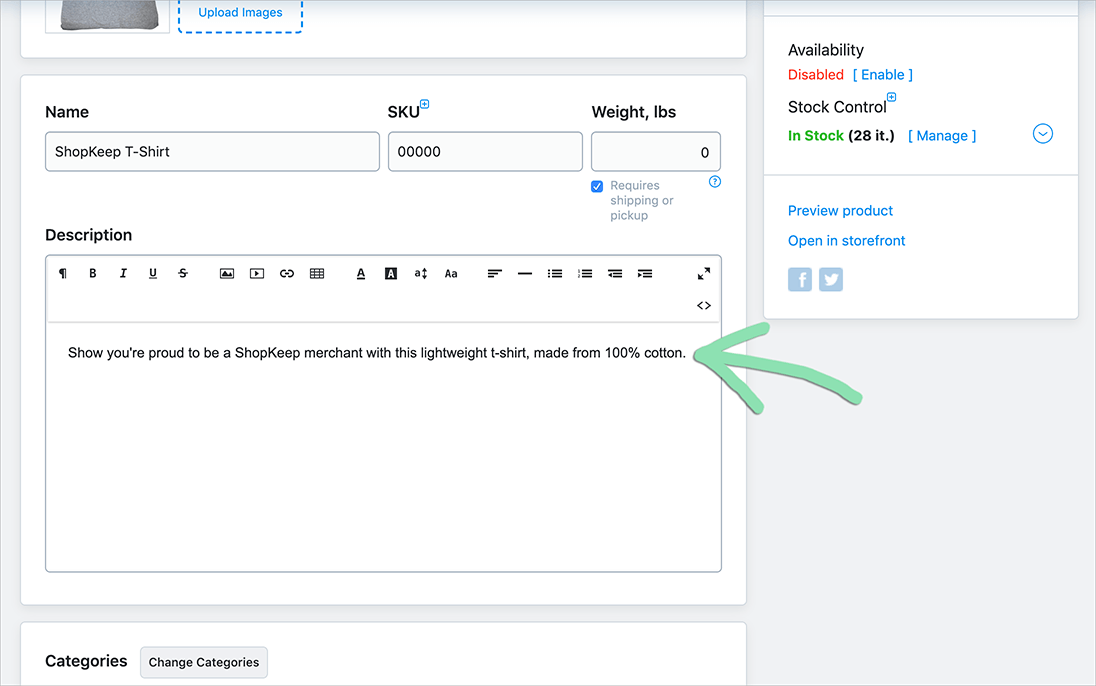
- (Optional) Enter a shipping weight.
This is used to automatically calculate shipping charges after adding a shipping method.

- Click 'Save' to save changes.

- (Optional) Repeat steps 1 - 7 as needed to customize additional items.
To learn how to organize items into categories to help your customers navigate the online store, visit our Advanced Topics article.
Learn about additional ways to customize synced items here.
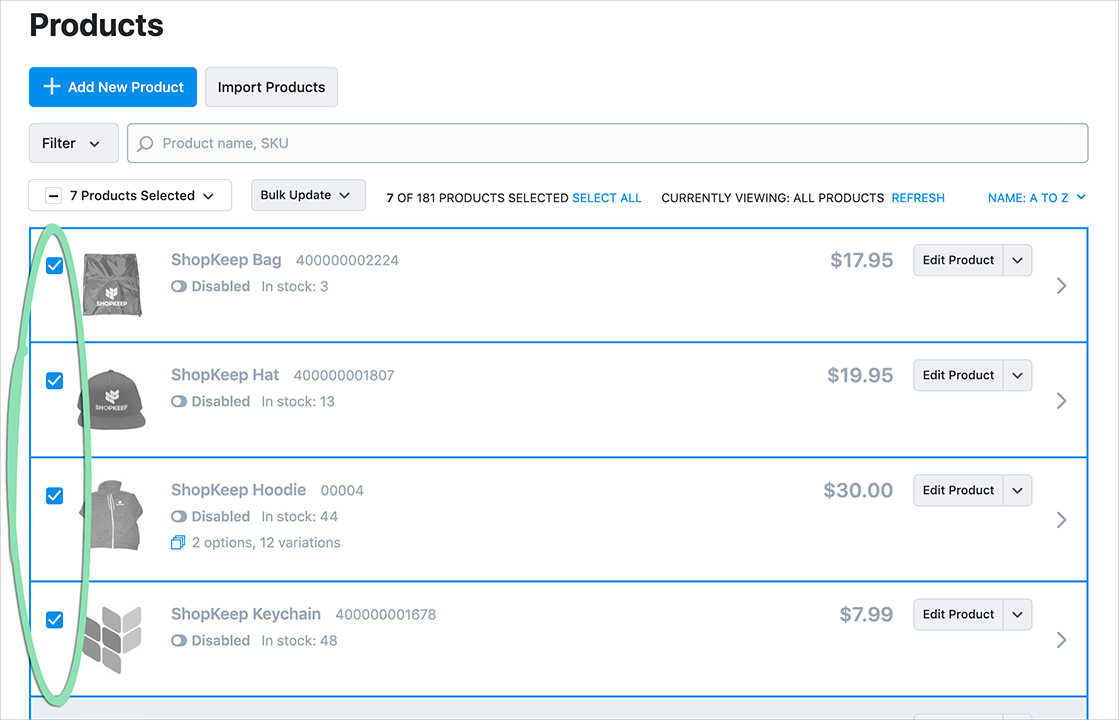
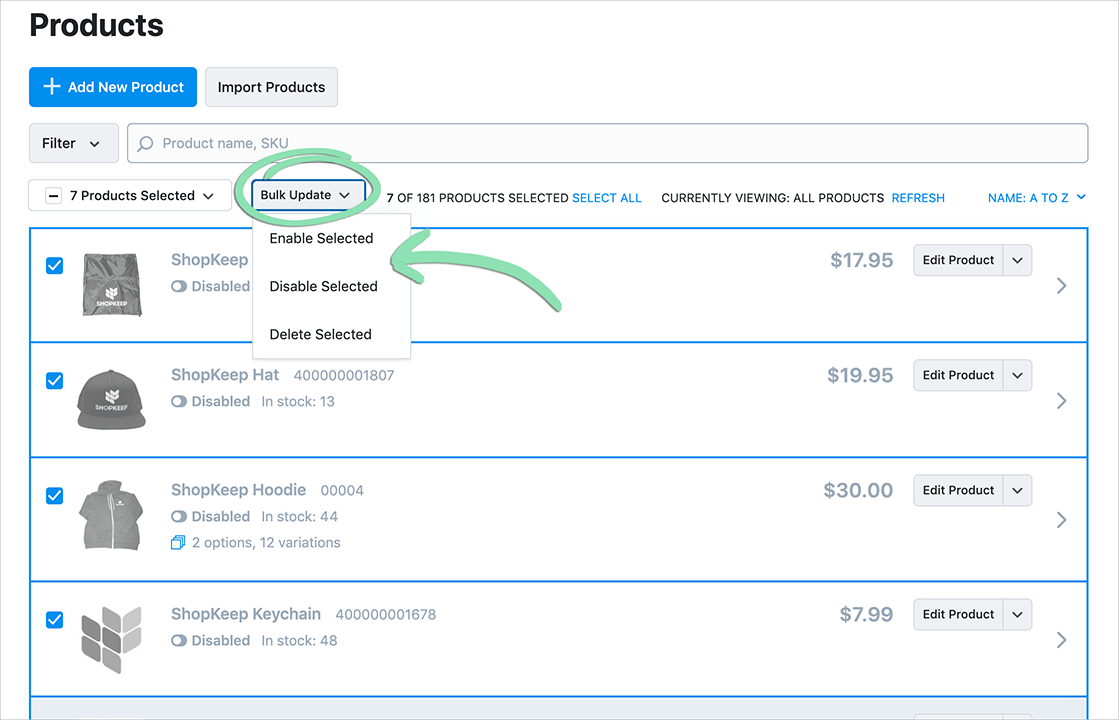
Enable and Disable Items
Enable inventory items to make them immediately available for purchase on your online store and disable items to prevent from being sold online. By default, items are disabled after syncing to Lightspeed eCom (E) and stay that way until they are manually enabled.
After enabling items, visit our Advanced Topics article to learn how to advertise and sell items on other platforms, such as Facebook and Google.
- From the eCommerce Dashboard, click 'Catalog' and select 'Items'.
- Enable or disable items one at a time or in bulk.
- To enable or disable a single item, toggle the switch under the item name.

- To enable or disable multiple items, check the boxes next to one or more items, then click ‘Bulk Update’ and select ‘Enable’ or ‘Disable Selected’.
Store Settings
Configure webstore settings by entering business information, setting up taxes, adding shipping, delivery, and pickup methods, deciding how to accept payment for orders, and enabling optional features such as order comments and tipping.
Some settings require an upgraded Lightspeed eCom (E) plan. For information on upgrading, visit the Select a Package section above.
Business Information
Enter the store name, company name, email address, and company address that will appear on order confirmations and other emails sent to customers.
- From the eCommerce Dashboard, click 'Settings' and select 'General'.

- Click 'Store Profile'.
- Fill in as much of the store profile as desired, but leave 'Store location' blank.
‘Store location’ is configured by default as the URL of the online store.

- Click ‘Save’ to save changes.
Taxes
Manage tax settings to ensure the correct tax amount is charged for every order, no matter where a customer orders from. Set up a separate tax for each state or location in which your business has a sales tax nexus to charge tax on orders placed from those locations.
Orders with multiple tax rates and orders where tax is charged on shipping costs do not sync to the Retail POS (S-Series) app via the eCommerce online ordering feature, do not appear in BackOffice or Lightspeed Pocket reporting, and must be processed from the eCommerce Dashboard.
IMPORTANT: Sales tax figures in order reporting are estimates based on how you have configured your tax settings. For official filings, always verify the current applicable local tax rates, then manually calculate tax using net taxable and non-taxable revenues. Be aware that tax laws can change at any time and you should contact a tax professional for specific tax advice regarding your business.
- Create a destination zone for a location where your business has a sales tax nexus or physical presence.a From the eCommerce Dashboard, click ‘Shipping & Pickup’ and select ‘Zones’.
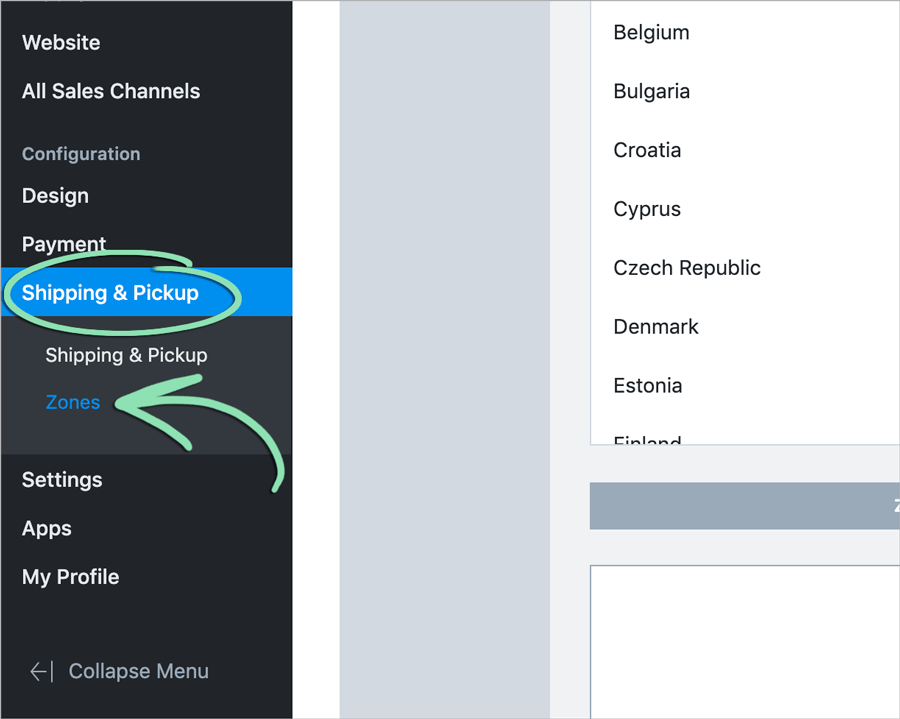 b Click ‘Add New Zone’.
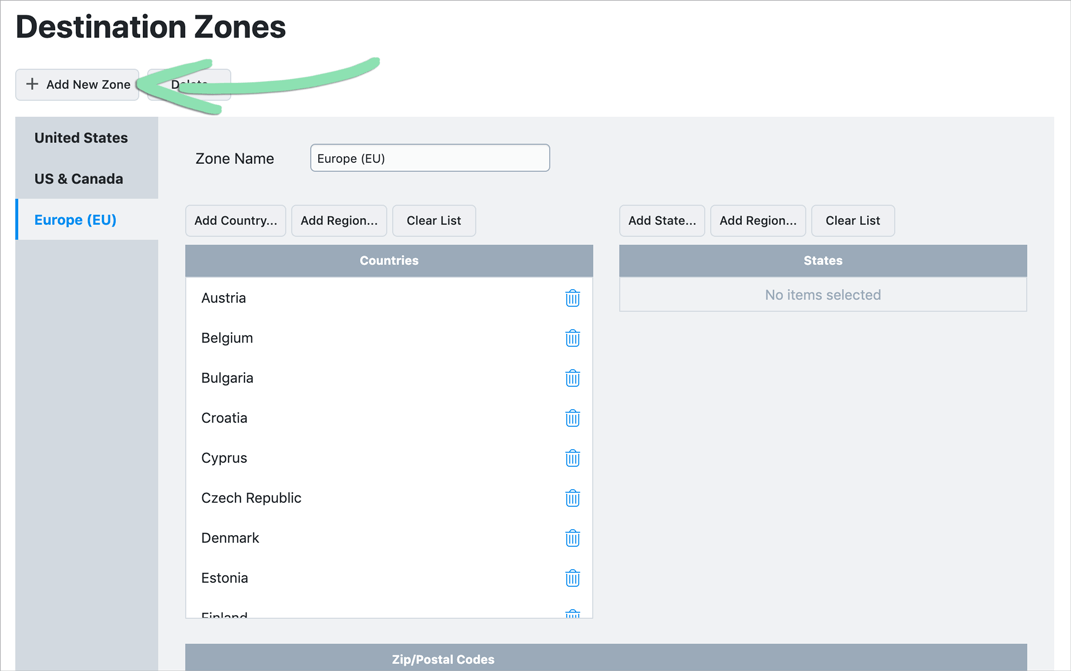 c Enter a name for the zone.
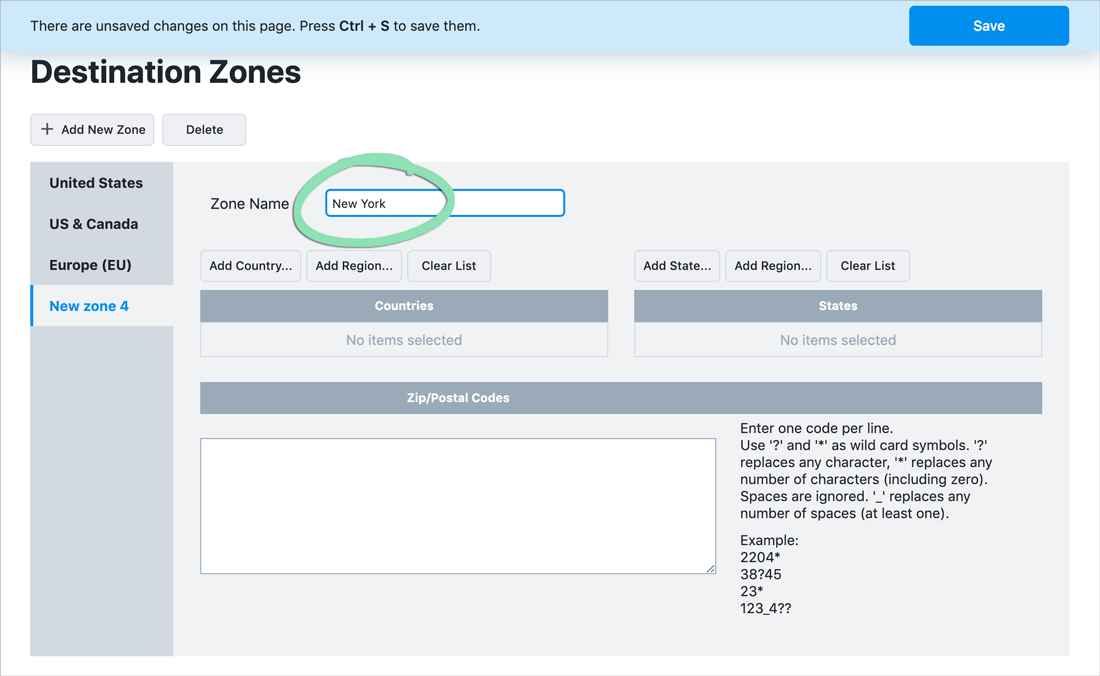 d Click ‘Add State’ or ‘Add Region’, then click the + next to a state or region where your business has a sales tax nexus or physical presence.
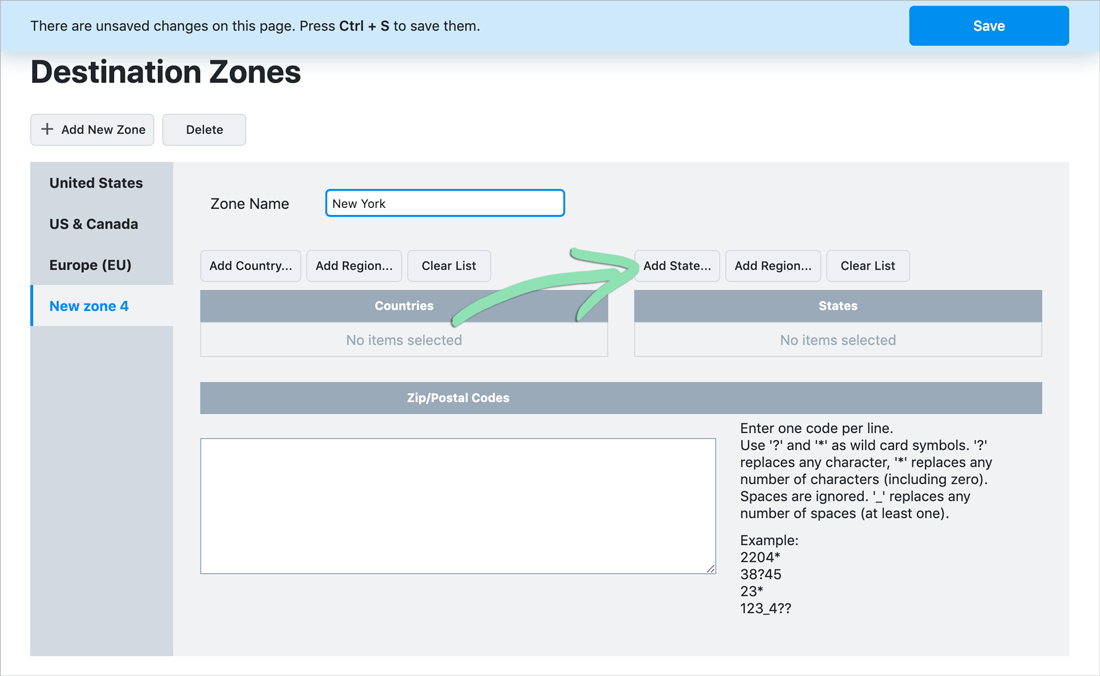
 e Click ‘Save’ to save changes.Learn more about managing destination zones here.
 - Click 'Settings' and select 'Taxes'.
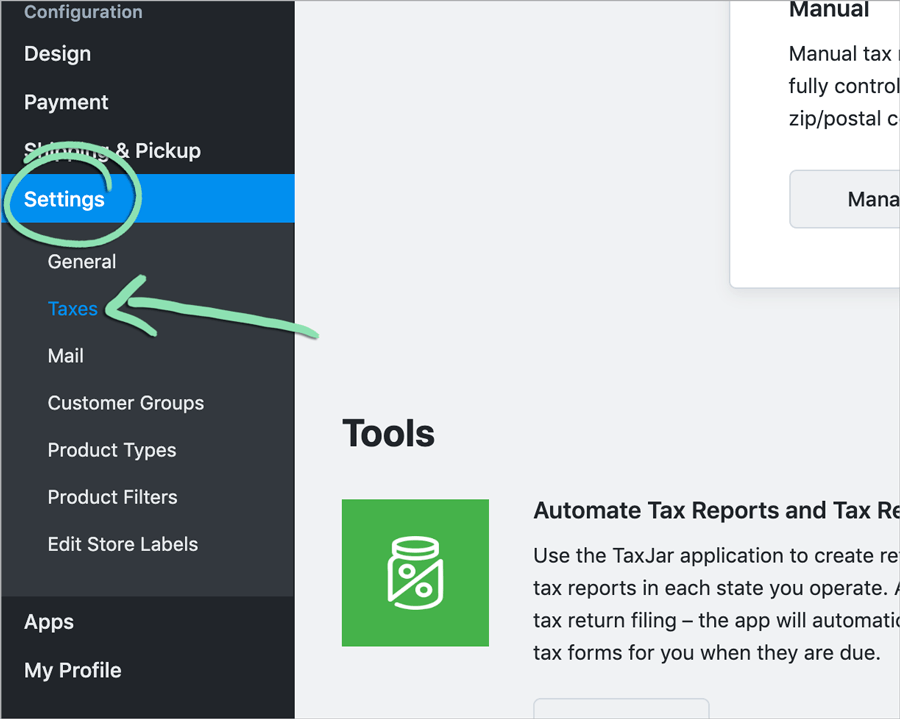
- Click 'Manage Tax Rates'.
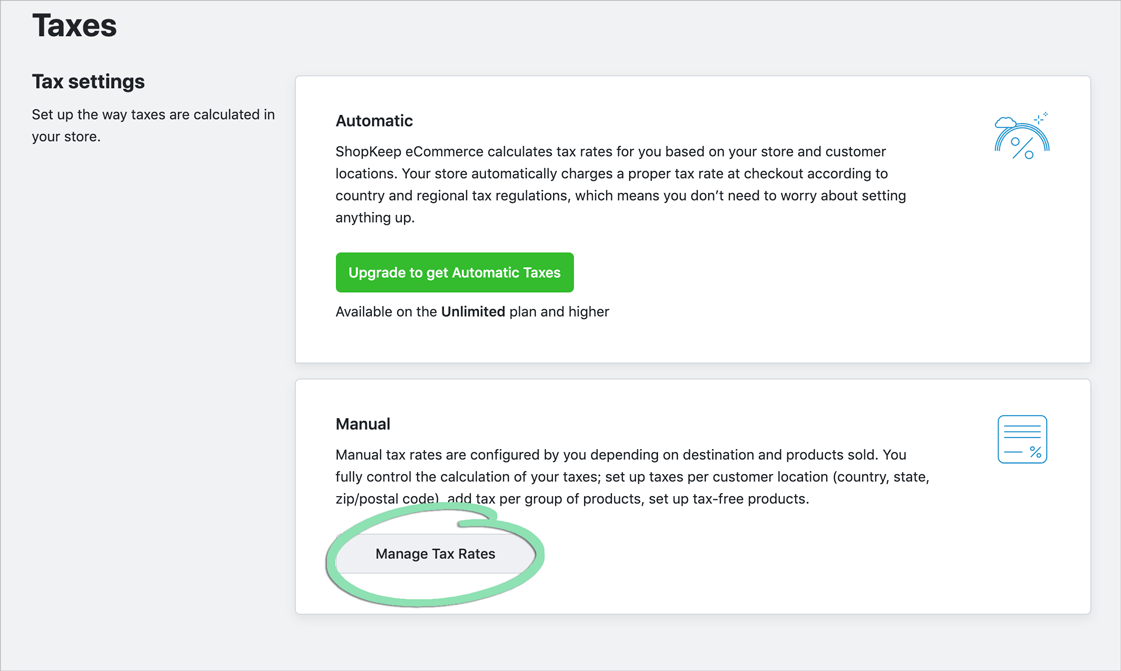
- Click 'Add New Tax'.

- Fill in the tax details.
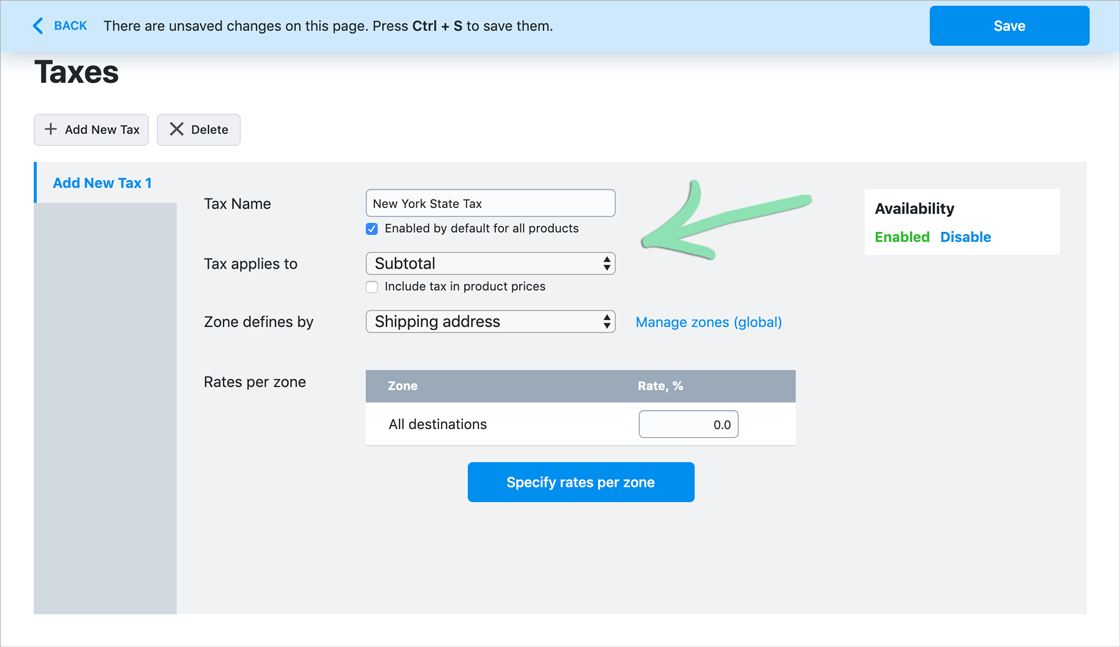
Tax Name | Name of the tax. This appears on the customer checkout page of the online store.
Enabled by default for all products | When checked, the tax will be automatically applied to all products.
Tax applies to | Select whether to apply tax to the order subtotal or to the subtotal plus shipping costs. If charging tax on shipping, orders with shipping costs will not sync to the Retail POS (S-Series) app via the eCommerce online ordering feature, will not appear in BackOffice or Lightspeed Pocket reporting, and will need to be processed from the eCommerce Dashboard.
Include tax in product prices | If checked, the prices displayed for items in the online store will be adjusted to include tax.
Zone defines by | Select whether to charge the tax based on the shipping address or the billing address of the customer.
Rates per zone | Enter a rate to apply to orders from all destination zones or add zone-specific rates. - Click 'Specify rates per zone'.
- Select the zone created in step 1 and enter the tax rate to charge for orders placed from that location.

- Click 'Save' to save changes.
- Repeat steps 1 - 8 for each additional state or location where your business has a sales tax nexus.
Learn more about managing taxes here.
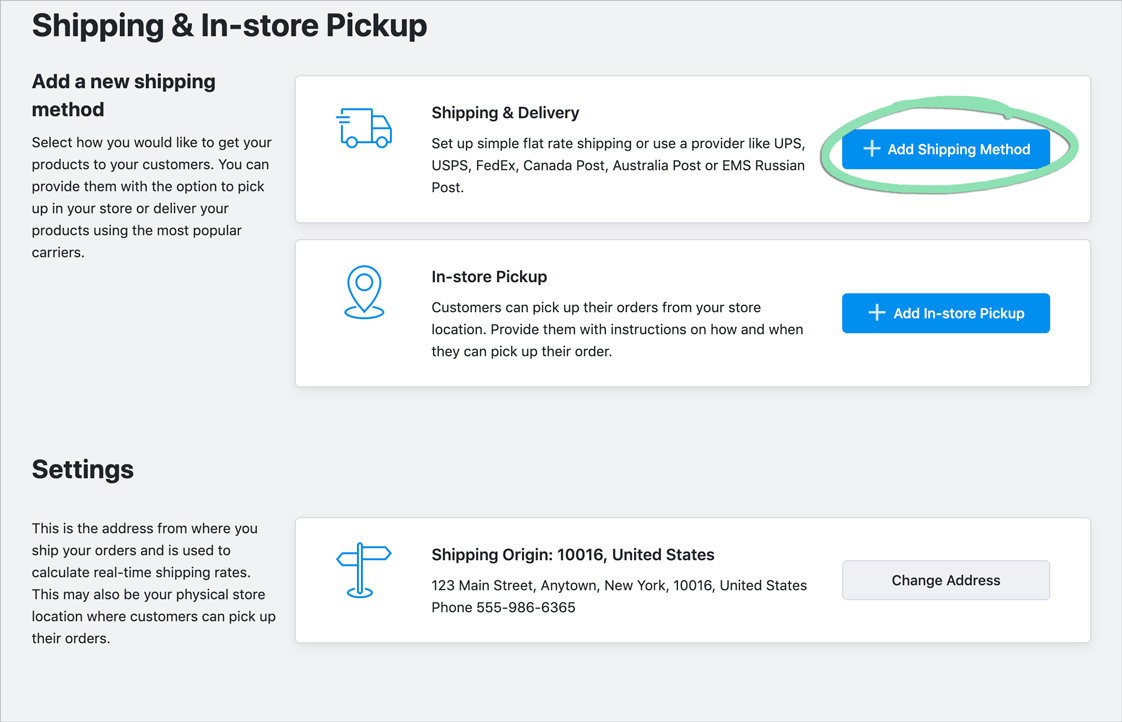
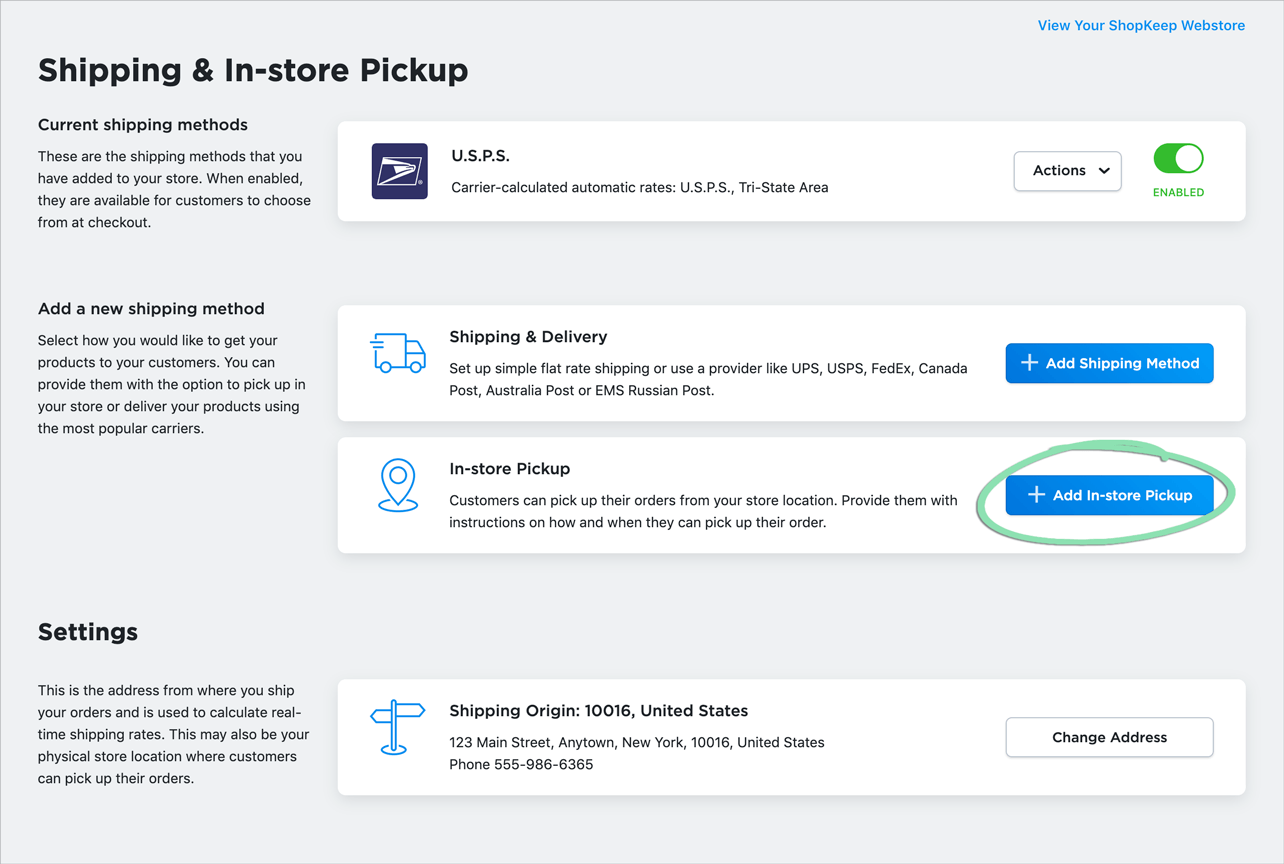
Shipping, Delivery, and Pickup
Set up shipping, delivery, and in-store pickup options to allow customers to get their order shipped or delivered directly to them via USPS, UPS, FedEx, local services, etc. or to pick up their order in store.
Orders where tax is charged on shipping costs do not sync to the Retail POS (S-Series) app via the eCommerce online ordering feature, do not appear in BackOffice or Lightspeed Pocket reporting, and must be processed from the eCommerce Dashboard.
- From the eCommerce Dashboard, click 'Shipping and Pickup' and select 'Shipping and Pickup'.

- Click 'Add Shipping Method'.
- To set up shipping via a third-party shipping carrier, click ‘Set Up’ next to a carrier and follow the prompts.
To restrict shipping to a specific region, add a shipping markup, or enter a default package size for automatically calculating shipping rates, click ‘Edit’ next to a shipping method after adding it.
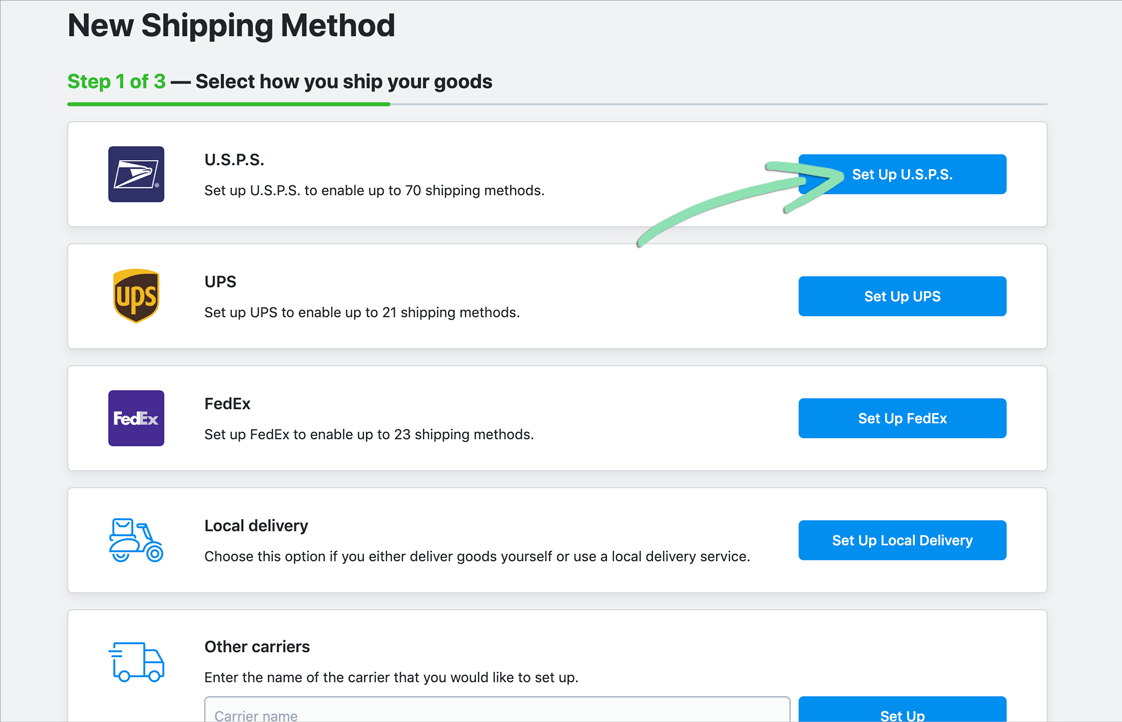
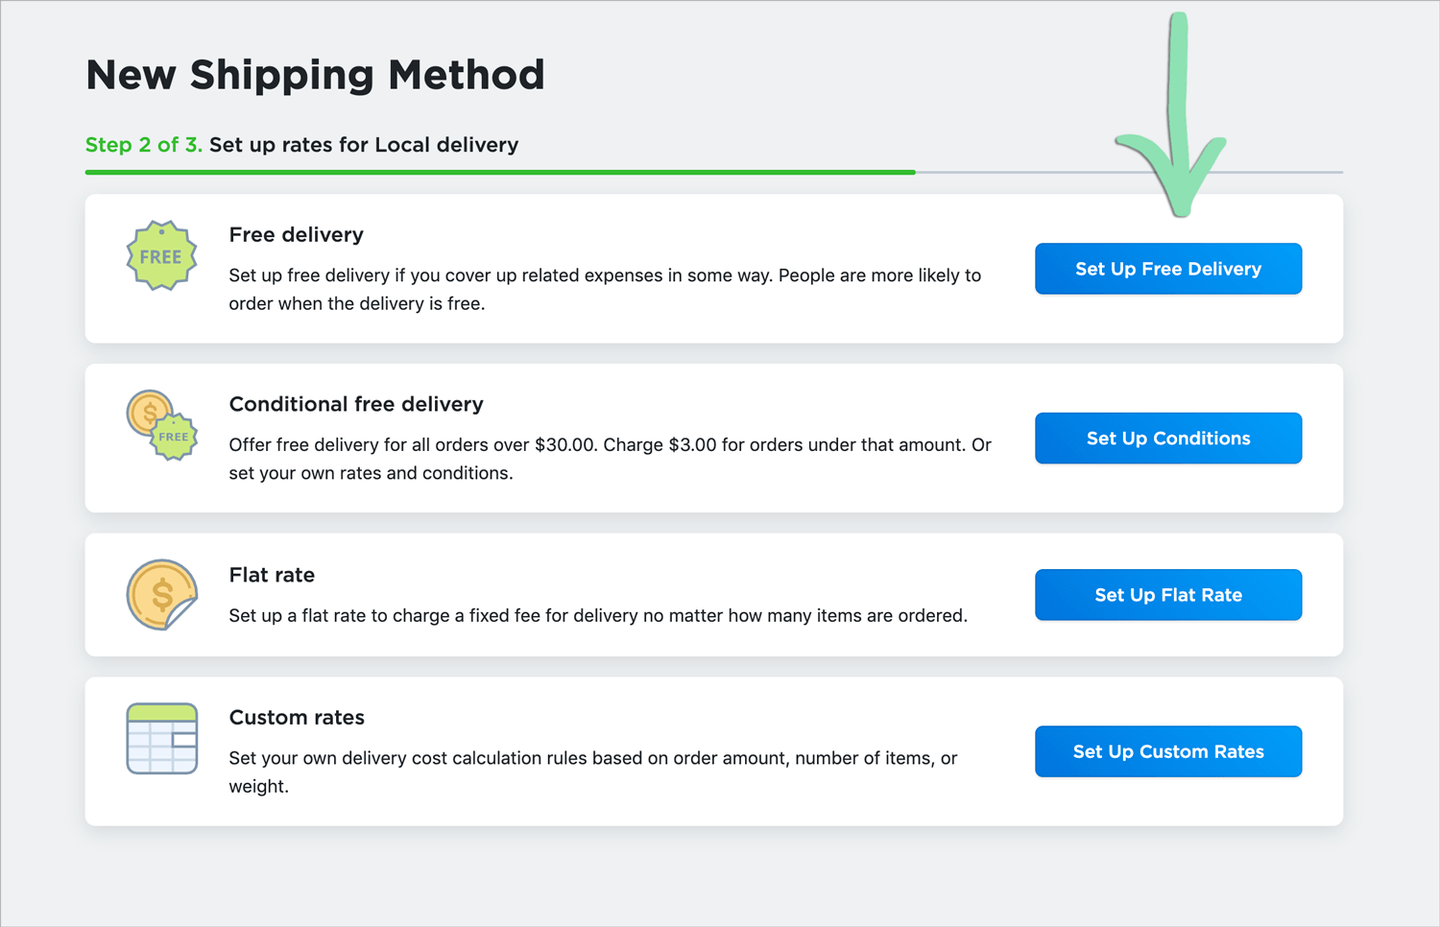
- To set up delivery using your own drivers or a local delivery service, follow steps 4a to 4d below.a Click ‘Set Up Local Delivery’, then select how to charge customers for delivery.Offer free delivery for all orders or orders over a certain total, charge a flat rate, or charge a custom rate based on order subtotal or weight.

 b Enter a customer-facing name for the delivery option, and set up the delivery fee (if applicable).
 c (Optional) Enable additional features for managing how and when the delivery method can be used by customers.Add description for customers | Enter text that will appear below the name of the delivery method when customers select it at checkout.
Limit availability by order subtotal | Enter a minimum order subtotal required to select this delivery method at checkout.
Limit availability to operating hours | Schedule the hours during which customers are able to use this delivery method. This feature requires an upgraded Lightspeed eCom (E) plan. For information on upgrading, visit the Select a Package section above.
Set delivery zone | Select a shipping region to limit deliveries to. Orders with a delivery address outside this area will be unable to be completed.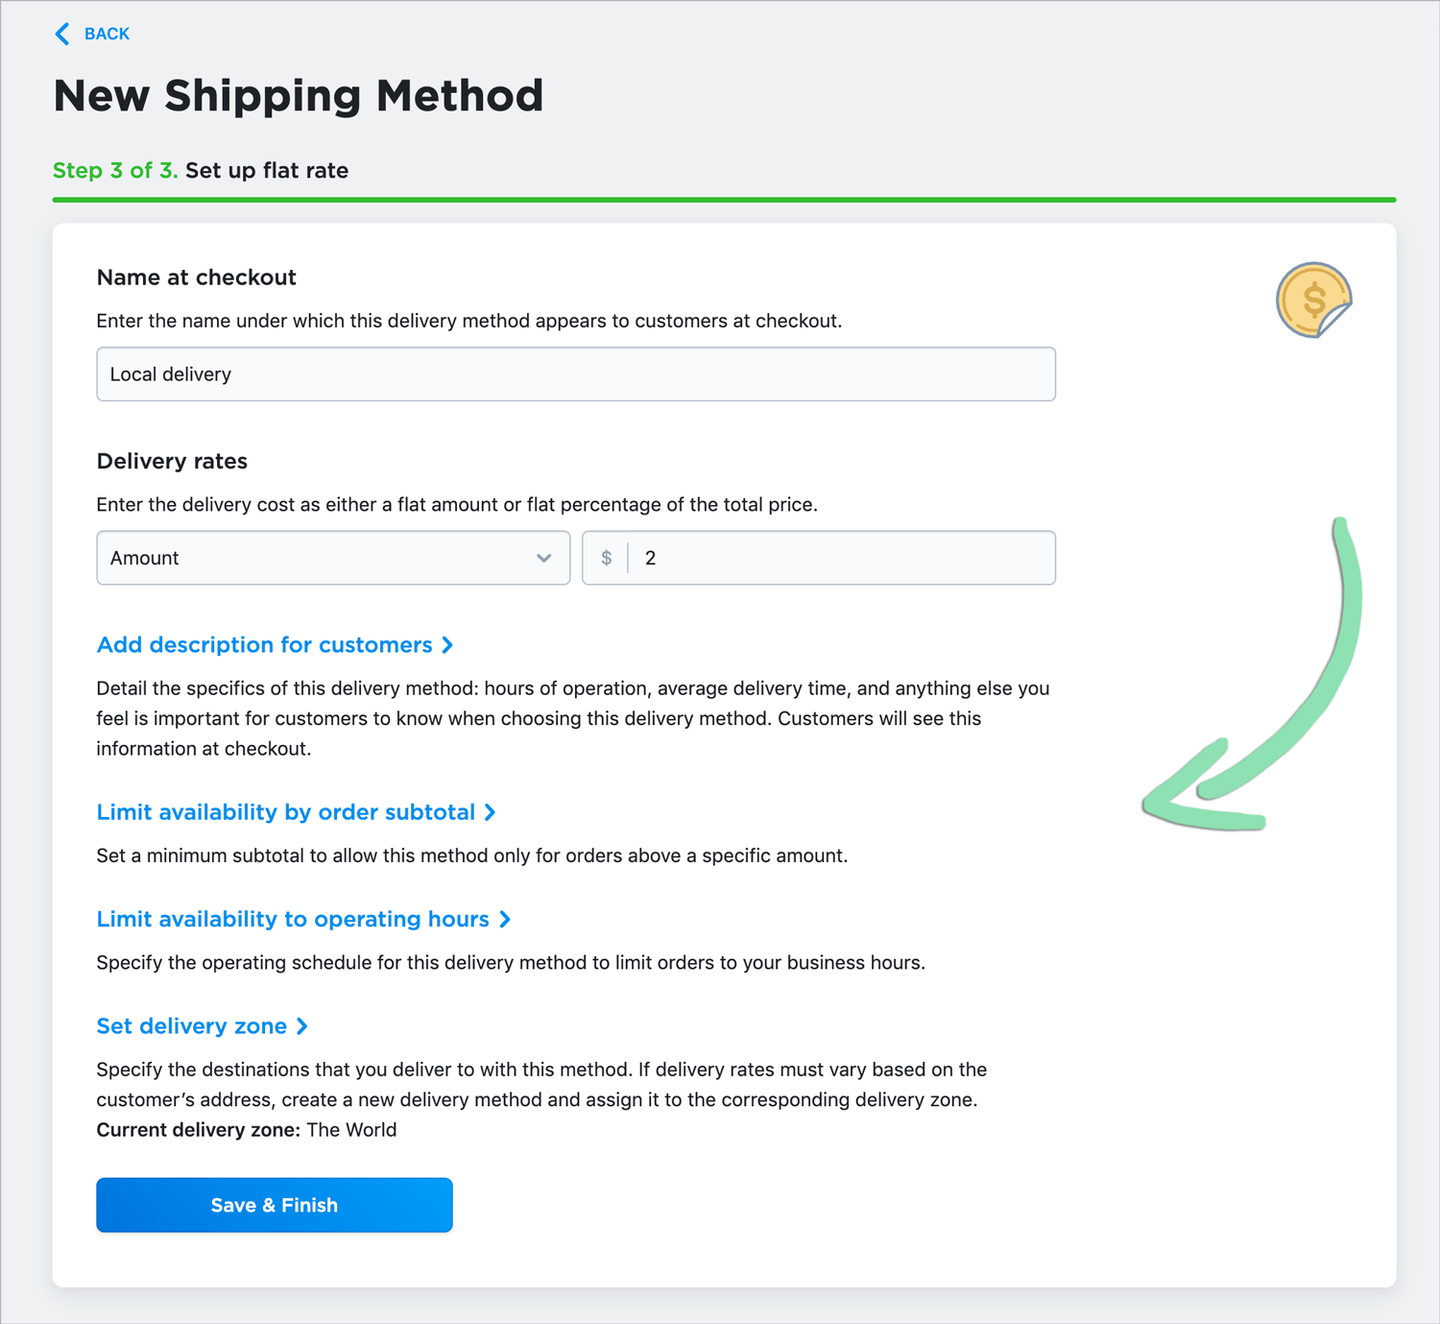 d Click ‘Save & Finish’.
 - (Optional) Repeat steps 3 and/or 4 to add additional shipping or delivery methods.
- Verify the 'Shipping Origin' is correct. If necessary, click 'Change Address' to enter a new address.
Learn more about managing shipping options here.

- From the eCommerce Dashboard, click 'Shipping and Pickup' and select 'Shipping and Pickup'.
- To set up in-store pickup, click ‘Add In-store Pickup’.
- Fill in the details for the in-store pickup option.

Pickup option’s label | Name of the pickup option. This appears on the customer checkout page of the online store.
Detailed instructions for customers | Anything customers must know or do to be able to pick up their order. This appears on the customer checkout page after selecting the pickup option.
Pickup charge | How much extra you will charge for in-store pickup. This appears as a shipping charge on the order after the customer selects the pickup option. - (Optional) Allow customers to schedule a pickup date and time for their order.
The pickup date and time a customer selects can be viewed when processing the order via the eCommerce Dashboard or the Retail POS (S-Series) app.
This feature requires an upgraded Lightspeed eCom (E) plan. For information on upgrading, visit the Select a Package section above.
a Enable ‘Ask for pickup date and time at checkout’.b Enter your business hours.Customers will only be able to schedule pickups to occur during the hours set here. c Select the number of minutes, hours, or days it takes you to prepare an order for pickup.
- Customers will not be able to schedule a pickup to occur sooner than this amount of time.
- To change the fulfillment time later as your business volume fluctuates, follow the steps here to edit the pickup option.

- Click ‘Add Pickup Option’ to save changes.
Learn more about setting up in-store pickup and managing pickup orders here.
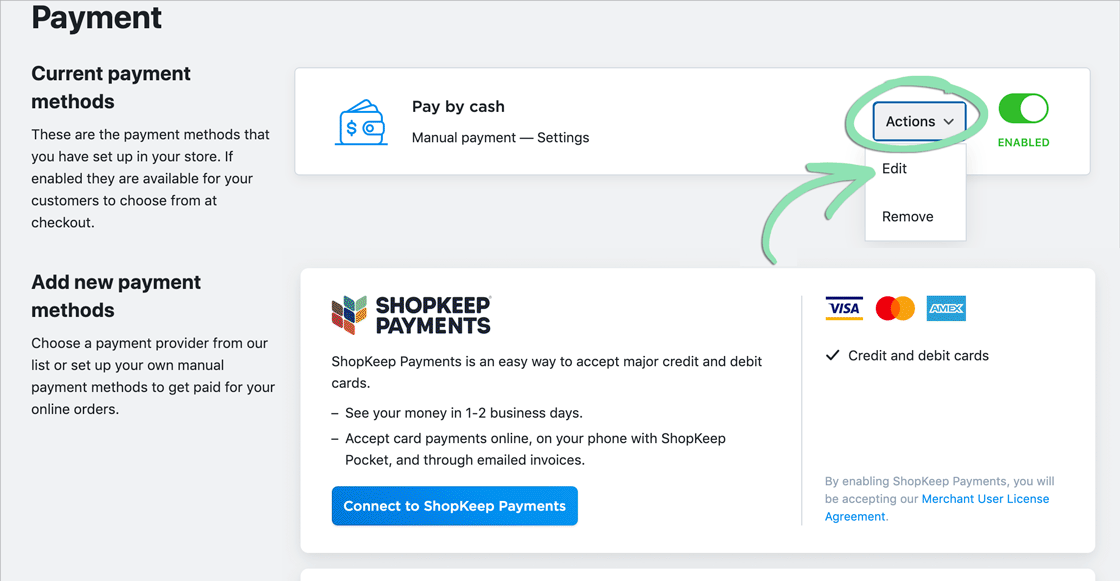
Payments
Select a payment provider to give customers the option to pay for orders online with a credit card. To accept cash payments outside of your online store, edit the default manual payment method to add instructions, or disable this option to not allow cash payments.
- From the eCommerce Dashboard, click 'Payment'.

- Set up credit card processing through ShopKeep Payments by Lightspeed or a third-party provider.
- To set up processing with ShopKeep Payments by Lightspeed, follow the steps below.
The platform for our eCommerce integration accepts the following credit card types through ShopKeep Payments by Lightspeed: Visa, Mastercard, Amex, Discover, Diners Club, JCB, and UnionPay.Once you begin processing online payments with ShopKeep Payments by Lightspeed, you will receive a weekly email statement summarizing the online and mobile payments processed the previous week.
a Follow the steps here to sign up for online payments in BackOffice.b From the ‘Payment’ section of the eCommerce Dashboard, click ‘Connect to ShopKeep Payments’. c If the page prompts you to turn on online payments, toggle the switch to enable the payment method at checkout if it is not already enabled.
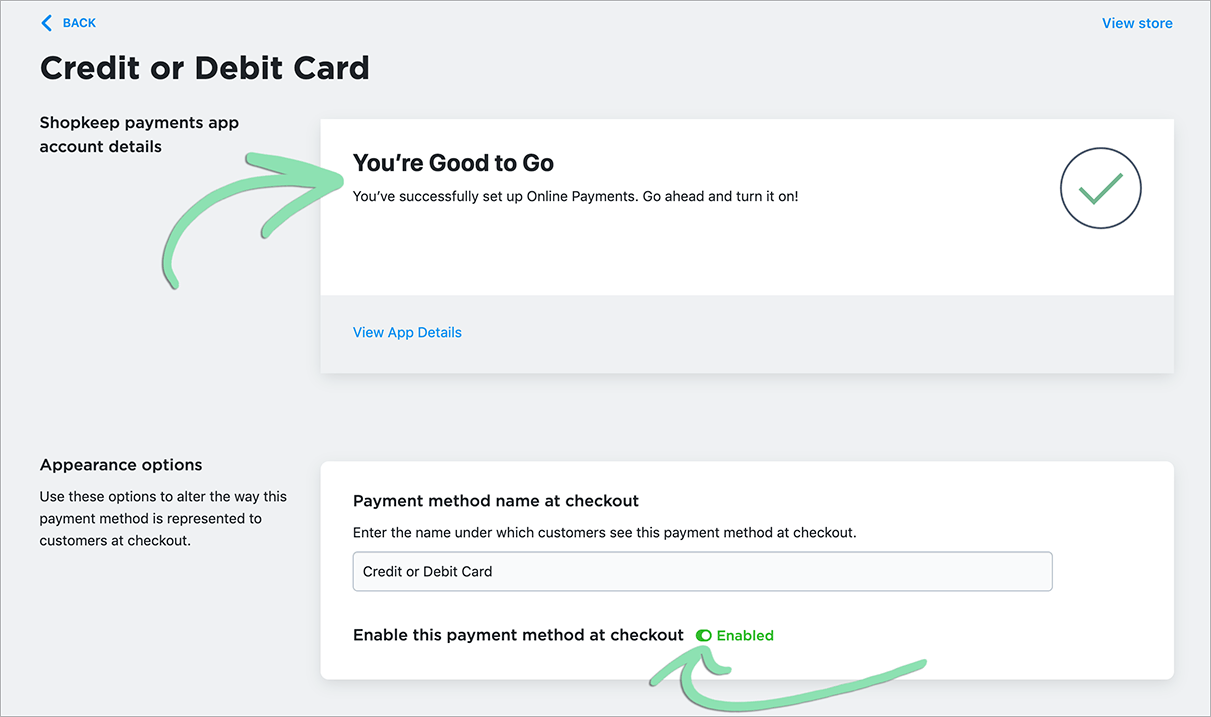
- To set up processing with a third-party provider, select a payment processing option and follow the prompts to complete setup.

- Edit the 'Pay by cash' payment method to add customer instructions for making cash order payments, or disable this option to not allow cash payments.
Learn more about setting up and managing payment methods here.
Order Limits and Comments
Set a minimum and/or maximum dollar amount for orders to prevent customers from placing orders that are too small or large to fulfill, and enable order comments to allow customers to communicate requests or notes they have for the order. Businesses often use order limits if they do not deliver orders under a certain value or to stop unusually large orders from being placed.
The order limits feature requires an upgraded Lightspeed eCom (E) plan. For information on upgrading, visit the Select a Package section above.
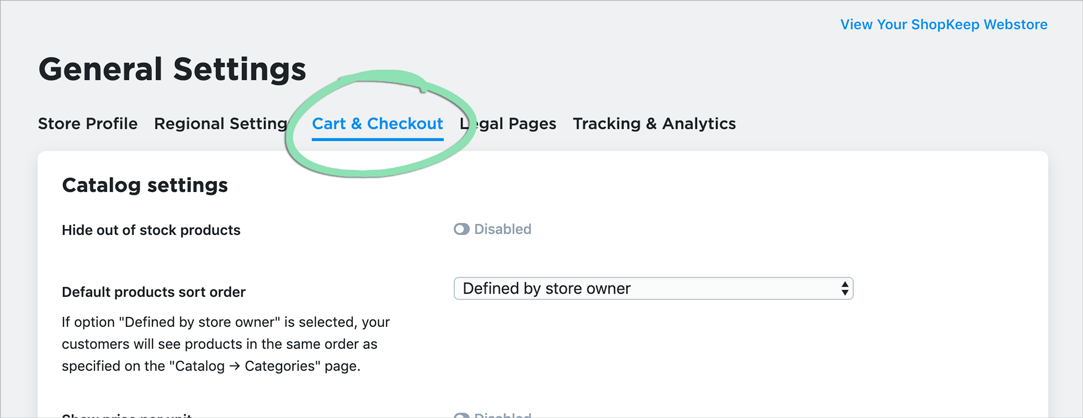
- From the eCommerce Dashboard, click 'Settings' and select 'General'.
- Click ‘Cart & Checkout’.
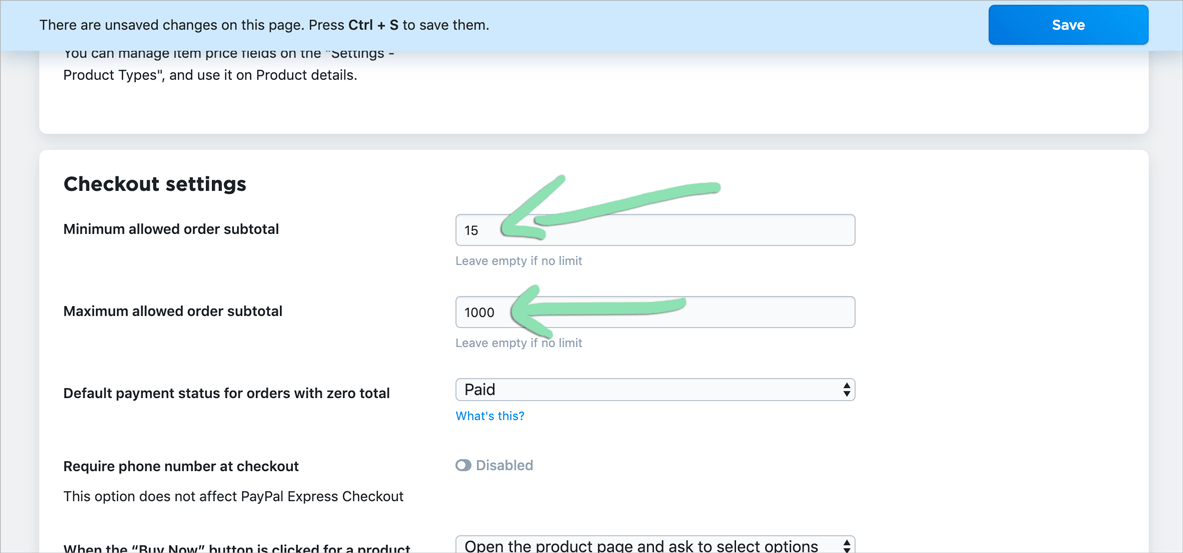
- (Optional) Enter a dollar amount for ‘Minimum allowed order subtotal’ and/or ‘Maximum allowed order subtotal’ to set order limits.
Customers will be unable to complete an order if the subtotal of the order is less than the minimum or greater than the maximum.
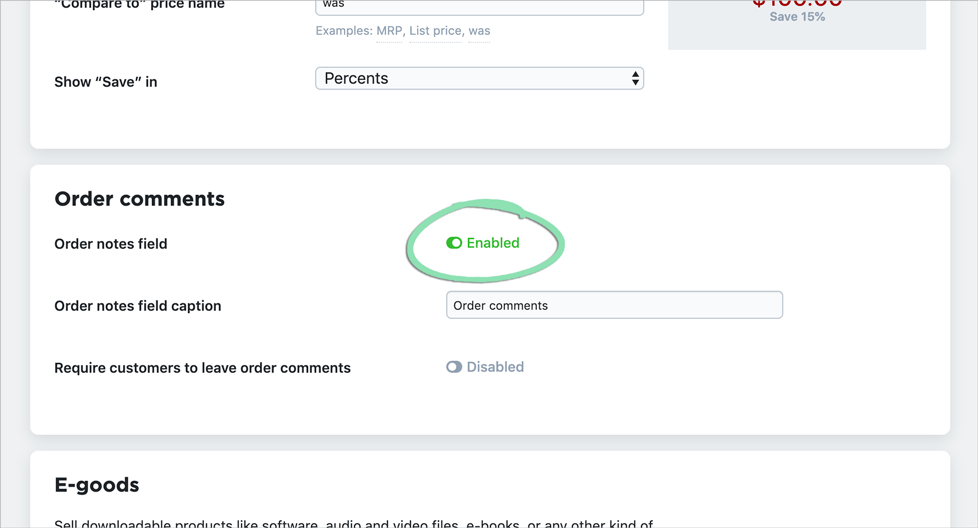
- (Optional) Enable the ‘Order notes field’ setting and configure the settings below it as needed.
Customers will be able to enter a comment for their order that can be viewed when processing the order via the eCommerce Dashboard or the Retail POS (S-Series) app.
- Click ‘Save’ to save changes.
Tips and Gratuity
Allow customers to leave a tip on their Lightspeed eCom (E) order by setting up tips and gratuity. Customize the text that appears on the order gratuity screen, set up amount or percentage-based tip options, and enable the relevant setting to set it live for your webstore.
This feature requires an upgraded Lightspeed eCom (E) plan. For information on upgrading, visit the Select a Package section above.
- From the eCommerce Dashboard, click 'Settings' and select 'General'.
- Click ‘Cart & Checkout’.
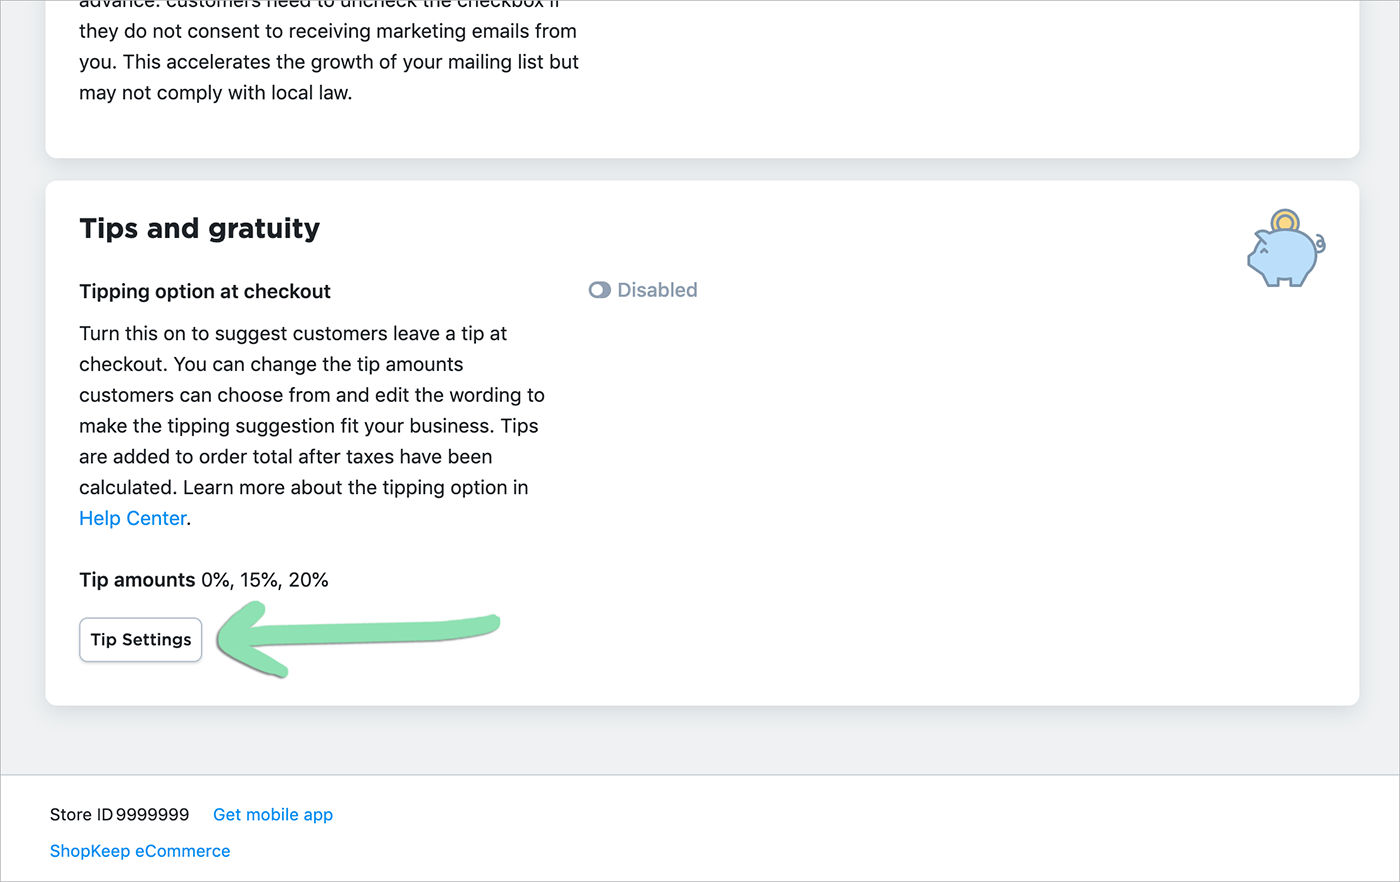
- Scroll down to ‘Tips and gratuity’, then click ‘Tip Settings’.
- Customize the ‘Tip wording’ and ‘Tip amounts’ sections as desired.
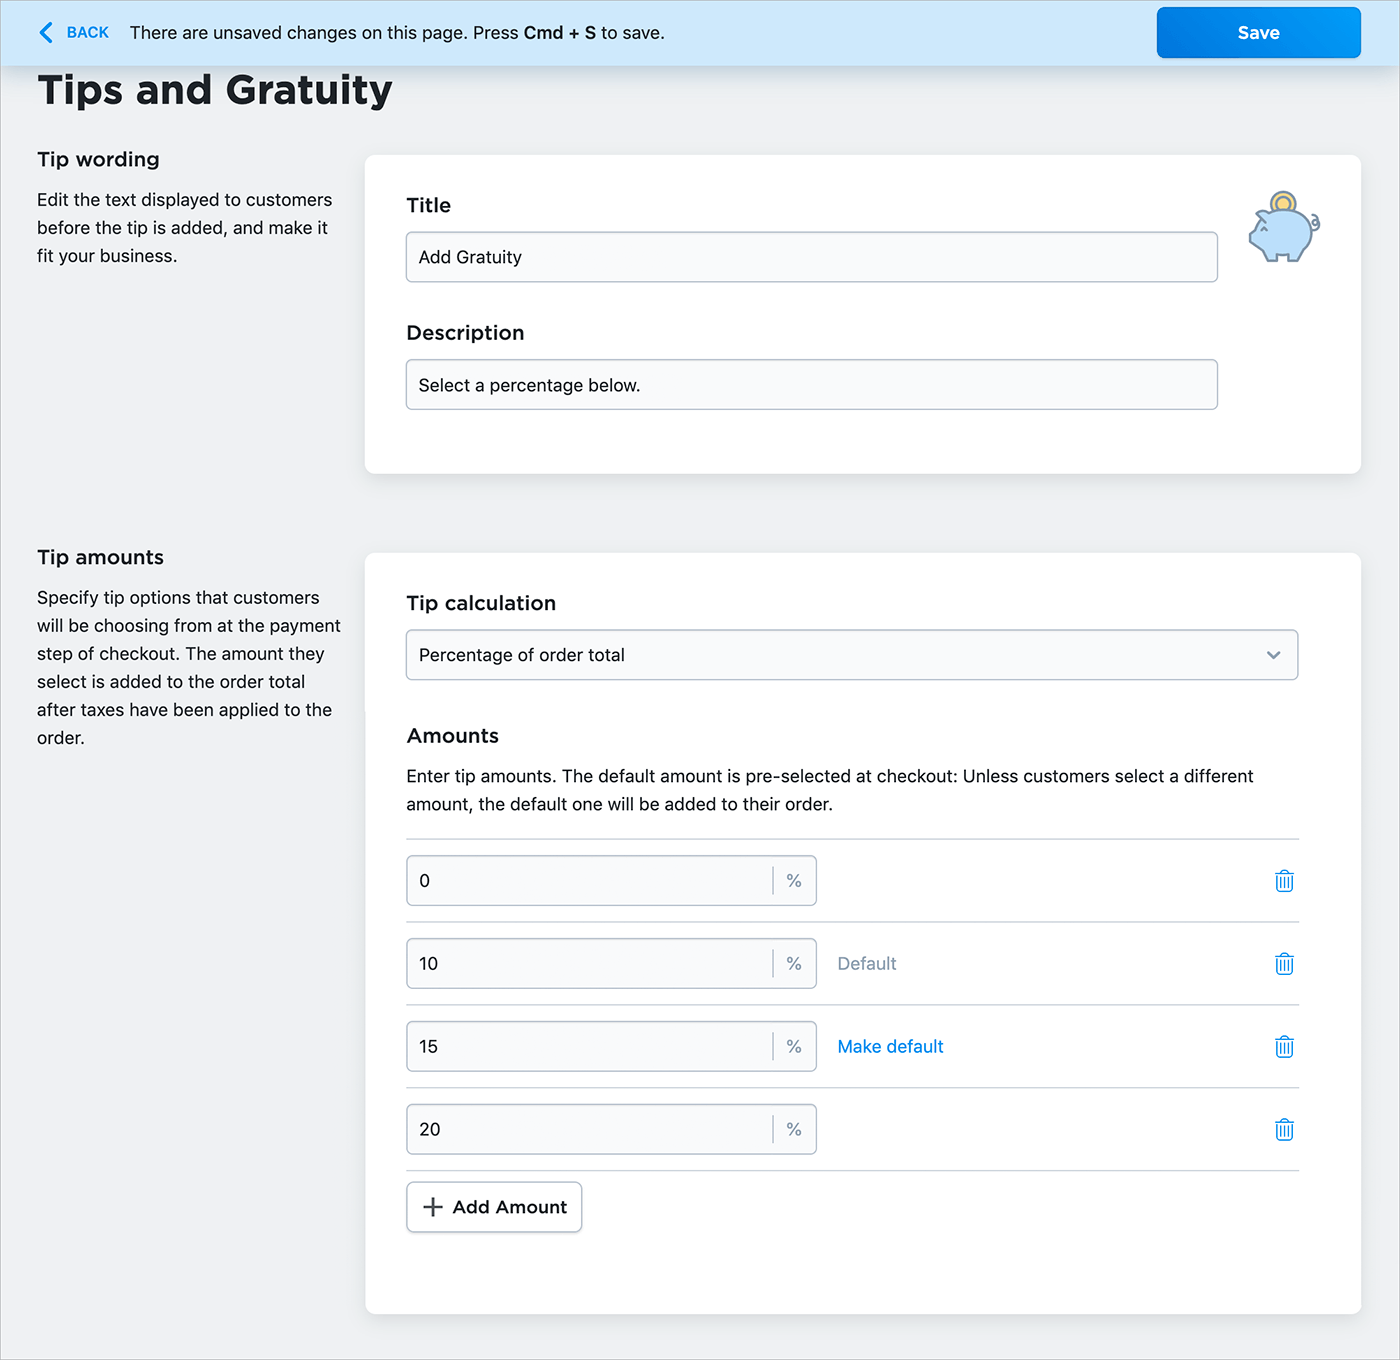
Title | Appears above the tip selection area of the ‘Payment information’ screen during order checkout.
Description | Appears under the ‘Title’.
Tip calculation | Display tip options as percentages of the order subtotal or as fixed dollar amounts.
Amounts | Specific tip percentage or amount options available for customers to select. The ‘Default’ option will be automatically selected at checkout. To give customers the ability to select ‘No tip’, add 0 as an option.
Make default | Sets an existing tip option as the default that will be automatically selected at checkout.
Trash can | Removes an existing tip option.
Add Amount | Adds a new tip option. - Click ‘Save’ to save changes.
- Click ‘Back’ to return to the ‘Cart & Checkout’ page.

- Toggle the ‘Tipping option at checkout’ setting to enable tipping in your webstore.
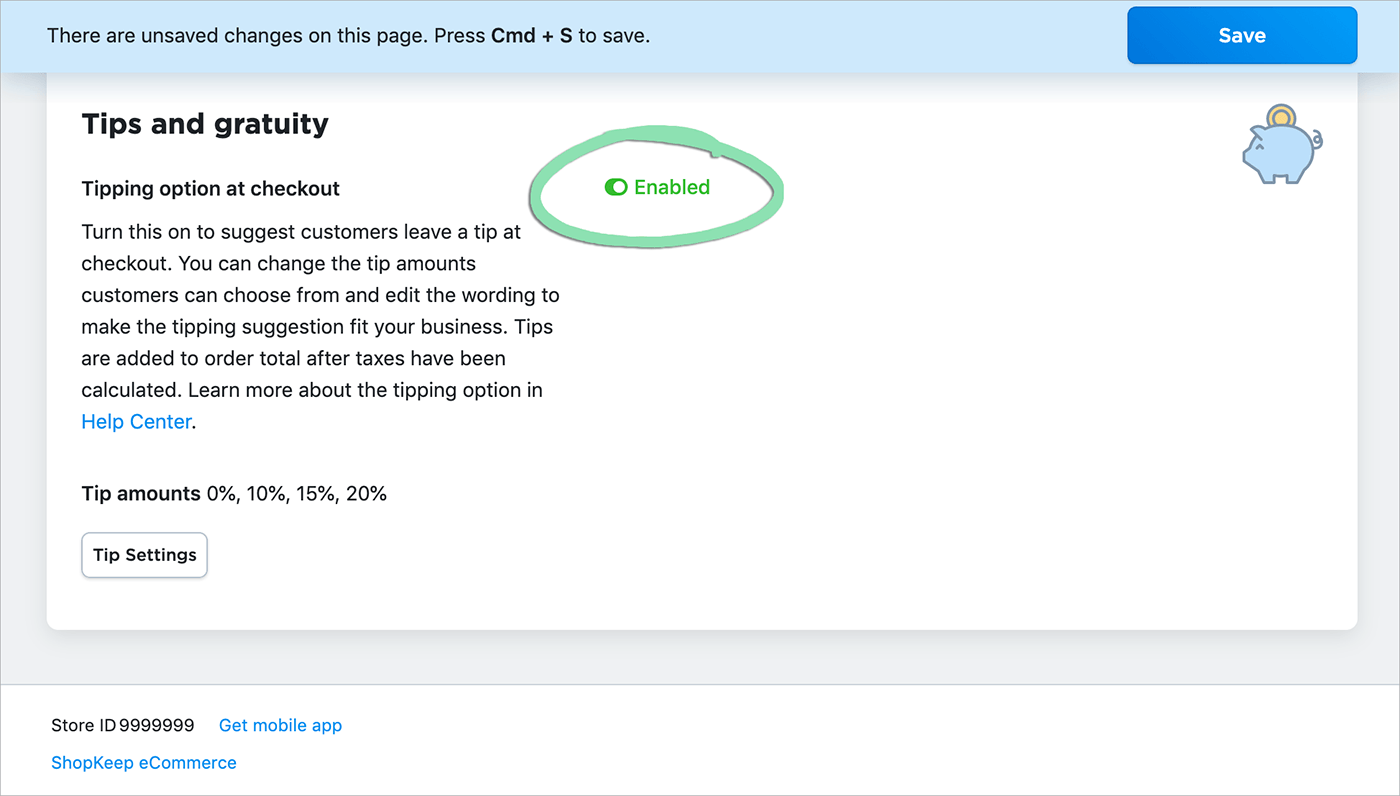
- Click ‘Save’ to save changes.
Preview Your Store
Preview your online store to decide whether additional changes are needed before sharing it with customers.
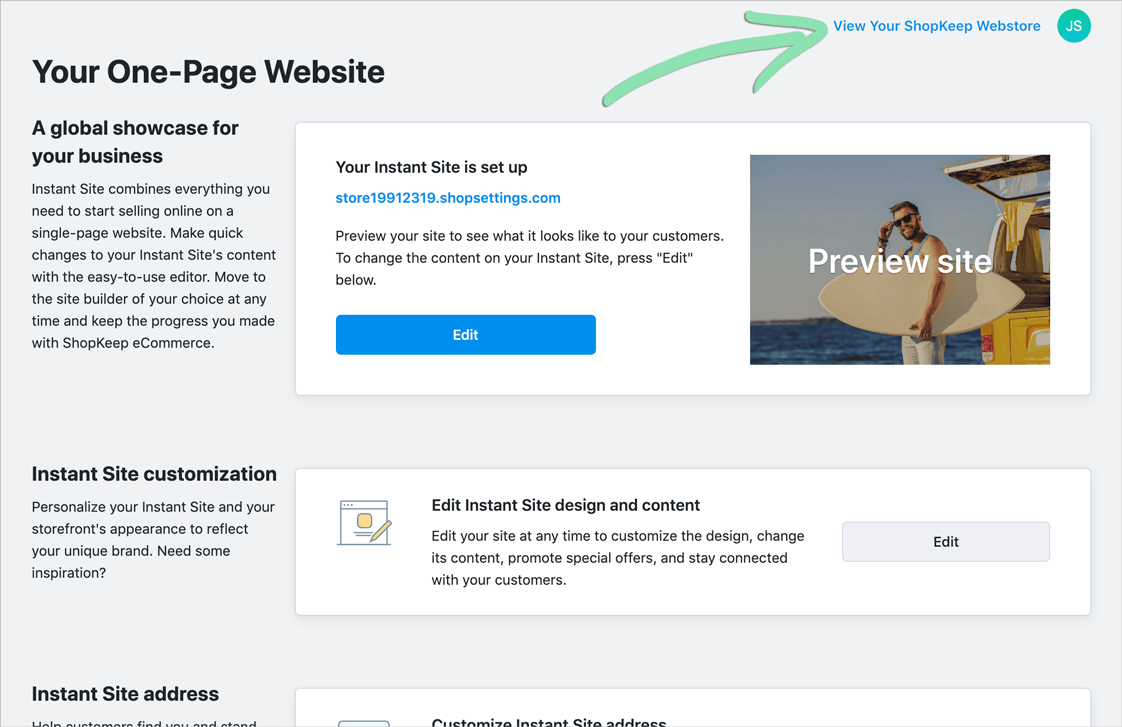
- From the eCommerce Dashboard, click 'Website'.

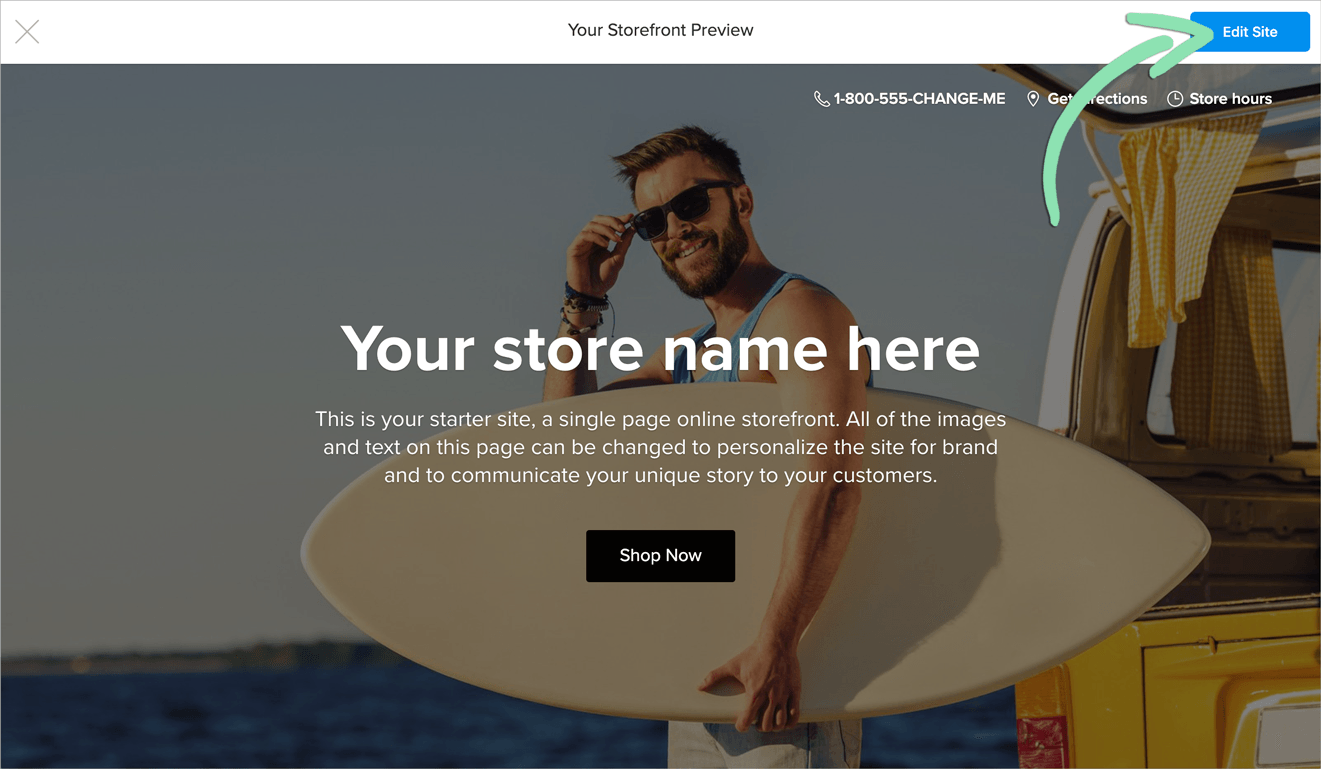
- Select 'View'.
- Review the store and items.
Items not showing up for sale? Visit our troubleshooting guide for help.
- If necessary, click 'Edit Site' to select a different theme, edit the headline, and make other changes to the site content and appearance.
Learn more about customizing your Instant Site here.
- When satisfied, repeat step 1 and share the 'Instant Site' URL with customers to allow them to access the online store.
- Visit our Advanced Topics article to learn how to use your own domain name for the online store.
- Need to temporarily shut down the online store for maintenance? Visit our troubleshooting guide for help.

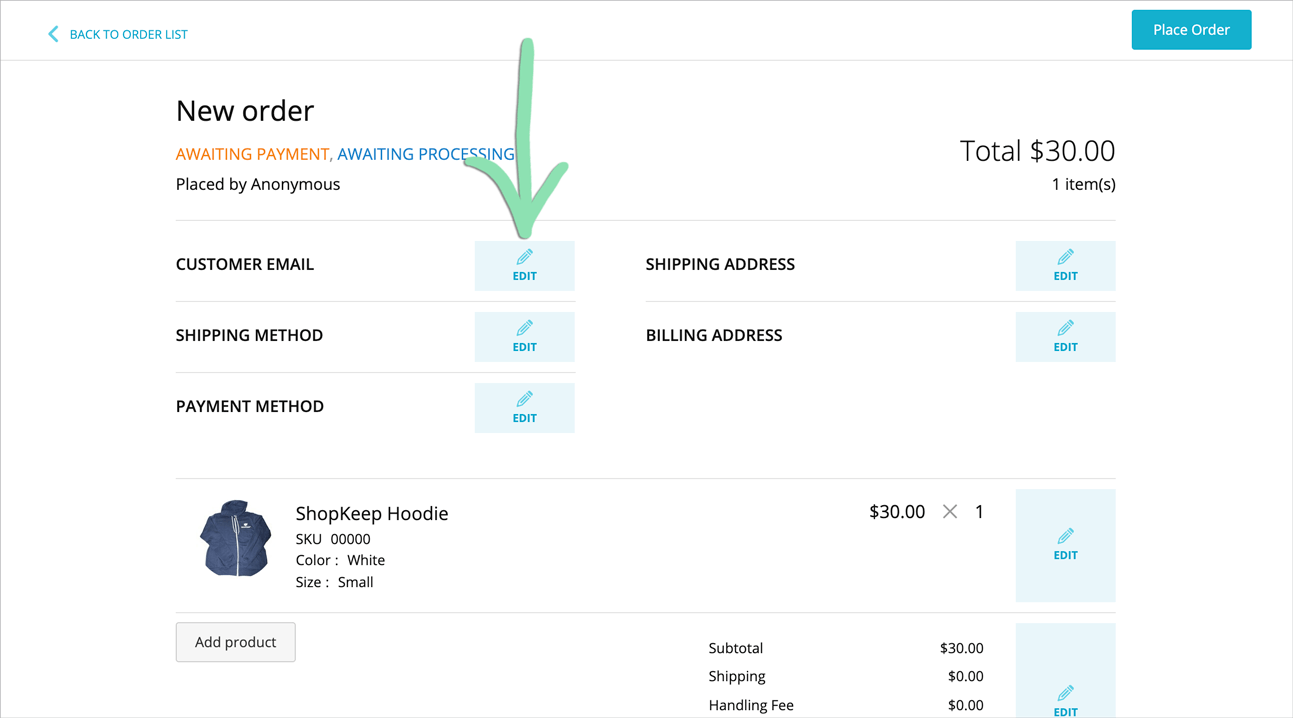
Manually Create Orders
Manually create orders for customers who order over the phone or are unable to place an order online themselves. Creating an order in Lightspeed eCom (E) allows you to track its payment and fulfillment status as you process the order from the eCommerce Dashboard.
- From the eCommerce Dashboard, click ‘My Sales’ and select ‘Order Editor’.

- Click ‘Create Order’.
By default, a product will be automatically added to each order when created. If necessary, the default product can be removed by following step 6 after adding additional products to the order.

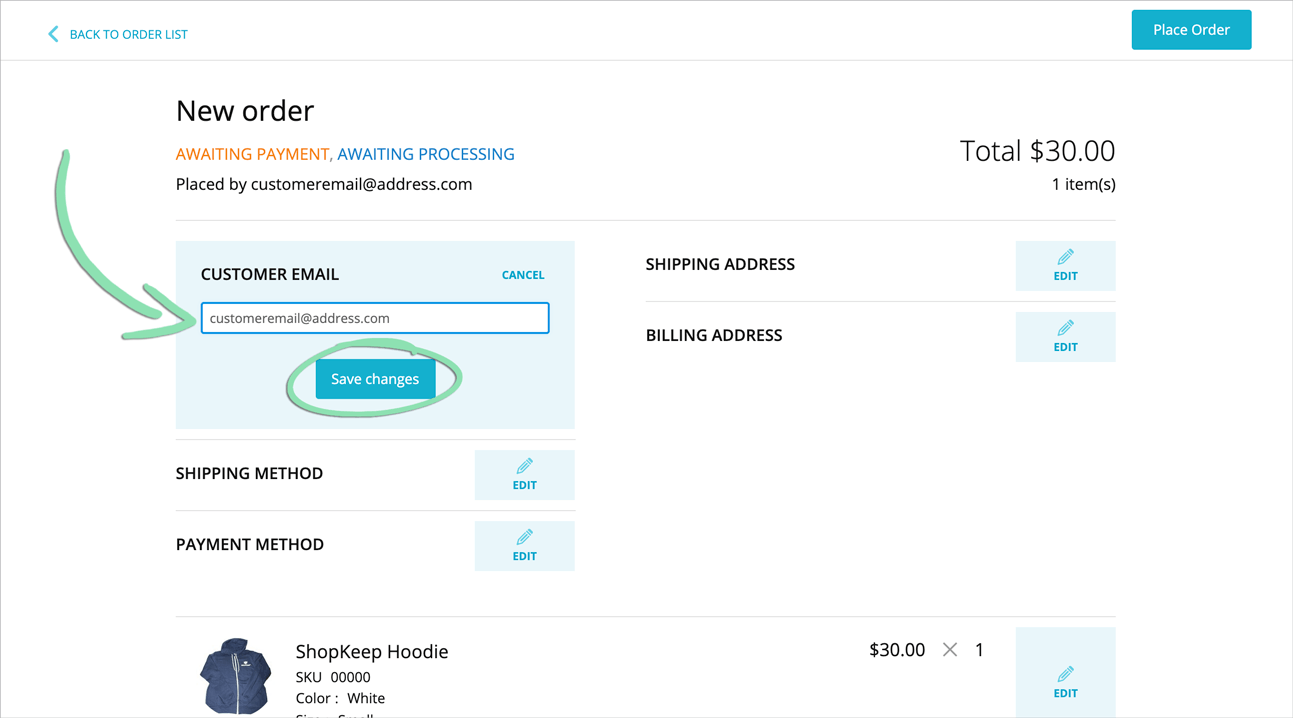
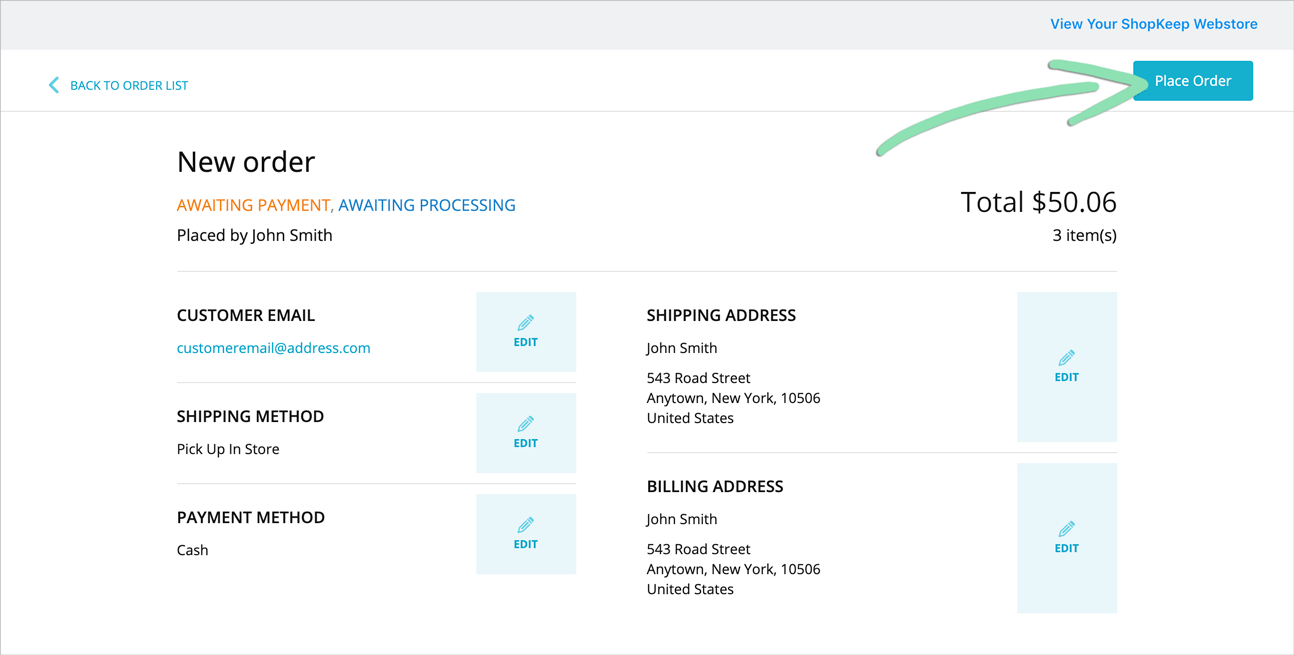
- Click ‘Edit’ next to ‘Customer Email’, then enter the customer’s email address and click ‘Save changes’.
If the customer previously ordered from your webstore, their shipping and billing addresses will automatically appear in the appropriate sections after clicking ‘Save changes’.
- Edit and save the ‘Shipping Address’, ‘Shipping Method’, ‘Billing Address’, and ‘Payment Method’ sections as needed.
‘Payment Method’ is used for tracking purposes only. Payment for created orders must be manually processed outside of Lightspeed eCom (E).
- Add products to the order.a Click ‘Add product’.
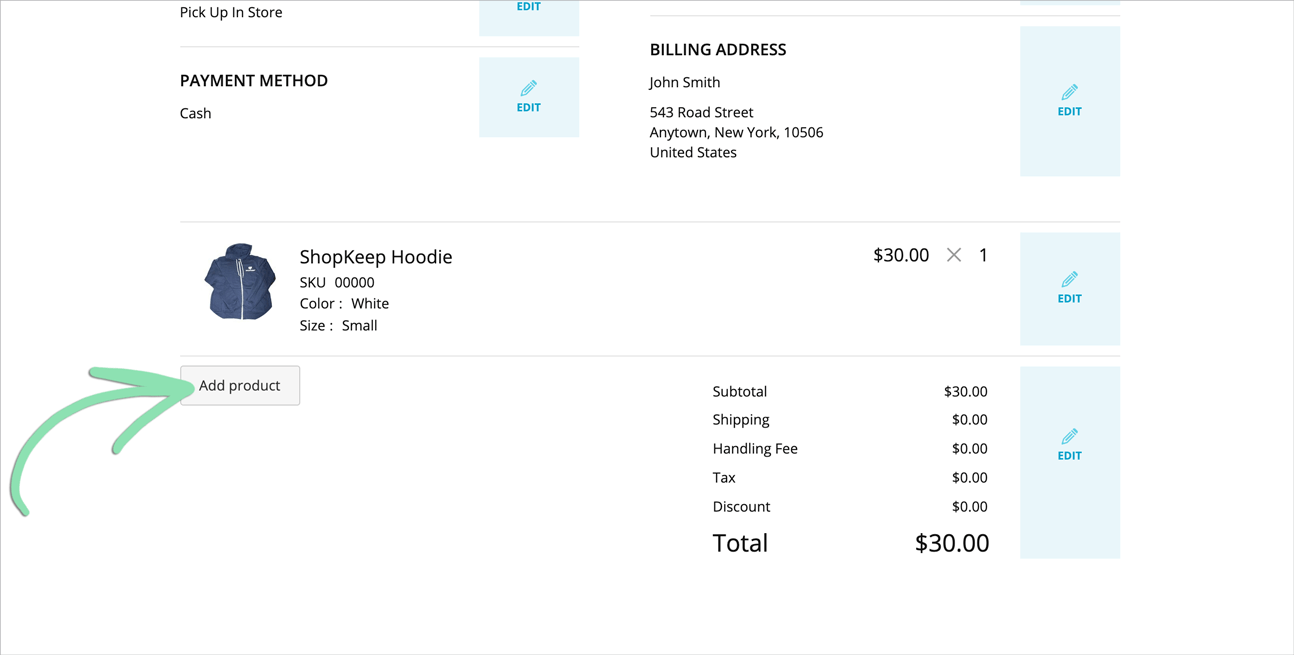 b Enter a product SKU and quantity, then click ‘Add product’.
- Don’t know the SKU for a product? Look it up from the Products page.
- The product name and price will automatically appear after clicking ‘Add product’.
If an item does not appear for sale, visit our troubleshooting guide for help.
- (Optional) To remove a product from the order, click ‘Edit’ next to that product and select ‘Remove’.
- (Optional) Click ‘Edit’ next to the order total to add shipping and handling fees, tax, and discounts as needed.

- Click ‘Place Order’ to save changes.
Learn how to edit, manage, export, and print orders here.
Process Orders
After the Business Owner is notified by email that a customer placed an order, visit Lightspeed eCom (E) to view the details of the order, add notes to it, change its payment status, ship it out, and mark it as shipped.
Orders can also be received and processed at the register. Visit our Lightspeed eCom (E): Online Ordering article to learn how to use this feature.
- From the eCommerce Dashboard, click 'My Sales' and select 'Orders'.

- Select an order number to view details.

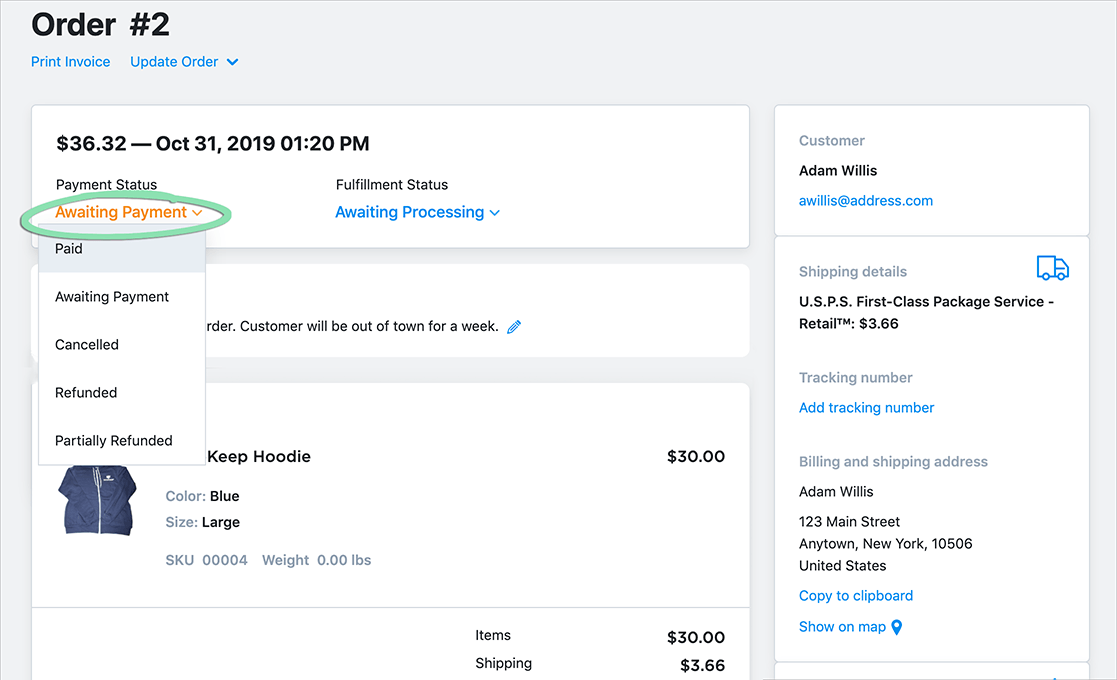
- (Optional) Add notes to the order.a Click ‘Add note’.
 b Enter notes, then click ‘Save’.
Add a customer’s special request, the reason for a refund, or other internal information staff need to know. Notes are visible only to staff in Lightspeed eCom (E) and customers cannot see them.

- If the customer submitted a manual payment (e.g. by phone, in person, etc.), click the 'Payment Status' drop-down to update the status to ‘Paid’.
- If the customer paid online by credit card, the status will automatically update to ‘Paid’.
- Supported orders will appear in BackOffice and Lightspeed Pocket reporting after being marked ‘Paid’. Learn which types of orders are not supported here.
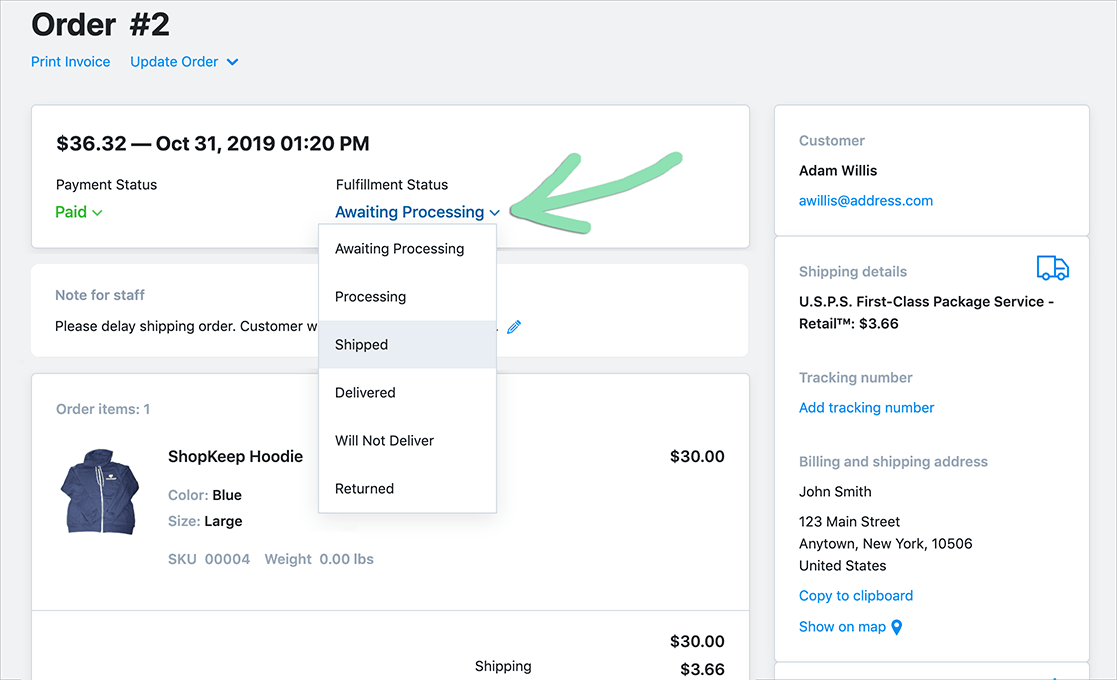
- Ship the order to the customer using the selected shipping method.
- After shipping the order, click the 'Fulfillment Status' drop-down to update the order status to 'Shipped'.
Learn more about managing orders here. To learn how to refund an order, visit our troubleshooting guide.
FAQ
Continue below for answers to common questions about Lightspeed eCom (E) integration.
Visit our Lightspeed eCom (E): Advanced Topics article to learn how to set up categories to organize your products, manage shipping regions, use your own domain name, add your online store to WordPress, advertise and sell products on social media, enable online gift cards, and more.
Visit our Lightspeed eCom (E) Troubleshooting guide for help solving common issues.
Open priced and unit priced items are not supported and do not sync from BackOffice to Lightspeed eCom (E). Additionally, “NO” Option modifiers added to items in BackOffice do not sync with those items.
No. Synchronization is one-way: information syncs from BackOffice to Lightspeed eCom (E) only. Changes made to items in Lightspeed eCom (E), including to the quantity on hand, will not sync to BackOffice and will cause a discrepancy between how the item appears in both places.
The quantity of a sold item will be automatically removed from BackOffice and from Lightspeed eCom (E) when a customer purchases the item online.
If you cancel or refund an order in Lightspeed eCom (E), the quantity of the returned item(s) will be automatically added to Lightspeed eCom (E) but will not be added to BackOffice.
Yes. The quantity of a sold item will be automatically removed from Lightspeed eCom (E) and from BackOffice when the item is rung up in the Retail POS (S-Series) app. For returns processed in the Retail POS (S-Series) app, the returned quantity will be automatically added to Lightspeed eCom (E) and to BackOffice.
Items and item variants will be automatically marked out of stock on your online store when their quantity on hand in Lightspeed eCom (E) reaches 0, preventing customers from purchasing them. When you receive more of an item, update its quantity in BackOffice to start selling it again online.
To find the URL of your online store, visit the eCommerce Dashboard and click ‘Website’.
Change the subdomain of your Lightspeed eCom (E) store by selecting ‘Change URL’ in the ‘Website’ section of the eCommerce Dashboard. You can also connect a custom domain to a Lightspeed eCom (E) store by following the steps here.
Integrated gift cards cannot be accepted as payment for online purchases. However, separate online-only gift cards can be sold and redeemed in your webstore. Visit our Lightspeed eCom (E): Advanced Topics article to learn how to set up online gift cards.
Yes. From the eCommerce Dashboard, click ‘Website’ and select ‘Edit’ to customize the look and feel of your online store. Select a preset theme or use the editor to change individual settings.
Yes. Orders can be received, viewed, and processed at the Retail POS (S-Series) app via the eCommerce online ordering feature.
Online orders closed at a Lightspeed Retail register using the eCommerce online ordering feature and supported orders marked ‘Paid’ in the eCommerce Dashboard will be included in BackOffice and Lightspeed Pocket reporting. Unsupported orders that will not appear in reporting include orders with tax charged on shipping costs, multiple tax rates, eGift card purchases or redemptions, and orders created with an initial Fulfillment Status other than ‘Awaiting Processing’. Learn more about how eCommerce orders appear in reporting here.
To view all orders placed through your online store, click ‘My Sales’ and select ‘Orders’ from the eCommerce Dashboard.
Yes. Upgrade your Lightspeed eCom (E) subscription package to enable advanced functionality for your online store. Downgrade your subscription package if you do not need the features available in an upgraded package. To learn how to upgrade or downgrade, visit the Select a Package section above.
What’s Next?
After setting up eCommerce integration, move on to other eCommerce-related topics. Learn how to advertise and sell products on social media, manage online orders at the register, and get help with any issues or questions that come up.
Advanced Topics
With eCommerce setup complete, learn about additional features designed to help you manage, market, and grow your online webstore, including how to sell products on social media, use your own domain name for your store, and manage shipping regions. Visit our Lightspeed eCom (E): Advanced Topics article for more information.
Online Ordering
Learn how to use the eCommerce online ordering features to receive and process orders at the register that were placed through your online webstore. These orders can print to your kitchen printers and include customer notes and delivery details. Visit our Lightspeed eCom (E): Online Ordering article to learn more.
Troubleshooting and Additional Support
Visit our Lightspeed eCom (E) Troubleshooting guide for help with any issues that arise, or go here to learn how to use features not covered in Lightspeed Retail documentation.