Performing Returns
Perform a return to refund a customer for a sale from the current register shift or a previous shift. Returns can be processed back to the customer’s original payment method, to a gift card for store credit, or to a variety of other tenders. Returning items puts them back into inventory and, though items cannot be exchanged, they can be returned and re-sold in separate transactions.
Current Shift Returns
If a sale occurred during the current open register shift, browse the shift history to find and return it.
-
In the Retail POS (S-Series) app, tap 'Sales History' on the Main Menu (iOS) or register menu (Android).Retail POS (S-Series) app for iOS
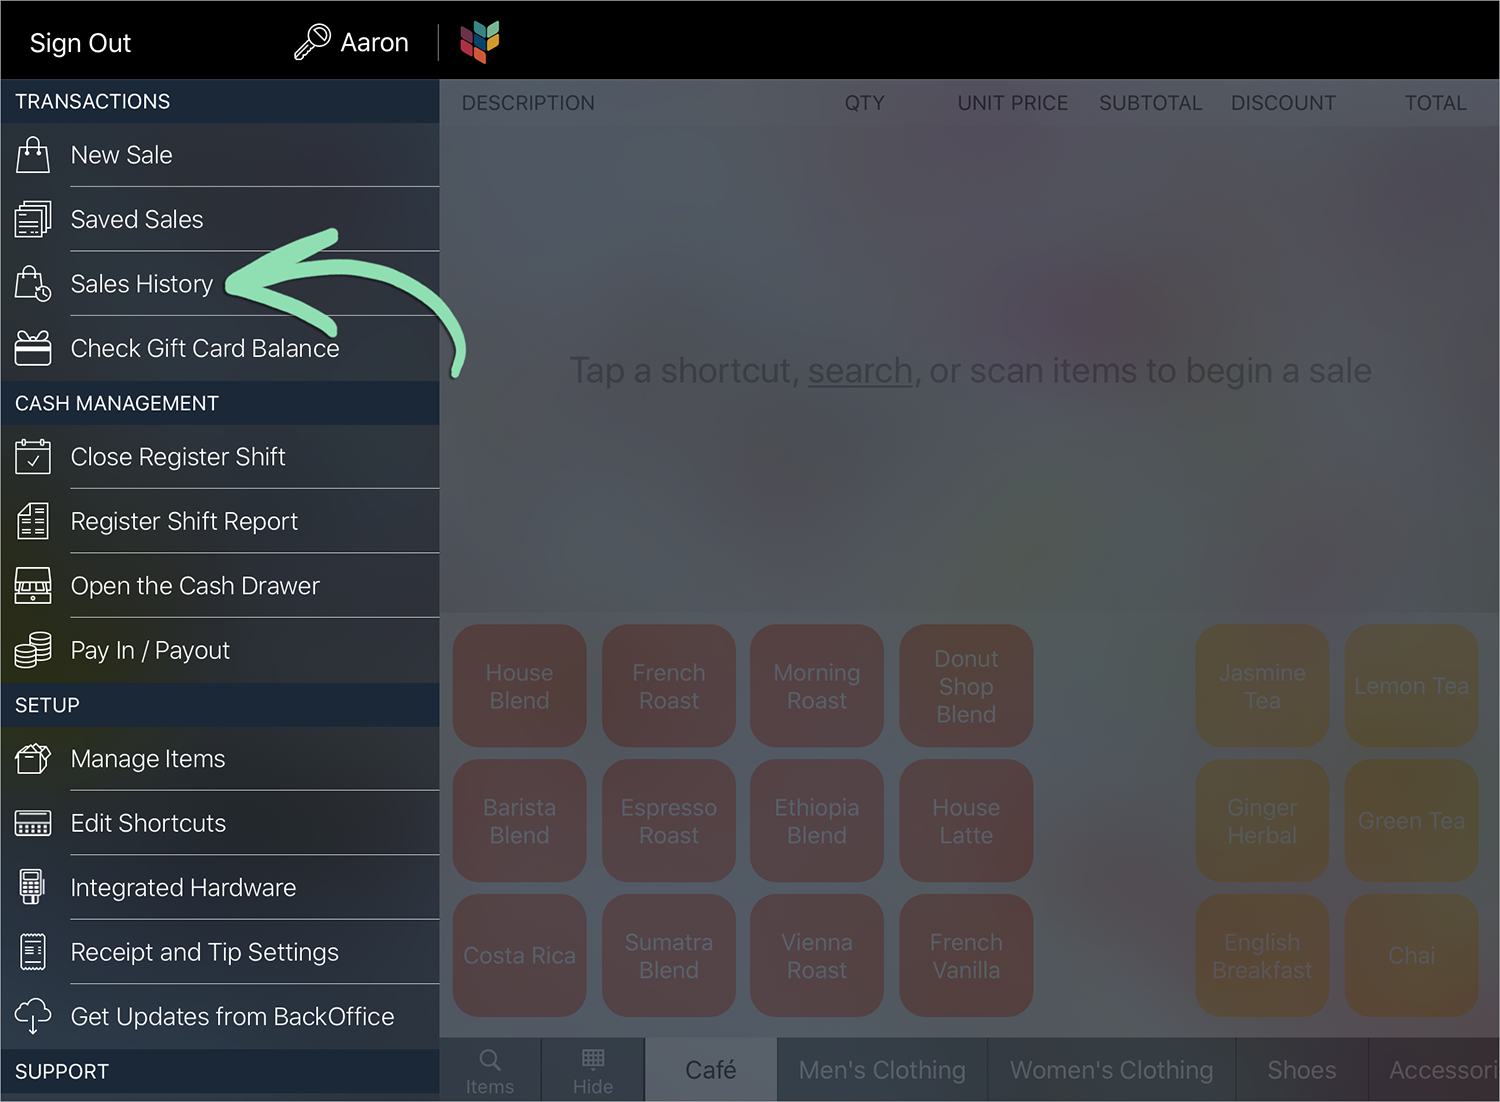 Retail POS (S-Series) app for Android
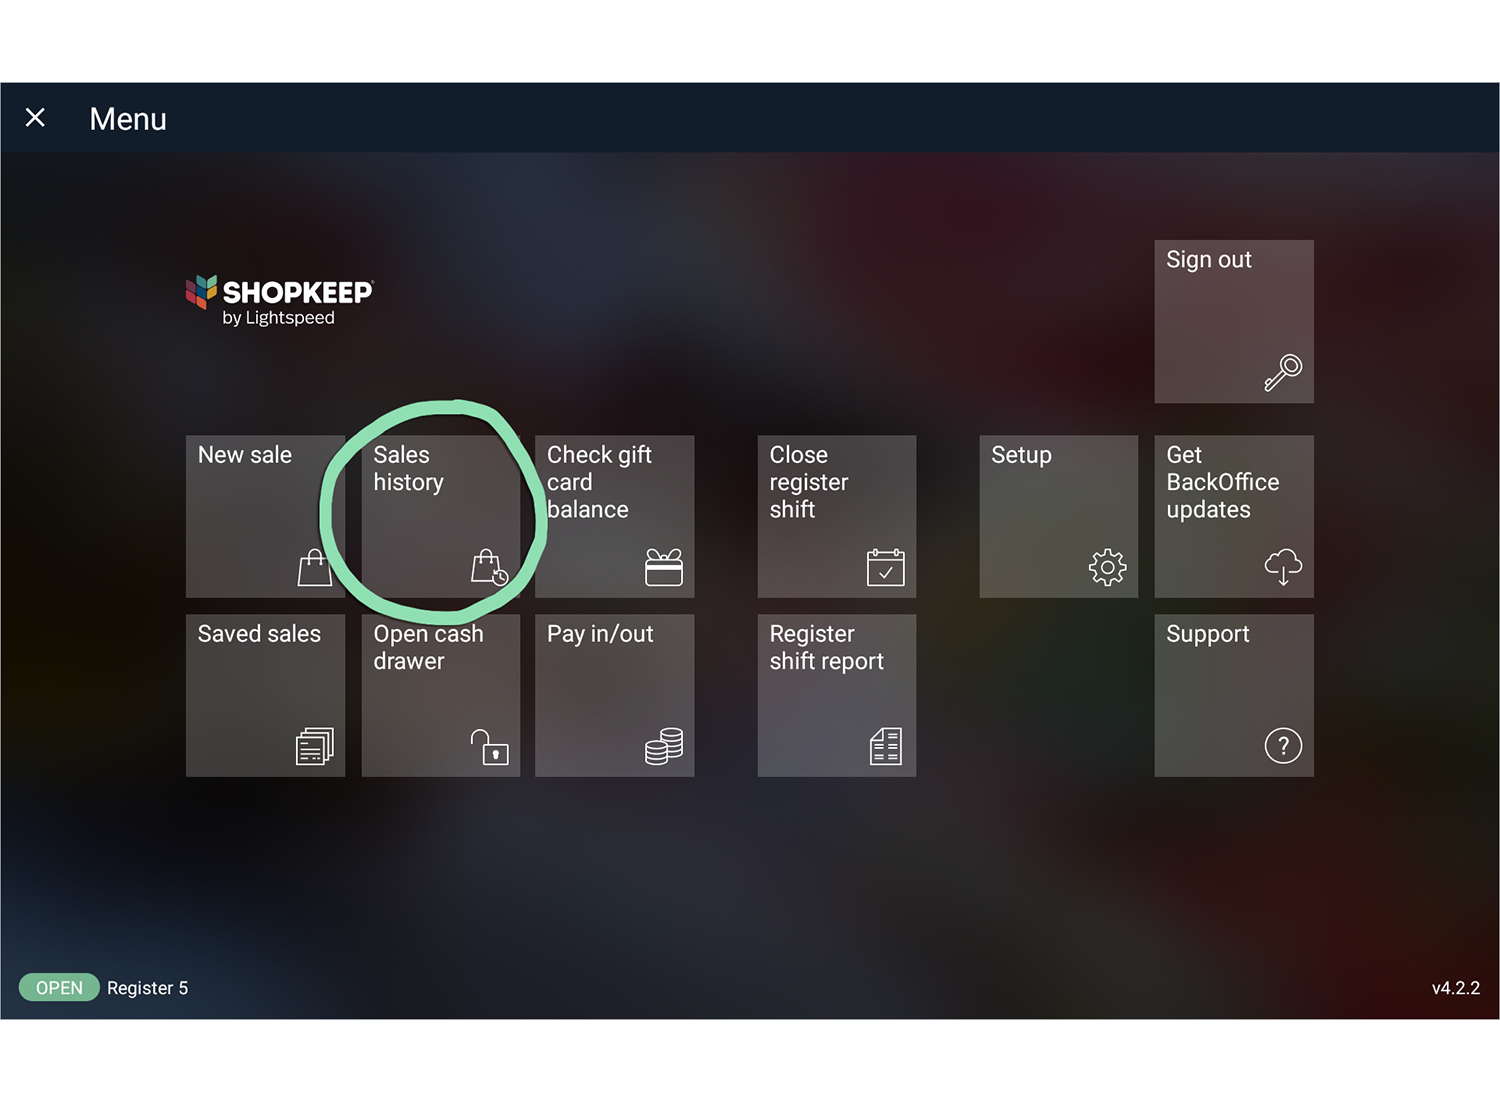
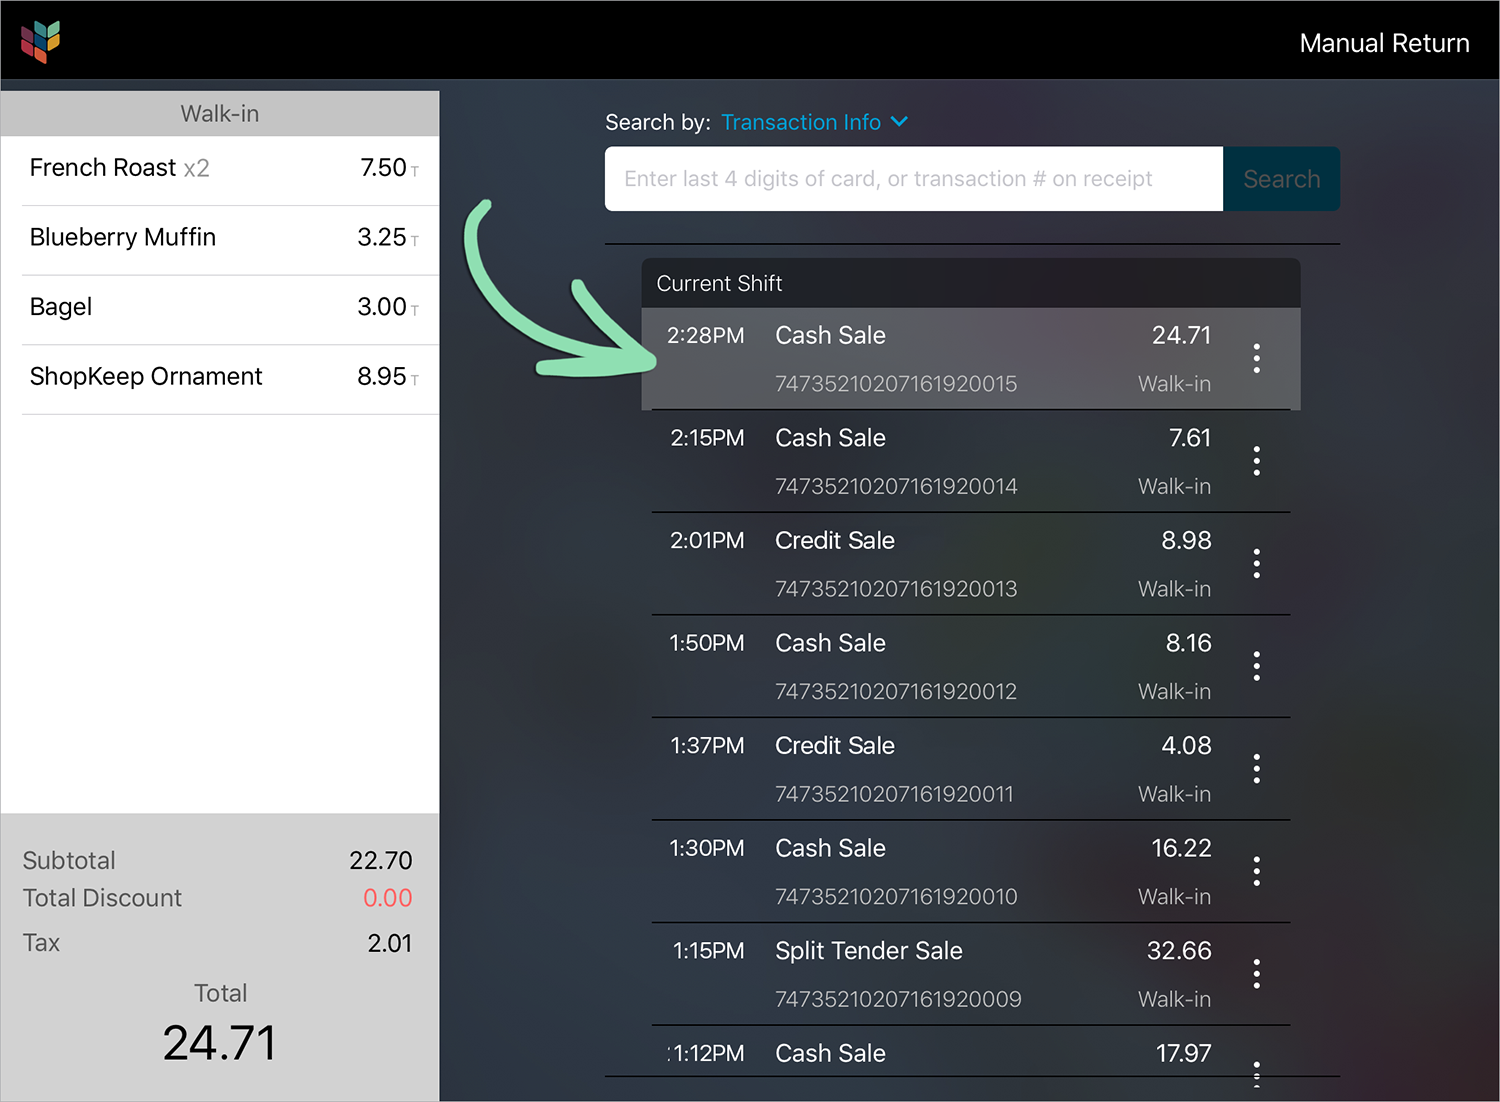
- Select a sale from the current register shift to return.
Unable to find the sale? Search for it by transaction number, customer contact information, last 4 digits of the credit card used, or by scanning the receipt barcode.
See step 2 in the Previous Shift Returns section to learn how to search for a sale to return.
-
Tap the 3-dot menu on a sale and select 'Begin Return' (iOS), or tap ‘Begin Return (Android).Retail POS (S-Series) app for iOS
 Retail POS (S-Series) app for Android
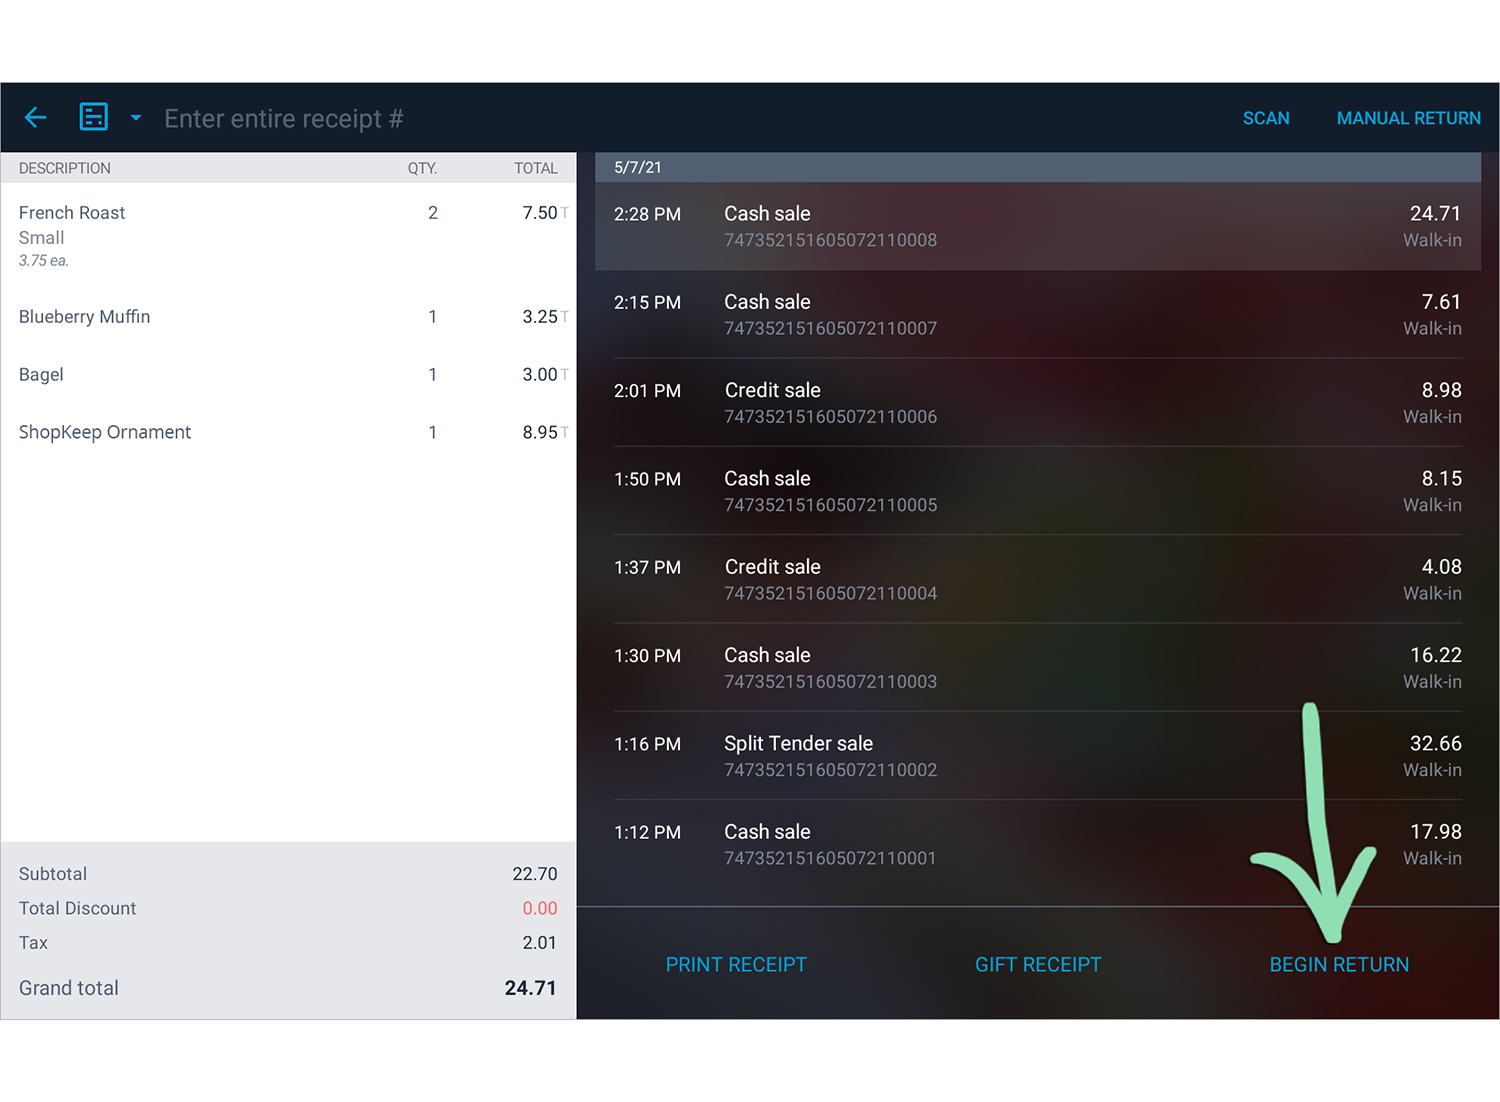
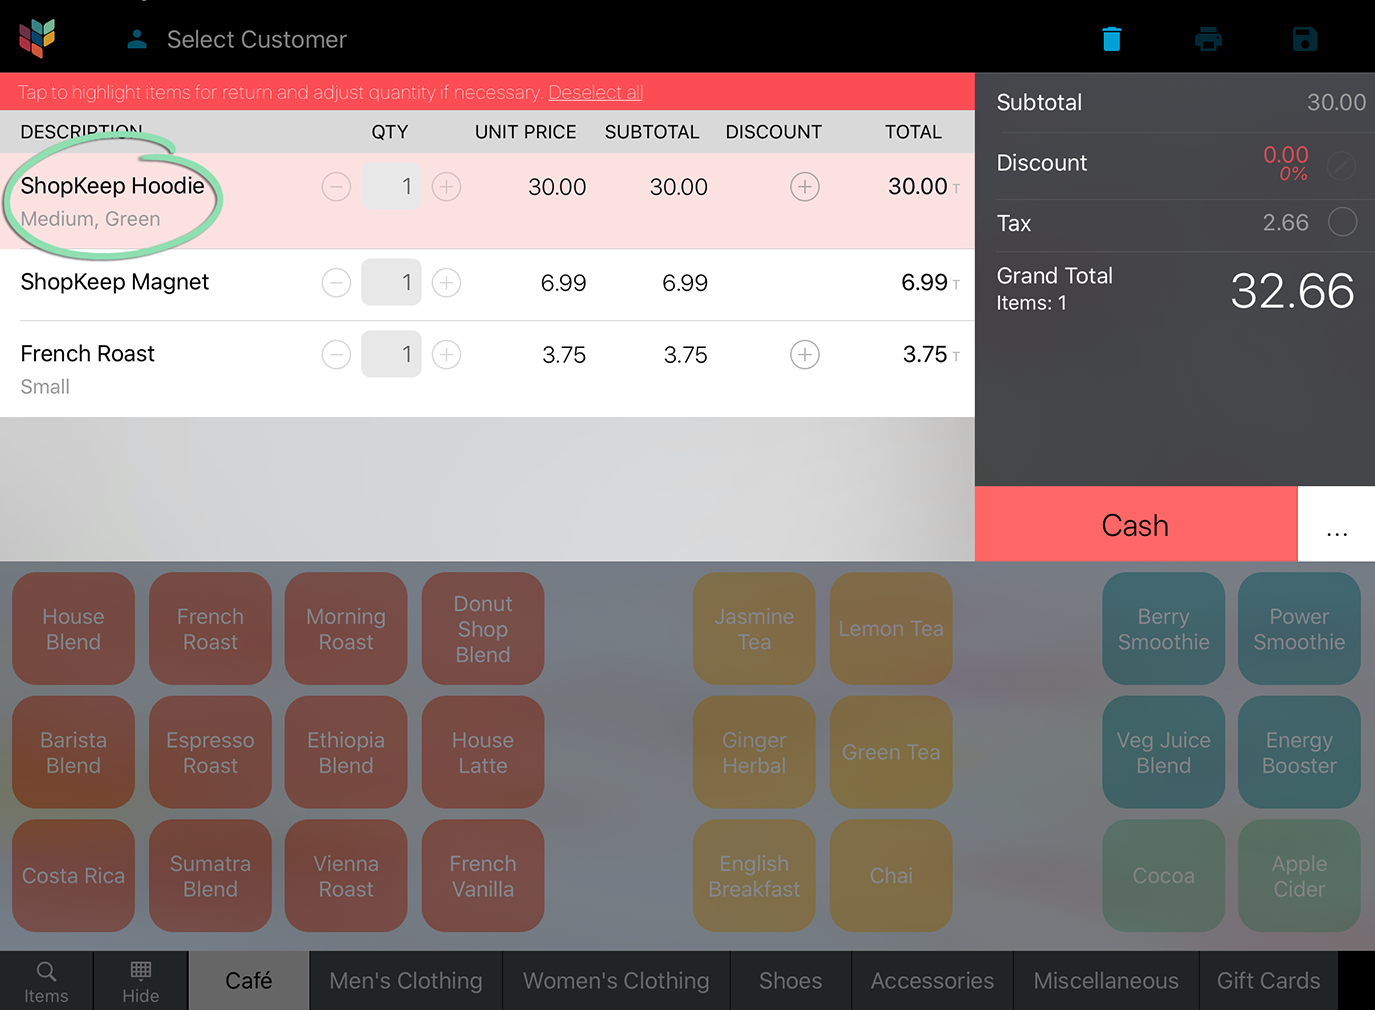
- Select the item(s) to return.
- Only highlighted items will be returned. Tap ‘Select all’ to return all items.
- Partial item returns are not supported. Need to refund part of an item’s price? Return the entire item first, ring up a new sale for the item, and apply a discount to the sale.
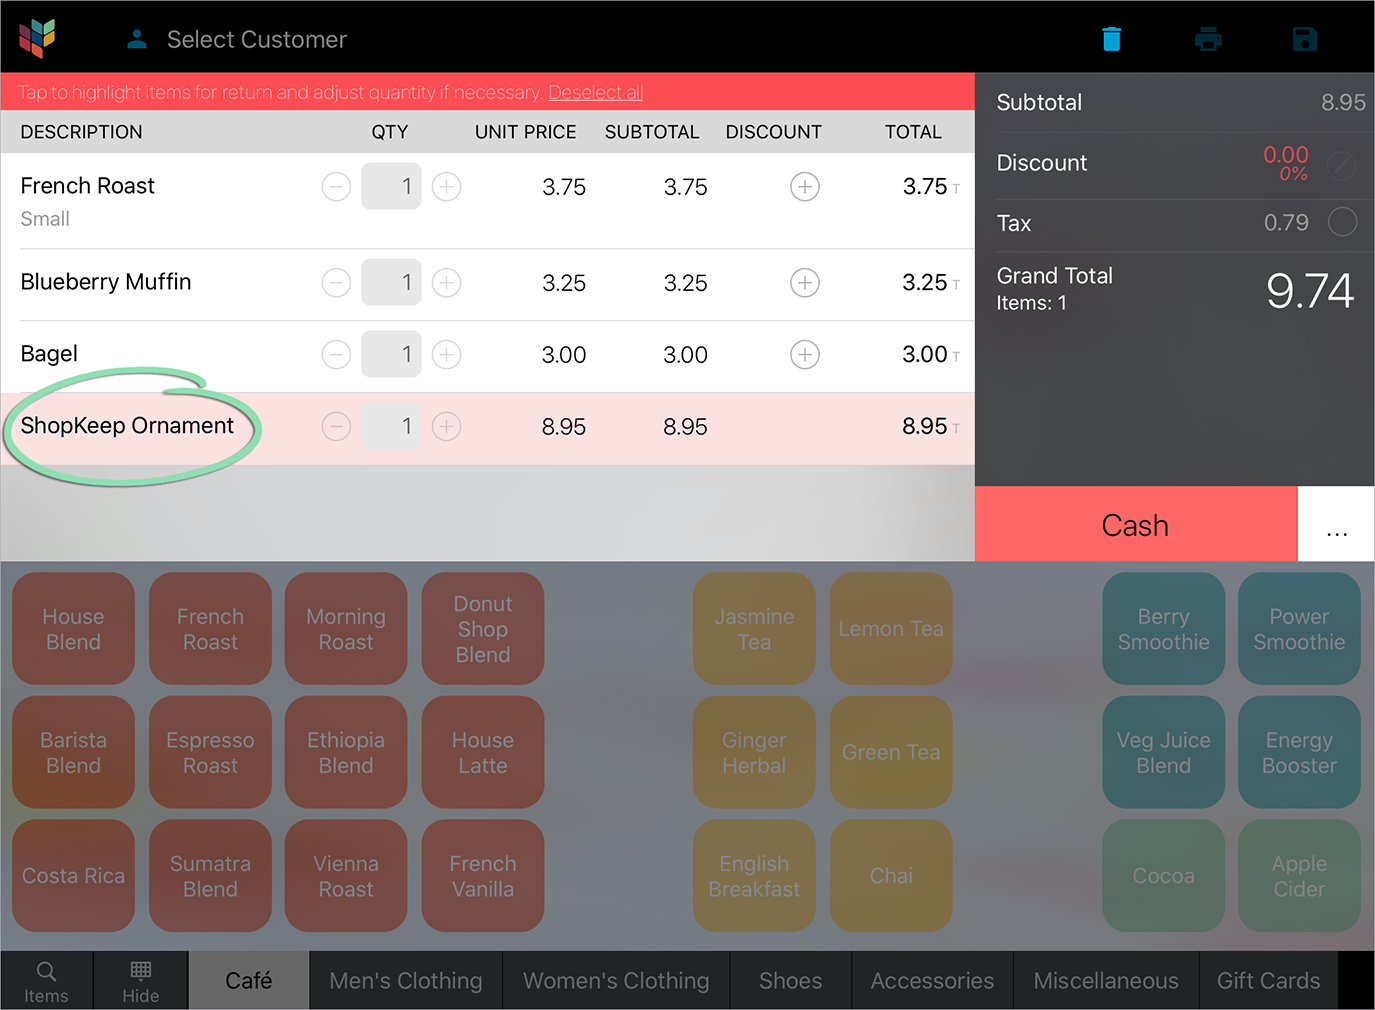
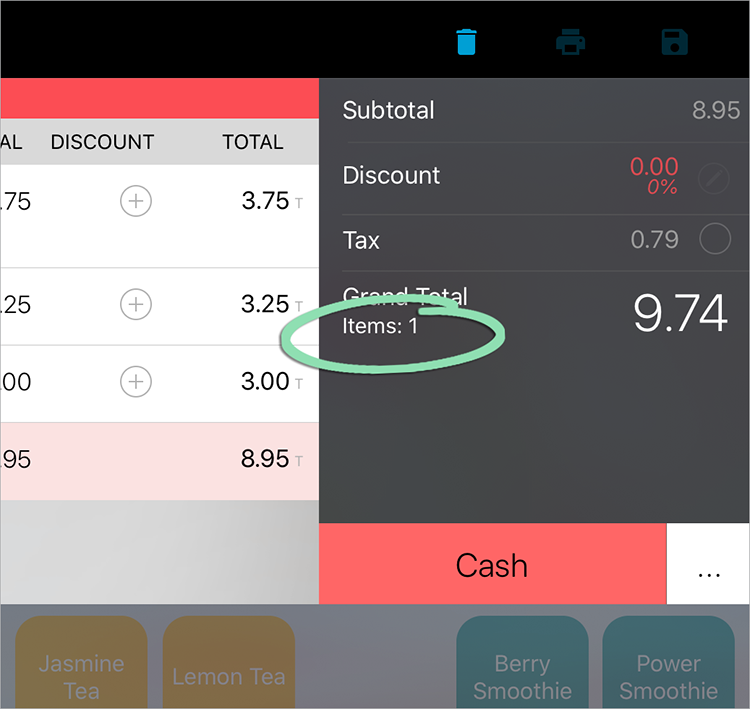
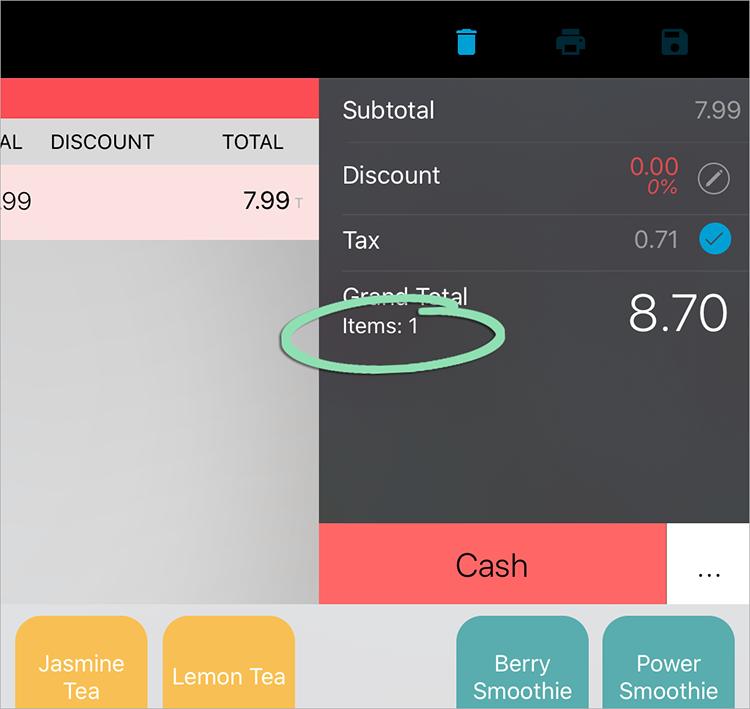
The total quantity of selected items appears under the grand total, allowing cashiers to verify the number of items being returned. Each unit priced item counts as 1 item despite the quantity entered.
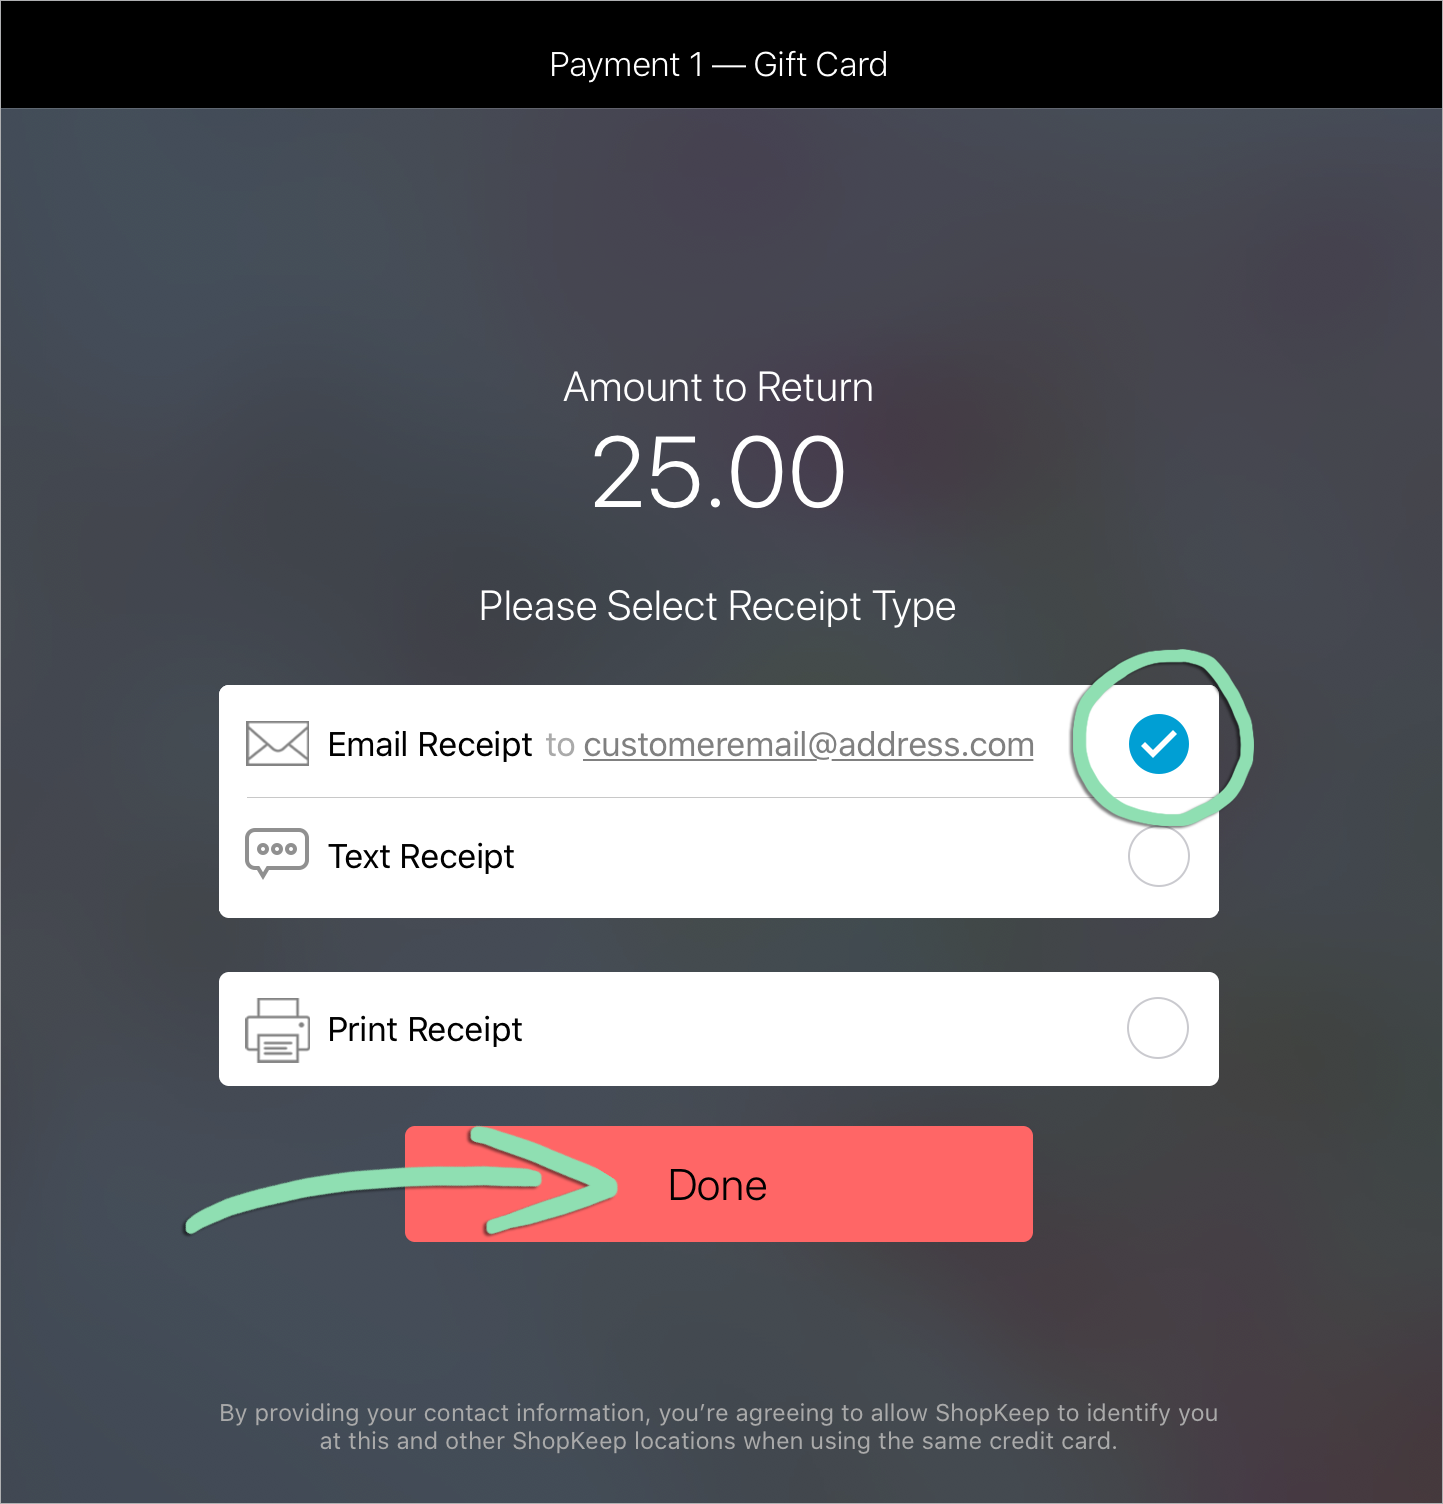
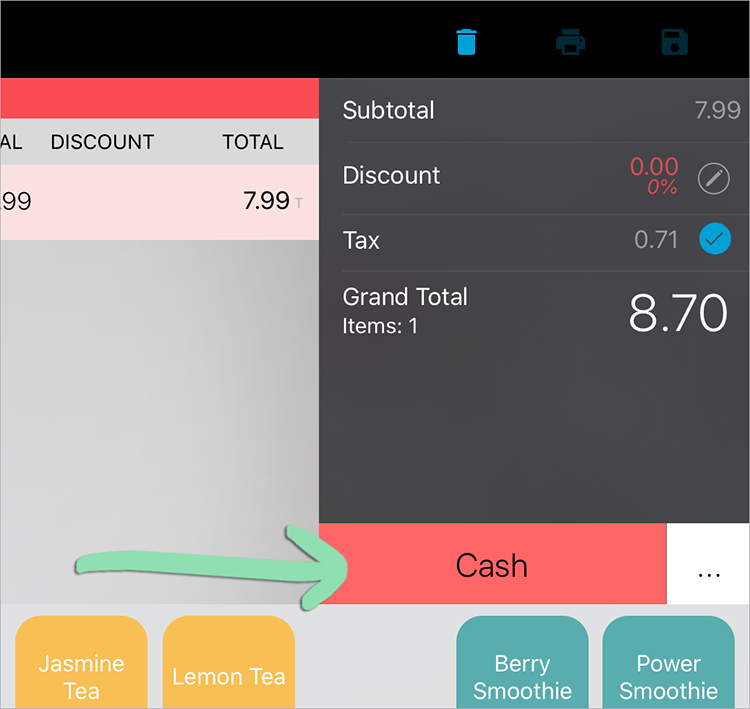
- Select the tender to return to the customer.
The original sale tender will appear in red as the suggested tender for return. To use a different tender, such as ‘Gift Card’, tap ‘…’
Sales can only be returned to a credit card if originally paid with the ‘Credit’ tender at the register.

- If using the Retail POS (S-Series) app for Android, tap ‘Yes’ to authorize the return.

-
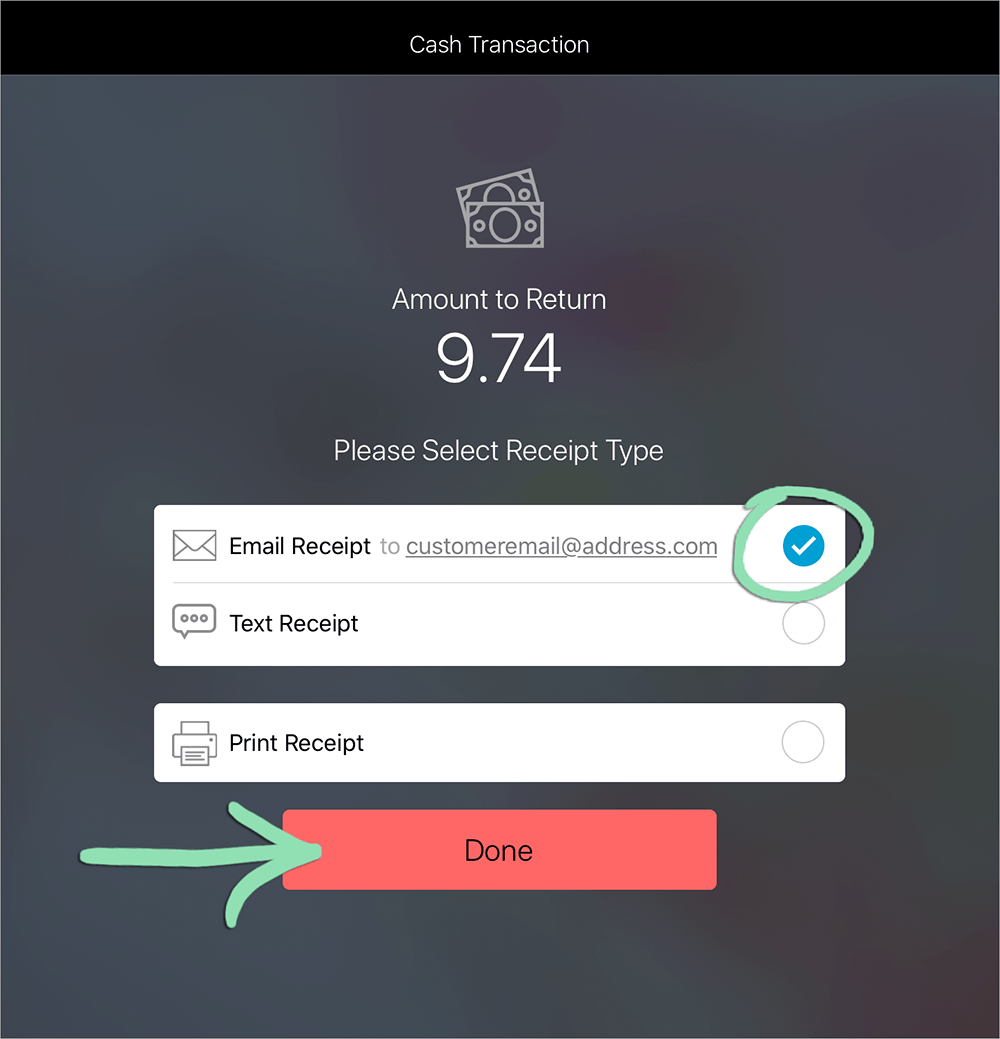
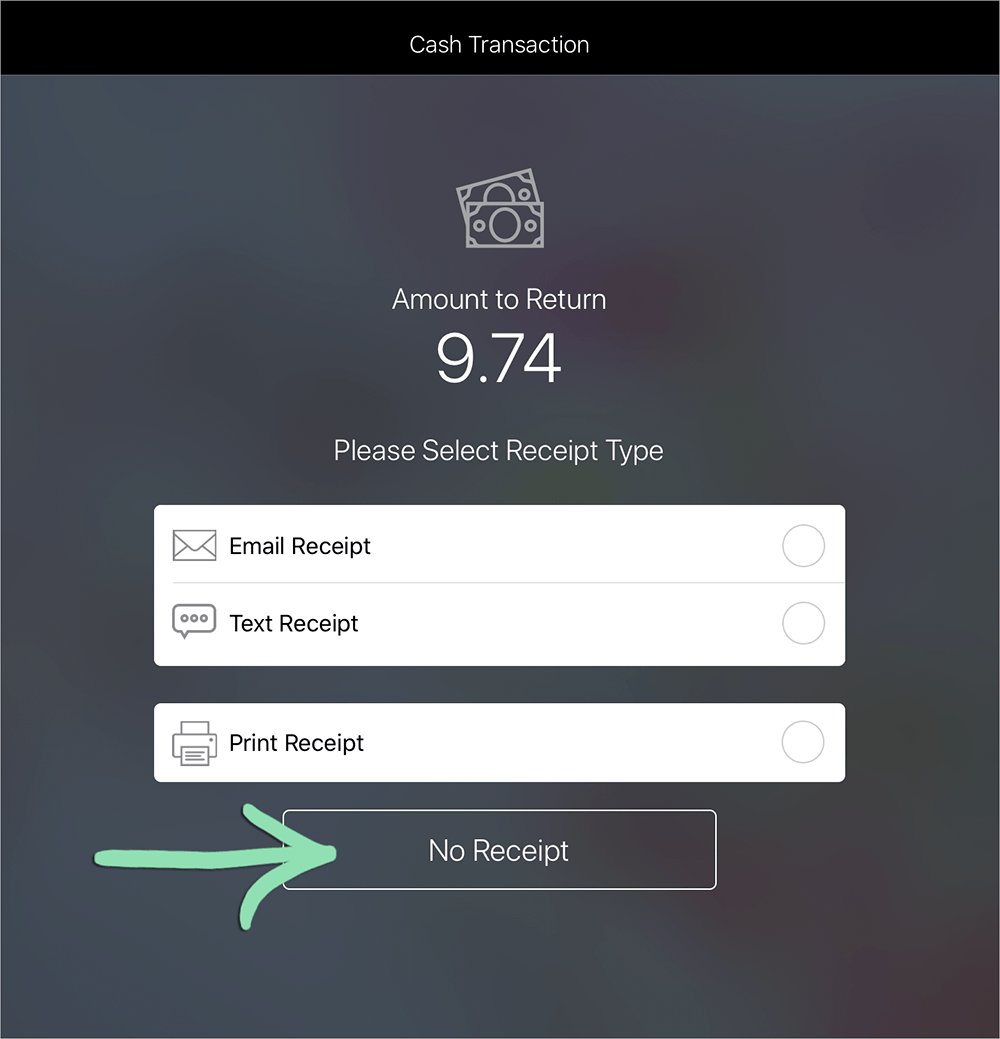
Select a receipt option and tap ‘Done’, or tap 'No Receipt'.Learn how to reprint a receipt for a completed return here.
Previous Shift Returns
If a sale occurred outside the current register shift, search by transaction number, customer contact information (name, phone number, email), last 4 digits of the credit card used during the sale, or scan the receipt barcode to find the original sale and start a return.
Need to locate a receipt or information about a sale? Find it on the BackOffice Transactions Report.
-
In the Retail POS (S-Series) app, tap ‘Sales History’ on the Main Menu (iOS) or register menu (Android).Retail POS (S-Series) app for iOS
Retail POS (S-Series) app for Android
- Search for a sale to return using any method listed below.a Enter the transaction number, customer contact information (name, phone number, email), or last 4 digits of the credit card used, then tap ‘Search’ (iOS) or ‘Done’ (Android).Searching by credit card or customer may require you to select the relevant option from the drop-down next to the search field.
All of the above details are available on the original sales receipt and in the BackOffice Transactions Report.Retail POS (S-Series) app for iOS Retail POS (S-Series) app for Android
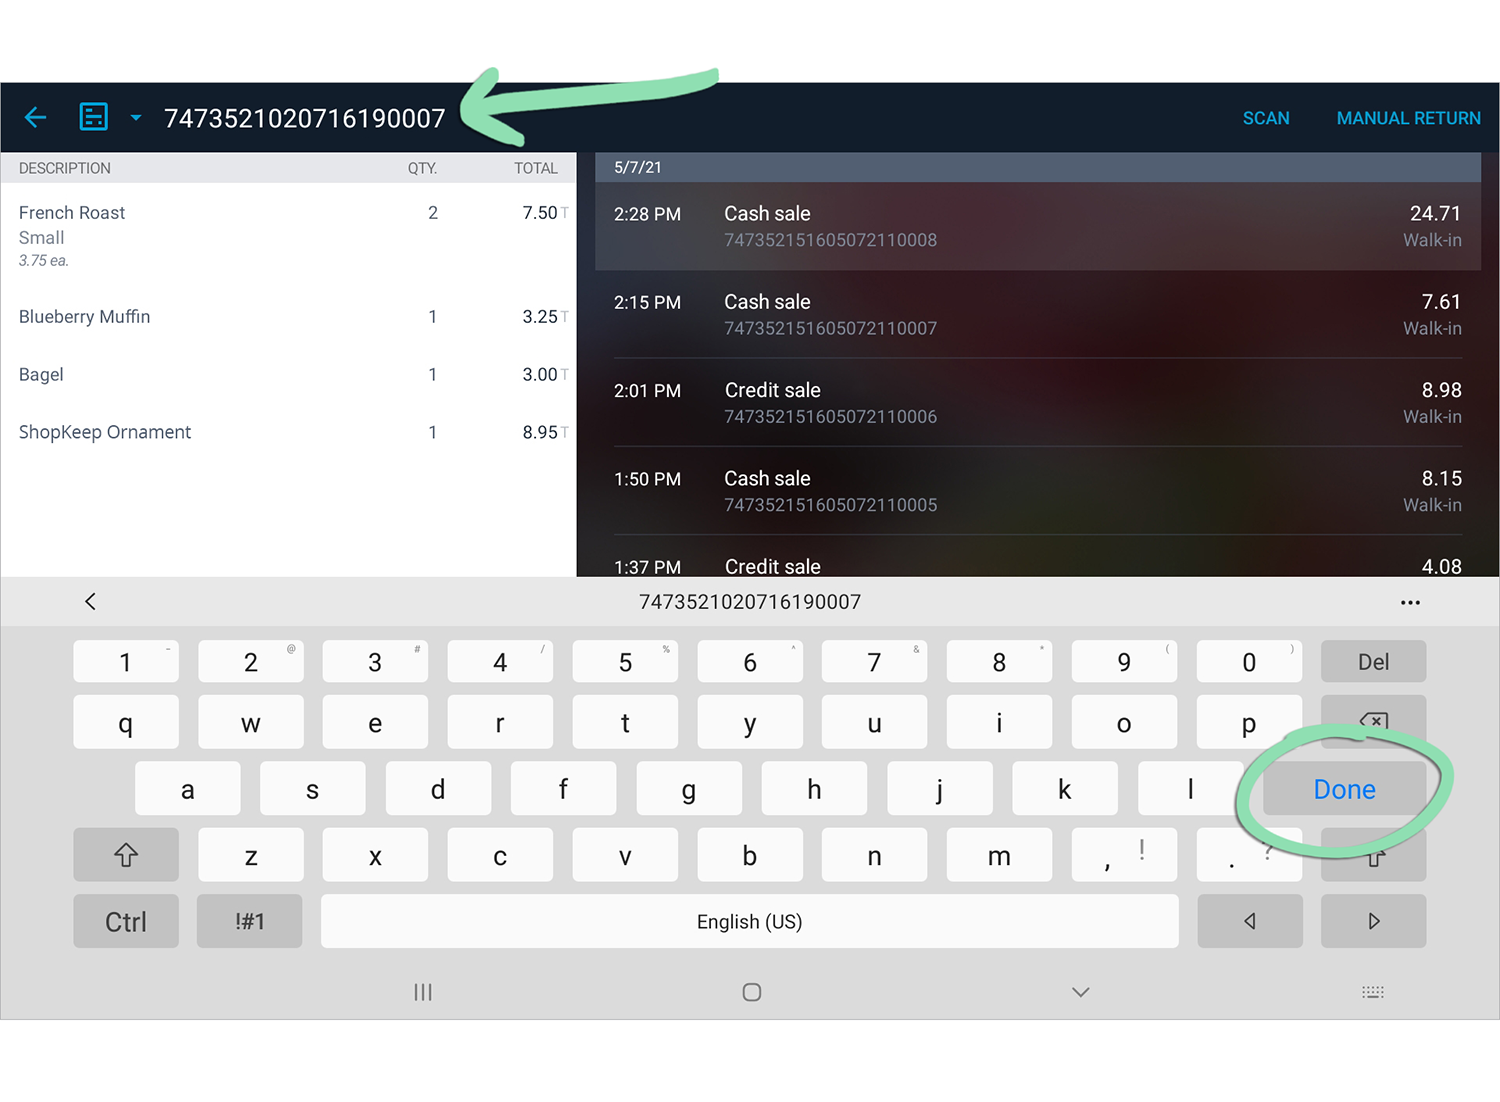 b Use a supported barcode scanner to scan a receipt barcode.Barcodes automatically print on receipts in the Retail POS (S-Series) app for Android but must be manually enabled for the Retail POS (S-Series) app for iOS.
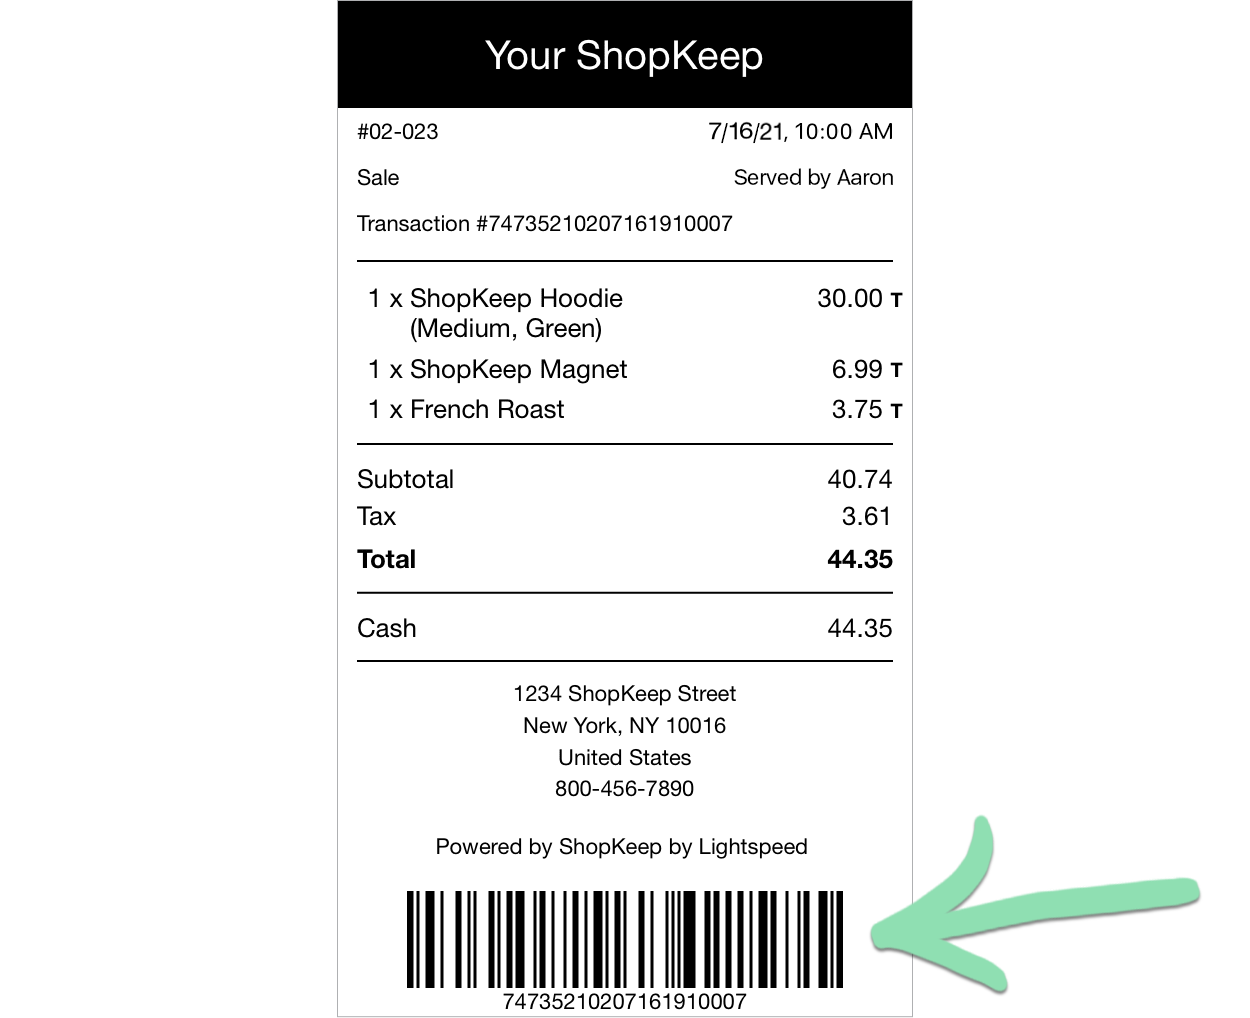 c Android only. Tap ‘Scan’ to use the register’s built-in camera to scan a receipt barcode, then align the barcode with the red line on screen and wait for the sale to appear.Barcode scanning with the built-in camera works best in well-lit areas. This feature is only available in the Retail POS (S-Series) app for Android.

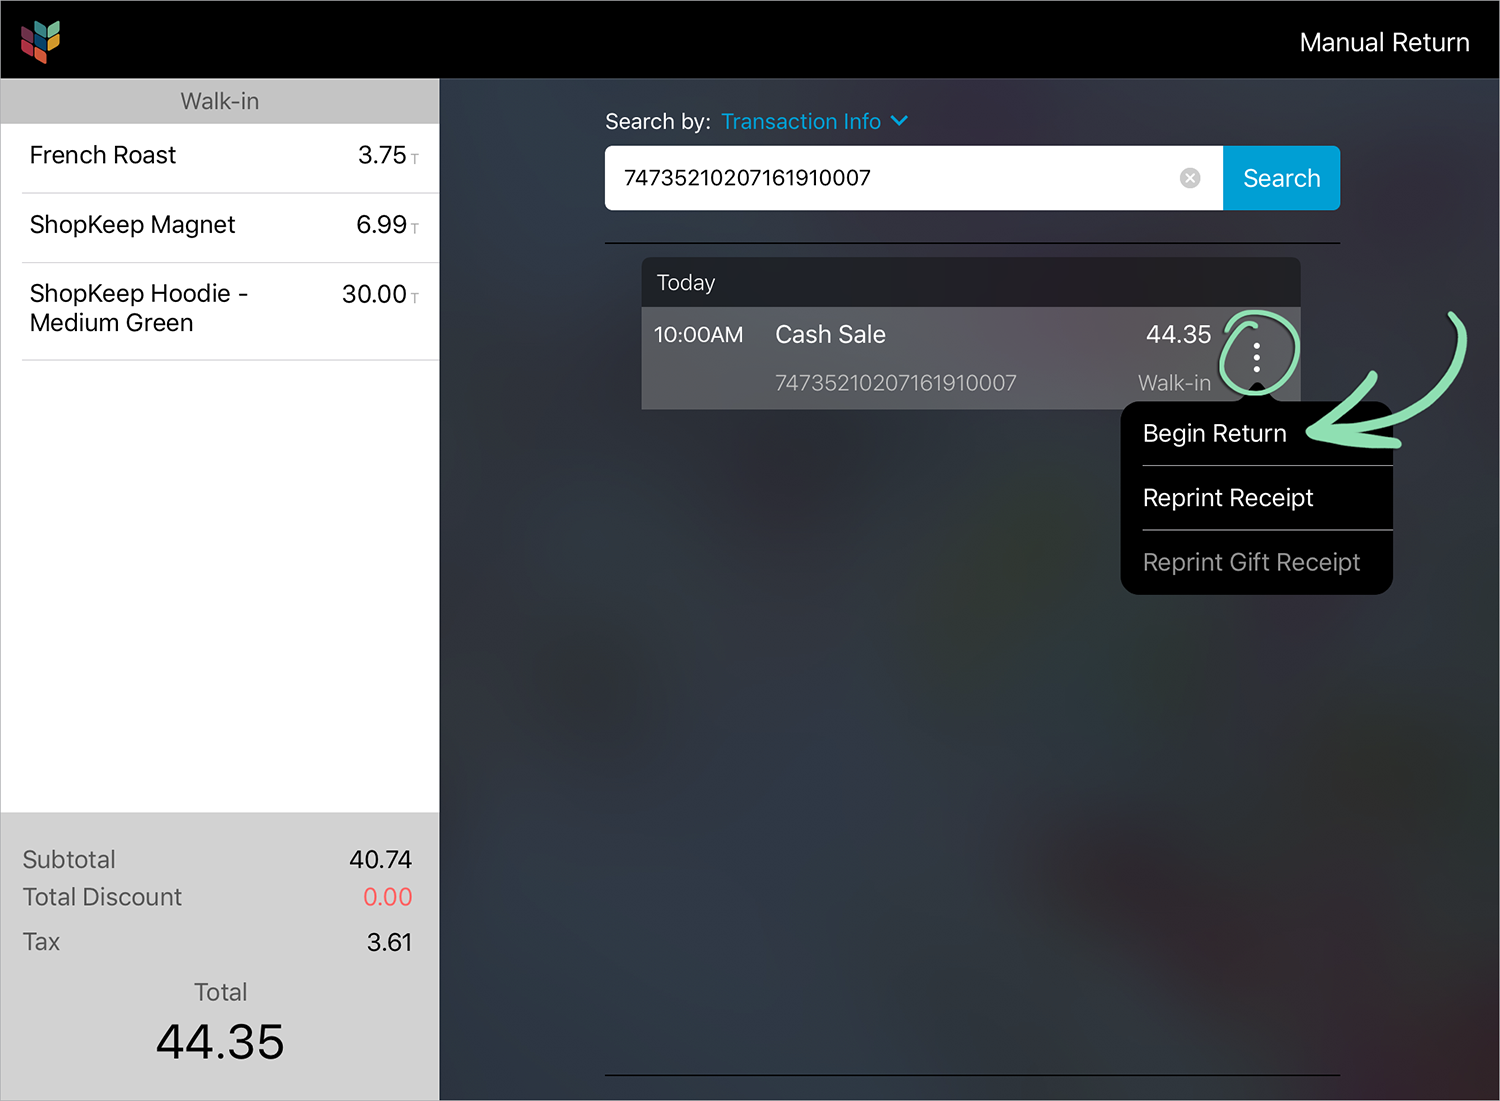
- Tap the 3-dot menu and select 'Begin Return' (iOS), or tap ‘Begin Return’ (Android).Retail POS (S-Series) app for iOS
 Retail POS (S-Series) app for Android
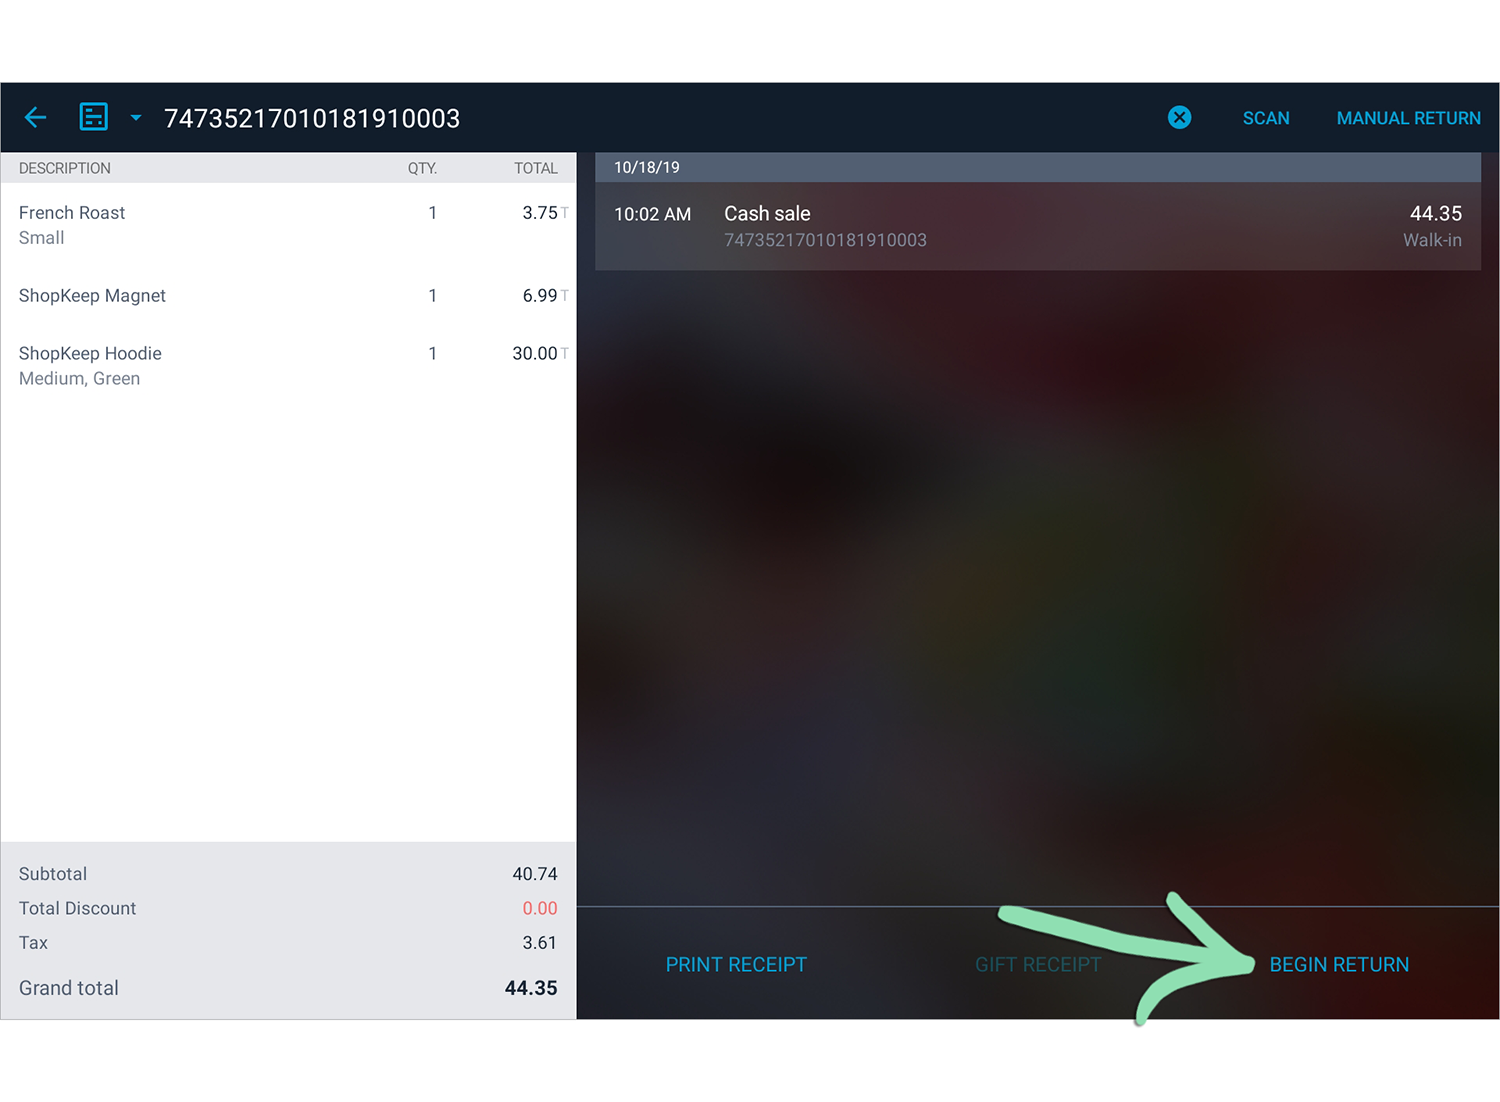
- Select the item(s) to return.
- Only highlighted items will be returned. Tap ‘Select all’ to return all items.
- Partial item returns are not supported. Need to refund part of an item’s price? Return the entire item first, ring up a new sale for the item, and apply a discount to the sale.
The total quantity of selected items appears under the grand total, allowing cashiers to verify the number of items being returned. Each unit priced item counts as 1 item despite the quantity entered.

- Select the tender to return to the customer.
The original sale tender will appear in red as the suggested tender for return. To use a different tender, such as ‘Gift Card’, tap ‘…’
Sales can only be returned to a credit card if originally paid with the ‘Credit’ tender at the register.

- If using the Retail POS (S-Series) app for Android, tap ‘Yes’ to authorize the return.

-
Select a receipt option and tap ‘Done’, or tap 'No Receipt'.Learn how to reprint a receipt for a completed return here.


Split Tender Returns
For split tender sales, either split the return to separate tenders or refund the entire balance to one tender.
- Begin a return for a split tender sale by following steps 1 - 4 in the Current Shift or Previous Shift section.
- Tap 'Split Tender' (iOS), or tap ‘...’ and select ‘Split Tender’ (Android).
Or select a tender, such as ‘Cash’, to refund the entire balance of the sale to.
Retail POS (S-Series) app for iOS Retail POS (S-Series) app for Android
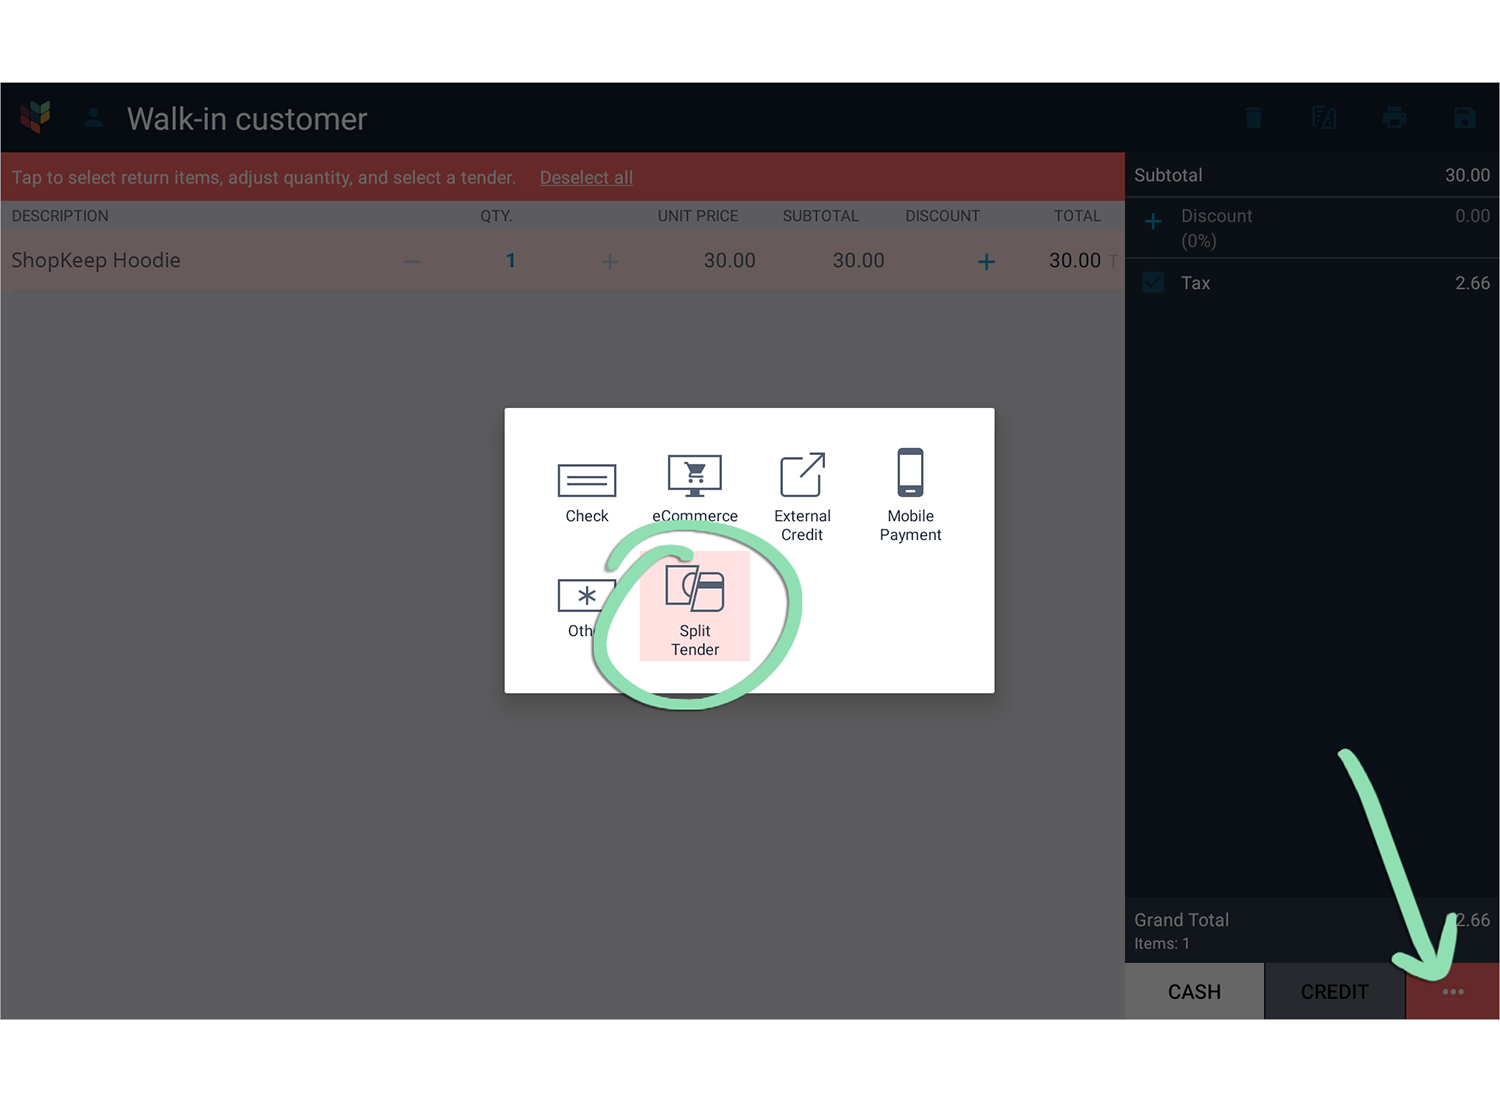
- (Optional) Use the '+' and '–' buttons to change the number of splits.
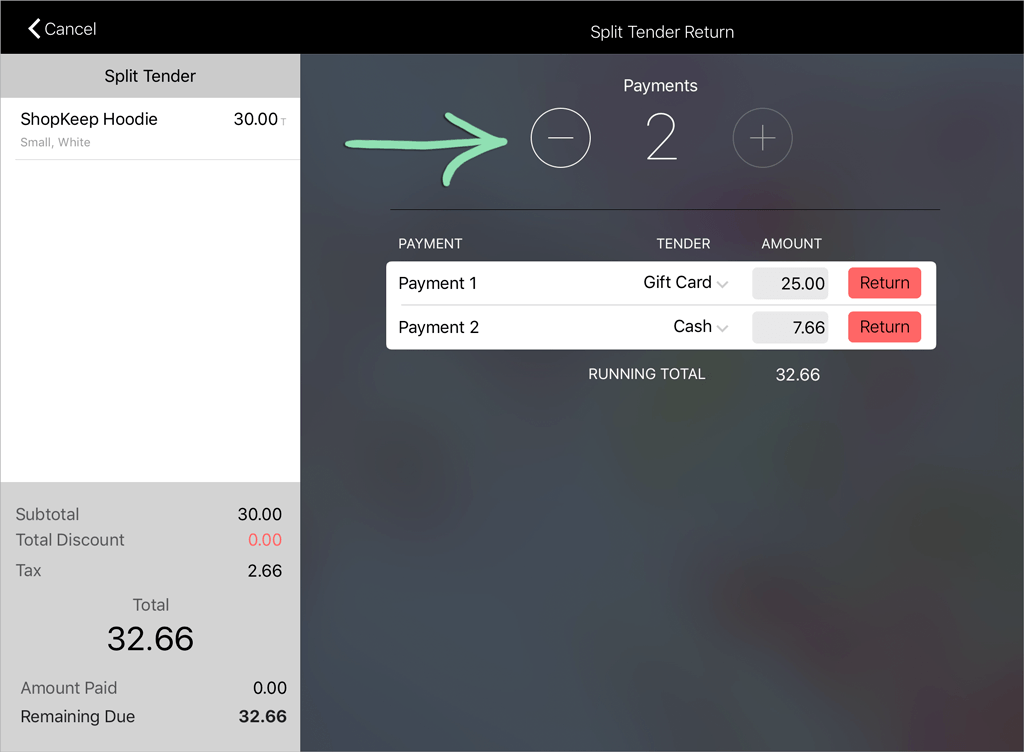
- Confirm the return tenders and amounts.
If necessary, tap a tender or amount to change it.

- Tap 'Return' next to a payment to refund it to the customer.
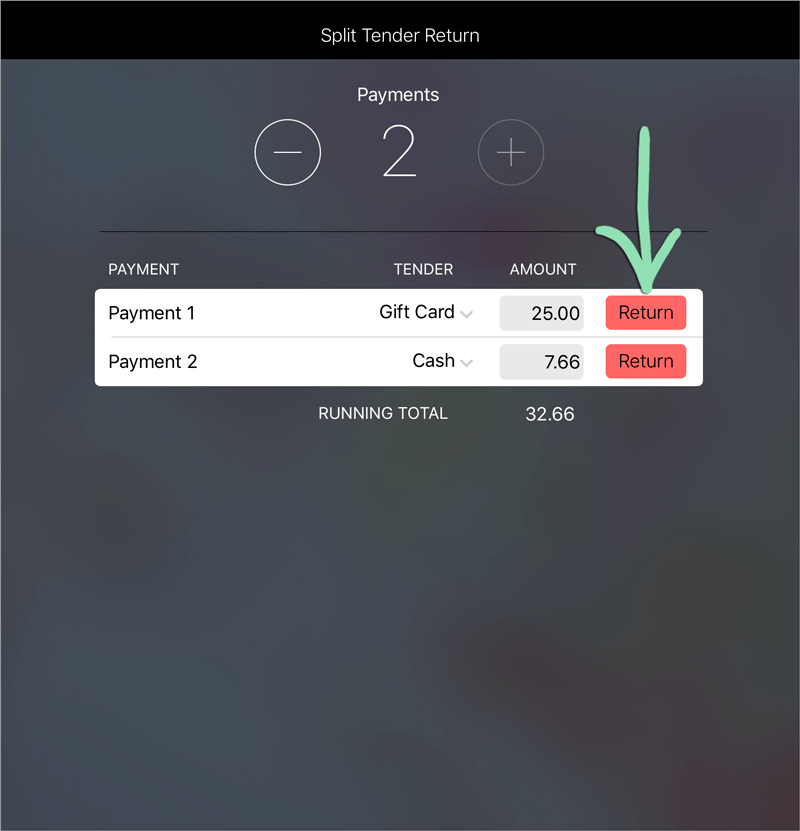
- Select a return receipt option for the payment and tap ‘Done’, or tap 'No Receipt'.
Payment receipts for split tender returns show only the amount refunded for the specific payment. For a receipt listing all the items on the return, print or email a transaction receipt (step 9).

- Repeat steps 5 - 6 for each remaining tender.
- After returning all tenders, tap 'Done'.

- Select a receipt option for the transaction and tap ‘Done’, or tap 'No Receipt'.
Transaction receipts for split tender returns show all items and payments on the return.
Learn how to reprint a receipt for a completed return here.
Manual Returns
If unable to locate the receipt for a sale, perform a manual return to refund the customer anyway.
Manual returns cannot be refunded to a credit card. To process a return for a sale paid by credit card, you must follow the steps in the Current Shift or Previous Shift Returns section above to look up the original credit sale.
-
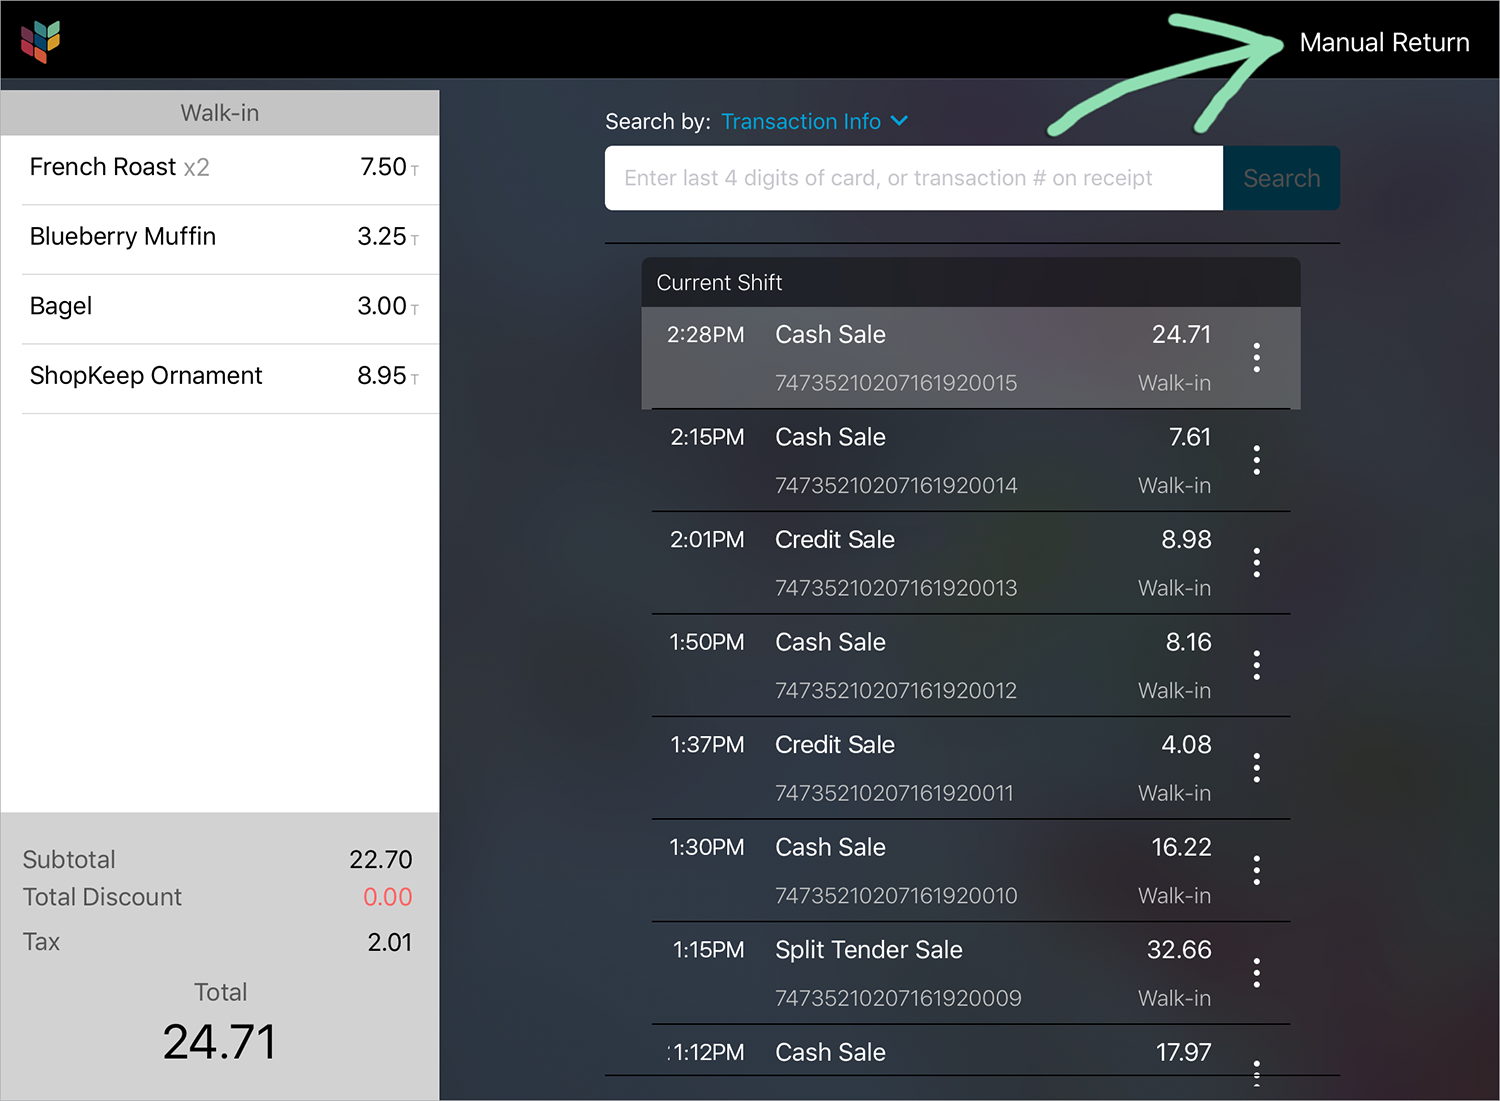
In the Retail POS (S-Series) app, tap ‘Sales History’ on the Main Menu (iOS) or register menu (Android).Retail POS (S-Series) app for iOS
Retail POS (S-Series) app for Android
- Select 'Manual Return'.
- Tap a shortcut, search by item name, SKU, or UPC, or scan an item to add it to the return.

The total quantity of items on the return appears under the grand total, allowing cashiers to verify the number of items being returned. Each unit priced item counts as 1 item despite the quantity entered.
- Select a non-credit tender to complete the return.
-
Select a receipt option and tap ‘Done’, or tap 'No Receipt'.Learn how to reprint a receipt for a completed return here.

