Register Main Menu
The Main Menu is the Retail POS (S-Series) app’s navigation menu which contains the cashier and manager functions used to run your business and assist customers. Performing sales and returns, opening and closing register shifts, and managing items, shortcuts, and receipt settings are just a few examples of features found on the Main Menu.
Access the Main Menu
The Main Menu houses all register functions and a few BackOffice functions as well. Open and close register shifts, perform pay ins and payouts, access cashier and manager controls, and add or edit inventory items from here. Learn how to open the Main Menu below.
- Sign into the Retail POS (S-Series) app.
- Tap the menu button.
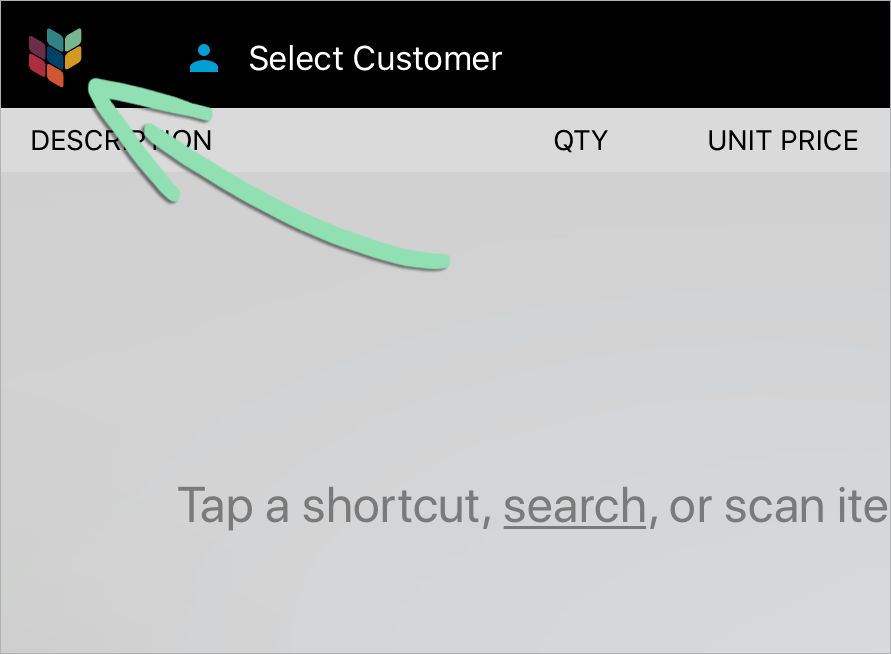
- Select an option on the Main Menu.
Below we cover the cashier, register manager, and Business Owner functions available in the ‘Transactions’, ‘Cash Management’, ‘Setup’, ‘Support’, and ‘Other Lightspeed Apps’ sections.

Transactions
Employees with cashier or manager privileges can run sales and returns, check gift card balances, reprint receipts, and perform other everyday register actions.
New Sale
From this screen, cashiers and managers can ring up customer purchases. Add items by searching, scanning, or using item shortcuts. Change quantities, add discounts, or perform other actions to adjust the sale.
To view detailed directions on how to run a sale, read our Running a Sale guide.
- Tap ‘New Sale’ on the Main Menu.

- Add an item to the sale by tapping a shortcut, scanning a barcode, or searching.

- Adjust the sale as necessary.
To view all the ways a sale can be adjusted, read our Running a Sale guide.
- Tender the sale and select a receipt option.
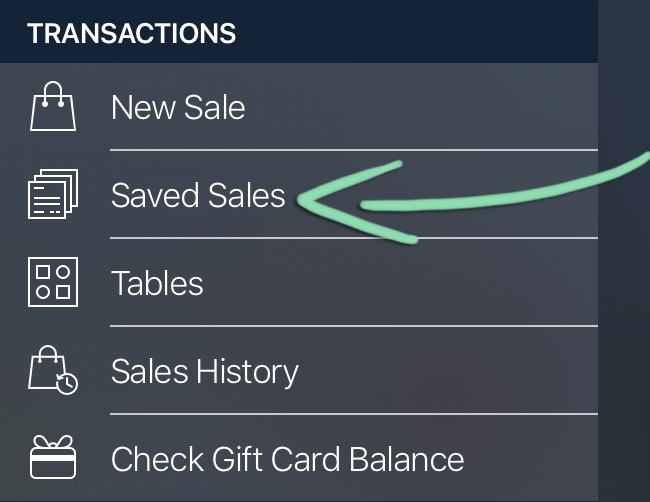
Saved Sales
This screen allows cashiers to view all saved sales, which are tabs that allow sales to stay open until ready for payment. From here, see the details of all saved sales including sale name and time elapsed since saved, modify a saved sale to continue the customer’s order, and close out a sale when it’s time to pay.
To view detailed directions visit our Saved Sales guide.
- Tap ‘Saved Sales’ on the Main Menu.
- Start a new sale by tapping ‘+’ or select an existing sale.

- Adjust the transaction as necessary.
To view detailed directions on how to run a sale, read our Running a Sale guide.
- Tender the sale and select a receipt option.
Tables
The optional Tables screen allows users to create a floor plan of the restaurant or bar, view open and seated tables, and manage orders directly from the table layout, saving time to quickly locate checks according to how tables are arranged in the restaurant.
Enable the table layout feature in BackOffice to be able to customize and use the layout at the register. To learn how to set up and use the table layout and Table Layout Sync, visit our Table Layout guide.
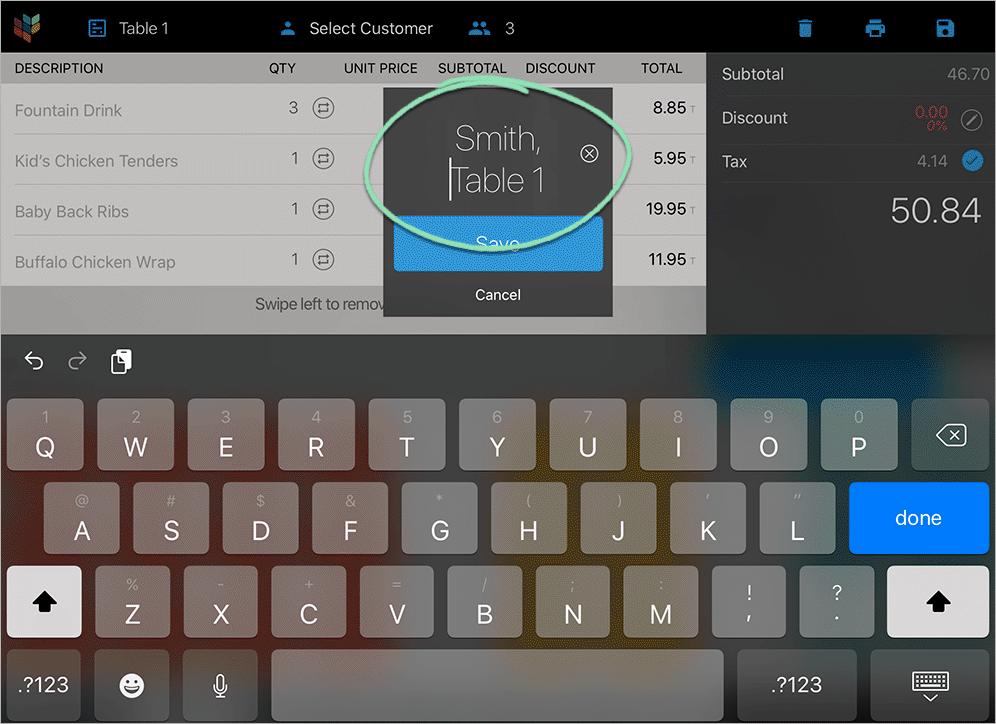
- Tap ‘Tables’ on the Main Menu.

- Tap any grey table to start a new sale or a white table to open an existing sale.

- Add items to the sale and adjust the transaction as necessary
- Tap the disk icon to create a saved sale.

- Enter a name and tap 'Save' to name the sale.
Sales History
The Sales History screen allows a cashier to browse the shift’s transactions, filter through customer transaction history, process returns, reprint receipts or resend them via email (iOS only), and view instructions for requesting tip adjustments (if processing credit cards with ShopKeep Payments by Lightspeed).
- Tap 'Sales History' on the Main Menu.

- To view a transaction from the current shift, find it on the list.
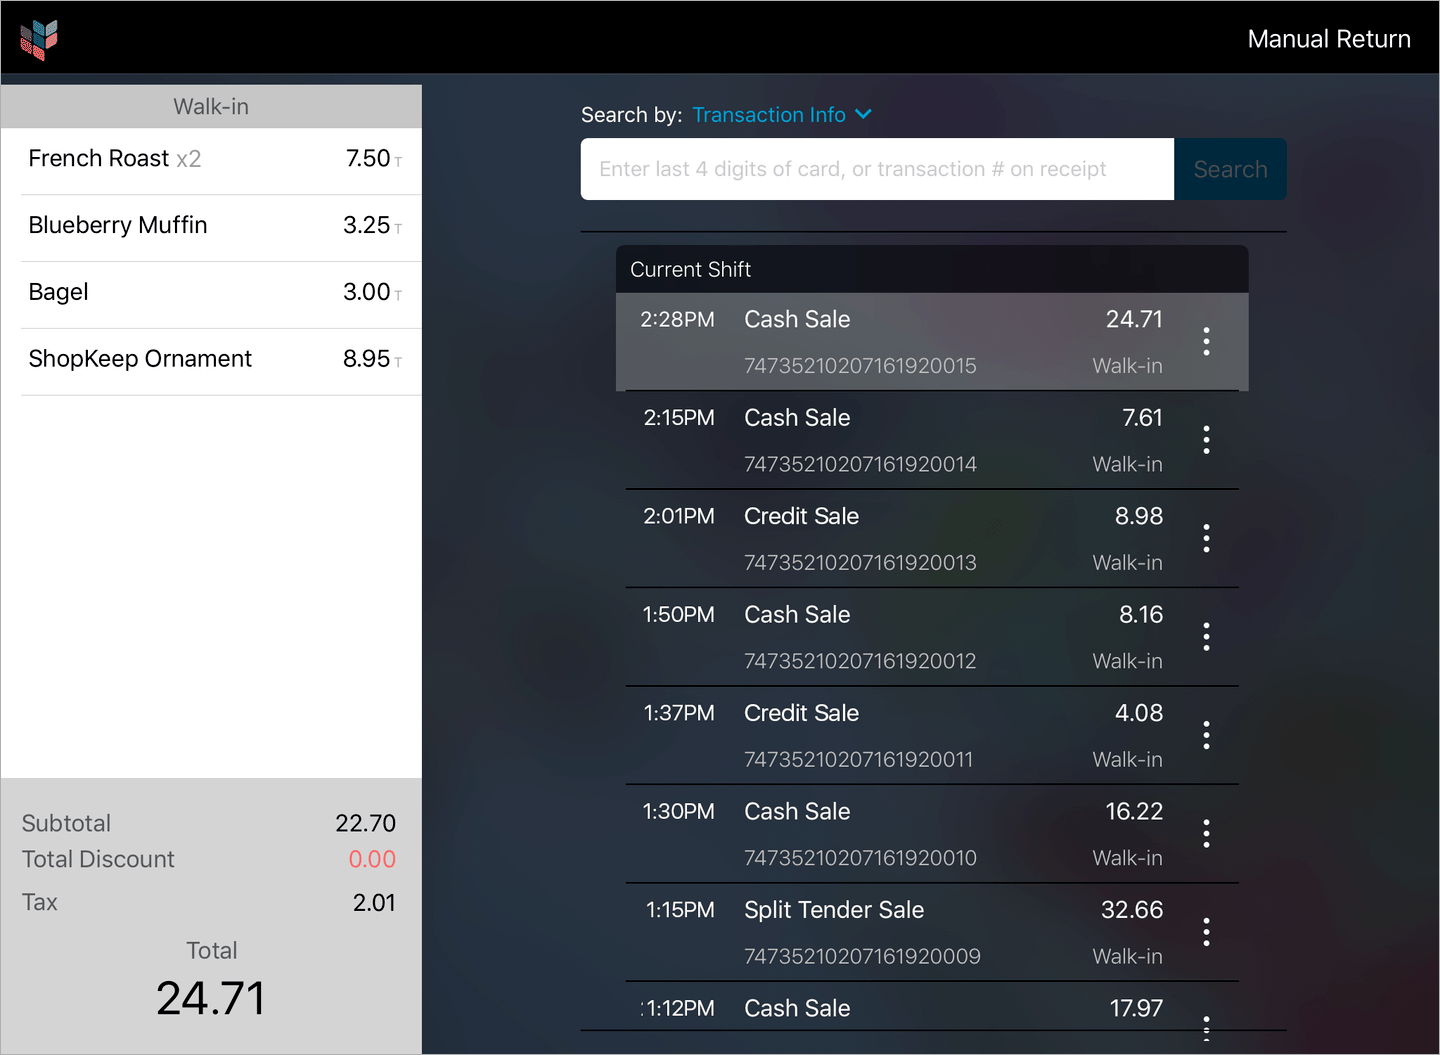
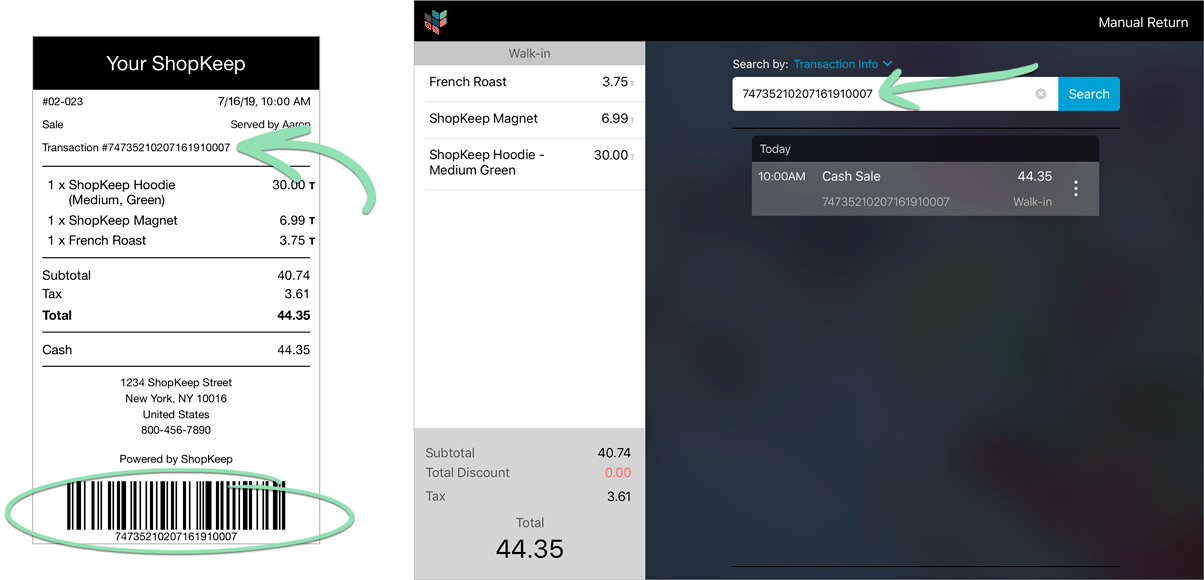
- To view a transaction from a previous shift, search for it or scan the barcode on the original receipt.
To search by original sale details, enter the transaction number or last 4 digits of the customer’s credit card.
To look up a customer’s purchase history, tap the arrow and select ‘Customer’. Then, search by customer name, email, or phone #.
- Tap the 3 dot menu on any transaction, then tap 'Begin Return'
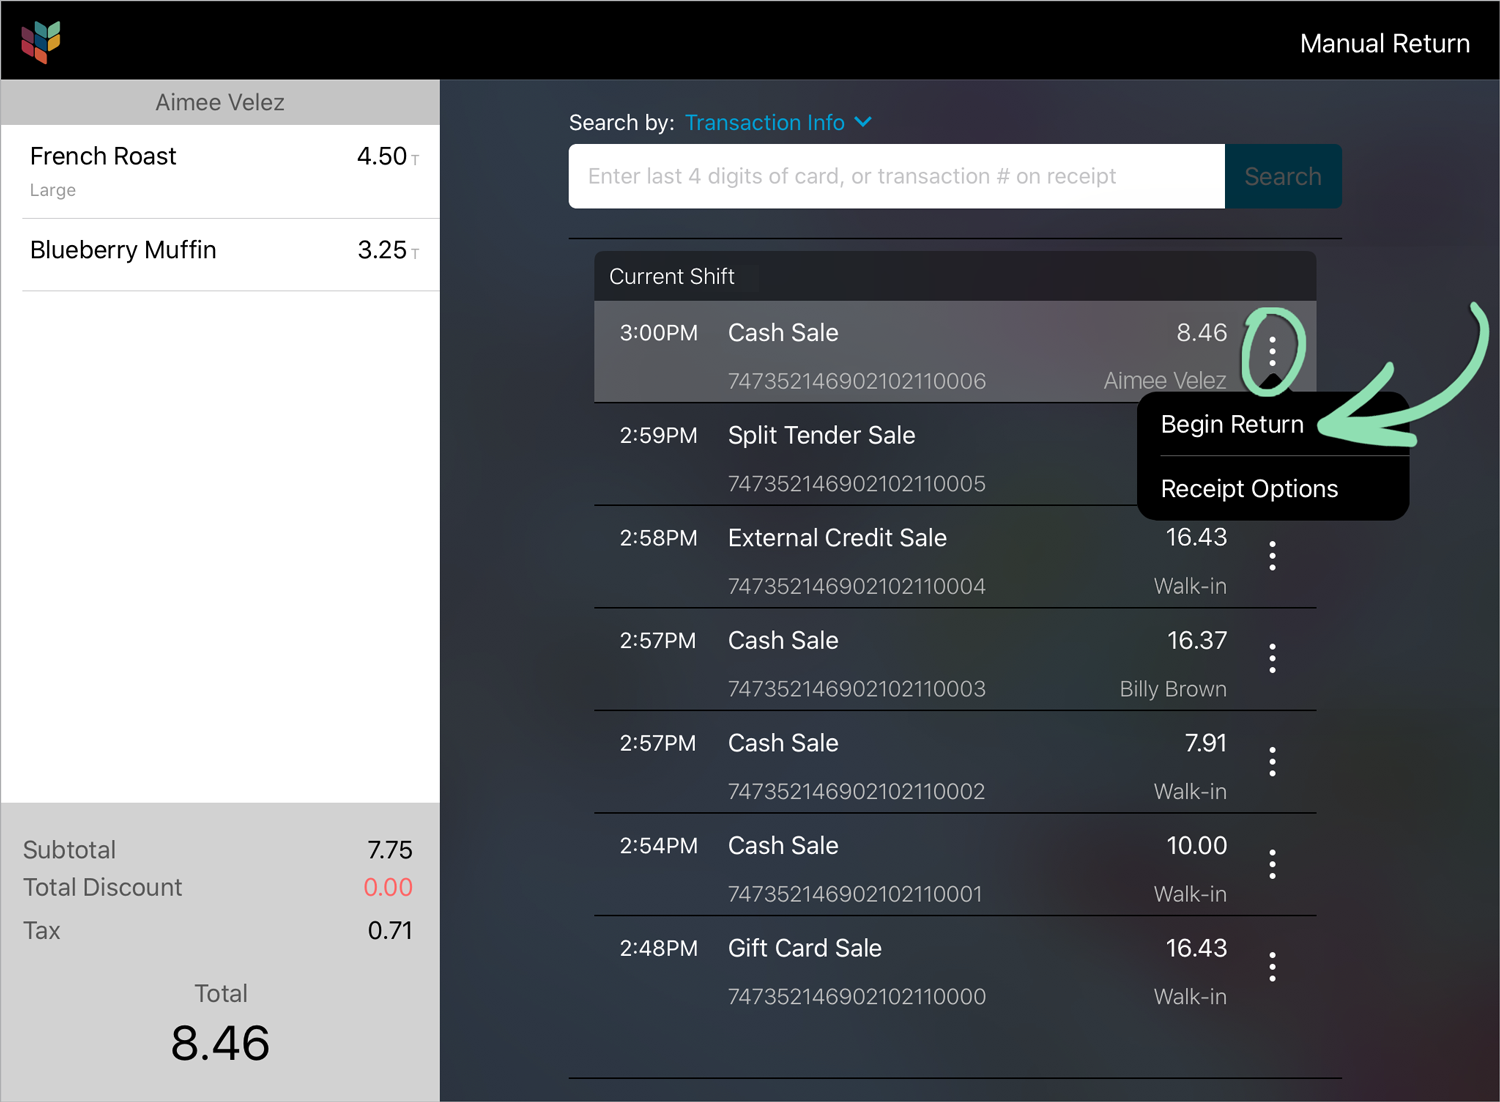
- Visit our Performing Returns article for the full steps to complete the return.
- Select a transaction from the current shift or a previous shift.
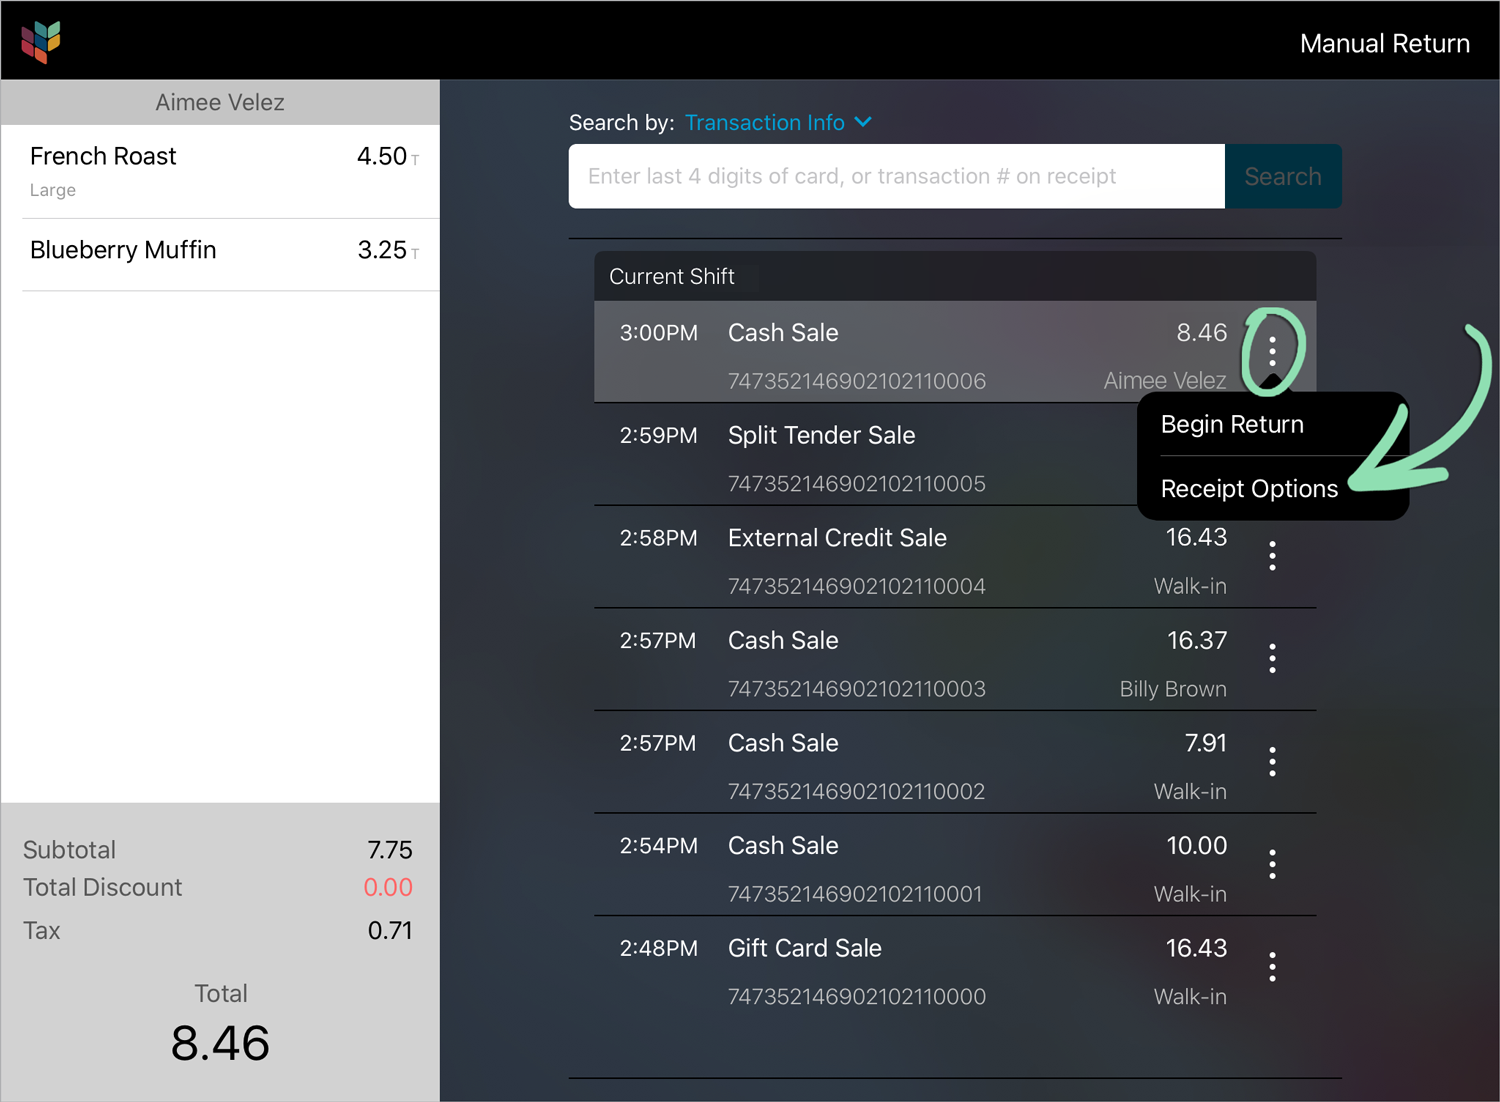
- Tap the 3 dot menu.
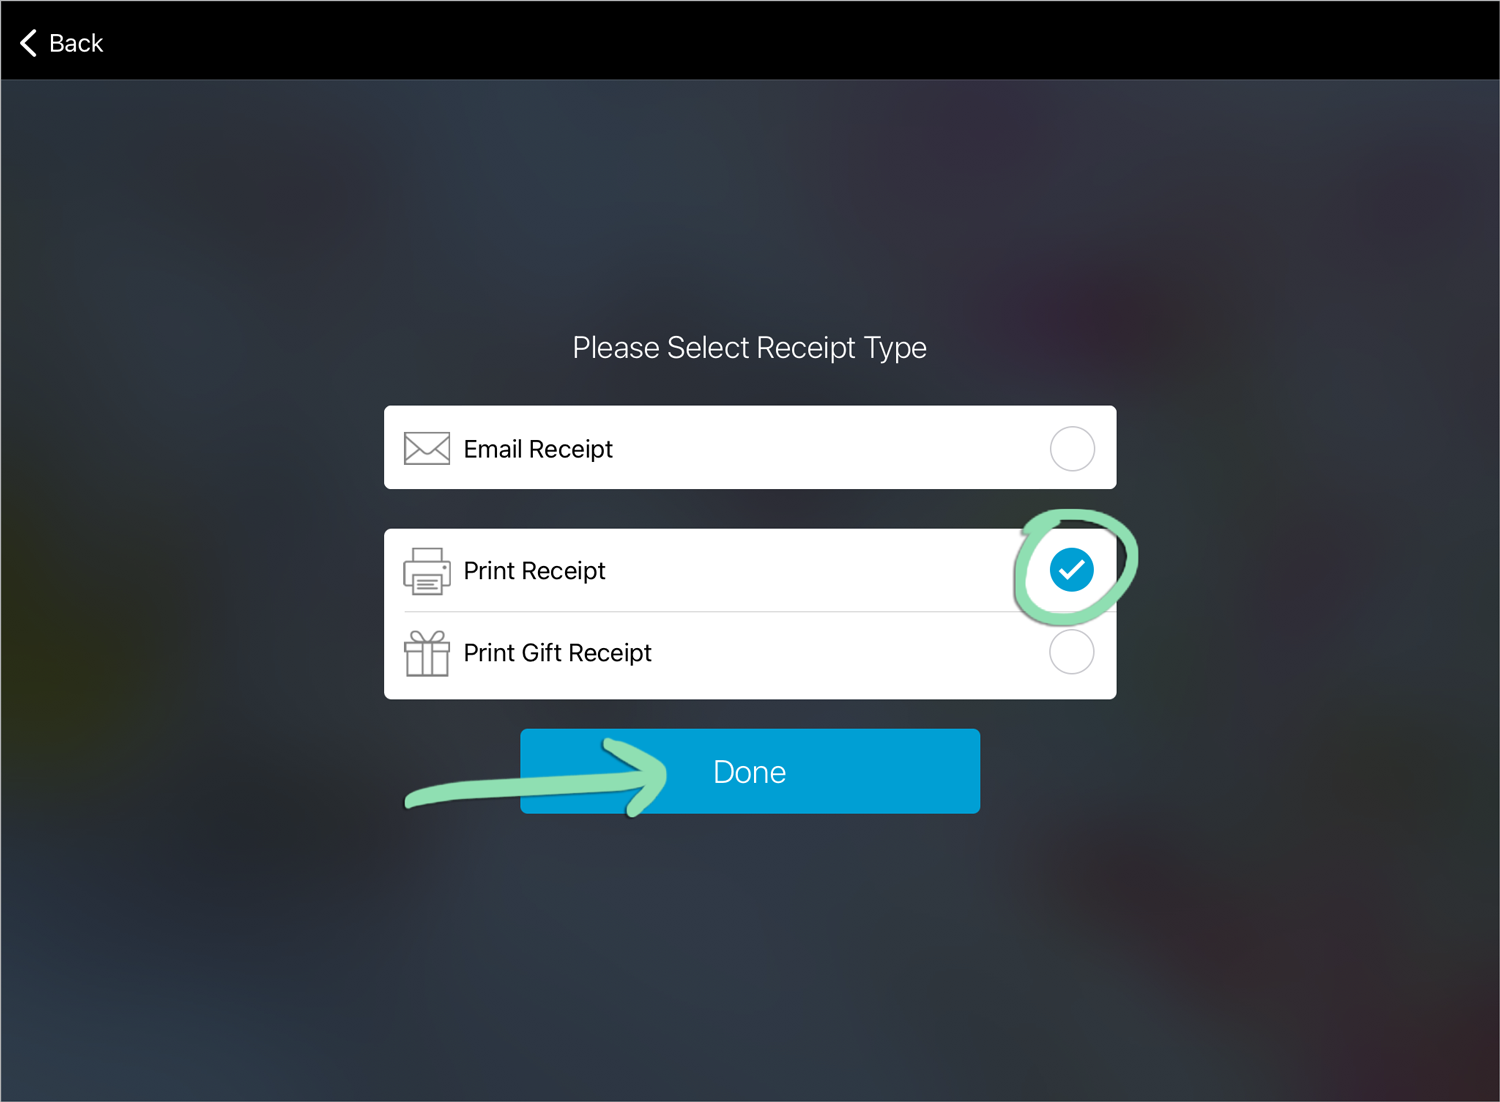
- To reprint or resend a sales receipt, select ‘Receipt Options’ from the menu. On the next screen, select ‘Email Receipt’, ‘Print Receipt’, or ‘Print Gift Receipt’, and tap ‘Done’.
Resending email receipts is only possible in the Retail POS (S-Series) app for iOS. Gift receipts can only be printed for sales from the current register shift.
- To reprint a return receipt, select ‘Reprint Receipt’ from the menu.

This feature is only available to merchants processing credit cards with ShopKeep Payments by Lightspeed and using the Retail POS (S-Series) app for iOS.
- Tap the 3 dot menu on a credit sale, then ‘Adjust Tip’.
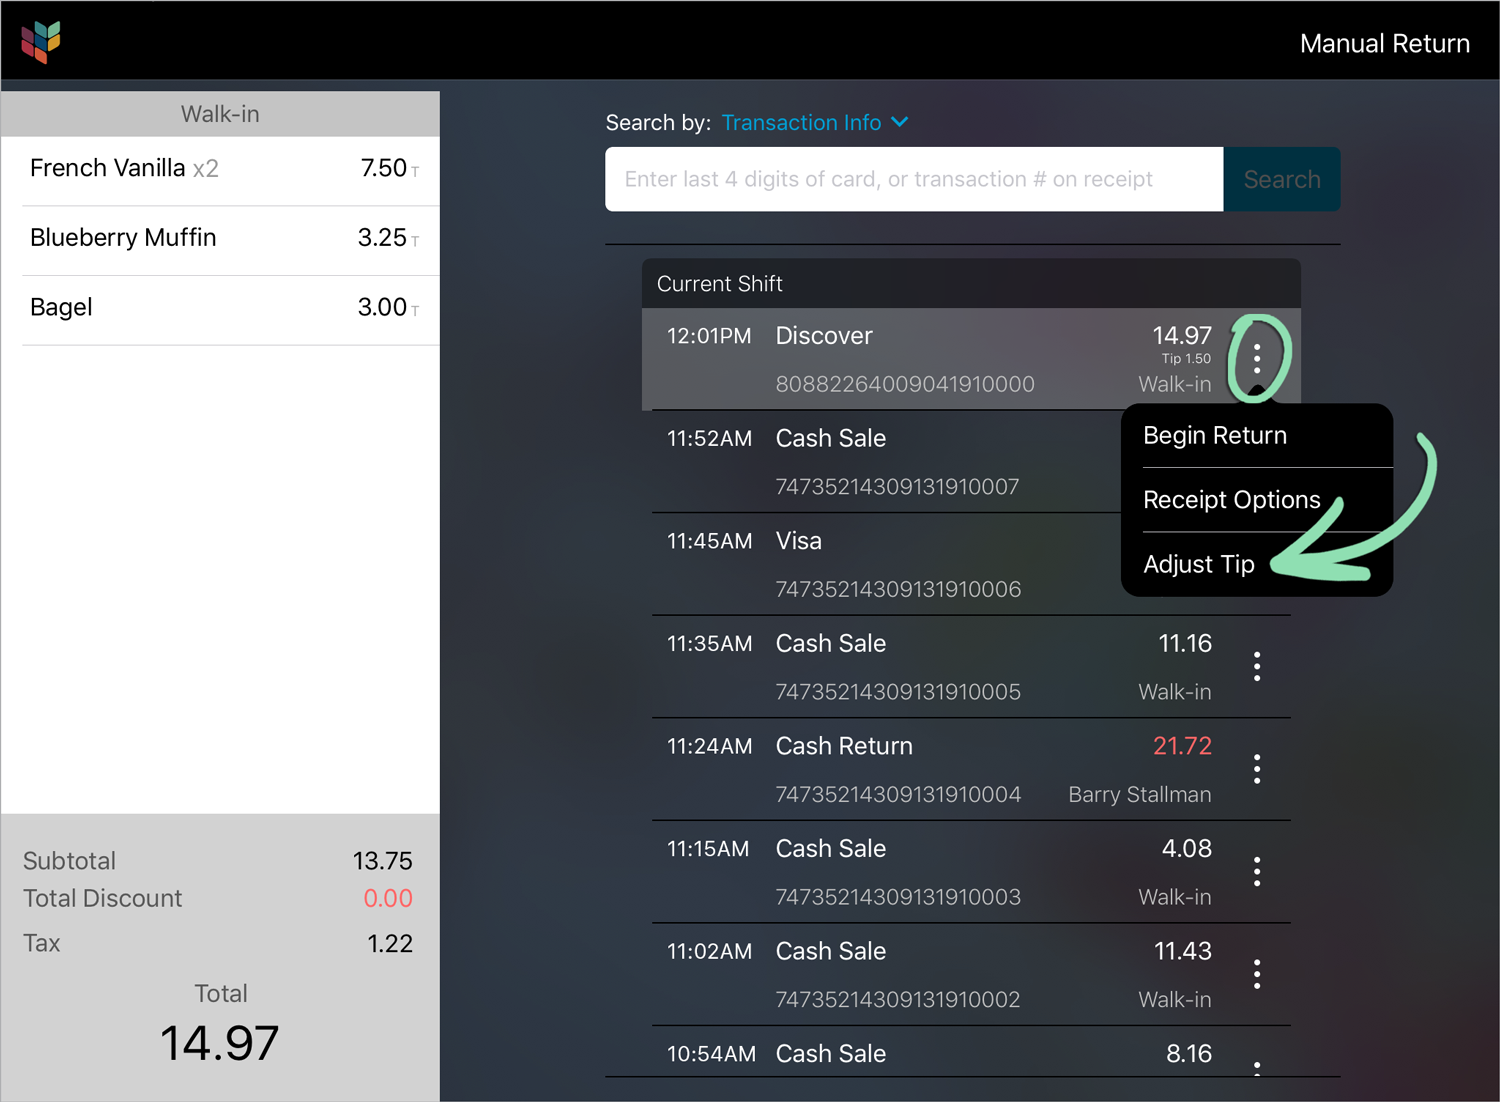
- Follow the instructions for requesting a tip adjustment.
To learn more about the tip adjustment process, read our Tips and Gratuity article.

Check Gift Card Balance
If using Integrated Gift Cards, check the balance of a customer’s card directly from the register.
- Select 'Check Gift Card Balance' from the Main Menu.

- When prompted, swipe a gift card to see its balance.

Cash Management
In this section you will learn how employees open and close register shifts, view register shift reports, open the cash drawer without performing a sale, and perform pay ins and payouts to add or remove money from the register till.
Open and Close Register Shift
Open and close register shifts from the Main Menu to maintain accurate reporting and make it easy to balance the cash drawer each day. Only employees who are Register Managers can open and close register shifts.
Visit our Opening and Closing your Register Shift article to view detailed directions.
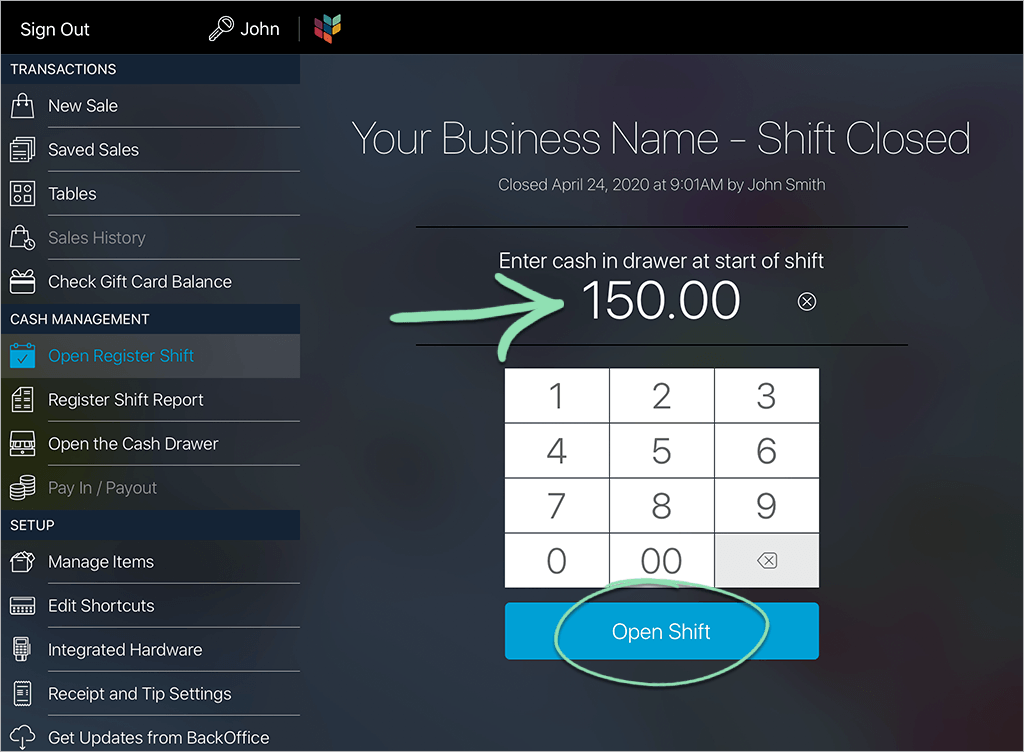
Open the Register Shift
- Sign into the register as a Manager when the shift is closed.
- Use the keypad to enter the opening amount, then tap 'Open Shift'.
The opening amount cannot be changed unless a new shift is opened
Close the Register Shift
- Select 'Close Register Shift' from the Main Menu.
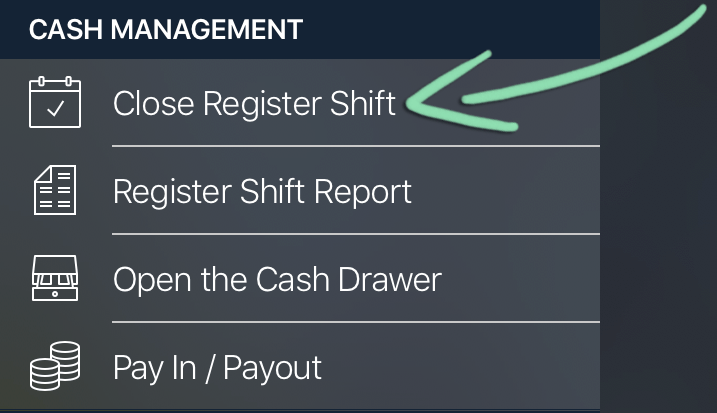
- Enter the amount of cash left in the drawer, then tap 'Close Shift'.

- (Optional) Tap 'Print Z Report' to print a copy of the register shift's totals to a connected receipt printer.
Register Shift Report
The cashier Register Shift Report allows an employee to view information on transactions they ran during their shift. Managers can run the Register Shift Report for individual employees or cumulatively for all employees.
Visit our X and Z Report article to view detailed information for each report.
- Select 'Register Shift Report' from the Main Menu.

- (Optional) Managers can tap 'All Employees' and select an employee to see their individual report.
Cashiers cannot filter by employee. Cashiers can only view their own report that reflects the sales they ran during the register shift.
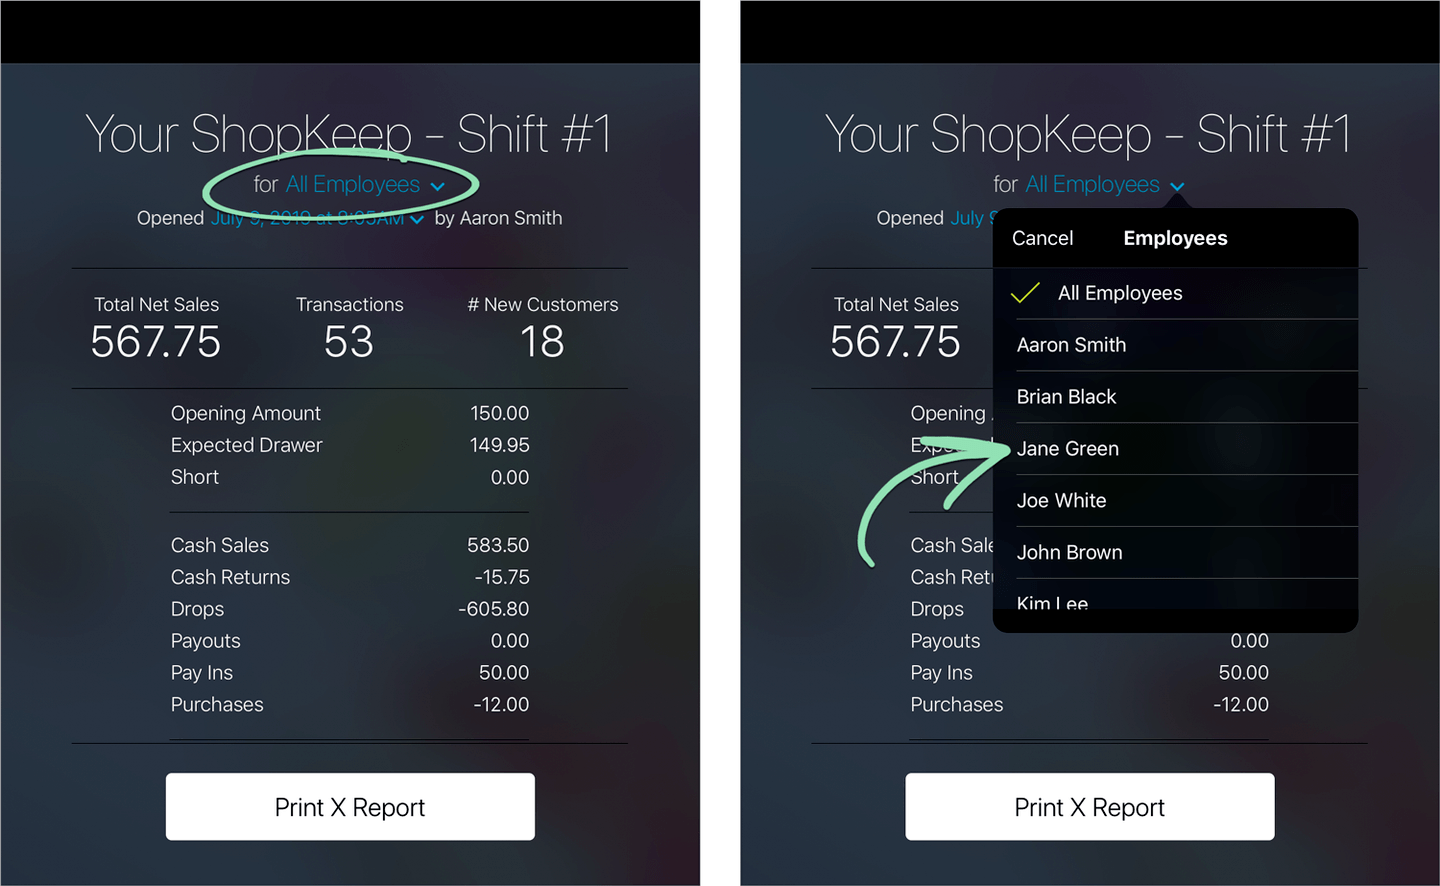
- Tap 'Print X Report' or 'Print Z Report' to print a copy to a connected receipt printer.
To learn about the information contained in this report, visit our X and Z Reports article.

Open the Cash Drawer
Performing a No Sale is a simple way to pop open the cash drawer without running a sale. Use this to open the cash drawer for pay ins or payouts, for customer change, or to insert checks if you don’t have a till with a slot.
Keep track of No Sales in BackOffice with the Pay ins & Payouts report.
- Select 'Open the Cash Drawer' from the Main Menu.
If the cash drawer does not open, visit our troubleshooting guide for help fixing the issue.

Pay In / Payout
Perform a payout any time you need to remove money from the register for any reason other than a return. Need to add more cash to the drawer mid-shift? Do a pay in. Pay ins and payouts help keep the cash drawer balanced and are recorded in BackOffice reporting.
Visit our Pay Ins and Payouts article to view detailed information for each type.
- Select 'Pay In / Payout' from the Main Menu.

- Select a type of pay in or payout.
- Safe Drop is for making cash deposits from the till into a safe or bank.
- Payout is a general reason for removing cash from the drawer.
- Pay In is used to add money to the drawer.
- Buy Inventory is for purchasing business supplies or ingredients.
- Non-Cash Gratuity is for paying employees credit and gift card gratuity from the till.
- Enter an amount and tap 'Continue'.

- Enter a comment (optional) and tap 'Done'.
- Tap 'OK' to complete the pay in or payout.

- Tap 'Open the Cash Drawer' on the Main Menu to open the cash drawer and add or remove money.
Setup
Manage Items
Staff assigned BackOffice Manager permissions will see this section on the Main Menu and are able to add or edit inventory items right from the register.
Visit our Adding Basic Items or Adding Items with Variants articles to view detailed directions.
- Select ‘Manage Items’ from the Main Menu.

- Tap ‘Add New’ to create a new item or select an item to edit

- Enter or edit the information for the item.
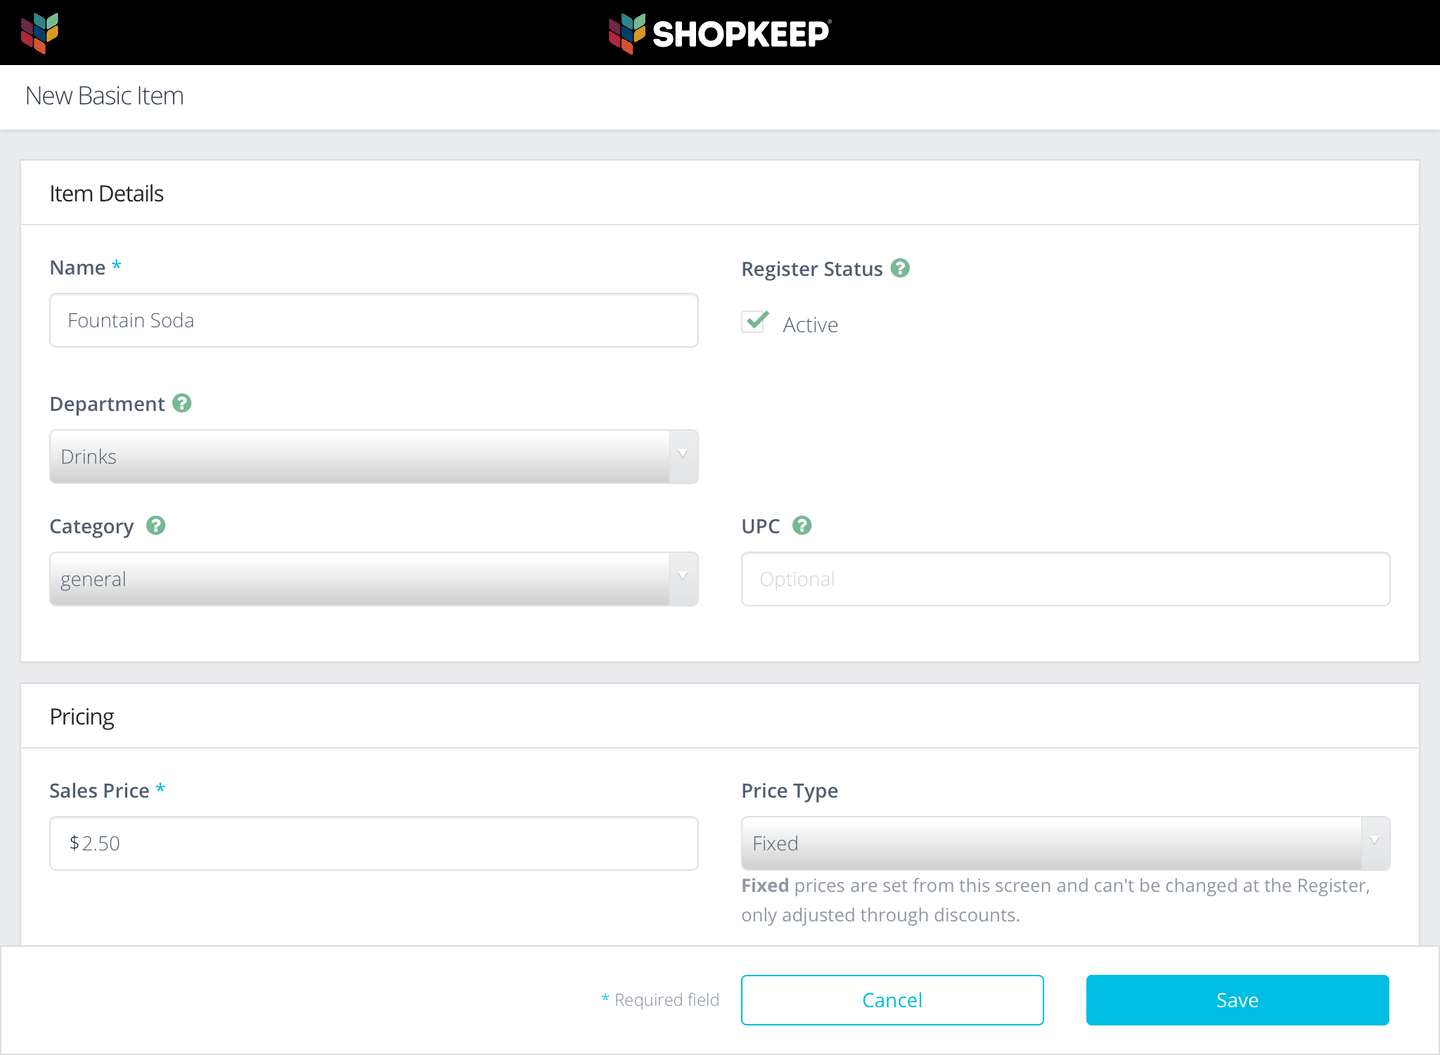
- Tap 'Save'.
Edit Shortcuts
Staff assigned BackOffice Manager permissions will see this section on the Main Menu and are able to create item shortcuts and manage the shortcut panel right from the register.
Visit our Item Shortcuts article to view detailed directions.
- Select ‘Edit Shortcuts’ from the Main Menu.

- Select an item from the list and drag it down to a space on the shortcuts panel.

Integrated Hardware
Set up a receipt printer, ticket printer, or credit card reader for use with the Lightspeed Retail POS from the Integrated Hardware screen.
Printers and card readers must be physically set up and powered on before they will appear on the ‘Integrated Hardware’ screens. Visit our Hardware page to locate the setup guide for your specific device.
- Select 'Integrated Hardware' from the Main Menu.

- Tap 'Card Readers' or 'Printers' depending on the device.

- Follow one of our hardware setup guides for detailed instructions.
You can find all our setup articles for hardware here.
Receipt and Tip Settings
Only Business Owners will see this section on the Main Menu and be allowed to update the business information that appears on receipts and other receipt settings.
Visit our Receipt Setup article to view detailed directions and information on all settings.
- Select ‘Receipt and Tip Settings’ from the Main Menu.

- Select a tab to edit information or settings.
Business Info | Where you enter the store name, address and contact information, website URL, and upload the store logo.
Paper Receipt | Where you manage settings specifically for paper receipts such as customized text, customer delivery information, and logos on receipts. Paper receipt settings also apply to the receipt image shown on email receipts.
Email Receipt | Where you manage settings for email receipts including logo links, promotional messaging, and social media links.
Tips and Signature | Where you manage tip and signature settings for credit card sales. - Enter the information for the business.

- Tap ‘Save’.
Get Updates from BackOffice
After making updates in BackOffice, such as updating tax settings or importing new inventory, use Get Updates from BackOffice to sync changes to the register.
Note: This does NOT update the Retail POS (S-Series) app itself. App updates are available via the App Store.
- Select 'Get Updates from BackOffice' from the Main Menu.

- Tap ‘Get Updates’.
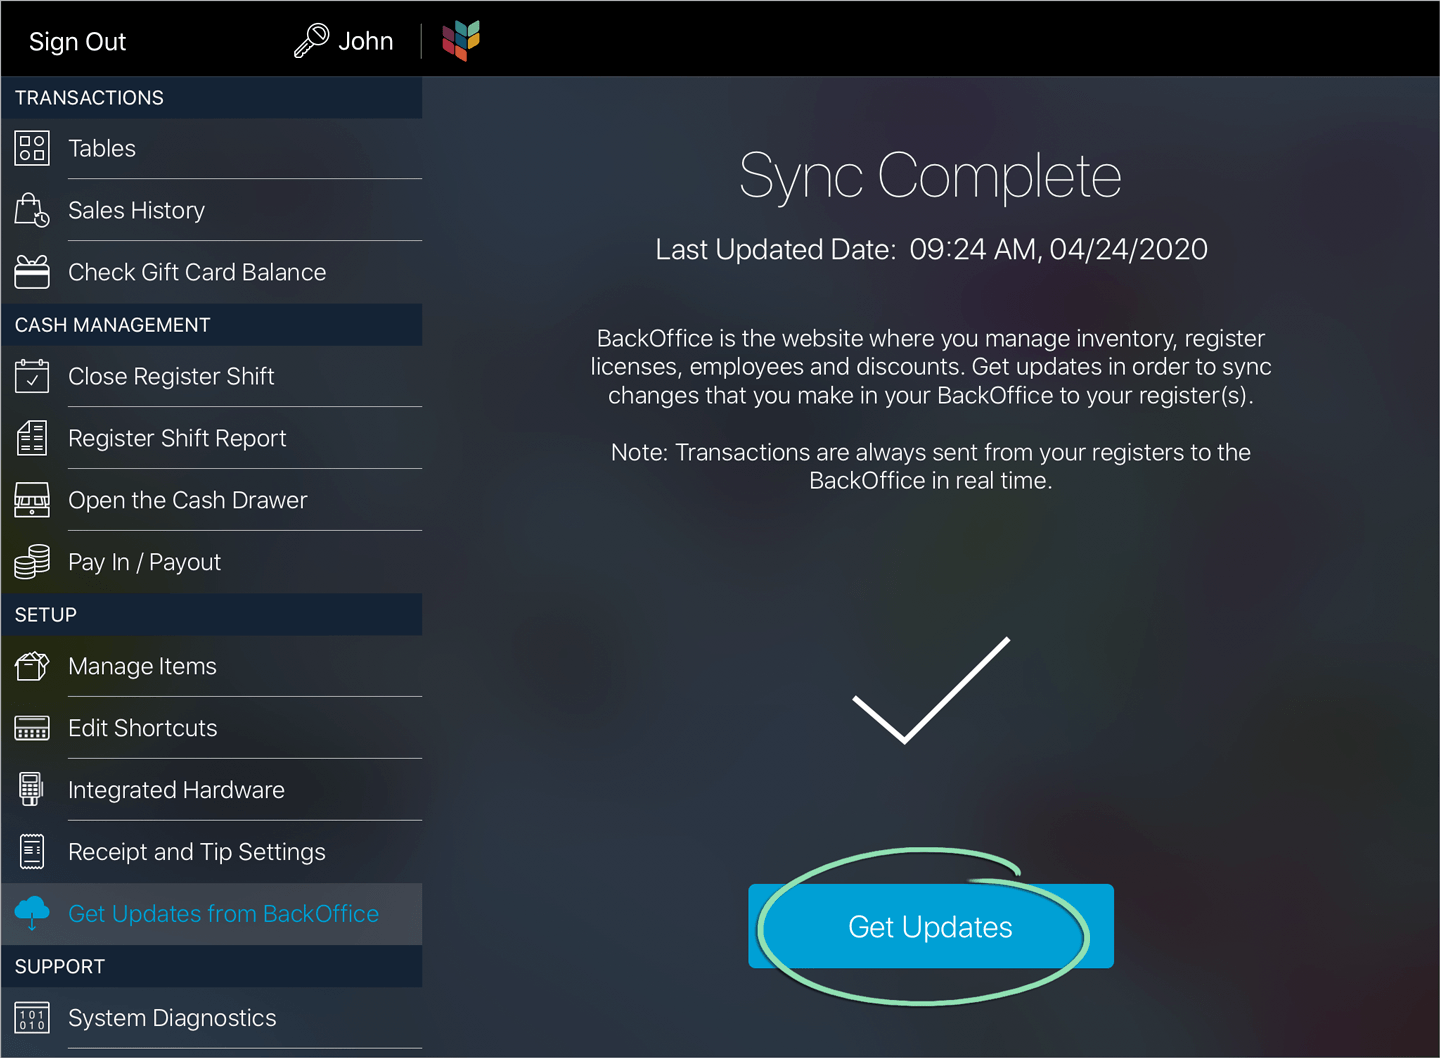
- Wait for the Lightspeed Retail POS to finish syncing.
If you receive an error while getting updates, visit our troubleshooting guide for help fixing the issue.
Support
System Diagnostics
This screen shows information on the current state of the register and its hardware connections.
- Select 'System Diagnostics' from the Main Menu.
Learn about each part of the Diagnostics screen here.

Register Settings
This tab contains the settings for toggling Saved Sales Sync, Table Layout Sync, and ticket printing for Lightspeed eCom (E) online orders off and on for that specific register. ‘Register Settings’ is only available to register managers.
- Select ‘Register Settings’ from the Main Menu.

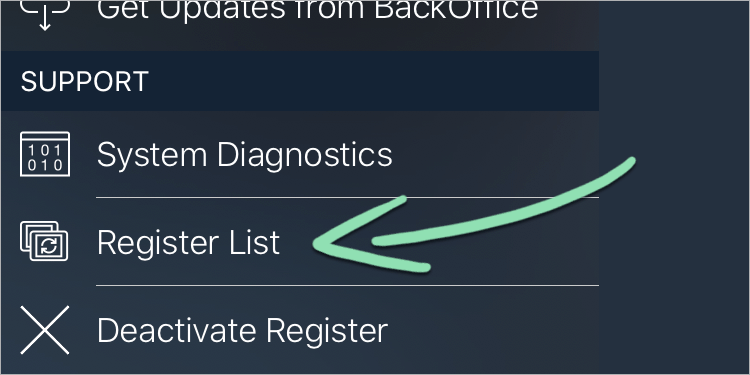
Register List
For stores with multiple registers connected via Serverless Sync™, the Register List shows which registers are currently connected and which are disconnected. Connected registers can share saved sales with one another, but disconnected registers cannot.
The Register List is only available when Serverless Sync™ is enabled. Learn how to set up and use this feature here.
- Select 'Register List' from the Main Menu.
Deactivate Register
Deactivating a register frees up a register license, allowing you to remove a license from the account or activate the Retail POS (S-Series) app on a different device.
- Select ‘Deactivate Register’ from the Main Menu.

Need Help?
If you need support or have questions, visit the ‘Need Help?’ section of the Main Menu. From here, you can chat with a Customer Care agent or search for answers on the Help Center.
- Select ‘Need Help?’ from the Main Menu.
- Click 'Chat with an agent' to chat with Customer Care.
To view the Help Center instead, click ‘Visit the Help Center’.

- Enter your name and email address.
- Click 'Chat with an agent' to connect with a Customer Care representative.

Other Lightspeed Apps
Cashiers and Register Managers can access additional Lightspeed Retail apps, such as Lightspeed Pocket, directly from the Main Menu. Tap the tab to launch an app if it is installed on your register device or, if not installed, tap to open the App Store page where the app can be downloaded.
This section is only available in the Retail POS (S-Series) app.
Lightspeed Pocket
The Lightspeed Pocket app for iOS and Android allows you to view sales reporting for all your business locations, download customer receipts, check employee time clock punches, and run sales by entering a total amount including tax.
- Select 'Lightspeed Pocket’ from the Main Menu.
Learn how to download, set up, and use Lightspeed Pocket here.
