Add an item with variants
An item with variants is a group of similar items with different attributes, for example, a t-shirt that comes in many sizes and colors, or packaged food with many sizes and flavours. An item with variants lets you create every item in the group at once. This guide will help you learn how to set up items with variants and how to sell them at the register.
Watch our Adding an Item with Variants video:
What are items with variants?
To understand how best to use items with variants, let’s define what they are, look at a few examples, examine benefits, and review limitations.
Examples of items with variants:
- Clothing: Clothing items, such as shirts and pants, are often sold in multiple sizes, colors, and materials, making them ideal for items with variants.
- Prepackaged food: Prepackaged food items often come in different portion sizes and flavors. Examples include potato chips and bottled beverages. For made-to-order food items, use basic items with modifiers.
- Miscellaneous retail items: Items with variants can be used for a number of other retail items, such as vape liquid (multiple nicotine levels and flavors), jewelry (different sizes and colors), and sheets (sizes, colors, and materials).
Benefits of items with variants
Benefits of items with variants:
- All variants are created at the same time, so there is no need to set up a separate item for each.
- Each variant can have its own price, cost, quantity on hand, UPC, and reorder trigger.
- Multiple variants can share the same UPC.
- On the register item shortcuts panel, all of an item’s variants are contained in a single shortcut.
Compatibility
Items with variants are not compatible with:
Create an item with variants
Fill in the item’s description, configure some optional settings, and enter the item’s options to create a new item with variants in BackOffice. Employees with the relevant BackOffice permissions also have the ability to create items with variants within the Retail POS (S-Series) app.
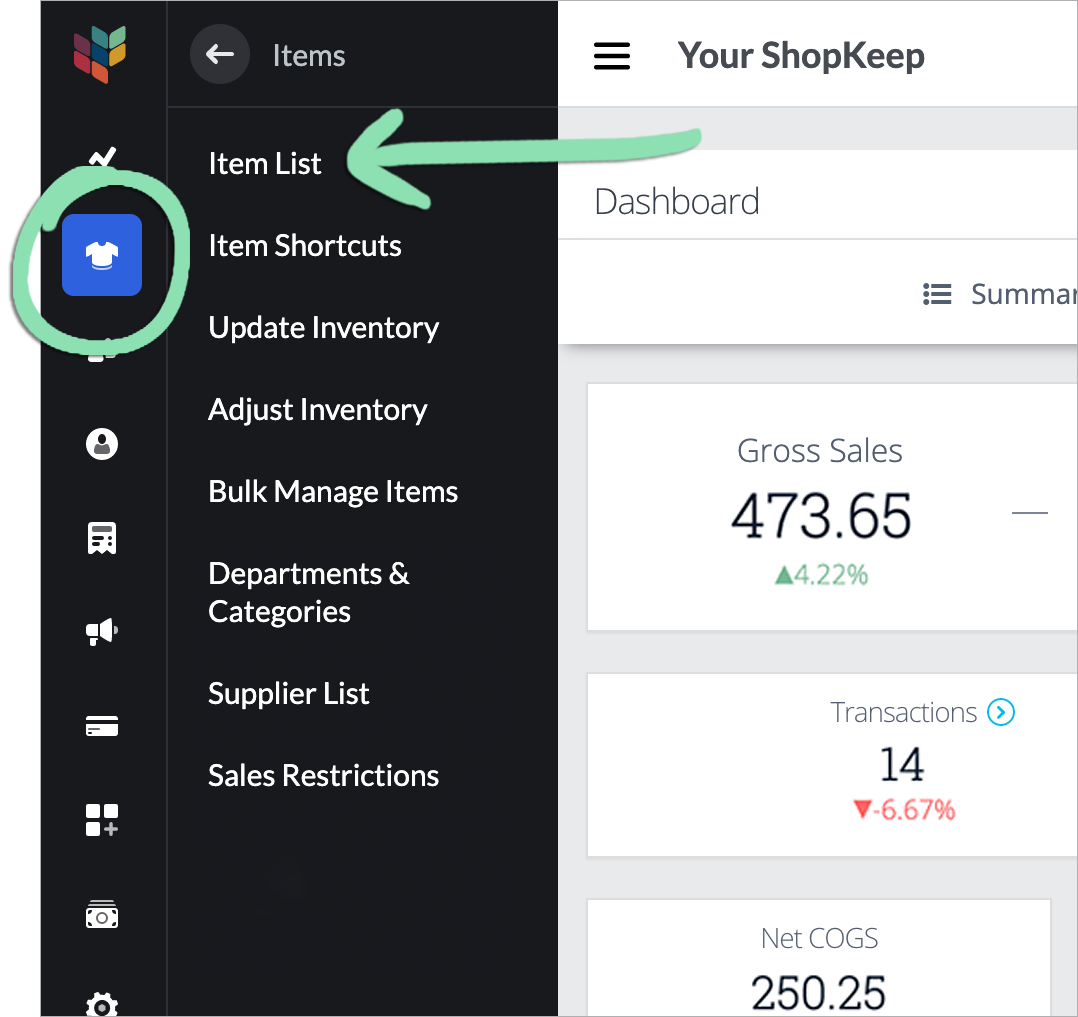
- Visit the Item List in BackOffice or from the Retail POS (S-Series) app (employees with BackOffice permissions only).
- In BackOffice, click ‘Items’ and select ‘Item List’.
- In the Retail POS (S-Series) app for iOS, tap ‘Manage Items’ on the Main Menu. For the Retail POS (S-Series) app for Android, tap ‘Setup’ on the register menu, then select ‘Manage Items’.
Retail POS (S-Series) app for iOS Retail POS (S-Series) app for Android
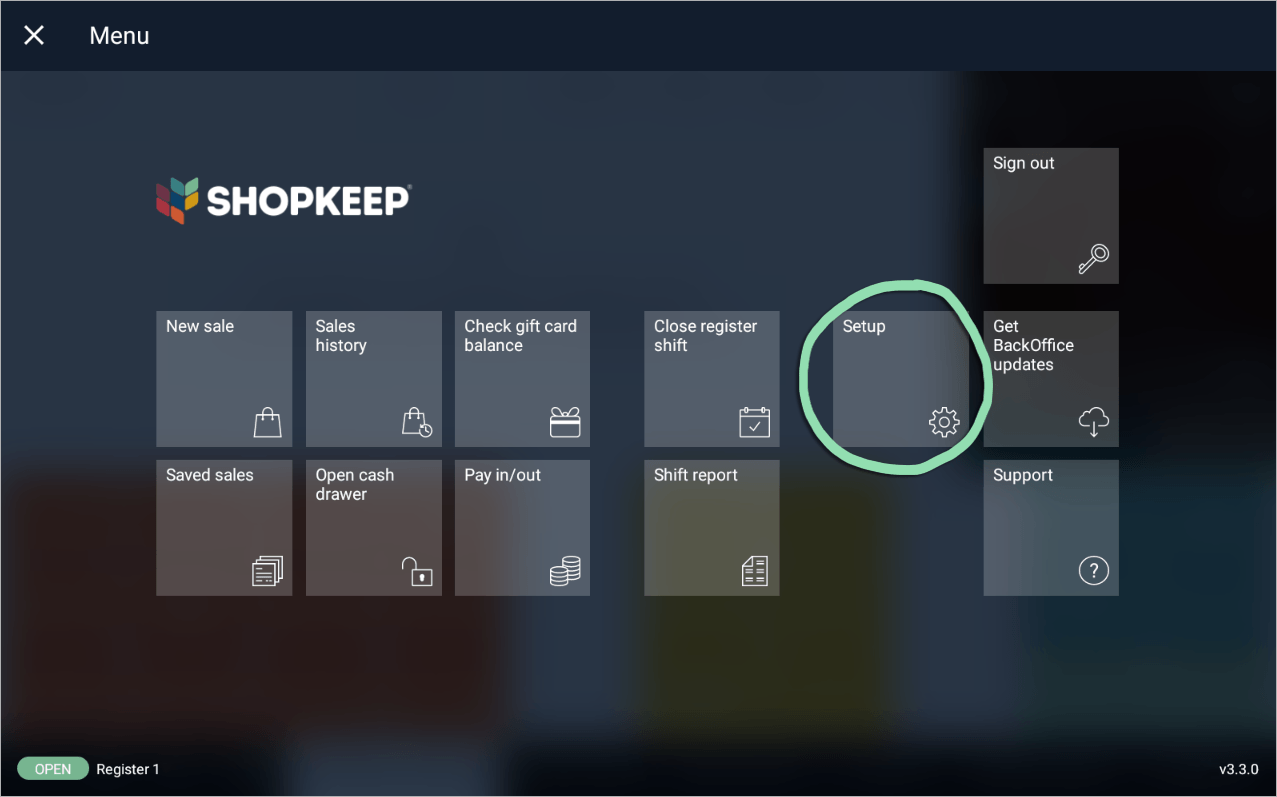
- Click 'Add New'.

- Select 'Create' under 'Item with Variants'.

- Fill in the 'Item Description' details.
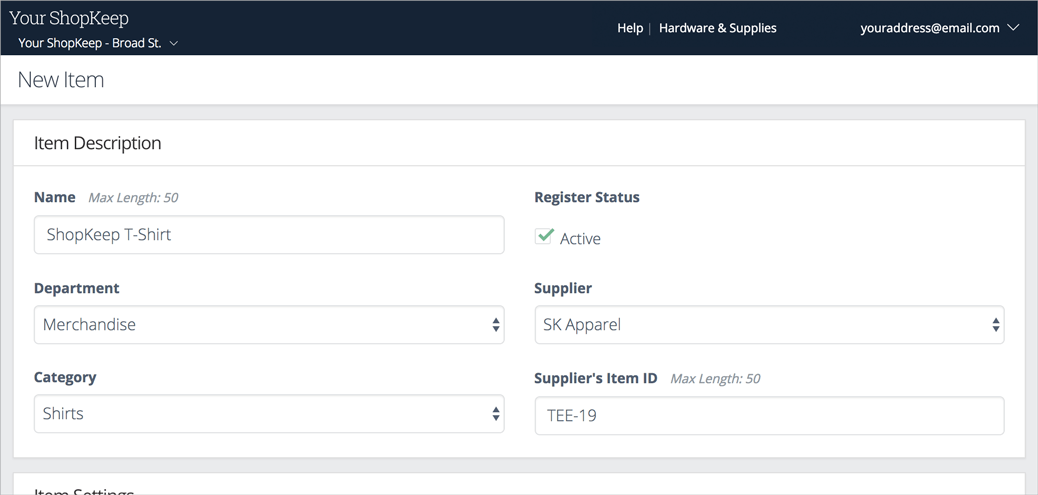
Name | How the item is identified at the register, on receipts, and in BackOffice. This field is required. Examples: T-Shirt, Bottled Water, Sheet Set.
Department | Grouping used for inventory organization and reporting. Examples: Clothing, Cold Beverages, Bedding.
Category | Subgroup within a Department, also used for organization and reporting. Examples: Men’s Shirts, Water, Sheets.
Register Status | If checked, the item can be sold at the register. If unchecked, the item is added to inventory but cannot be sold.
Shortcuts for inactive items remain on the Shortcuts Panel until removed. Visit our troubleshooting guide to learn how to remove an item’s shortcut.Supplier | Vendor from whom the business gets the item. This is used for item organization, reordering, and reporting.
Supplier’s Item ID | The item’s reorder code. This field is only active when a ‘Supplier’ is entered.
- (Optional) Customize the default 'Item Settings'.
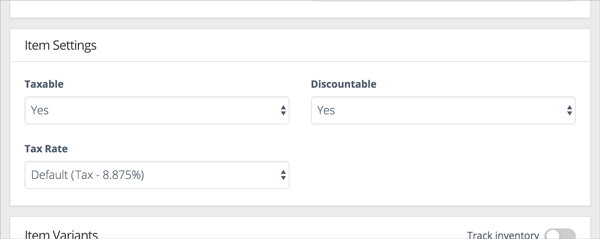
Taxable | If Yes, tax will be charged for the item. If No, tax will not be charged.
Tax Rate | Select an existing tax rate, or create a new one to override the default tax rate for the item. This field is only active when ‘Taxable’ is set to ‘Yes’.
Discountable | If Yes, discounts can be applied to the item. If No, the item cannot be discounted.
- Set up the options and option values that will define the item's variants.a Enter an ‘Option Name’.Options are the traits that distinguish between an item’s variations. Options cannot be added, deleted, or edited after saving the item. Examples: Color, Size, Material.
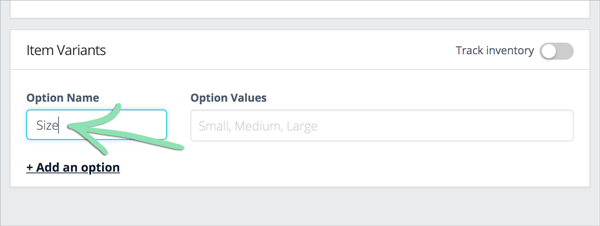 b Enter ‘Option Values’, separating each with a comma.Option values are the specific types of options. Option values can be added or removed but not renamed after saving the item. Examples: Blue, Large, Cotton.
 c (Optional) Click ‘Add an option’ and repeat a – b in step 6 to add more options.Items can have up to three options and 150 total variants.
 - (Optional) Toggle 'Track Inventory' on to track the item's quantity on hand, cost, and reorder trigger.

- Uncheck the 'Active' box for any variants not being sold.
Inactive variants cannot be sold at the register. Reactivate a variant at any time by rechecking the box.
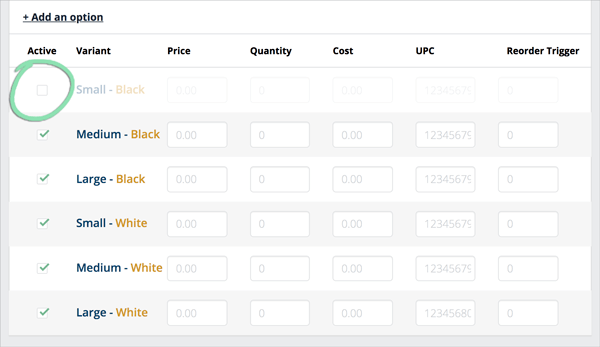
- Fill in each variant's details.
Click ‘Copy to all’ to copy a value from one variant to the others.

Price | Amount customers pay at the register. This is a required field.
Quantity | Total amount in stock. This field only appears when ‘Track Inventory’ is enabled.
Cost | How much the business pays to acquire the variant. This field only appears when ‘Track Inventory’ is enabled.
UPC | 2 – 55 digit product barcode that can be scanned at the register to ring up the variant. Cashiers can also search for items by UPC at the register.
UPCs with letters are not supported. If a product UPC contains letters, print a new label using the item’s SKU via Lightspeed Label Printing to scan the item at the register.Reorder Trigger | Low quantity amount that, when reached, prompts the item to appear on the Reorder Report. This field only appears when ‘Track Inventory’ is enabled.
- (Optional for multi-location accounts) Check the box to create the item in all linked locations.
This option is available for merchants with multiple linked locations and is only visible to the Business Owner in BackOffice.
- In linked locations where the item is created, its variants are given a quantity on hand of 0 and the item is charged the default tax for that location. Separate labels must be printed from the BackOffice of each location as variants will have different SKUs in each store.
- In locations where an item with the same name or UPC already exists, the new item will not be created.

- Click the default save option or click the arrow to select another save option to finish creating the item.
-
Save and create new | Save the current item and create a new basic item.
Save and keep editing | Save the current item and remain on the details page to make adjustments.
Save and close | Save the current item and return to the Item List.The last used selection will be remembered as the default save option.

- (Optional) If creating the item in linked locations (step 10), finish setting it up in the other store(s).a Refresh the Item List to check the status of the item.Once created in all linked locations, the blue status bar will disappear when the page is refreshed.
 b After the item is created, switch to another location.c – f below are optional. Do only what matches your business needs.c From the Item List or Bulk Management, update item properties that are different for the new store (e.g. price changes, reorder triggers, etc.)Items are not synced between stores. Each store’s inventory is separate and must be managed independently from that location’s BackOffice.d Adjust the quantity on hand of each variant to the correct quantity for that location.e Assign the item to a tax rate.g Repeat b – f in step 12 for each additional location.
 - If creating the item from BackOffice, get updates on the iOS or Android register to sync the changes to the register.
Receiving an error when getting updates? Visit our Login / Access Troubleshooting guide for help.
Change the order of an item with variants
Variants are sorted in the order their variant options appear on the item page. To change the item variant:
- Scroll down to Item Variants.
- Under Option Values, click and drag the options to change the order in which they’re displayed. The variant order in the table below will automatically refresh.
- Click Save and close to finalize your changes.
The new order of variants will also be reflected in the Item List and the Update Inventory sections of the Items Category.
Sell an item with variants
After creating an item with variants, learn how to sell it at the register.
-
Ring up an item to add it to the sale.
- When scanning a UPC assigned to multiple variants, the cashier must manually select a variant. If no variant is selected, an ‘i’ appears to remind them.
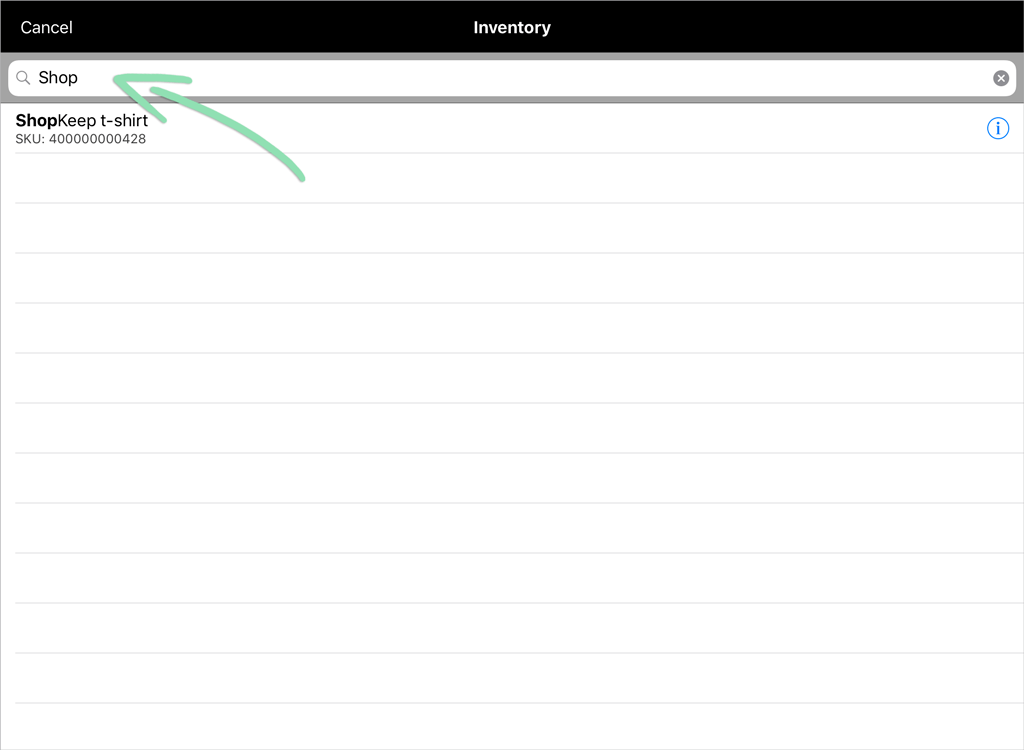
- Can’t find the item on the register? Visit our troubleshooting guide for help.
Tap a Shortcut Search for an Item
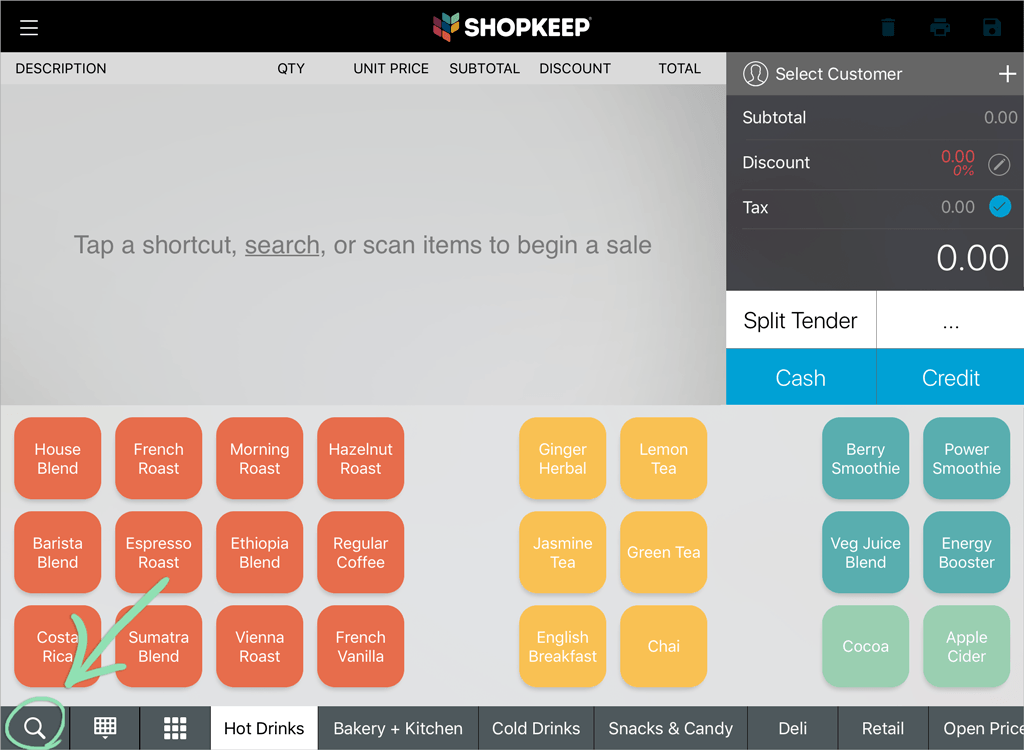
- From left to right, select the option values of the variant being sold.
If an option value cannot be selected, it means that specific variant is not active. Visit our troubleshooting guide to learn how to activate the variant.

- Tap 'Done'.

- (Optional) Tap a line item to edit its option value selections.

- Complete the sale as usual.
Need help finishing the sale? Visit our Running Sales at the Register article.
FAQ
View answers to common questions about items with variants.
What is the difference between items with variants and basic items?
Items with variants are items sold in variations, such as a shirt with several size options. Basic items are sold individually without variants.
Should I use items with variants or basic items with modifiers?
Visit our Variants vs. Modifiers article to compare the benefits of using items with variants against using basic items with modifiers to decide which is best for specific items.
Can I transition existing basic items to items with variants?
Yes. If you have existing items to change over, please read our Transitioning to Items with Variants article.
How many variants can an item have?
Each item can have up to three options and 150 variants. The number of variants is calculated by multiplying together the number of values for each option. For example, if an item has two options (Size and Color) and each option has 5 values (Small, Black, etc), there would be 25 total variants.
Can I add variants to an item after saving it?
Yes. To add more variants to an item, edit the item and enter additional option values.
Can I edit the name of an option value?
No. However, you can remove the option value and re-add it with the correct name. Learn more about removing and re-adding option values here.
Can I print barcode labels for items with variants?
Yes. Visit our Lightspeed Label Printing article to learn how to print labels directly from BackOffice.
How can I view my current inventory?
The Item List in BackOffice shows every item currently in inventory. From the Item List, you can browse all items, customize what information is displayed, search, sort, and filter to find specific items, view details of individual items and item variants, add new items, edit existing ones, and download an export of the list.
How do I check the quantity on hand of an item with variants?
Visit our Inventory Tracking & Reorder Report article to learn how to view an item’s quantity both in BackOffice and at the register.
Can I import items with variants?
Yes. Visit our Bulk Management: Items with Variants article to learn how to import new items with variants from a spreadsheet.
How do I edit an item with variants?
Select an item with variants from the Item List to make changes to it. To update many items with variants at once, use Bulk Management.
How do I delete an item with variants?
From the Item List, click to edit an existing item and select ‘Delete’. Check the box to delete the item in all linked locations (optional for multi-location accounts) and select ‘Continue’ to confirm the deletion. To delete many items with variants at once from a single location, use Bulk Management.
Please be aware that if a deleted item is re-added, labels printed before deletion will not scan at the register. New labels must be printed. Deleted items will still appear on sales reports for dates prior to deletion, but will not appear on some other reports. Visit our Inventory FAQ to learn which reports are not supported.
How can I get help if I have issues using items with variants?
Visit our Items with Variants Troubleshooting guide for help solving common problems.
What’s next?
After reviewing the sections above, move on to the articles below to learn about related topics, such as how to add items with variants to the register layout.
The shortcut panel is the collection of item buttons that make up the register layout where cashiers tap to ring up inventory items at the register. Visit our Item Shortcuts article to learn how to add shortcuts to the panel and customize how it looks.
Print barcode labels for variants without UPC codes to allow cashiers to scan those items at the register. Visit our Lightspeed Label Printing article to learn how to print labels directly from BackOffice.
Items with variants appear in several areas of BackOffice, such as the Item List and Receive Inventory screen. Visit our Items with Variants in BackOffice article to learn how these items affect BackOffice operations.
Having trouble creating or selling an item with variants? Visit our Items with Variants Troubleshooting guide for help with any issues you experience. If you have a question not listed above, visit our Inventory FAQ.