Bulk Manage:
Inventory Imports
Bulk Management enables you to create, update, and delete entire groups of basic items at once using spreadsheets in BackOffice. This feature makes managing large inventories more efficient. To learn how to instead import items with variants, visit our Bulk Manage: Items with Variants article.
Bulk Management does not support raw goods or modifiers, so you must manage these directly from BackOffice for each item. Visit our Modifiers or Raw Goods articles for help with these features.
When to Use Bulk Management
Bulk Management is a powerful tool that can transform how you manage inventory. Before jumping right in, it is important to learn when you should and when you should not use this feature.
Use Bulk Management:
- When you have many inventory items to import
For merchants with large inventories, it’s more efficient to import items via Bulk Management than to create them one by one from the Item List.
- When you have a digital copy of your items
If the items you need to create already exist in a spreadsheet file, just copy their information into our Bulk Management template. Once in the template, the items will be ready to import.
- If you need to update or delete many existing items
It is more efficient to manage large numbers of items with Bulk Management than it is to update or delete those items one at a time from the Item List.
- If you need to create, update, or delete raw goods or modifiers
Raw goods and modifiers must be managed directly from BackOffice as Bulk Management does not support these features. Modifiers can also be managed in the Retail POS (S-Series) app from the Item List.
- When you have just a few items to create, update, or delete
In this case, it is less efficient to prepare a Bulk Management spreadsheet than it is to create, update, or delete items one by one via the Item List or to use Bulk Edit to update items.
- If you are not comfortable working with spreadsheets
Using Bulk Management requires editing, formatting, and saving spreadsheets files. If you don’t feel confident performing these actions, Bulk Management may not be right for you.
- If you want to create, update, or delete items from within the Retail POS (S-Series) app
Bulk Management is not accessible from the Retail POS (S-Series) app, only from BackOffice. Managing basic items at the register must be done from the Item List.
If you decide not to use Bulk Management, you can create, update, or delete items one at a time via the Item List, or use Bulk Edit to update multiple existing items at the same time.
Start a New Job
To get started with Bulk Management, log in to BackOffice from a computer and start a new job.
- From BackOffice, click 'Items' and select 'Bulk Manage Items'.

- Select 'New Job'.

- Choose a type of job, then click 'Next'.
- Continue to one of the sections below for the steps to complete the Bulk Management job.
Create New Items
To create new basic items with Bulk Management, you’ll need to download the import template spreadsheet, fill in your product information, and upload the completed file to BackOffice.
Download & Prepare the Template
Bulk Management works by importing items from a spreadsheet. Download our import template and fill it in with your inventory information to get started.
- Click here to download the basic items import template.
- Open the template in spreadsheet software.
- Fill the spreadsheet with your product information.
For a description of each spreadsheet column, click here. The only required columns are ‘Name’ and ‘Price’. Columns left blank will automatically be given the default value for that setting (‘TRUE’ or ‘0’).

- Save or export the completed spreadsheet in .CSV format.
For help saving the file, visit our Spreadsheets for Bulk Imports article.
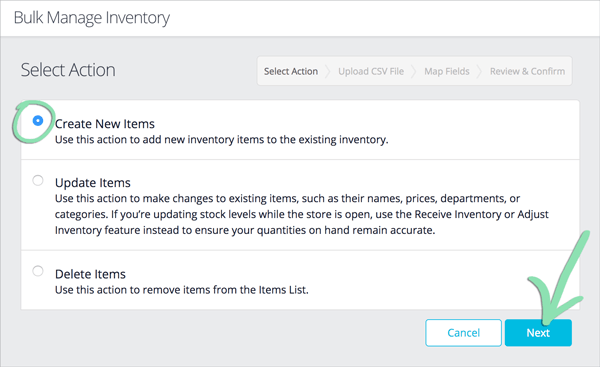
- In Bulk Management, select 'Create New Items', then click 'Next'.
- Click 'Choose File', then select the import spreadsheet.

- (Optional for multi-location accounts) Check the box to create the items in all linked locations.
This option is only available to the Business Owner of accounts with multiple linked locations. Visit our Multi-Store Management article to learn how to create a new linked location or link existing locations.
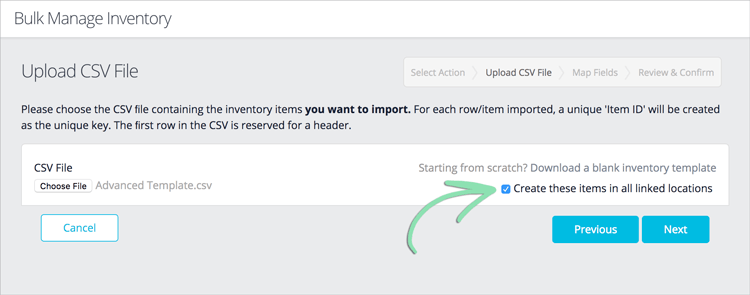
- Click ‘Next’ to continue.
If an error appears, visit our Items Troubleshooting guide for help.

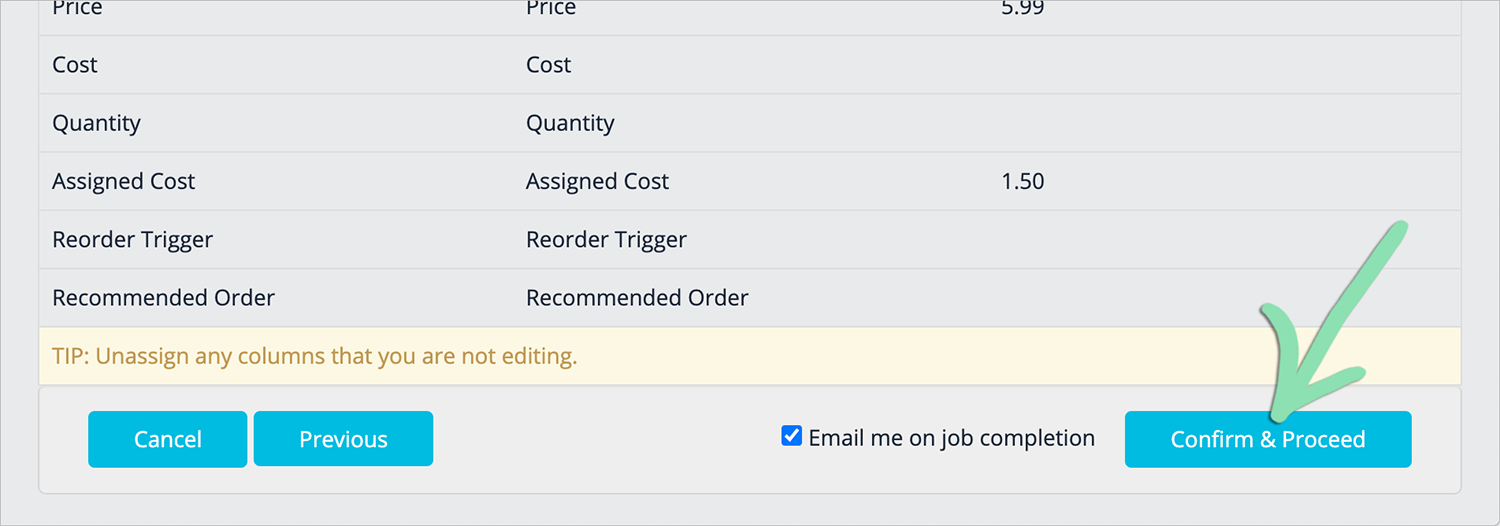
- Follow the steps below to map the fields in the import file.
Map the Import
With the spreadsheet uploaded, review the ‘Map Fields’ page to make sure BackOffice matches the spreadsheet columns to the correct stock item fields.
- For each value under 'Stock Item Fields', select the corresponding spreadsheet column from the ‘Your CSV Headers’ drop-down.
Most fields will automatically map to the correct CSV headers unless you changed the default column names on the import spreadsheet.

- If particular spreadsheet columns are empty, set them to 'unassigned'.
Unassigned fields will automatically receive the default value for that setting (‘TRUE’ or ‘0’). The ‘Option Name’ and ‘Option Value’ columns will always be unassigned when importing basic items.

- Click 'Next', then select 'Confirm & Proceed' to process the import.
- Refresh the Bulk Management page to check the status of the import.
If there are errors with the import, visit our Items Troubleshooting guide for help.

Update Items
Use ‘Update Items’ to make changes to many existing items at once, such as to increase prices or make items inactive. To update basic items with Bulk Management, you’ll need to export current inventory, edit the export spreadsheet to reflect the changes being made, and upload the completed file to BackOffice.
Need to update items with variants instead? Visit our Bulk Manage: Items with Variants article for help.
Export Inventory
To update existing items using Bulk Management, start by exporting the current inventory from BackOffice.
- In Bulk Management, select 'Update Items', then click 'Next'.
- Click 'Export your existing inventory to a CSV'.

Prepare & Upload the Spreadsheet
With the inventory exported, make changes on the export spreadsheet to items that need updating and remove items that do not.
- Open the inventory export spreadsheet.
The file will appear in your downloads folder as ‘accountname_inventory_items.csv’.
- Make changes to item settings on the spreadsheet, and remove any rows and columns that are not being updated. Do NOT change the 'Item UUID' or remove the 'Item UUID' or 'Name' columns.
- Changing the name, department, category, or supplier of an item will also update this information in some historical reporting. To learn more, visit the article for a specific report from our BackOffice support page.
- Below is an example of a price update. ‘Item UUID’ and ‘Name’ are required for the import to work, and ‘Price’ is the only column that changes. Rows and columns not being updated are removed.
Before Editing Spreadsheet After Editing Spreadsheet
- Save or export the completed spreadsheet in .CSV format.
For help saving the file, visit our Spreadsheets for Bulk Imports article.
- In Bulk Management, click 'Choose File', then select the updated spreadsheet.
If an error appears, visit our Items Troubleshooting guide for help.
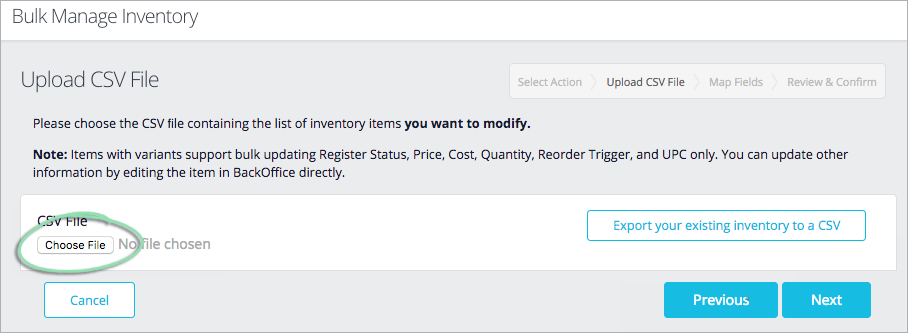
- Click ‘Next’ to continue.
- For each ’Stock Item Field’ being updated, select the corresponding spreadsheet column from the ‘Your CSV Headers’ drop-down.
Most fields, except for ‘Cost’, will automatically map to the correct CSV headers unless you changed the default column names on the import spreadsheet.
Updating item costs will override the weighted average cost calculations performed by the system when inventory was received. Don’t want to use weighted average cost? Follow the steps here to disable the feature.
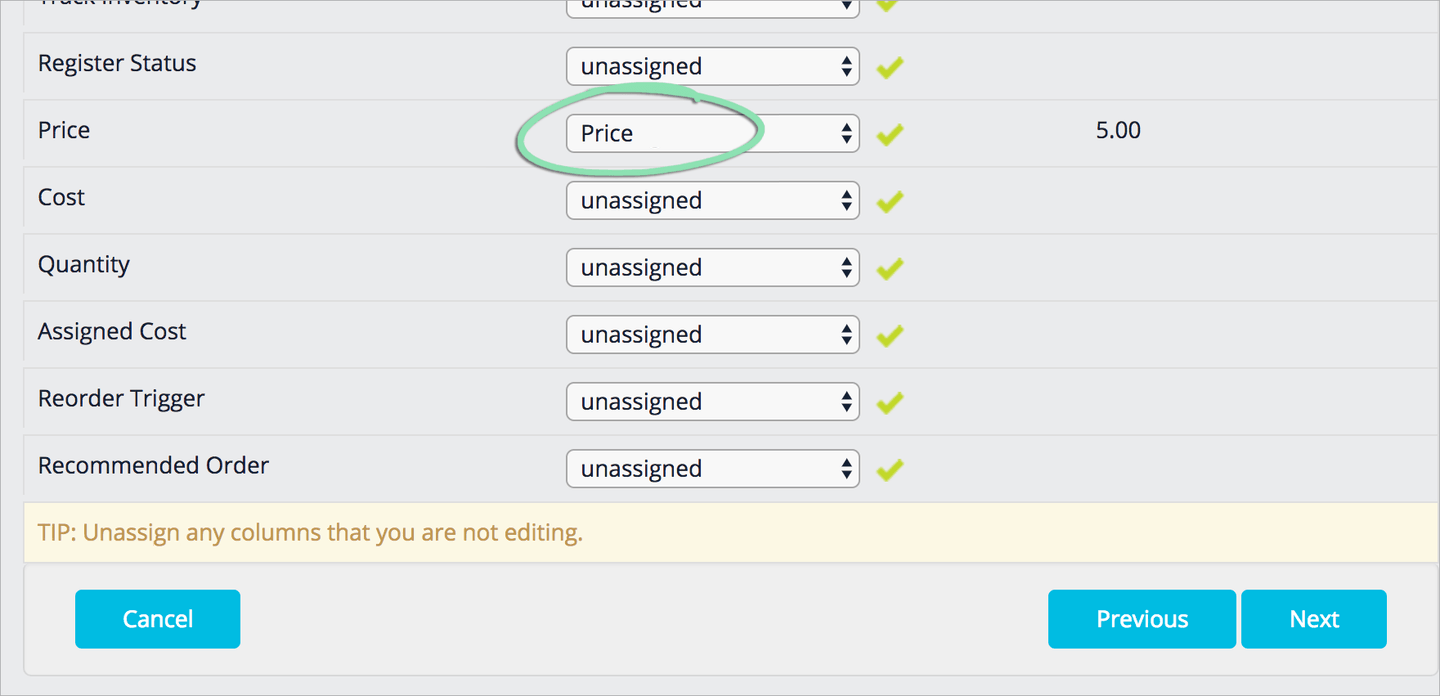
- Verify the ‘Item UUID’ and ‘Name’ fields are mapped to the correct headers.
- Set all fields not being updated to ‘unassigned’.

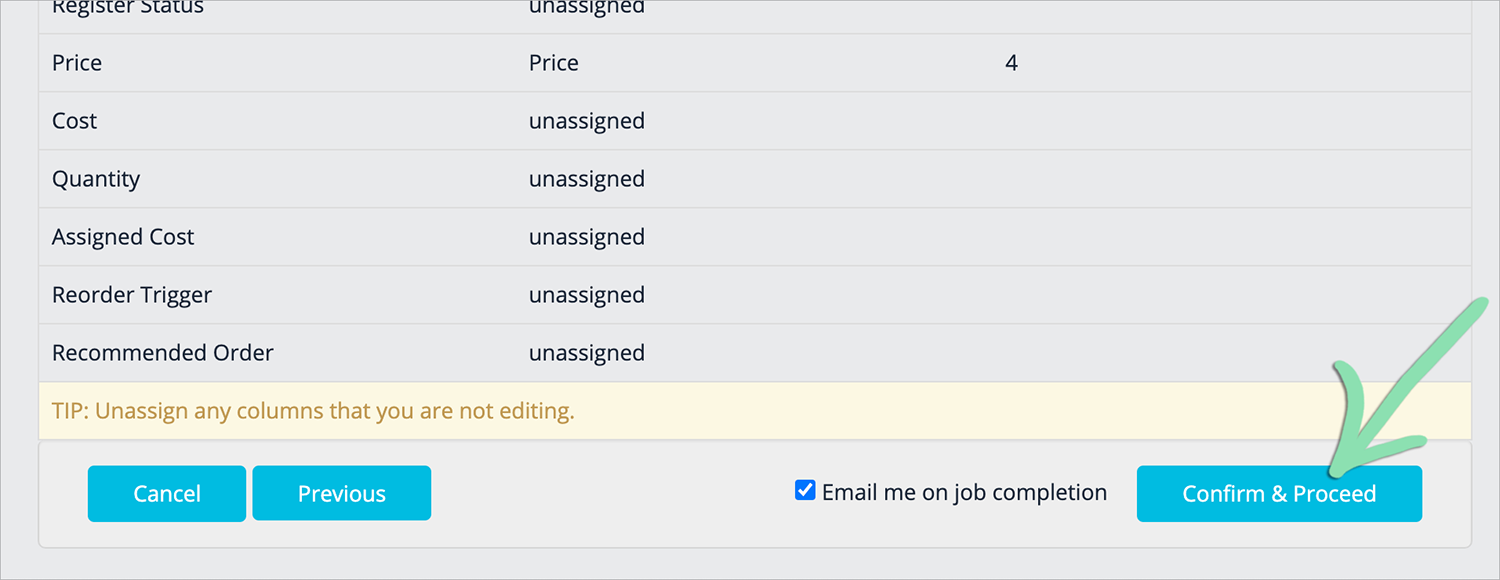
- Click 'Next', and select 'Confirm & Proceed' to process the import.
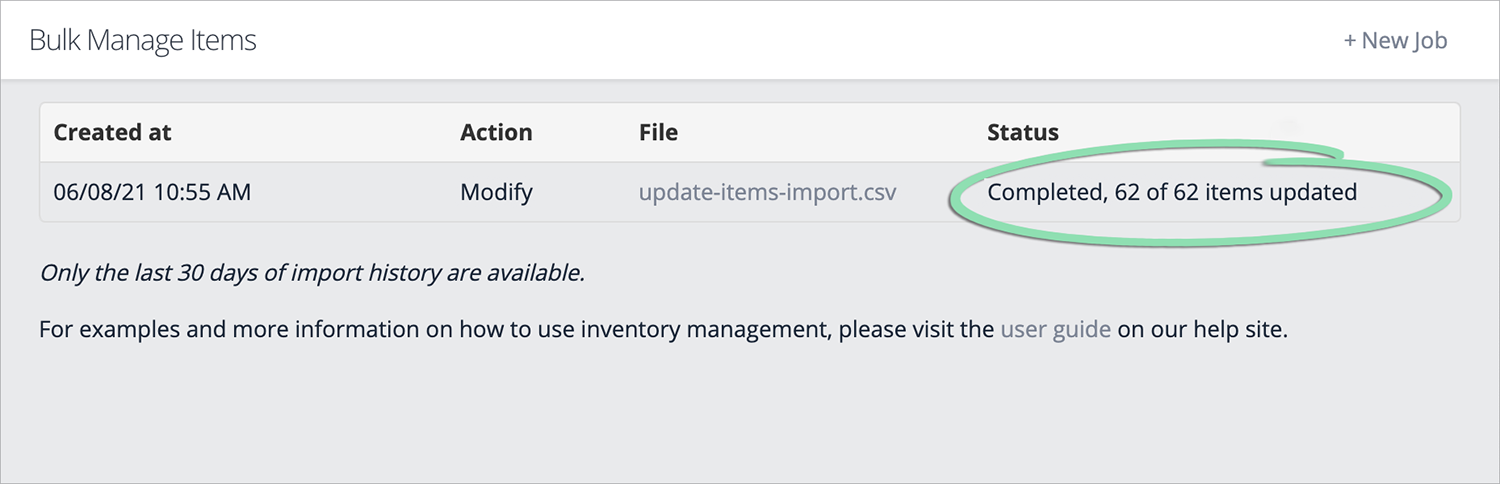
- Refresh the Bulk Management page to check the status of the import.
If there are errors with the import, visit our Items Troubleshooting guide for help.
Delete Items
Use ‘Delete Items’ to remove many existing items at once from BackOffice. To delete basic items with Bulk Management, you’ll need to export current inventory, remove items not being deleted from the export spreadsheet, and upload the completed file containing the items to be deleted.
Before deleting basic inventory items, please be aware of the following:
Export Inventory
To delete existing items using Bulk Management, start by exporting current inventory from BackOffice.
- In Bulk Management, select 'Delete Items' and click 'Next'.
- Click 'Export your existing inventory to a CSV'.

Prepare & Upload the Spreadsheet
Using the spreadsheet of existing items exported from BackOffice, prepare the .CSV file to include only the items you need to delete from inventory.
- Open the export in spreadsheet software.
- Delete rows from the spreadsheet containing items you do NOT want to remove from inventory.
The example below shows 5 basic items being deleted. All items remaining on the spreadsheet will be deleted from inventory after it is uploaded to BackOffice.
Before Editing Spreadsheet After Editing Spreadsheet
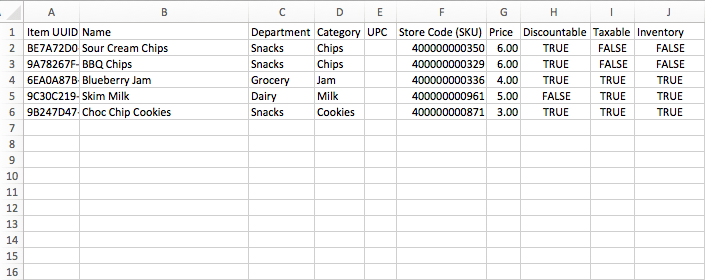
- Save or export the completed spreadsheet in .CSV format.
For help saving the file, visit our Spreadsheets for Bulk Imports article.
- In Bulk Management, click 'Choose File', then select the edited spreadsheet.
- Be sure to select the spreadsheet saved in the previous step, NOT the original file exported from BackOffice. All items in the uploaded spreadsheet will be deleted.
- If an error appears, visit our Items Troubleshooting guide for help.

- Click ‘Next’ to continue.
- Verify the ‘Item UUID’ field is mapped to the correct spreadsheet header.
This field will automatically map to the correct CSV header unless you changed the default column name on the import spreadsheet.

- Click ‘Next’, then ‘Confirm & Proceed’ to process the job.
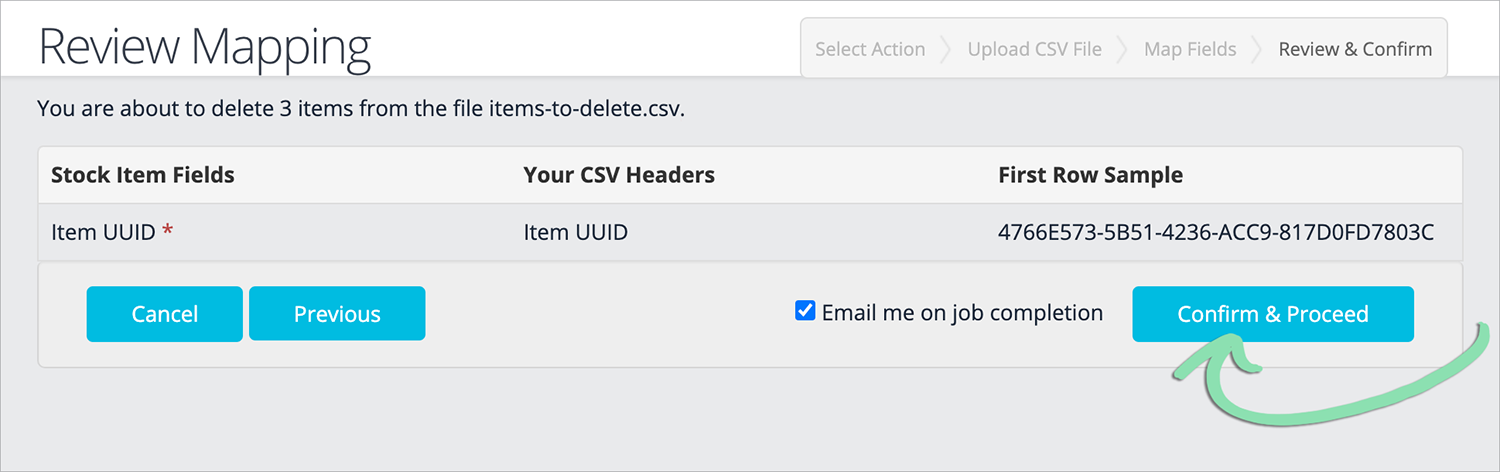
- Review the warning, then click ‘Continue’ to confirm.

- Refresh the Bulk Management page to check the status of the job
If there are errors, visit our Items Troubleshooting g