The Lightspeed Retail POS on the Sunmi T2 Lite runs on the Android operating system and is where you perform transactions, open and close register shifts, and verify customer IDs, among other things. Let’s take a tour of the register and all that it has to offer.
Haven’t set up BackOffice yet? Visit our setup guide here.
Setting up the Sunmi T2 Lite for the first time? Visit our setup guide here.
Register Menu
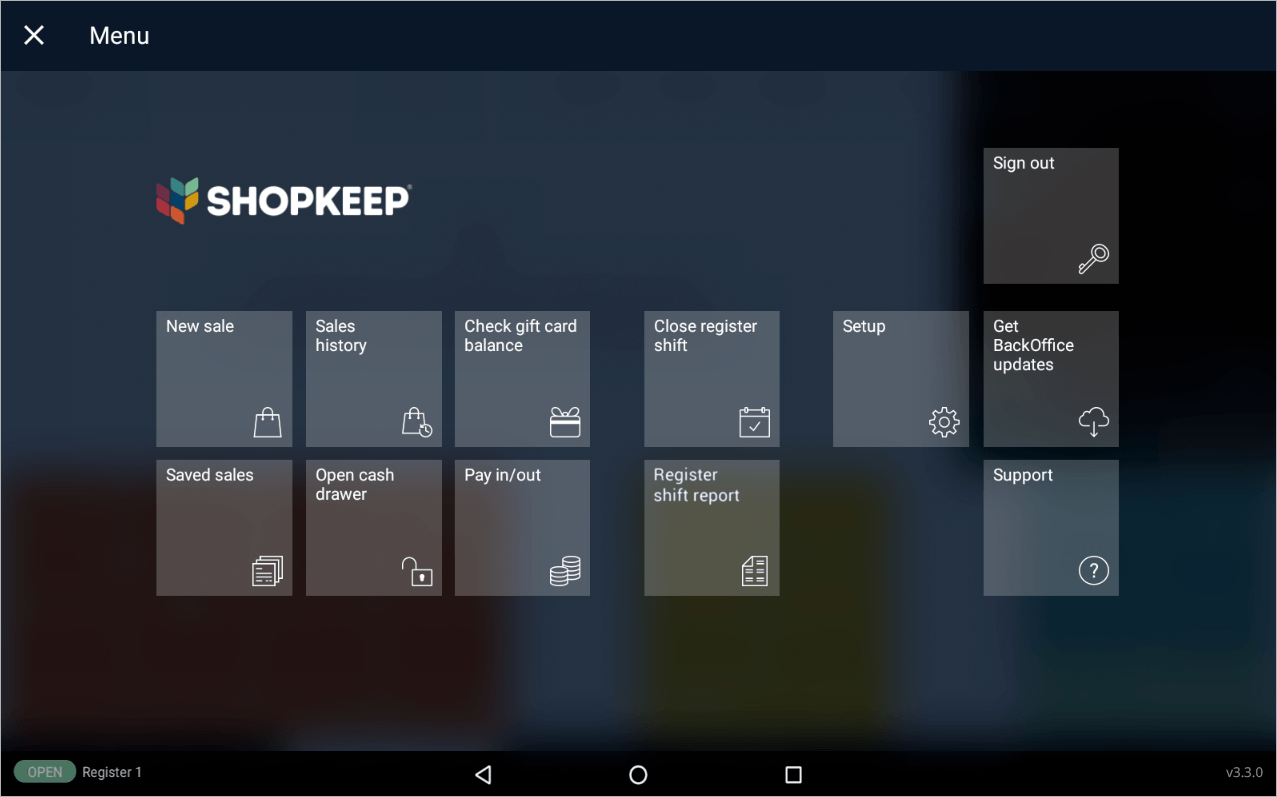
The register menu opens when signing in to the Retail POS (S-Series) app and contains cashier and manager functions.
Open and close register shifts, perform pay ins and payouts, and access other cashier and manager controls from here. The ‘Support’ tile shows register diagnostics and Customer Care contact information.
Below we explain each button starting with the top row, from left to right.
Sign out | Tap to log out of the register so another employee can sign in. New sale | Ring up a sale. See the Running a Sale section below for more information. Sales history | Browse transactions from the current shift and perform returns. See the Performing a Return section below for more information. Check gift card balance | If using Integrated Gift Cards, check the balance of a customer’s gift card. Open/Close register shift | Register managers only.Open a register shift to enter the starting amount in your cash drawer and start taking sales. Close a register shift to enter in your closing cash drawer amount and reconcile your day. Setup | Register managers and employees with BackOffice permissions only. Access optional auto signout, payment, hardware, and saved sales syncing settings, among other things. With the relevant BackOffice permissions, staff can also add and edit inventory items and manage item shortcuts. Business Owners have the added ability to update receipt and tip settings. See the Setup Screen section for more information. Get BackOffice updates | Register managers only. Used to sync changes made in BackOffice to the register. Saved sales | View all open saved sales. Saved sales can be filtered, sorted, and managed from this screen. Filter and sorting selections are saved for each employee. When an employee signs into the register, their ‘Saved Sales’ screen will reflect the filters and sorting they most recently applied. Open cash drawer | Register managers only.Open a connected cash drawer without ringing up a transaction. Pay in/out | Register managers only.Add or remove money to or from the cash drawer. This automatically opens a connected drawer. Register shift report | Cashiers can view or print a summary of their transactions for register shifts during which they worked. Register Managers can run the Register shift report for individual employees who worked during the register shift or for all employees. Support | Displays the status of the register and its connected hardware and provides Customer Care contact details. See the section below for more information about this tile. Navigation bar (bottom of screen) | Contains the Back, Home, and App Overview buttons. Learn the function of each button here. Don’t see the navigation bar? Swipe up from the bottom of the screen to reveal it.
Register Support
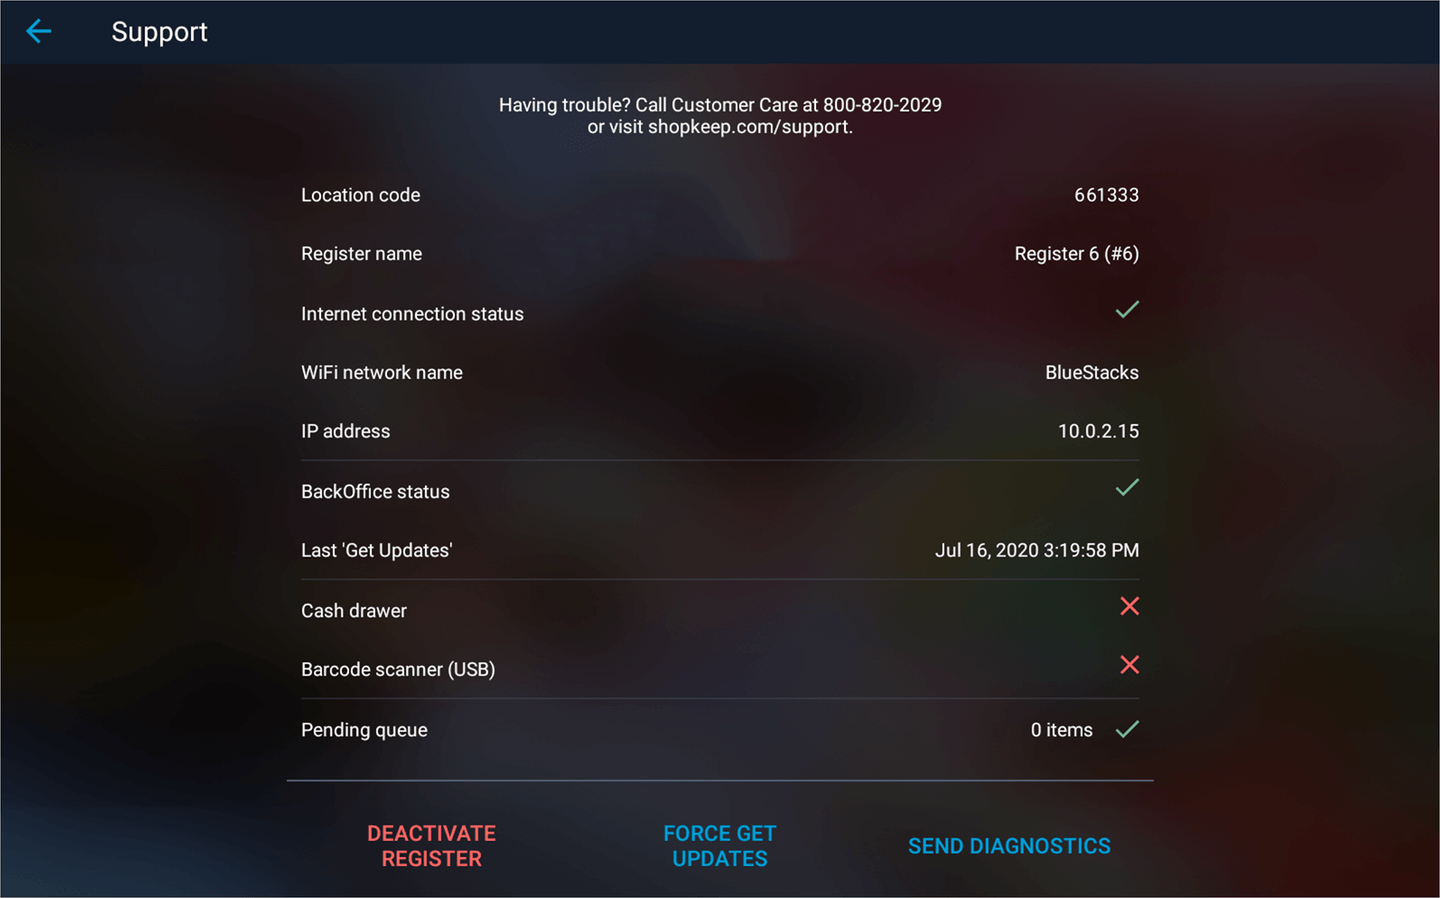
The ‘Support’ screen contains register diagnostics and Customer Care contact information, as well as some additional information such as WiFi status.
From the Register Menu, tap ‘Support’.
Location code | Unique code used to identify your Lightspeed Retail account when contacting Customer Care. Register name | Register’s name and number. This can be set up or edited in Register Licenses settings in BackOffice. Internet connection status | Shows if the register is able to access the internet. WiFi network name | Name of the WiFi network the register is currently connected to. IP address | The register’s IP address on the network. BackOffice status | Indicates if BackOffice is functional and able to communicate with the register. If there is an error, check our status page. Last ‘Get Updates’ | Last time this register synced with data from BackOffice. Cash drawer | Shows if a cash drawer is connected to the register. Barcode scanner | Indicates if a USB barcode scanner is connected to the register. Pending queue | Amount of register information waiting to be sent to BackOffice. Deactivate Register | Business Owner only. Unlinks the register from your Lightspeed Retail account to allow the Retail POS (S-Series) app to be activated on a different device or a register license to be removed. Force Get Updates | Register managers only. Pushes data from BackOffice to the register if ‘Get BackOffice updates’ fails to sync. Send Diagnostics | Sends the register database to Lightspeed Retail. Only use if asked to by Customer Care.
Tap the back icon to return to the Register Menu.
Setup Screen
From BackOffice setup to network status and auto sign out options, the ‘Setup’ screen contains features and optional settings for setting up and customizing how the register works.
Open the ‘Setup’ screen from the register menu to access BackOffice features for managing items, editing shortcuts, and updating receipt and tip settings and to manage settings for auto signout, display and font sizes, saved sales syncing, hardware, and receipts. Below we explain each feature and setting on this screen.
The ‘Setup’ screen is only available to Register Managers and employees with BackOffice permissions.
From the Register Menu, tap ‘Setup’.
Manage items | Only available to employees with the relevant BackOffice permissions. Add new and edit existing basic inventory items and items with variants. Edit shortcuts | Only available to employees with the relevant BackOffice permissions. Manage the item shortcuts that appear on the sale and return screens of the register. Receipt and tip settings | Only available to the Business Owner of Lightspeed Retail accounts created on or after July 23, 2019. Set up receipts and customize tip settings. Auto sign out after transaction | When on, employees will be automatically signed out of the register after every transaction they complete. This is disabled by default. Auto sign out after saving a sale | When on, employees will be automatically signed out of the register after every sale they save. This is disabled by default. Auto sign out after idle time | When on, employees will be automatically signed out of the register after being idle for a set amount of time. This is disabled by default. When signed out, items left on the New Sale screen will be saved as a saved sale. Unsaved changes to existing saved sales will also be saved. Display and Font size | Opens the Settings app to the ‘Display size’ and ‘Font size’ settings used to increase or decrease the size of interface elements and text on the Sunmi T2 Lite. Card signature threshold | The total a credit sale must exceed before a customer signature is required. Tap to change the threshold amount. Saved Sales and Tables Sync | When on, saved sales and the table layout automatically sync between registers and are backed up to the cloud. This is enabled by default. Read our Saved Sales Sync article for more information. Card Readers | Set up a new credit card reader, view the connected reader, and toggle readers on or off. Receipt Printers | Set up a new receipt printer, view all available receipt printers, and toggle receipt printers on or off. Kitchen printers | Set up a new kitchen printer, view all connected kitchen printers, and toggle kitchen printers on or off. Scanners | Set up a new Zebra or Socket barcode scanner and view all connected scanners. Weight Scales | Set up a new Star integrated weight scale, view the connected scale, and toggle weight scales on or off. Show customer receipt print option | When off, printed receipt options are hidden on the receipt options screen at the end of transactions. This is enabled by default. Always print receipt | When on, the ‘Print receipt’ option will be automatically selected at the end of every transaction. This is disabled by default. Always email receipt | When on, the ‘Email receipt’ option will be automatically selected at the end of every transaction tagged to a customer with an email address. This is enabled by default.
Tap the back arrow to return to the Register Menu.
Running a Sale
Every sale starts by ringing up the items a customer is purchasing. After adding items to a sale, a cashier can change item quantities, remove items, or discard the entire order.
Add Items to the Sale
Tap a shortcut, search by item name, SKU, or UPC, or scan an item’s barcode using the supported Zebra DS2208 or DS4608 scanner to add it to the transaction. Magnifying Glass| Tap to search for an item by name, SKU, or UPC.
Selling Restricted Items
Learn how to ring up age-restricted and quantity-restricted items at the register.
Age-Restricted Items
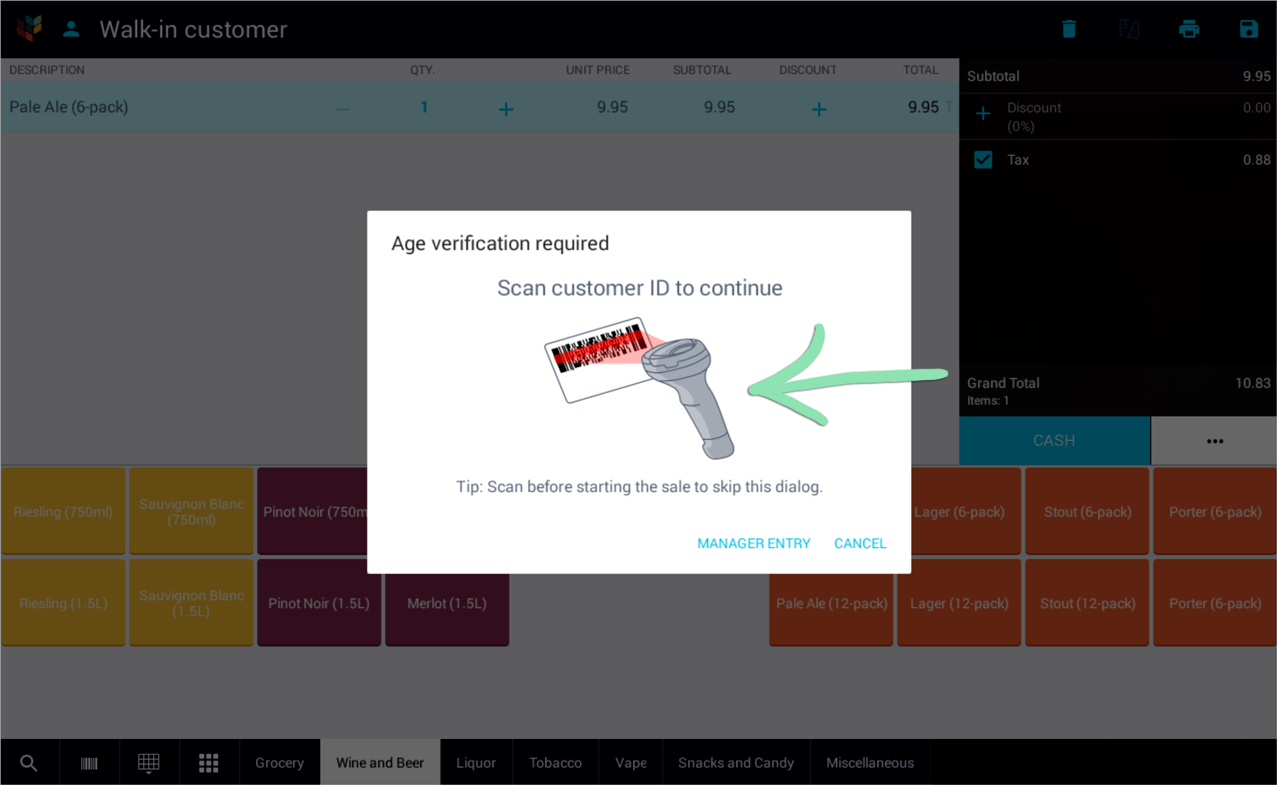
Add an age-restricted item to a sale.
The cashier verifies the age of the customer by scanning their ID, license, or passport or manually entering the date of birth from their ID.
To scan a customer’s ID or driver’s license, you must use one of our supported 2D scanners: the Zebra DS2208 or DS4608. To scan a customer’s passport, you must use the Zebra DS4608. Learn which part of the ID, driver’s license, or passport to scan here.
To manually enter the customer’s date of birth if unable to scan their ID, tap ‘Manager Entry’.
If prompted, enter a Register Manager code and tap ‘Approve’.
Select a reason for manual entry, then enter the customer’s date of birth.
Verify the information displayed matches the customer's ID and the picture on the ID matches the customer, then tap 'Yes' to confirm or 'No' to cancel.
If the customer does not meet the item age requirement, tap 'Remove' to delete the age-restricted item from the sale.
The age verification method prints on the receipt to indicate if the ID was scanned or manually entered.
Quantity-Restricted Items
A cashier adds a quantity-restricted item to a sale.
If the quantity of items from a restricted department or category exceeds the sale limit, the cashier is prevented from increasing the quantity.
The cashier taps 'Remove' to dismiss the prompt and delete the extra quantity.
Changing Item Quantities
There are two different ways to change the quantity of an item on a sale, see how below.
Tap '+' or' –' to increase of decrease the item quantity.
Tap the quantity, enter a new number, and tap 'Done'.
Quantity-restricted items can’t have their quantity increased beyond the restriction that was set in BackOffice.
Remove Items from a Sale
Cashiers can either remove individual sale items or discard the entire transaction. Track the quantity and value of items deleted at the register and items from discarded transactions with X and Z reports.
Swipe left across a line item and tap 'Delete' to remove it.
Tap the trash icon to delete all items on the sale.
Customers
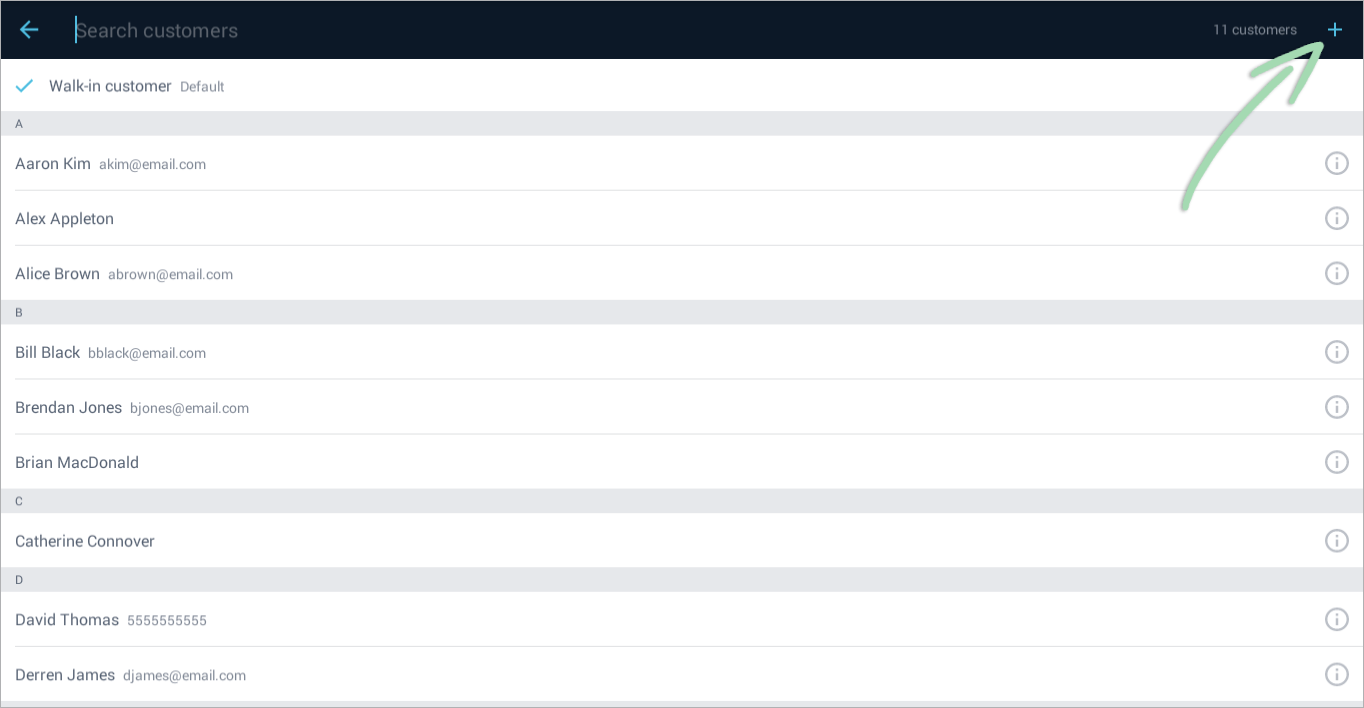
By default, sales are assigned to a ‘Walk-in’ customer. Learn how to change the customer tagged to the sale.
Tap the customer name or email.
Select an existing customer to tag to the sale or tap the ‘+’ to add a new one.
If adding or editing a customer, tap the disk icon to save changes.
If there are notes associated with a customer, an icon will appear next to their name on the transaction screen to remind the cashier to check the notes.
Complete the Sale
Finish the sale and tender out the customer.
Select the tender the customer is using to finish the transaction. Select ‘Cash’, 'Credit', or tap the ‘...’ icon to view other available tenders if enabled.
Visit our Tenders article to learn how to enable additional tenders, such as ‘Check’ or ‘External Credit’.
After selecting a tender, follow the prompts to accept and process the payment. Select a receipt option and tap ‘Done’, or tap ‘No Receipt’ to complete the transaction.
Customers can also select a receipt option from the customer-facing touchscreen on the Sunmi T2 Lite.
When a transaction is complete, tap anywhere on screen to return to the 'New Sale' screen.
Performing a Return
Perform a return from the ‘Sales History’ screen to refund a customer for a sale from the current register shift or a previous register shift.
Viewing Transactions
Navigate to the ‘Sales history’ screen to see a list of transactions processed during the current register shift on that register.
Tap a transaction to view details.
To view a transaction from a previous register shift, search by customer or enter the transaction number from the receipt. If the customer cannot provide the transaction number, a copy of the receipt can be found in BackOffice via the Transactions Report.
Processing Returns
Tap ‘Begin Return’ and select the item(s) to return.
Choose the tender to return to the customer.
The original sale tender is highlighted in red as the suggested tender for return. Tap ‘…’ to use a different tender for the return.
Select a receipt option and tap ‘Done’, or tap 'No Receipt'.
Customers can also select the email receipt option and enter their email address from the customer-facing touchscreen on the Sunmi T2 Lite.