BackOffice Setup for Recreation & Entertainment
After setting up BackOffice, check out part 2: Retail POS (S-Series) for Recreation & Entertainment.
Recreation-based businesses, such as dance studios and music schools, must accept deposits, sell services, and manage customer relations. Set up these and other key features in BackOffice before using the register.
Add Items, Services, & Deposits
Whether you’re selling a lesson, merchandise, or a deposit, set up an item for it in BackOffice or from the Retail POS (S-Series) app (employees with BackOffice permissions only).
If you have any questions about adding or managing items, visit our Inventory FAQ.
Items and Services
- Visit the Item List in BackOffice or from the Retail POS (S-Series) app (employees with BackOffice permissions only).
- In BackOffice, click ‘Items’ and select ‘Item List’.

- In the Retail POS (S-Series) app for iOS, tap ‘Manage Items’ on the Main Menu. For the Retail POS (S-Series) app for Android, tap ‘Setup’ on the register menu, then select ‘Manage Items’.
Retail POS (S-Series) app for iOS Retail POS (S-Series) app for Android
- Click 'Add New'.

- Select 'Create' under 'Basic Item'.

- Enter an ‘Item Name’ and ‘Item Price’, then click ‘More fields....’ to enter additional details (steps 5 - 6), or click ‘Save’ to quickly add the item.

- If entering additional details, fill in the item's fields.
Name | What the item, service, or deposit is called. This appears on the shortcut for the item, receipts, and reporting.

Department | A general grouping used for item organization and reporting.

Price Type | How the register rings up the item price.
-
Fixed: Item has a predetermined price.
At the Register: Cashier enters the sales price at the register.
Unit Price: A fixed price per unit (oz, lb, ft, etc.) sold.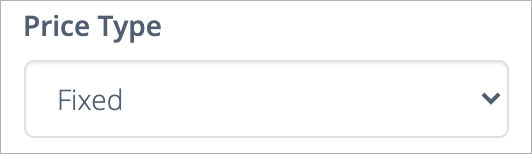
Sales Price | The amount a customer pays.

Taxable | Yes or No. Determines whether tax is charged on the item.

Track Quantity on Hand | Determines whether the item’s quantity on hand is tracked.
Leave this toggled off for items that don’t have a physical quantity on hand, such as lessons and deposits.
- Click the default save option or click the arrow to select another save option to finish creating the item.
Save and create new | Save the current item and create a new item.
Save and keep editing | Save the current item and remain on the details page to make adjustments.
Save and close | Save the current item and return to the Item List.The last used selection will be remembered as the default save option.

Deposits
- Enable the deposit tender in Tender Settings.
- Create a new basic item using the steps outlined above.
Name:Deposit / Lesson Deposit / etc.

Taxable:No
- From the ‘Liability Tender’ drop-down, select ‘Deposit’.

- Select a save option to finish creating the item.
Receipt Setup
A receipt is a record of payment, but it also gives the customer a link back to the business. Customize receipts with contact information and your website in BackOffice or from the Retail POS (S-Series) app (Business Owners only), then add social media links to email receipts.
- Sign into BackOffice as an employee with the relevant permissions or the Retail POS (S-Series) app as the Business Owner and open receipt settings.
- In BackOffice, click ‘Settings’ and select ‘Receipts and Tips’.

- In the Retail POS (S-Series) app for iOS, select ‘Receipt and Tip Settings’ from the Main Menu. For the Retail POS (S-Series) app for Android, tap ‘Setup’ on the register menu, then select ‘Receipt and Tip Settings’.
Retail POS (S-Series) app for iOS Retail POS (S-Series) app for Android
- Select the 'Business Info' tab.

- Fill in as much 'Business Info' as desired for receipts.

- (Optional) Click ‘Choose Image’ to upload a business logo for the top of email receipts.
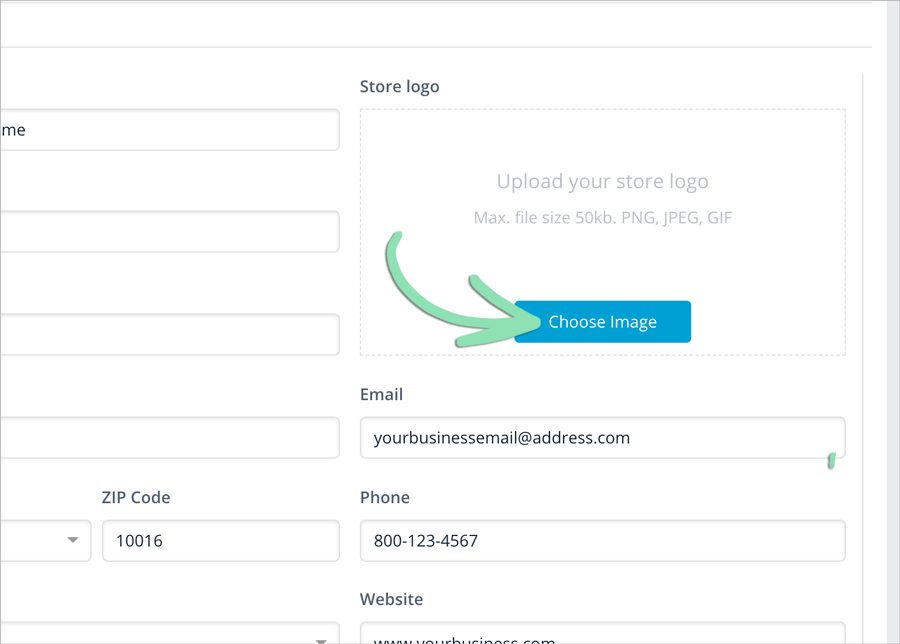
- Click 'Save' to save changes.
- Select the 'Email Receipt' tab.
- Fill in the information to appear on the email receipt.

Logo Link | Enter a URL to make the store logo a clickable link.
Heading | A heading that appears under the logo.
Message | A message that appears under the Receipt Heading.
None / Image / Text | Upload an image or enter text to appear above the social media links. For ‘Image’, tap ‘Choose Image’ to upload an image file. Banner images must be in .PNG, .JPG, or .GIF format and cannot exceed 70kB in size. For ‘Text’, enter a message.
Message Link | Enter a website URL to send customers to when they click the image or text banner.
Facebook, Twitter, etc. | Enter social media links, then toggle on the switches to enable them to appear on email receipts.
- Click 'Save'.
Check out the finished receipt here.
Visit the full Receipt Setup article for help customizing additional settings for paper receipts.
Add Staff
If you have employees, add them to BackOffice so they can use the register. In BackOffice, you can track their sales and time clock punches.
If you have questions about adding or managing staff, visit our BackOffice FAQ.
This feature is only available for Lightspeed Retail merchants on select pricing packages.
- In BackOffice, click 'Staff' and select 'Staff List'.

- Click 'Add Staff'.

- If prompted, set a new register code for the Business Owner and tap 'Enable PIN'.

- Enter at least a first name, last name, register code, select a role, and click 'Save'.
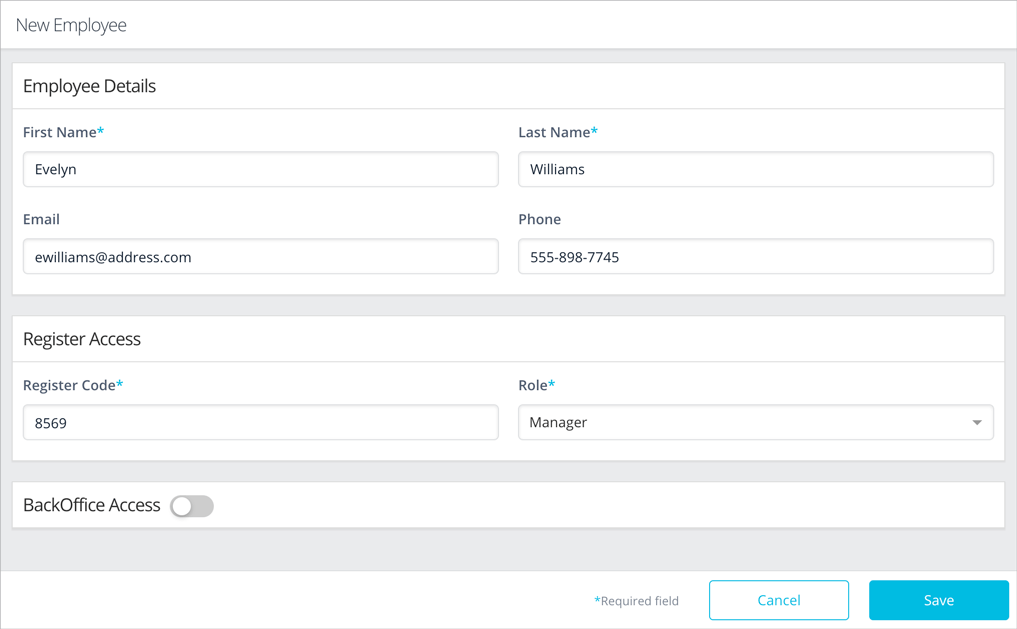
Register Code | 4-digit code that allows an employee to clock in and out and sign into the register.
Role | Select ‘Cashier’ or ‘Manager’. Cashiers can run sales, returns, and perform other cashier functions at the register. Managers can perform cashier and manager functions, such as opening the register shift and cash drawer.
BackOffice Access | Select a level of BackOffice access to give to an employee. Visit our Manage Staff article to learn about the different types of BackOffice permissions.
Don’t see ‘BackOffice Access’? Visit our Staff Troubleshooting guide for help.
Learn about employee settings and permissions in the full Manage Staff support article.
Customer Management
Enter customer information to track customer deposits and purchases, contact details, and engagement with the social media links on email receipts.
Add Customers
If you have an existing set of customers, set up each one at a time through the customer list.
Questions about adding or managing customers? Visit our BackOffice FAQ.
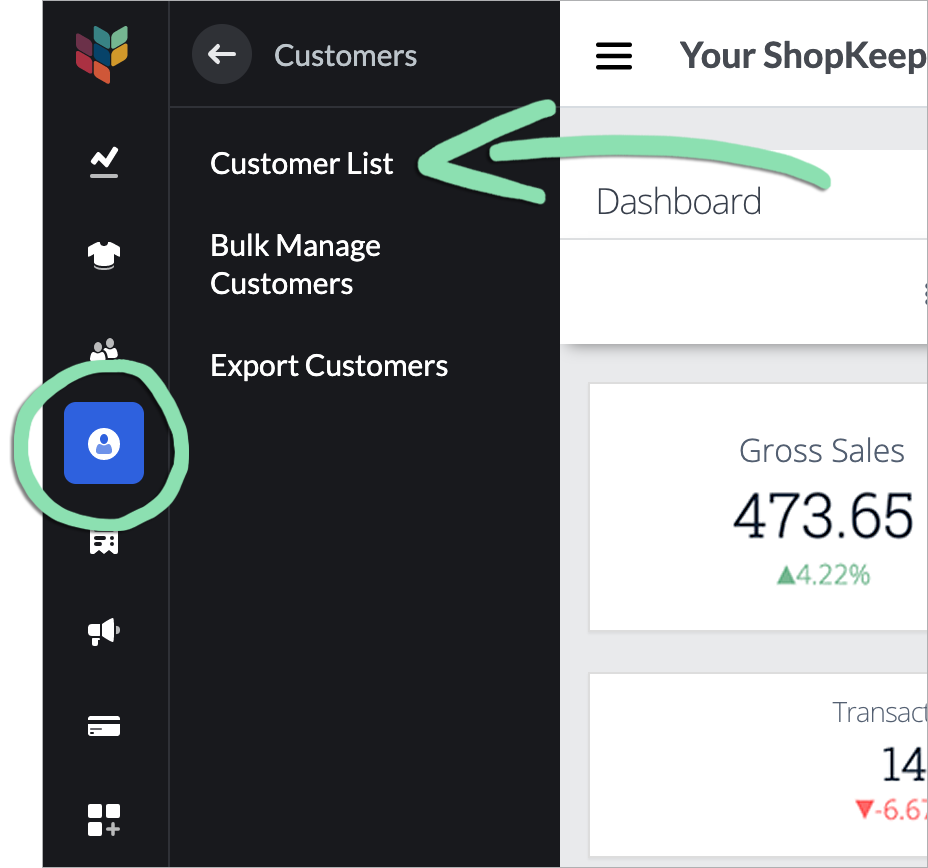
- In BackOffice, click 'Customers' and select 'Customer List'.
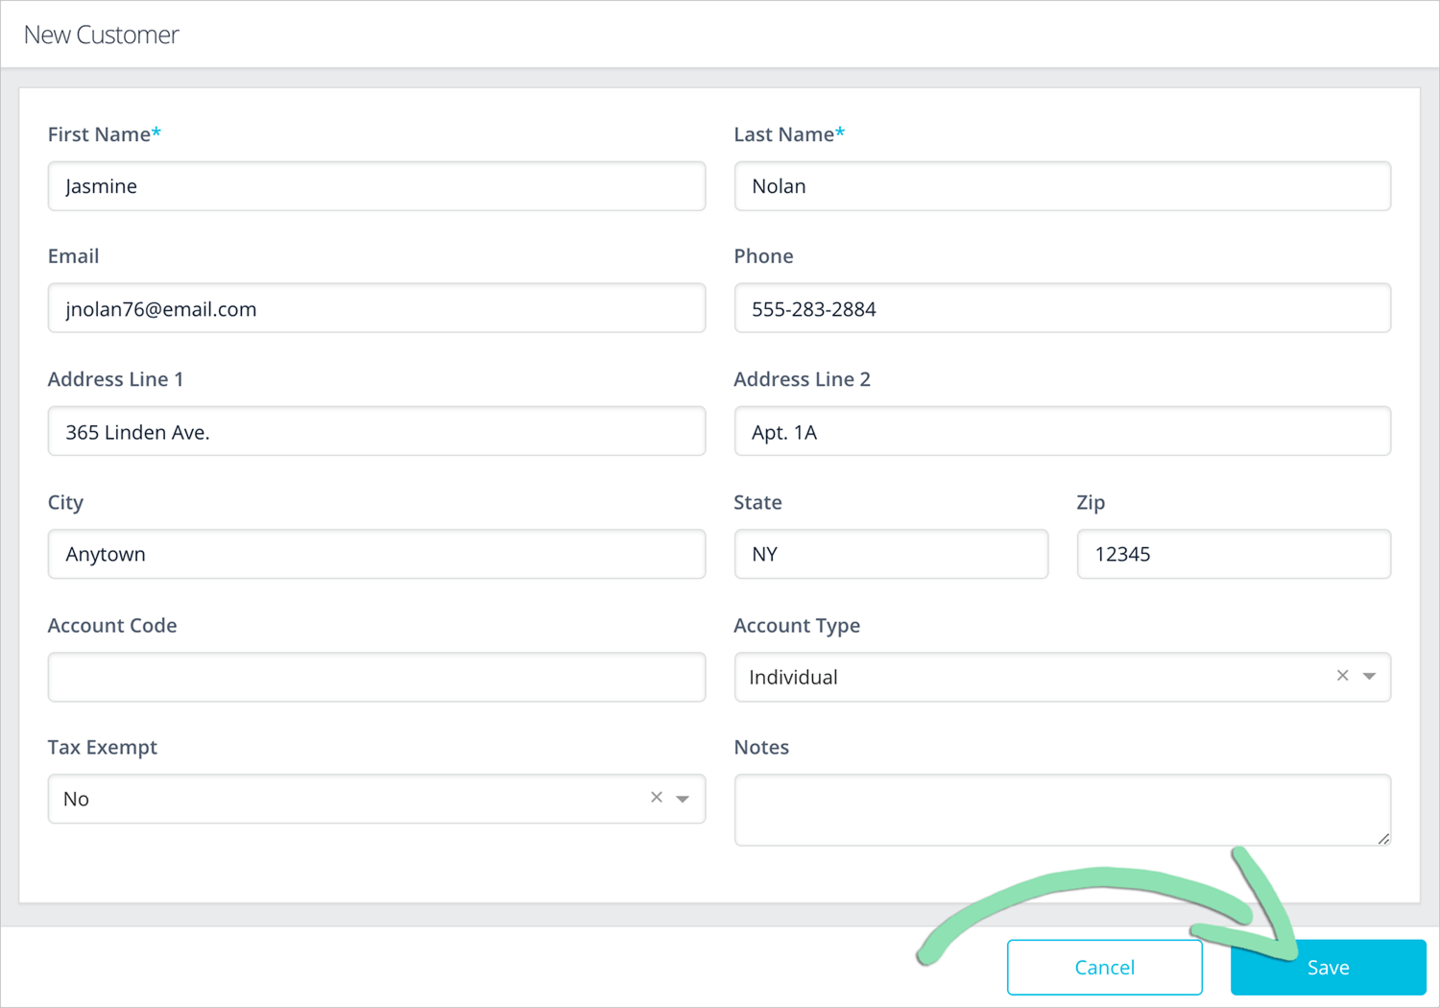
- Click 'Add Customer'.
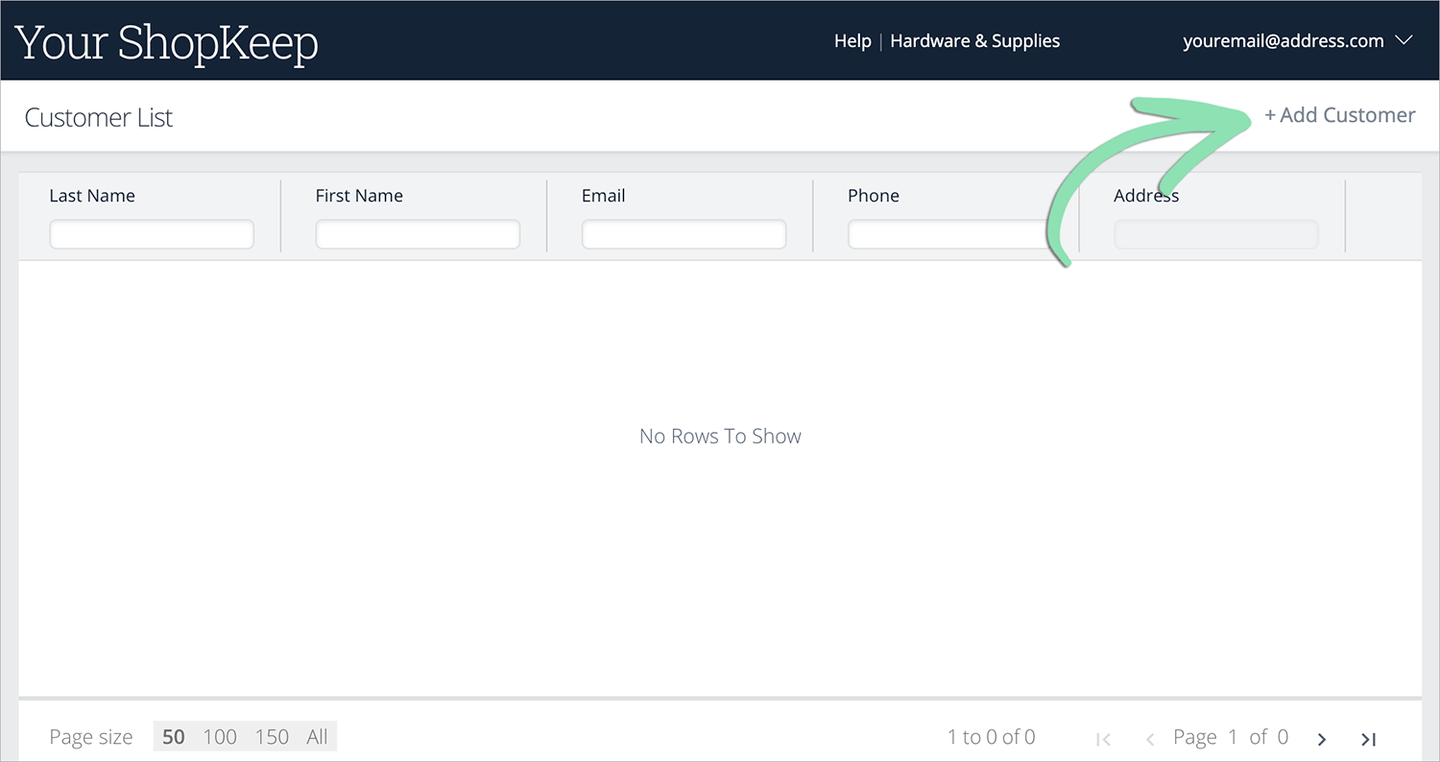
- Enter the customer's information and click 'Save'.
At minimum, one of the following must be entered: first name, last name, phone number, or email.
To learn how to manage customers at the register, visit the full Manage Customers support article.
Customer Purchase History
Check a customer’s purchase history to see when they last stopped by and what they bought.
If you have questions about customer reporting, visit our Reporting FAQ.
This feature is only available for Lightspeed Retail merchants on select pricing packages.
- From the Customer List, click the pencil icon next to a customer.

- Click 'Item Purchase History'.

This shows the customer’s entire history, complete with totals and the individual items they bought.

Marketing Dashboard
Track the growth of your customer base and see how customers interact with email receipts using the Marketing Dashboard.
- In BackOffice, click 'Marketing' and select 'Marketing Dashboard'.

Customer Growth
Refer to the Customer Growth section to see how your customer base grows on a daily basis and to identify top customers.

Email Receipt Interactions
Use the Email Receipt Interaction section to see how often cashiers send email receipts and how frequently customers click the links inside.

For a full explanation of the Marketing Dashboard, visit our Marketing Dashboard article.
Additional Features
Here are a few more features that recreation/entertainment businesses find helpful.
Named Discounts
Set up preset named discounts so employees can apply commonly used discounts at the register.
- In BackOffice, click 'Settings' and select 'Discounts'.

- Click 'Add Discount'.
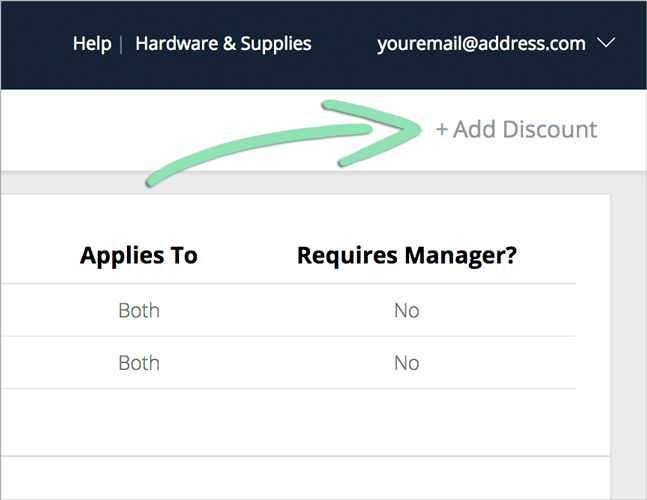
- Set the parameters of the discount and click 'Save'.
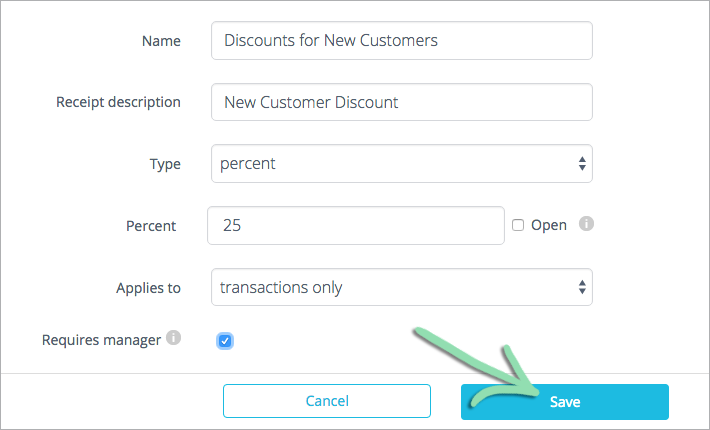
Visit the Discounts support article to learn about what each discount setting means.
Mailchimp
Use Mailchimp to send email marketing campaigns to customers. The customer information added at the register and in BackOffice automatically syncs to Mailchimp once set up.
- Click 'Integrations' and select 'Mailchimp'.

- Click 'Login'.
Don’t have a Mailchimp account? Click ‘Sign Up’ to create one.

- Enter your Mailchimp username and password and click 'Log In'.
If you receive an error while logging in, visit our Mailchimp Integration Troubleshooting guide for help.
- Click ‘Allow’ to enable Lightspeed Retail to access your Mailchimp account.
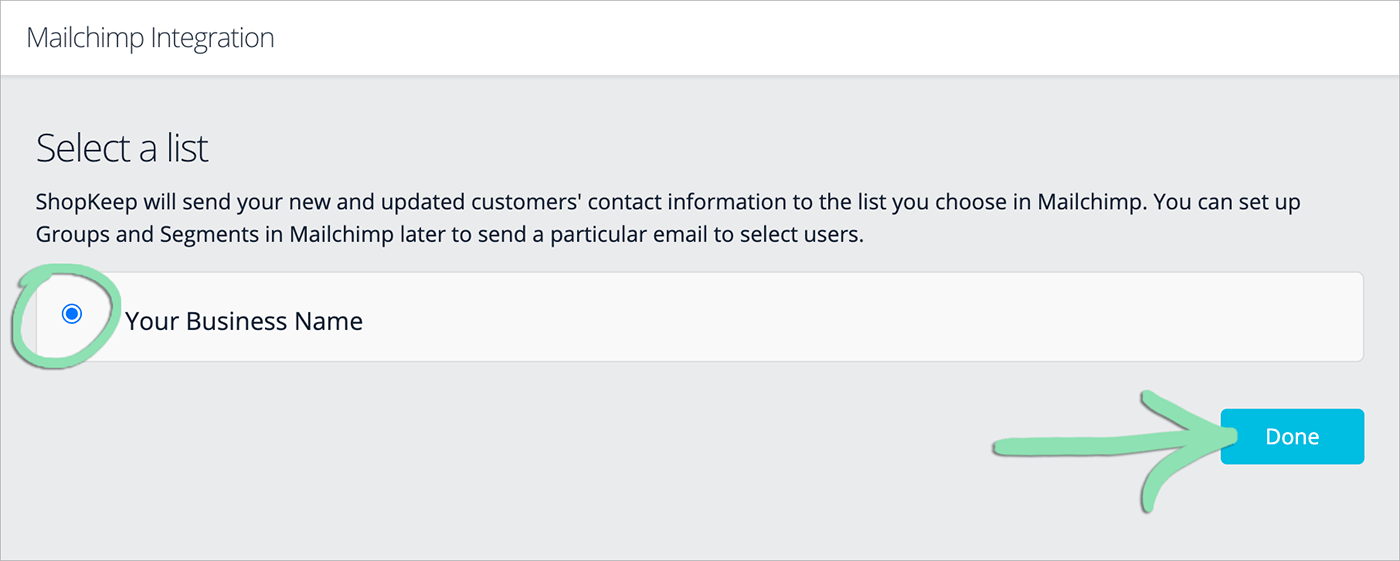
- Select a Mailchimp audience to sync your Lightspeed Retail customers to and click 'Done'.
Check out the Mailchimp Integration support article for more detailed setup help.
Gift Cards
Every holiday season, gift cards are always among the most gifted items. Get in on the action by setting up Integrated Gift Cards for your business.
For questions about ordering, processing, or setting up gift cards, visit our Gift Card FAQ.
Integrated Gift Cards are only available to Lightspeed Retail merchants on select pricing packages.
- In BackOffice, click ‘Marketing’, then select ‘Gift Cards’.

- Click ‘Set Up Gift Cards’ to open the setup form.

- Enter your contact details, business address, and other required information, then click the blue button to submit the setup form.
Some fields will be prefilled with Business Owner information. Verify that the details in those fields are correct before submitting the form.

- Wait for an email from Lightspeed Retail within 3 - 5 business days confirming setup is complete and containing instructions for ordering gift cards.
- Get updates on the iOS or Android register to sync changes to the register.
Learn how to issue and redeem gift cards in our Integrated Gift Cards article.