The Retail POS (S-Series) app is where you run sales and returns, print receipts, and perform other point of sale operations. Let’s take a tour of the Lightspeed Retail register and some of the features it has to offer.
Sales are made up of two primary steps: adding items to the customer’s order from available inventory, and tendering the sale. After a manager opens the register shift, follow the steps below to run a basic sale.
After learning the basics, visit our full Running Sales at the Register article to learn how to apply discounts, change item quantities, and perform other actions during a sale.
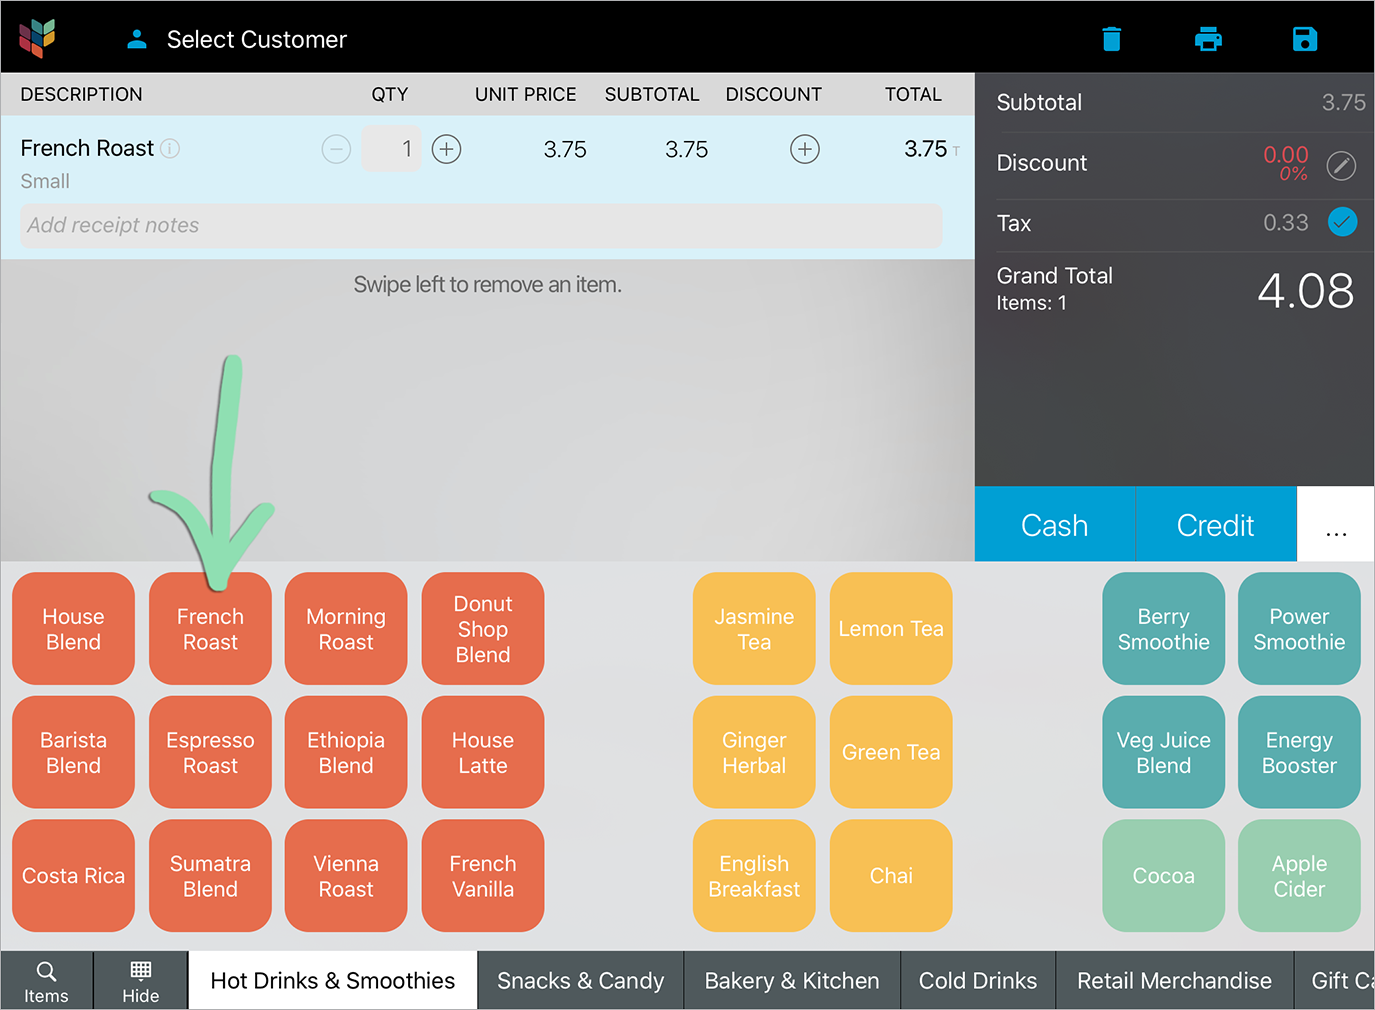
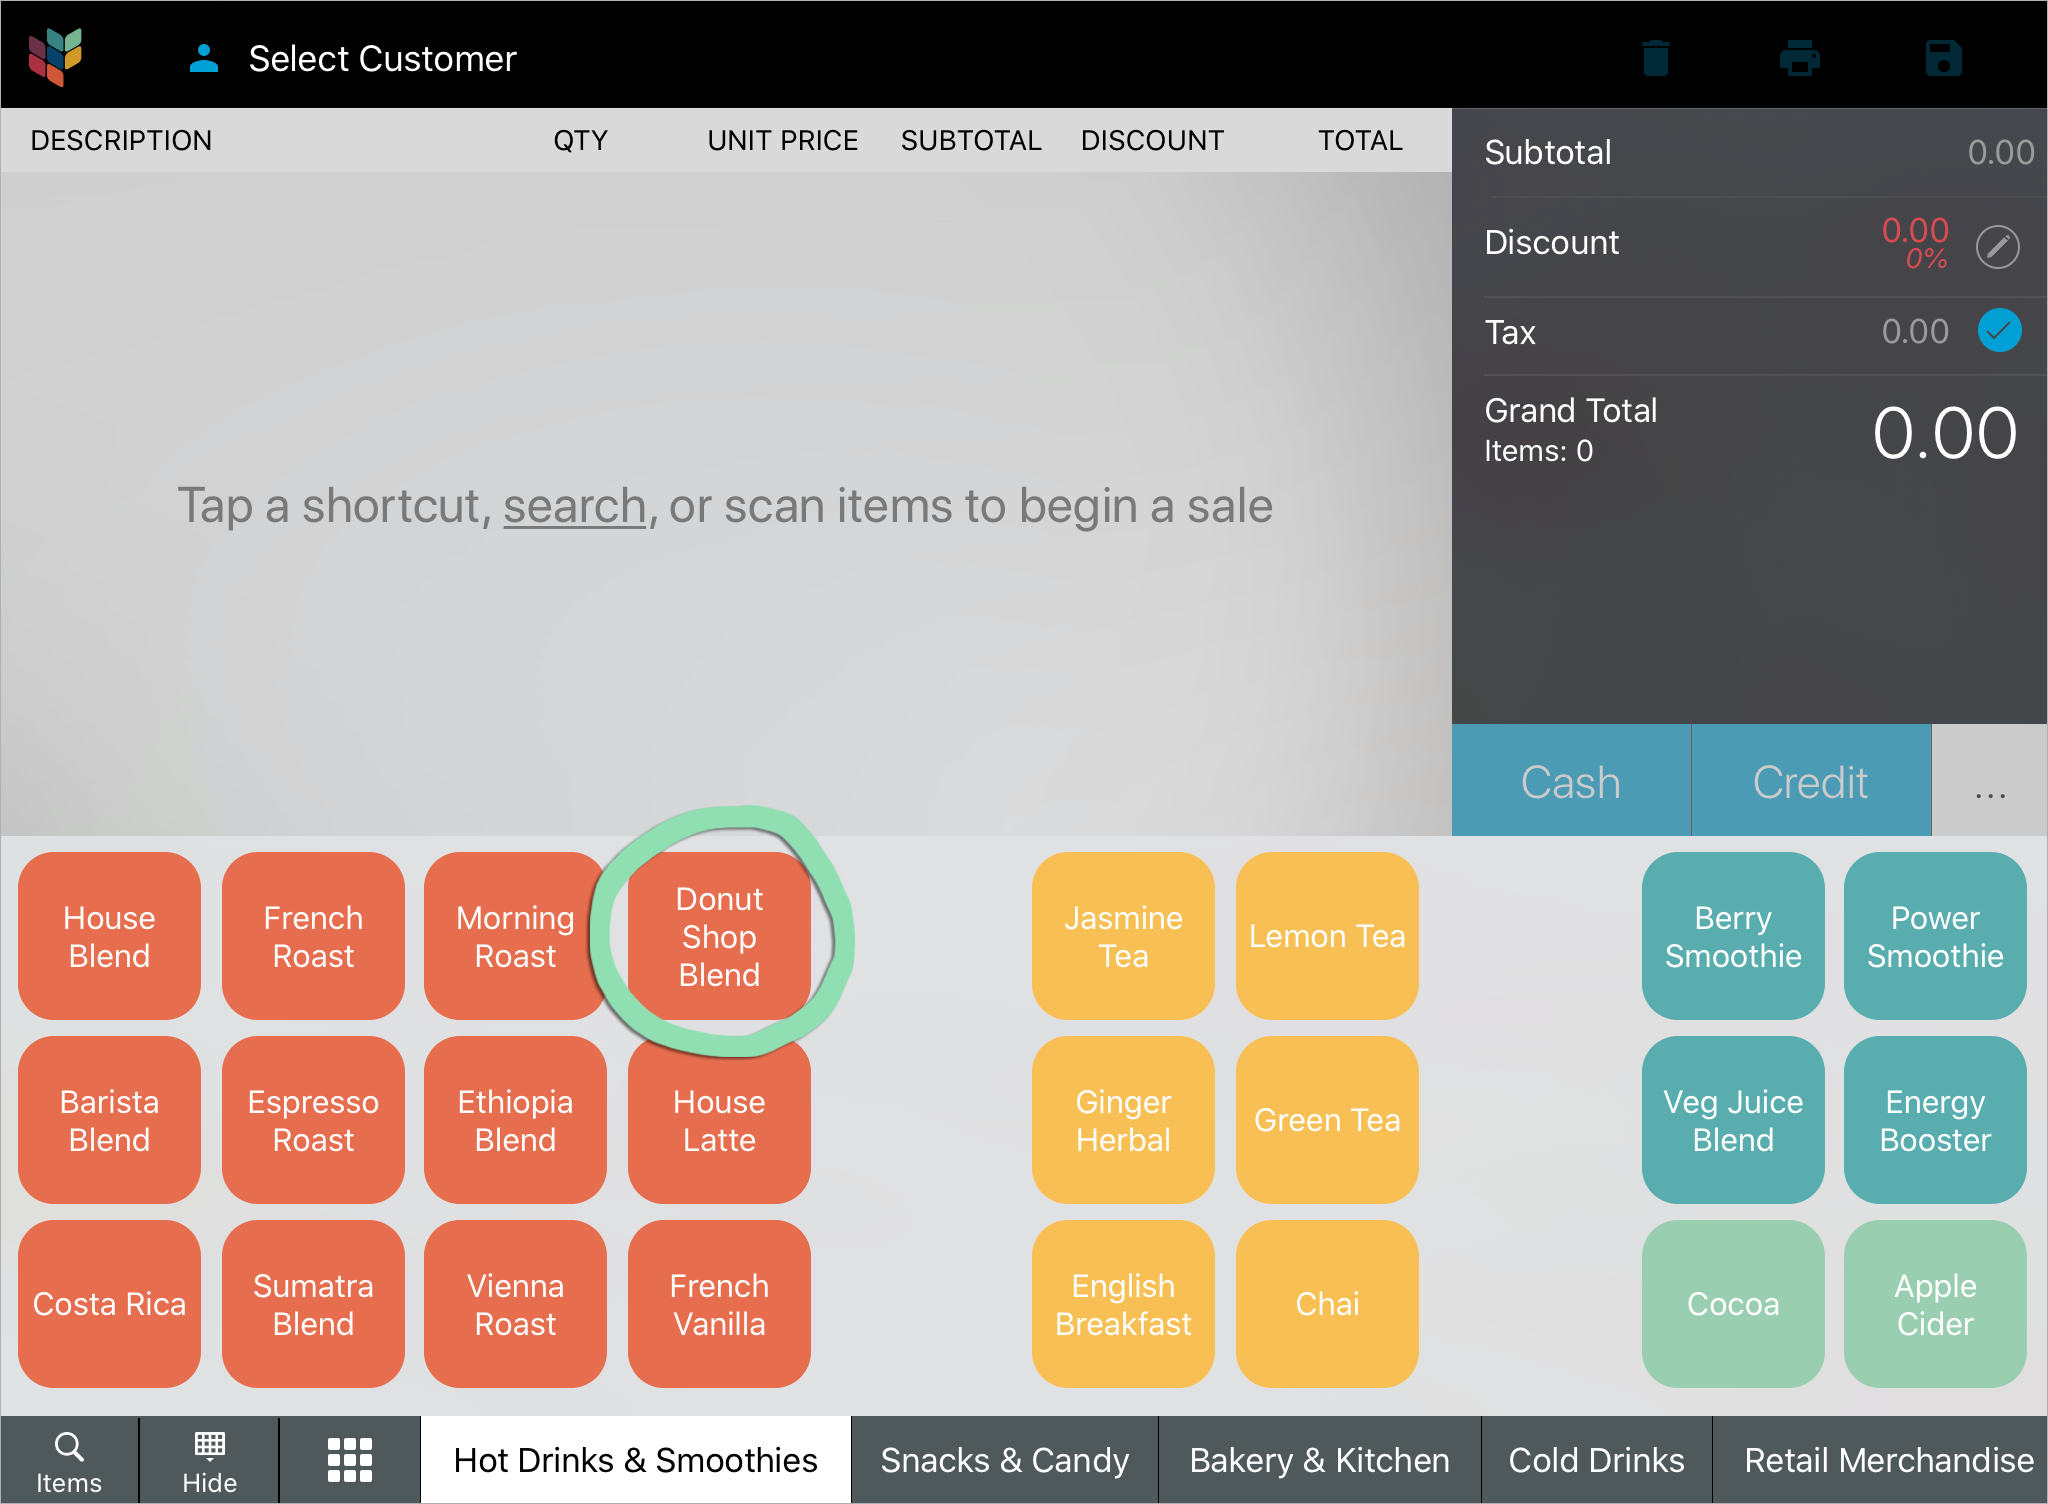
From the 'New Sale' screen, add an item to the sale using any method listed below.
For help connecting a barcode scanner to the register, visit our Hardware page to find the setup article for your specific scanner.
dAndroid only. Tap the barcode icon to use the register’s built-in camera to scan an item’s barcode, then align the barcode with the red line on the screen and wait for the item to be added to the sale.
Barcode scanning with the built-in camera works best in well-lit areas. This feature is only available in the Retail POS (S-Series) app for Android.
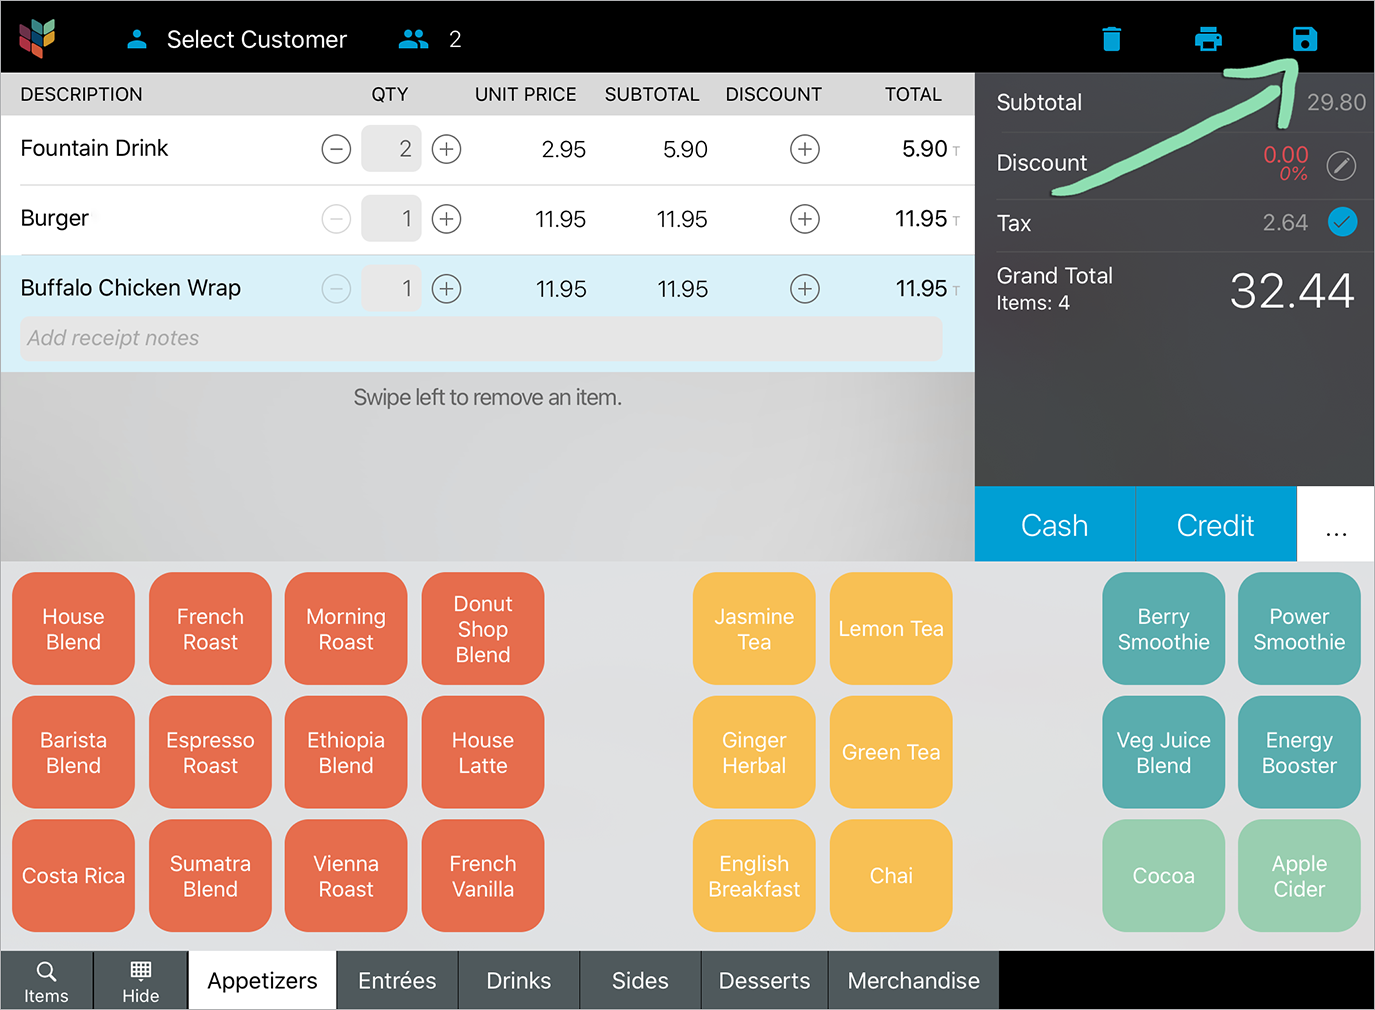
The total quantity of items on the sale appears under the grand total, allowing cashiers to track the number of items being sold. Each unit priced item counts as 1 item despite the quantity entered.
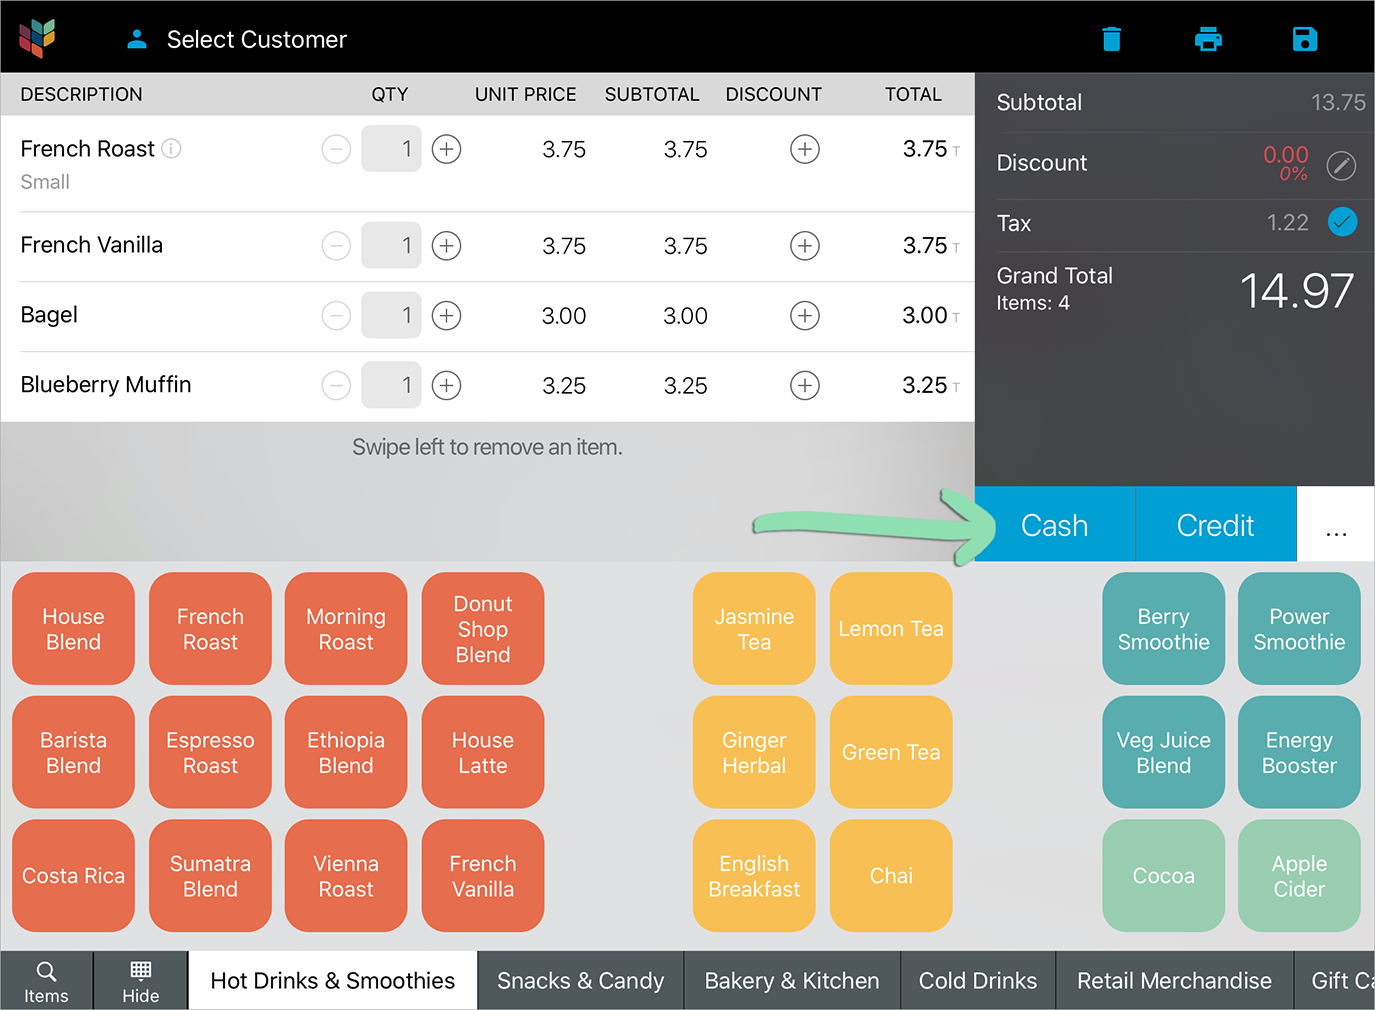
Issuing a gift card at the register is as simple as selling the ‘Gift Card’ item that was automatically created when you set up integrated gift cards. Open pricing allows cashiers to enter the value of a gift card as they ring it up.
This feature is only available for Lightspeed Retail merchants on select pricing packages.
To learn how to set up gift cards for use at the register, visit our full Integrated Gift Cards article.
Add the 'Gift Card' item to a sale.
Use the keypad to enter an amount to load onto the card, then tap 'Done'.
Click to Enlarge
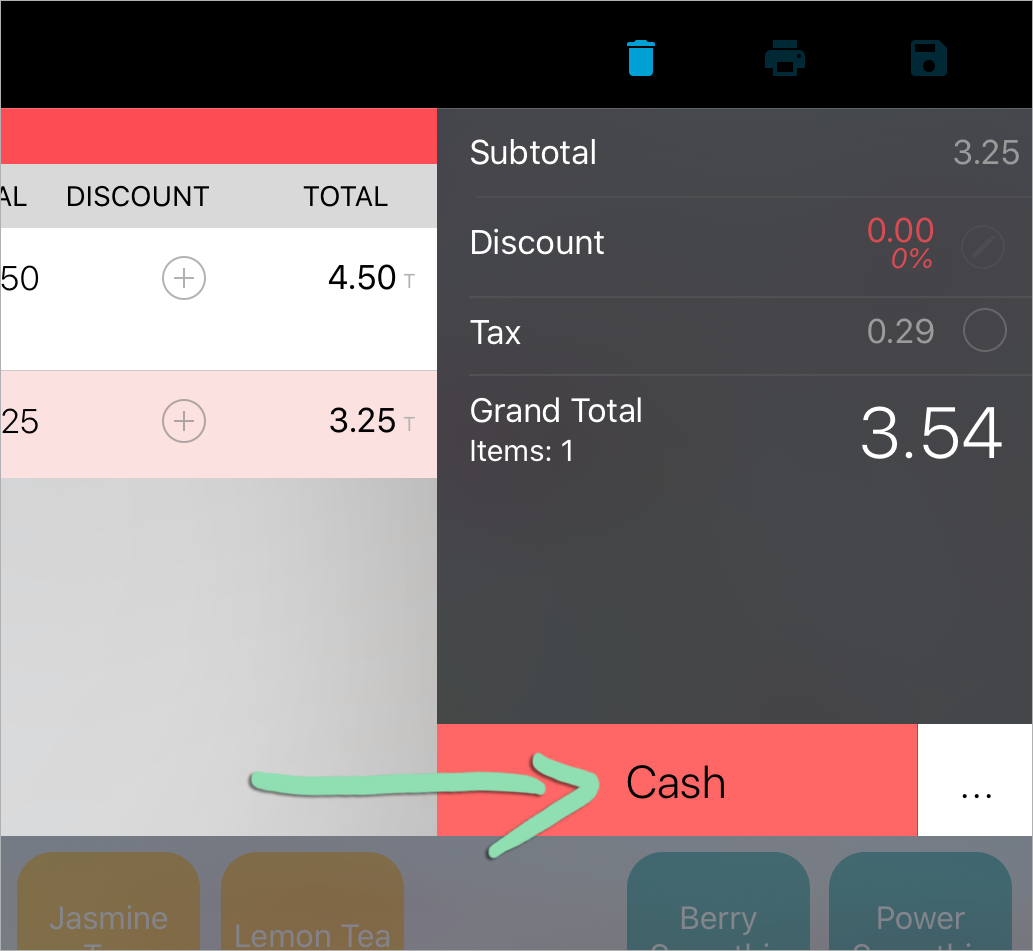
Select a payment tender to continue the sale as usual.
When prompted, swipe a gift card through your credit card reader.
Don’t have a card reader? Learn how to manually enter the gift card number or scan its barcode here.
Tap ‘Add’ to add the amount to the card, then select ‘Continue’ (iOS) or ‘Continue to Payment’ (Android).
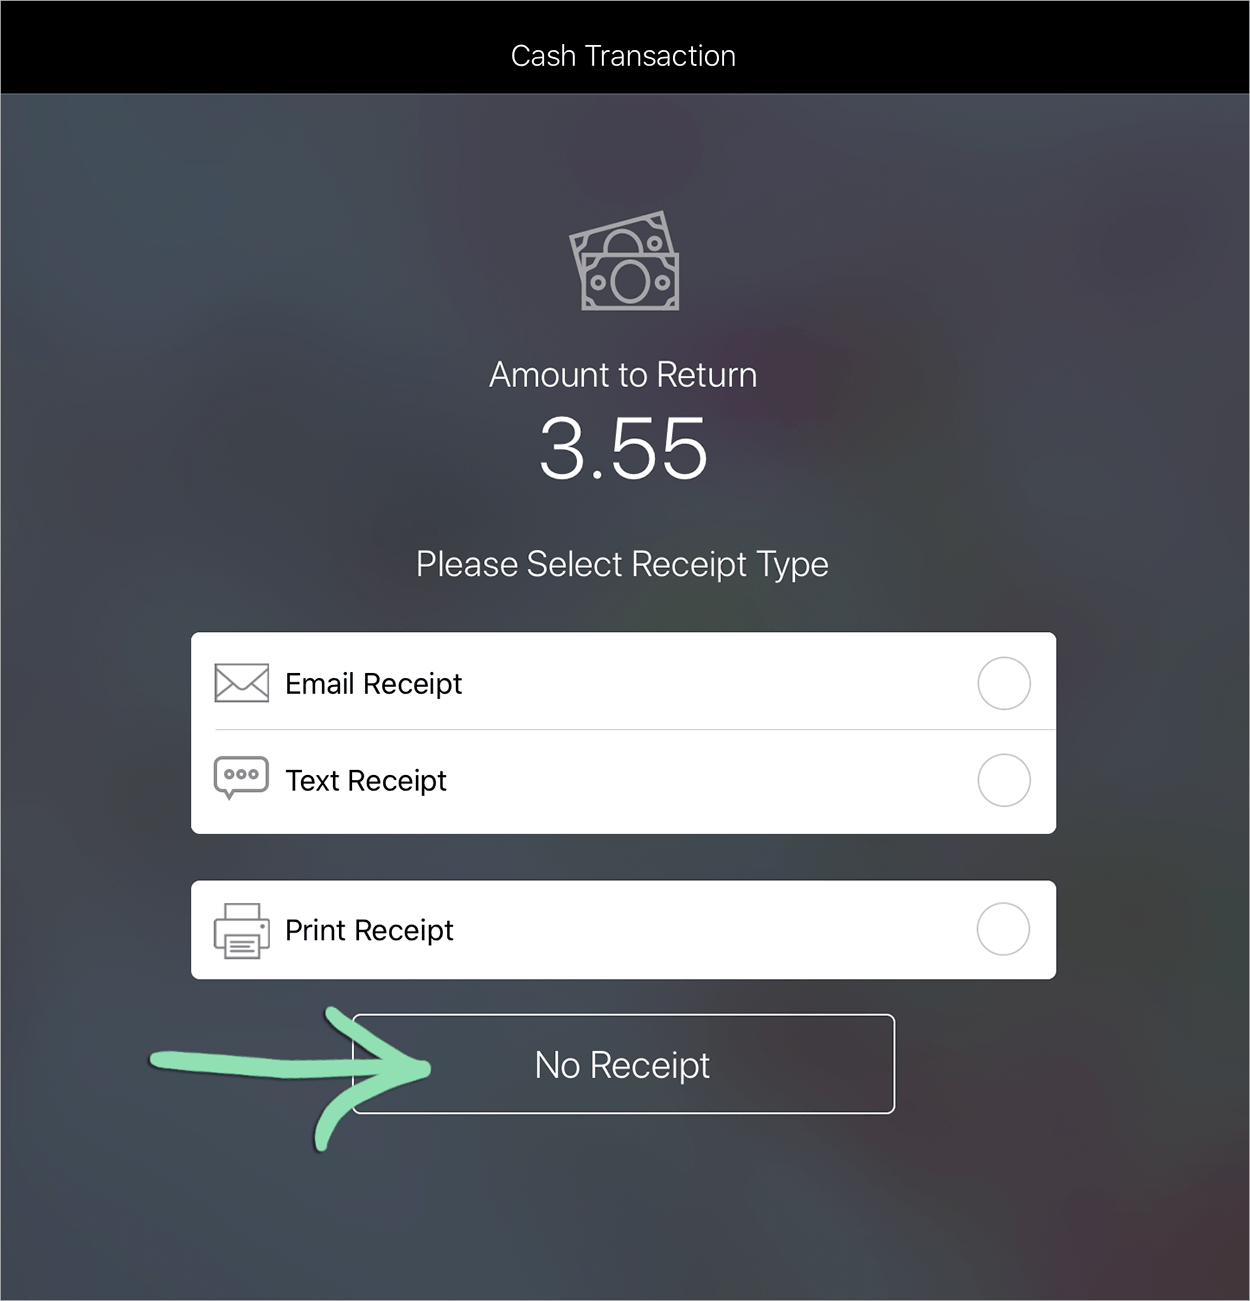
Process the customer's payment, then select a receipt option and tap ‘Done’, or tap 'No Receipt'.
If you have questions about gift card ordering, processing, or setup, visit our Gift Card FAQ.
Save a Sale
Save a sale to start a check or tab that will remain open until the customer is ready to pay. Once a sale is saved, you can modify it to add additional items as the customer continues their order.
After saving a sale, visit our full Saved Sales article to learn how to manage and view reporting on saved sales.
(Optional) Enter a new name for the saved sale. If using an iDynamo, swipe a credit card to automatically use the cardholder’s name.
Don’t have an iDynamo? Tag a customer to the sale before saving to automatically assign their name to the saved sale. If no customer is tagged, the name defaults to ‘Walk-in’, plus the current time.
Tap 'Save' (iOS) or the disk icon (Android) to finish saving the sale.
Perform a return to refund a customer for a purchase made at your business. This section will cover how to return a sale that was run during the current open register shift.
To learn how to return a sale from a previous register shift or perform a manual return, visit our full Performing Returns article.
The total quantity of selected items appears under the grand total, allowing cashiers to verify the number of items being returned. Each unit priced item counts as 1 item despite the quantity entered.
The original sale tender is highlighted in red as the suggested tender for return. Tap ‘…’ to use a different tender, such as ‘Gift Card’. Sales can only be returned to a credit card if originally paid with the ‘Credit’ tender at the register.
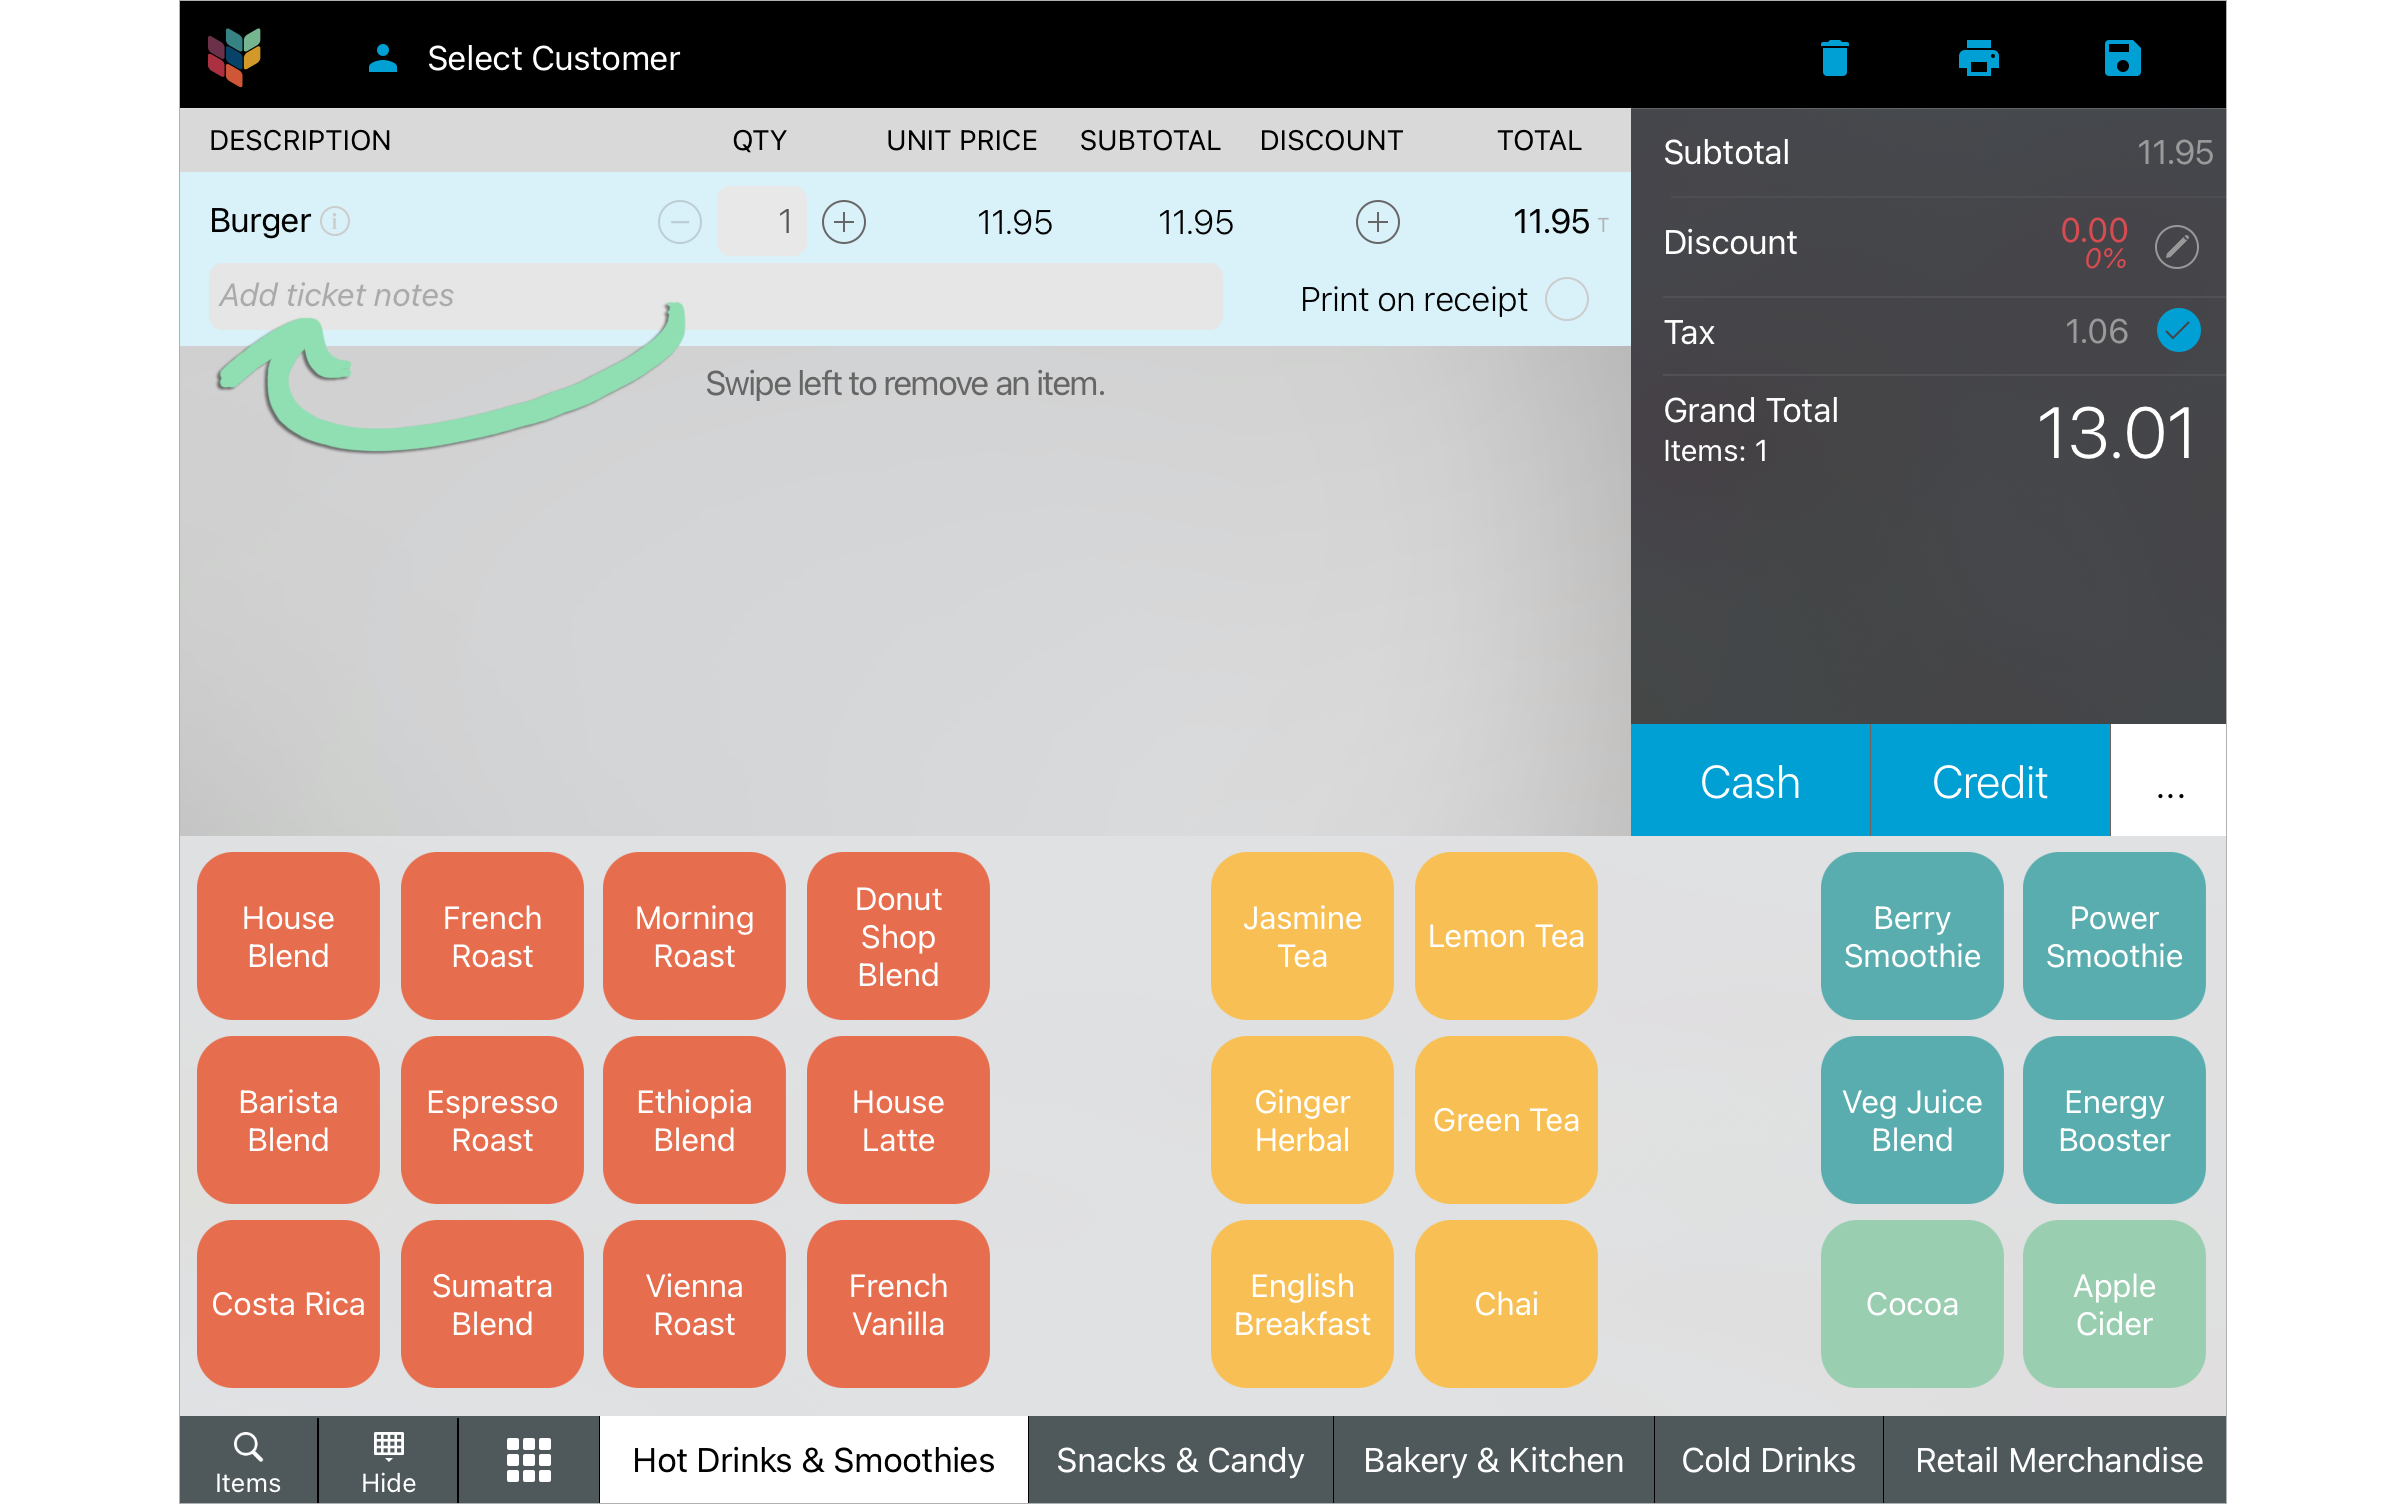
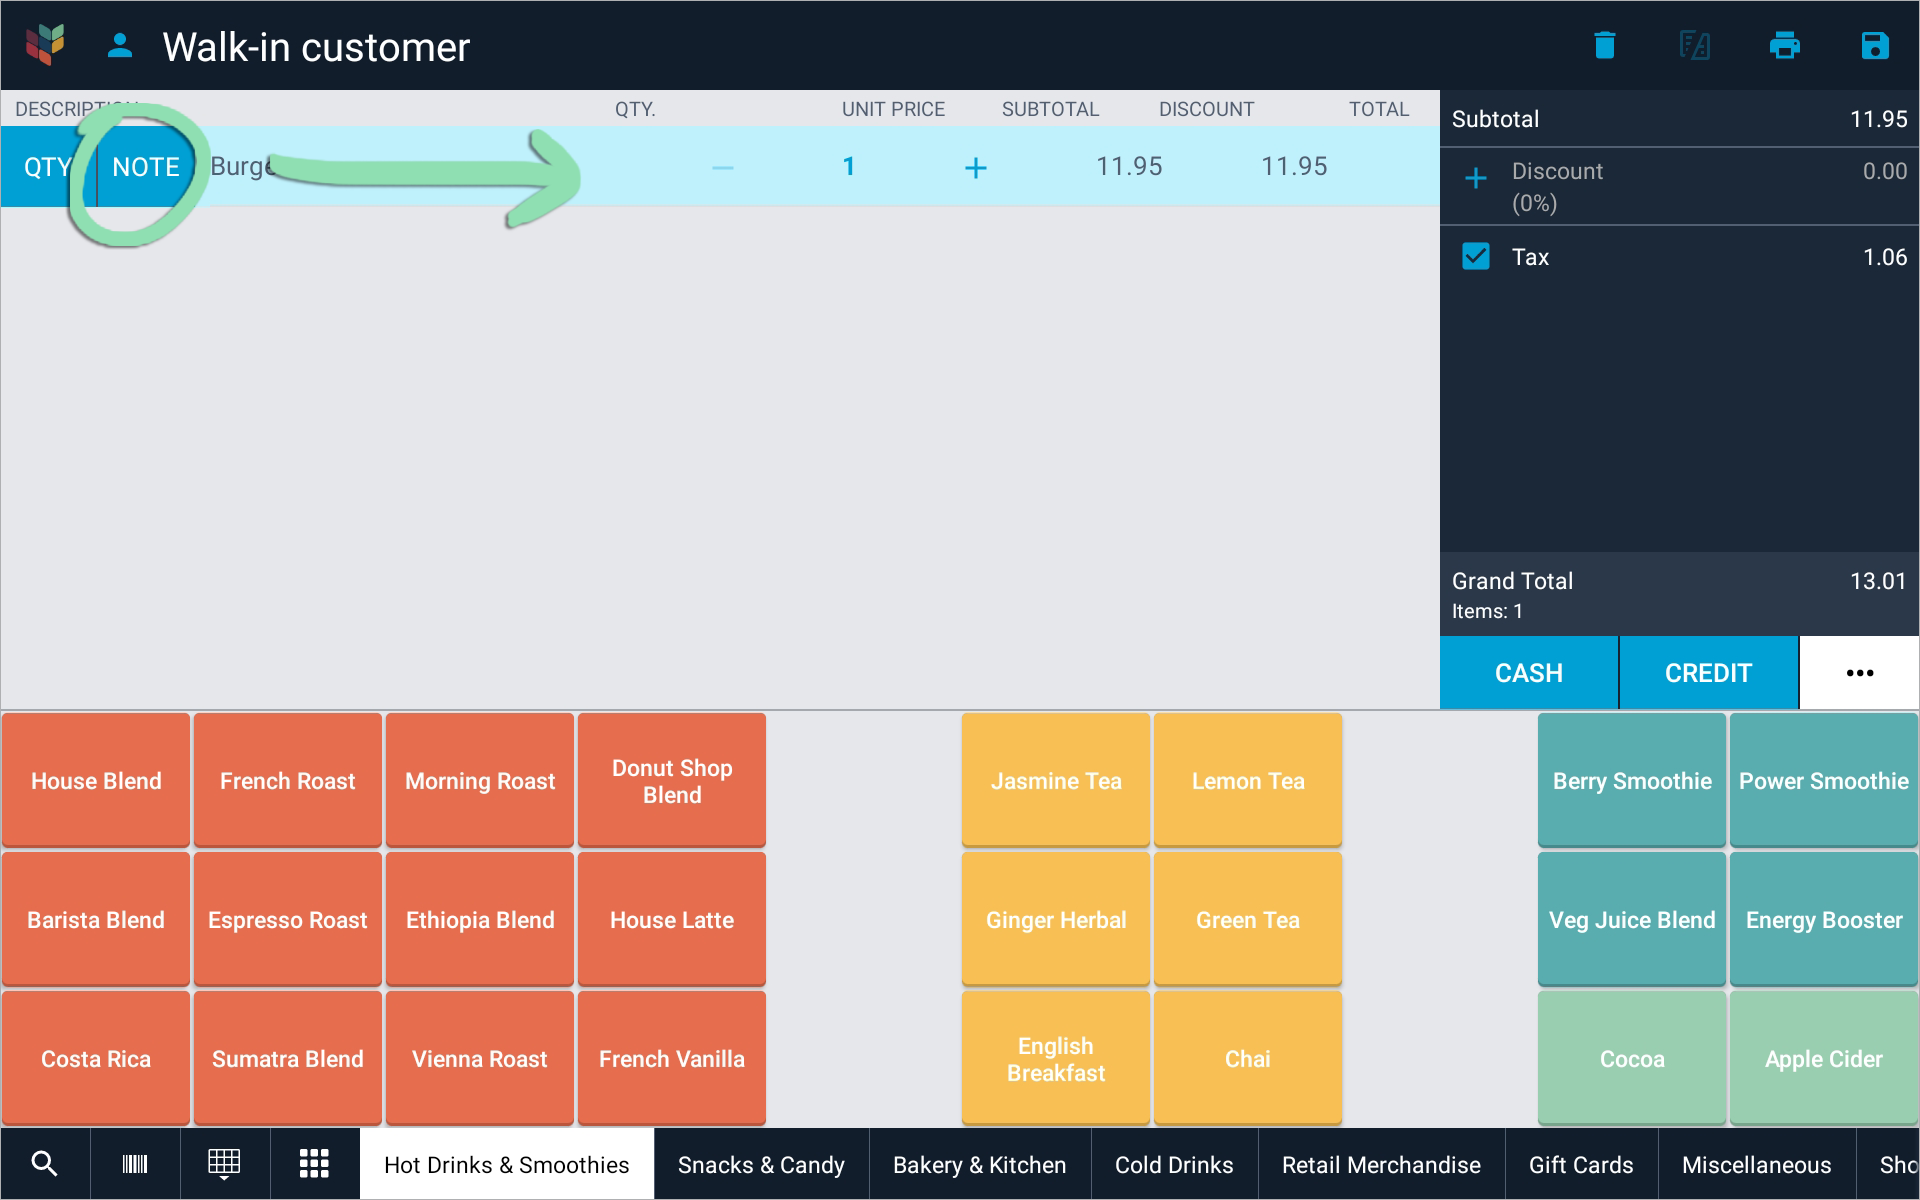
Add notes to a sale item to enter additional information for the item that will appear on its kitchen ticket and/or receipt. Use notes to alert the kitchen of a customer’s allergy, record a serial number, or any other time you need to include extra details for an item. Receipt notes are also available from the BackOffice Transactions Report on the downloaded copy of the receipt.
Add an item to a sale.
Tap ‘Add ticket notes’ or ‘Add receipt notes’ (iOS), or swipe right across the item and tap ‘Note’ (Android).
Don’t see these options in the Retail POS (S-Series) app for iOS? Tap the line item to highlight it.
(Optional) If adding a ticket note, enable the ‘Print on receipt’ (iOS) or ‘Also print on receipt’ (Android) setting to add the note to the sale receipt.
Tap ‘Done’ (iOS) or ‘Add’ (Android) to finish adding the note.
Kitchen notes print on kitchen tickets after saving or tendering a sale. Receipt notes appear on customer receipts at the end of the sale and are available from the BackOffice Transactions Report on the downloaded receipt copy.
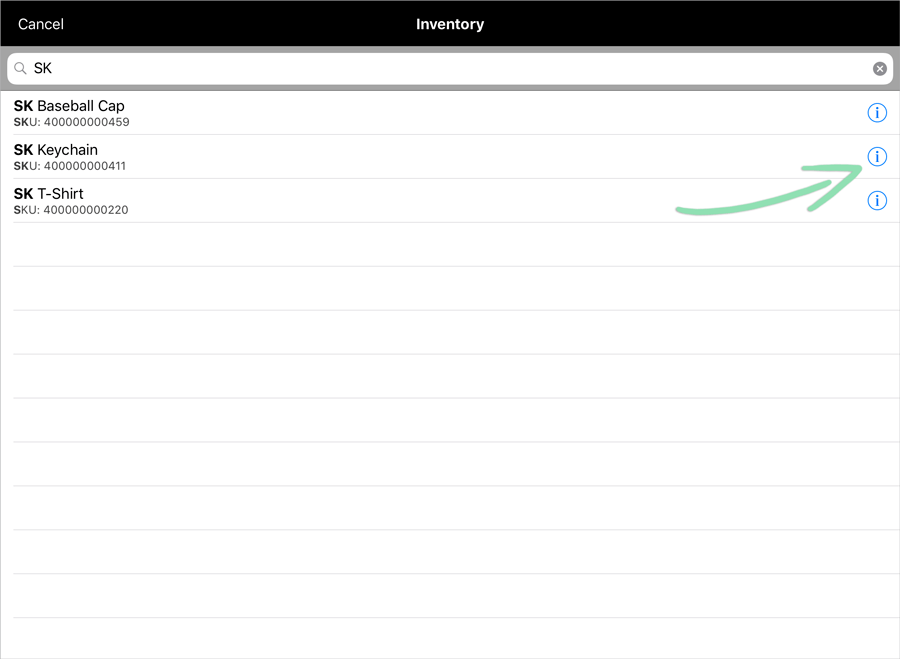
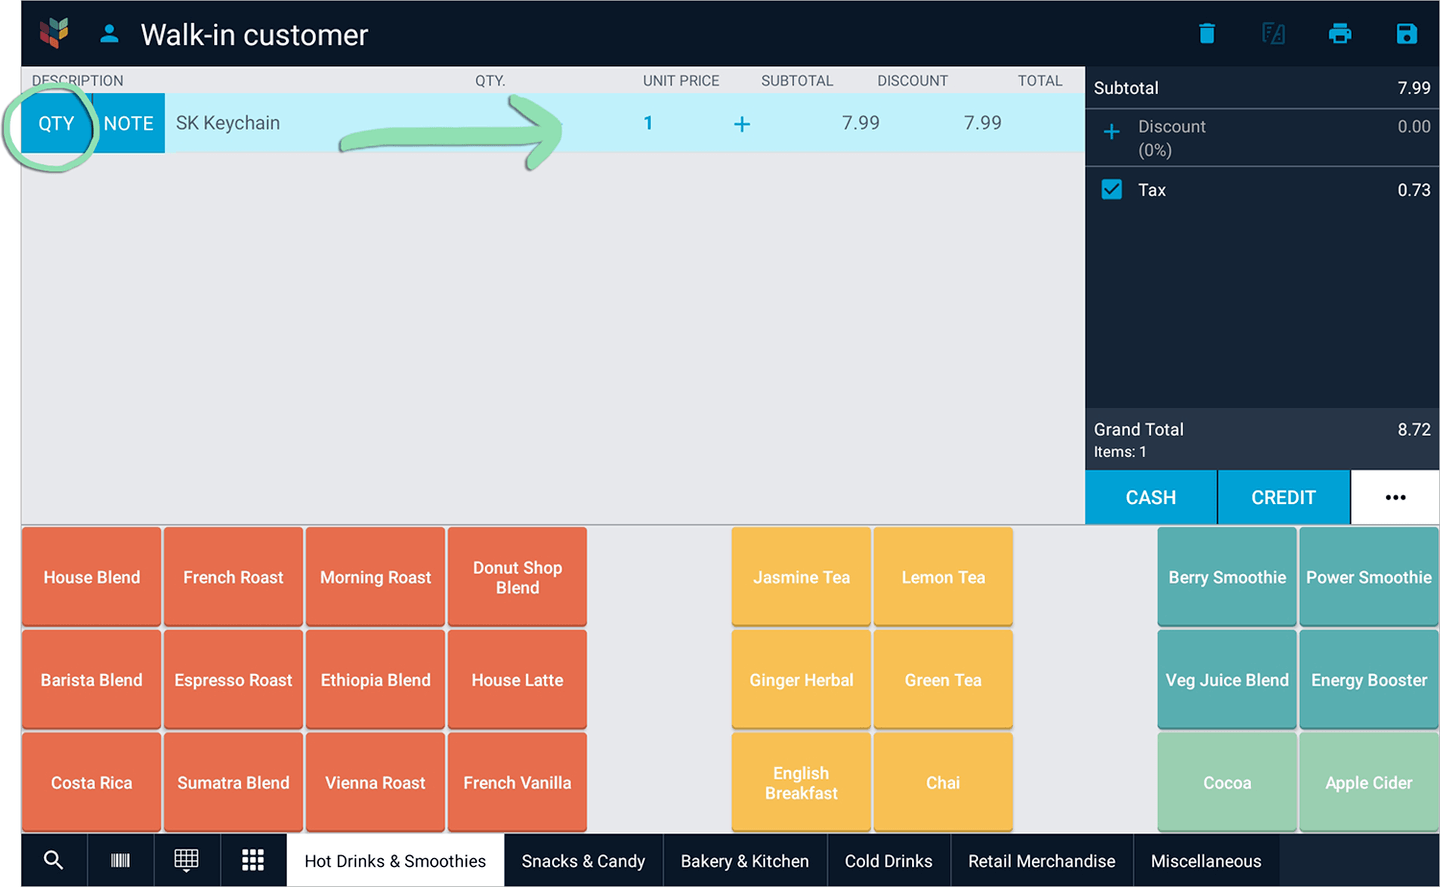
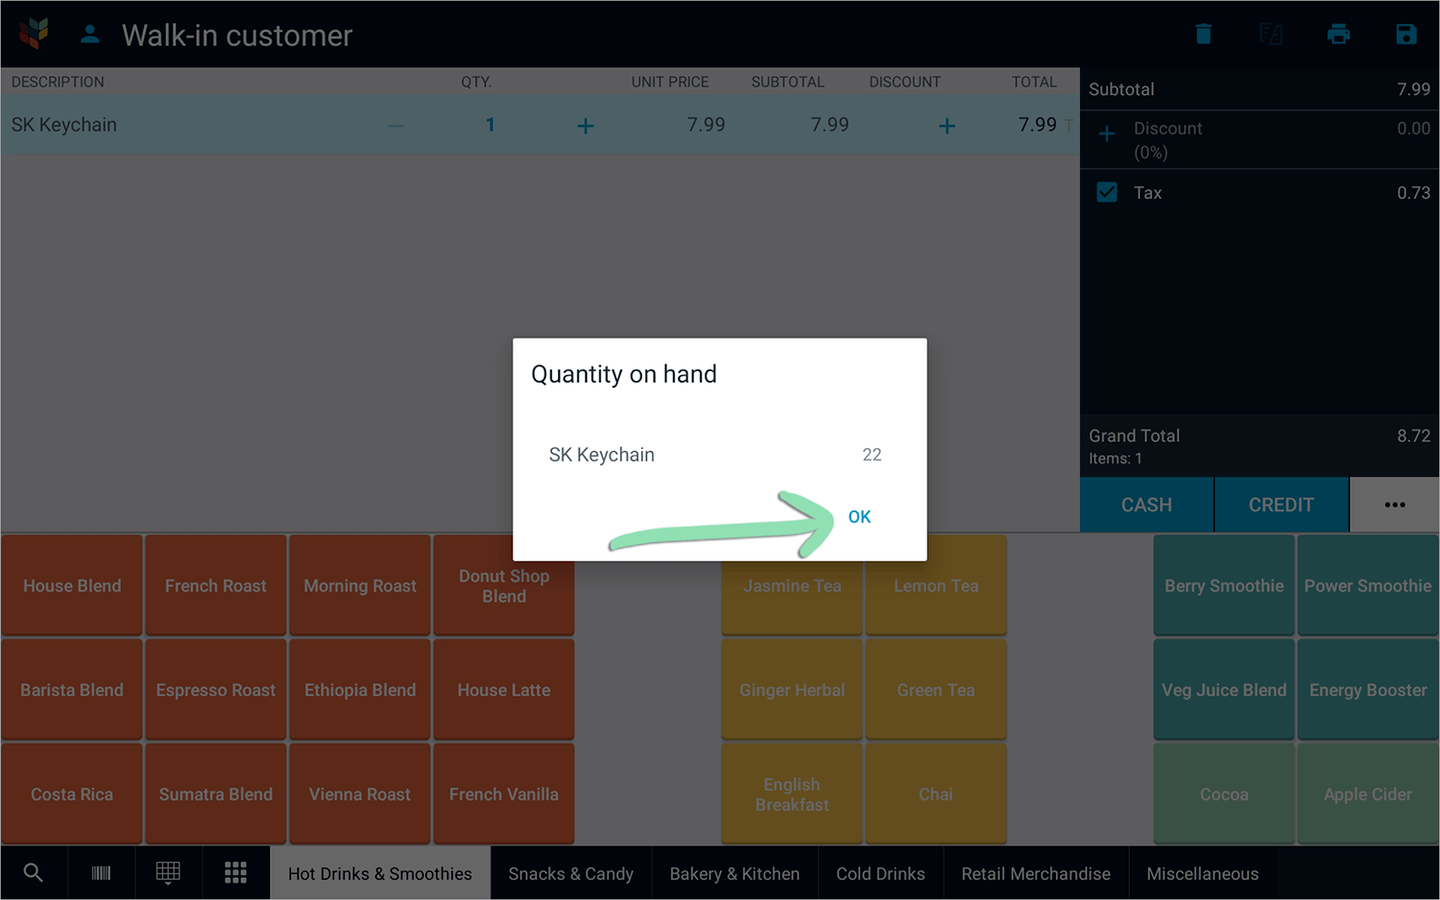
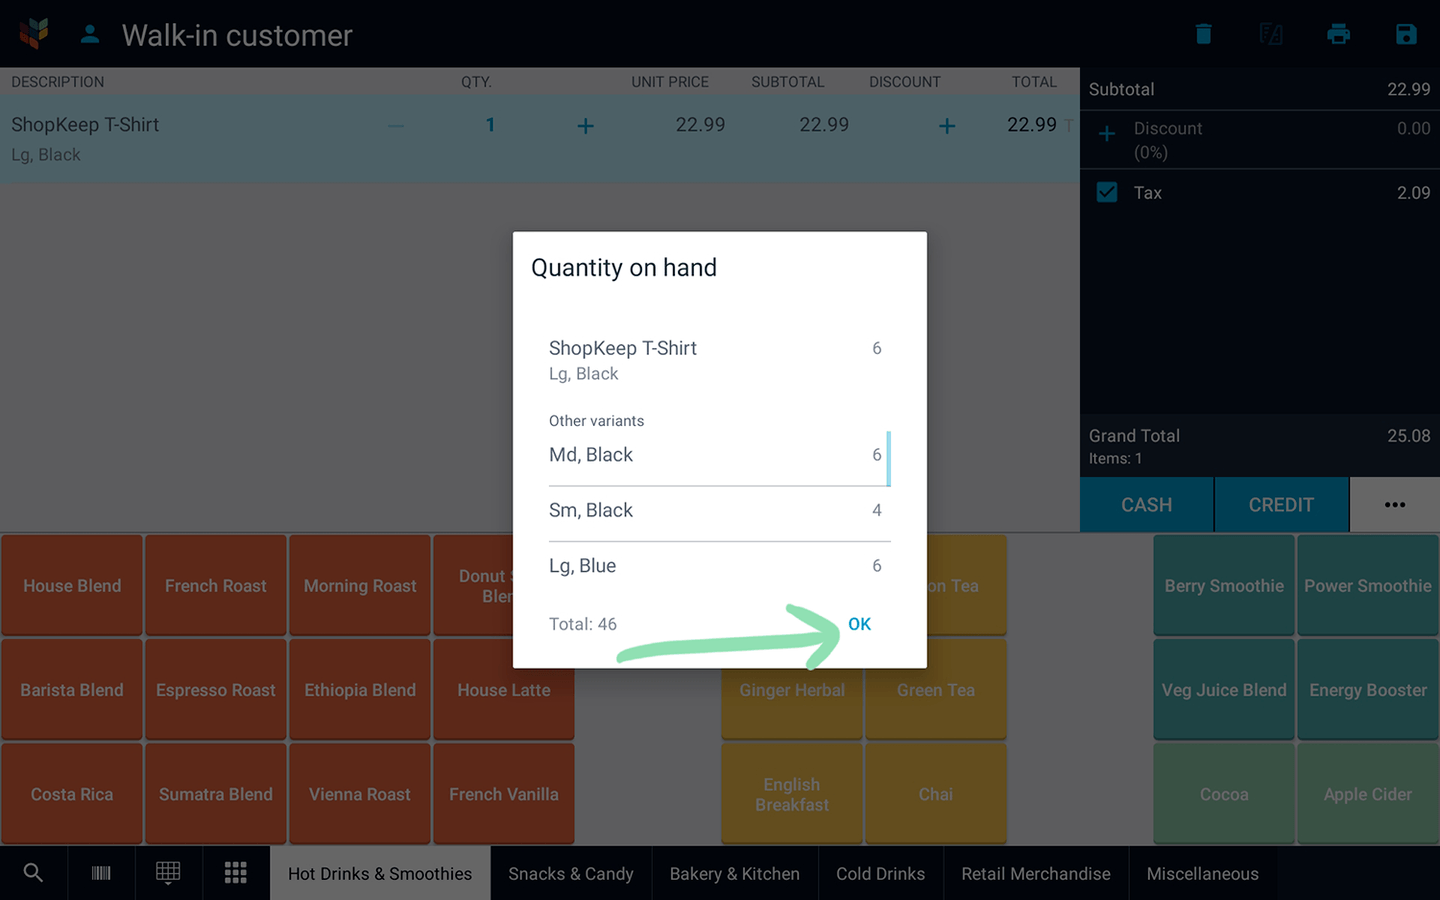
Look up an item’s quantity on hand (QoH) to see how much is in stock. The specific steps to check the quantity on hand will vary based on whether you use the iOS or Android Retail POS (S-Series) app.
Manage item availability at the register to manually control if specific items can be rung up. When an item runs out, a Register Manager can make it unavailable to temporarily prevent it from being sold. When an unavailable item is ready to be sold again, make it available to allow it to be rung up.
This feature is only available in the Retail POS (S-Series) app for iOS.
Select whether to make the item unavailable or available for sale on that register.
Unavailable items will be grayed out on the shortcuts layout and item search panel, preventing them from being rung up from those areas. If an unavailable item is physically present, it can still be rung up by scanning the item barcode.
Individual item variants and modifiers cannot be made unavailable.
If prompted, enter a manager code and tap ‘Enter’ to authorize the change in availability.
Click to Enlarge
(Optional) Repeat steps 1 - 3 on each additional register to update item availability for those registers.
Item availability does not sync between registers, so items must be manually made unavailable or available on each individual register.
Receipt Options
The Lightspeed Retail POS offers a few ways to provide receipts to customers. Customers can select an email receipt, printed receipt, or printed gift receipt.
Email and Print Receipts
At the end of every transaction, there are options that allow a customer to choose if, and how, they want to receive their receipt.
Visit our Receipt Setup article to learn how to customize the business information, logo, and messaging that appear on receipts.
Email Receipt | Send the sales receipt to an email address. *For swiped and EMV credit transactions, the email address entered will be linked to the customer’s credit card and email receipts will be automatically selected when using that card at any Lightspeed Retail merchant. Learn more here.
Print Receipt | Print the sales receipt to a connected receipt printer.
Print Gift Receipt | Print the sales receipt without prices to a connected receipt printer.
No Receipt | Receipt is not emailed or printed.
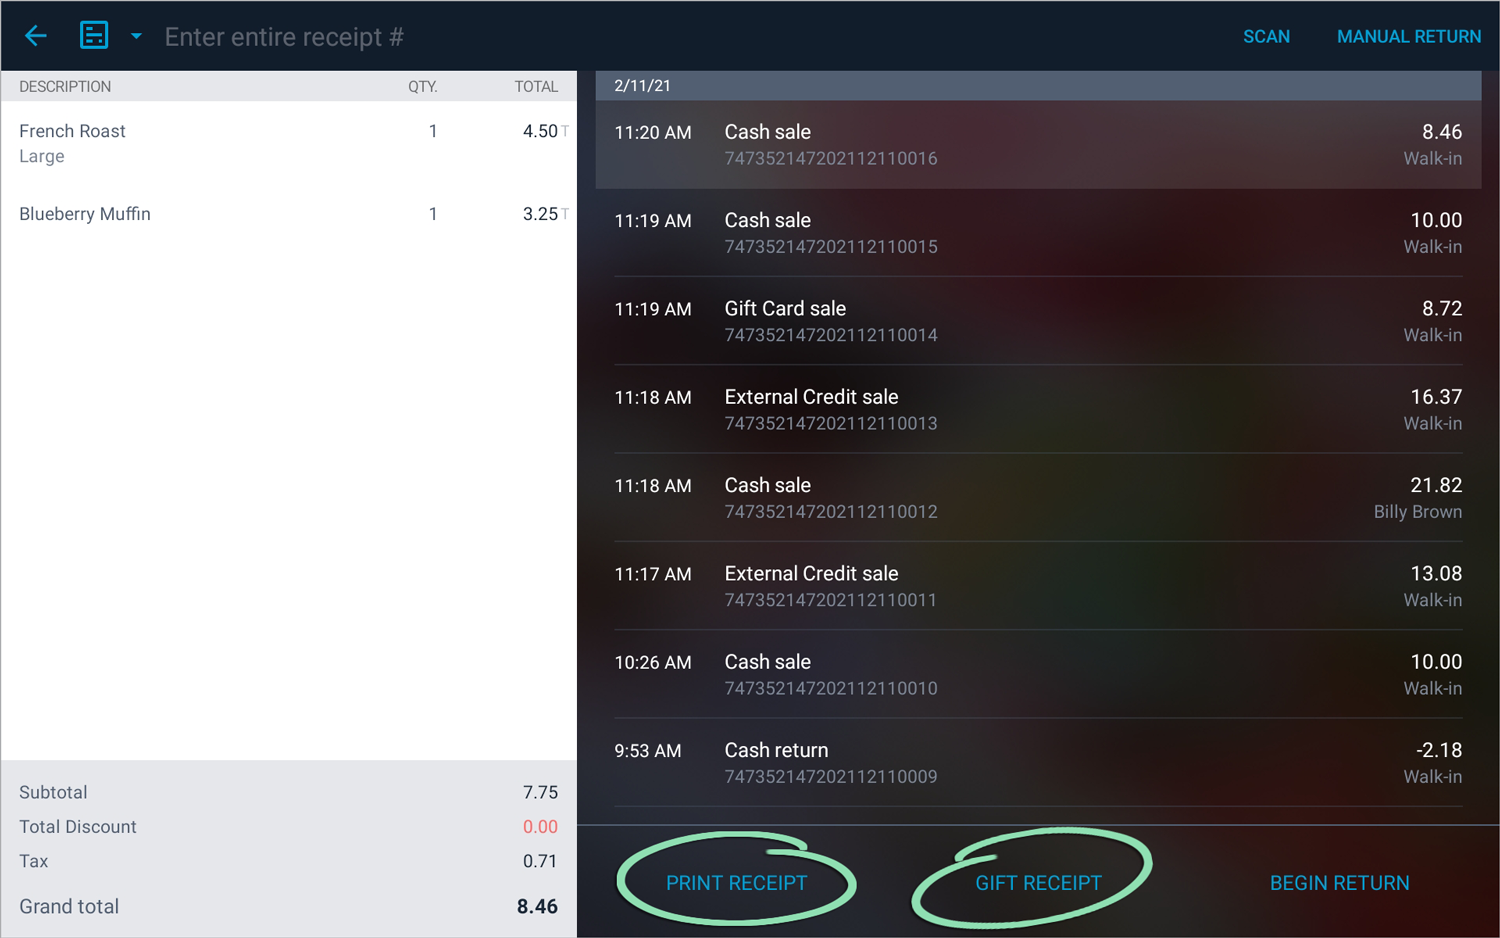
Reprint or Resend a Receipt
If a customer needs an extra copy of a receipt, reprint it or resend it via email from the ‘Sales History’ screen. Resending email receipts is only possible in the Retail POS (S-Series) app for iOS for sales, but you can reprint receipts in the iOS and Android Retail POS (S-Series) apps for sales and returns.
Select a transaction to reprint or resend a receipt for.
Resending email receipts is only possible in the Retail POS (S-Series) app for iOS for sales, but you can reprint receipts in the iOS and Android Retail POS (S-Series) apps for sales and returns.
If the transaction is from the current register shift, find it on the list.
If the transaction is from a previous register shift, use the search bar to look it up.
Search by transaction number, last 4 digits of the customer’s credit card, or tap the arrow and select ‘Customer’ to search by customer name, email, or phone #.
Follow the set of steps below for the iOS or Android Retail POS (S-Series) app.
Retail POS (S-Series) app for iOS
aTap the 3 dot menu.
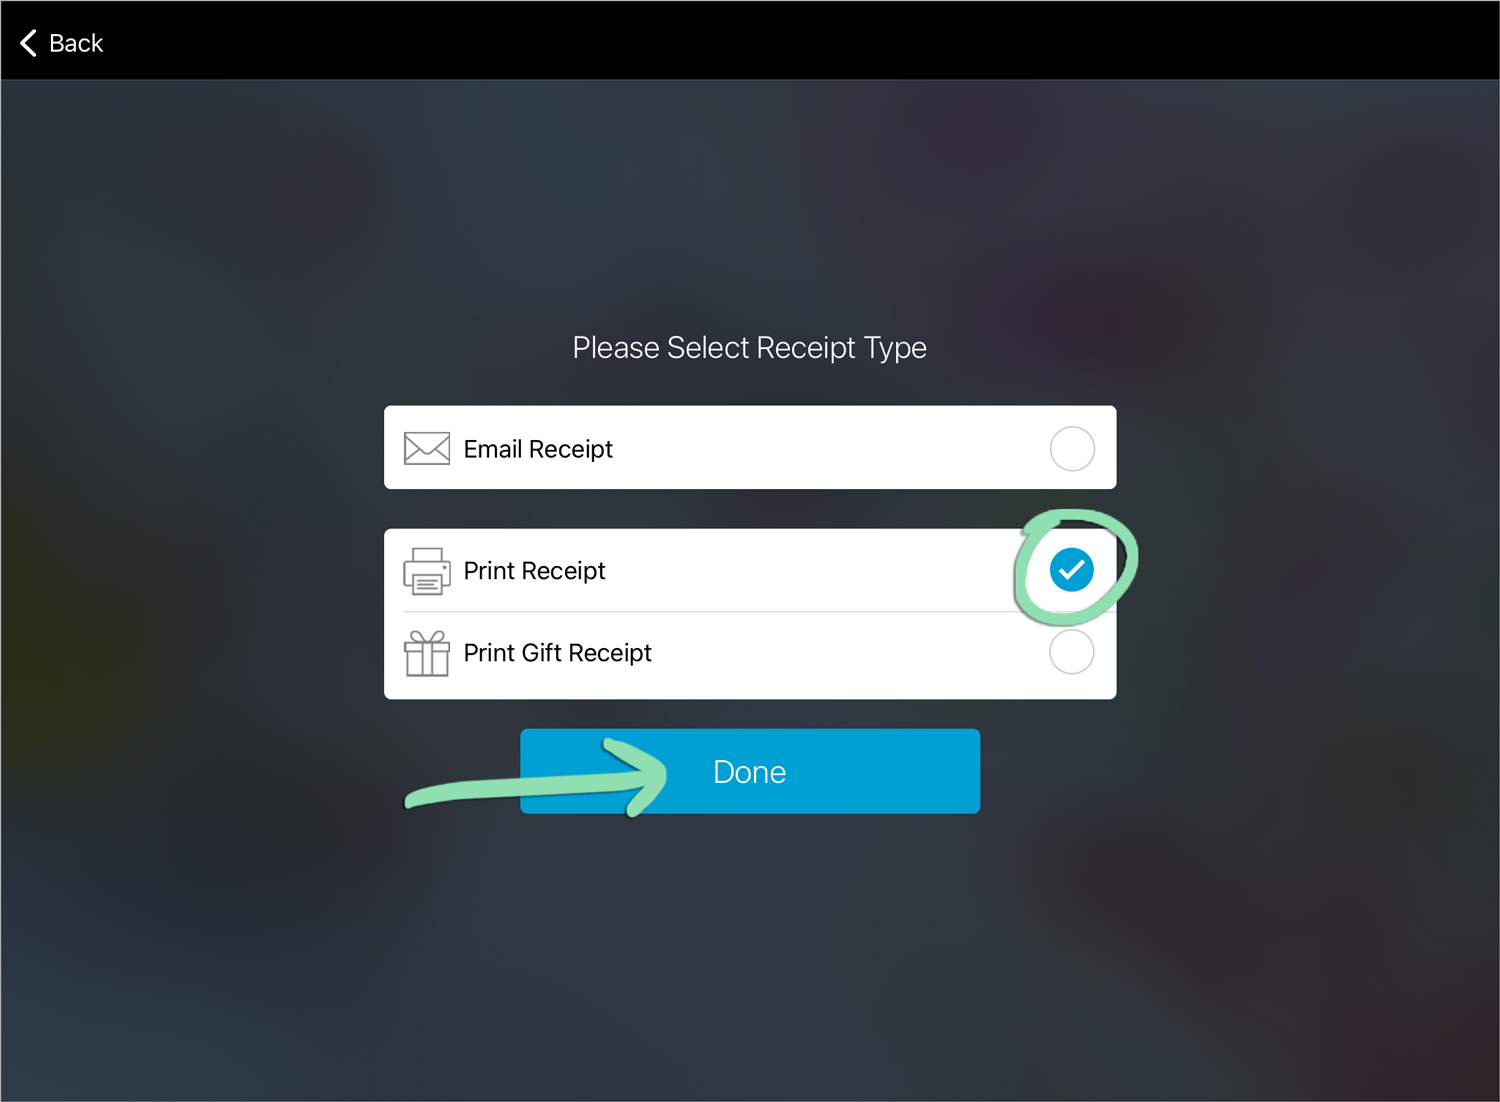
bTo reprint or resend a sales receipt, select ‘Receipt Options’ from the menu. On the next screen, select ‘Email Receipt’, ‘Print Receipt’, or ‘Print Gift Receipt’, and tap ‘Done’.
Gift receipts are only available for sales from the current register shift.