Add employees to the BackOffice Staff List to give them access to the Retail POS (S-Series) app and, if needed, also to BackOffice. With customizable employee privileges and settings, you can allow staff members to perform additional manager functions at the register or control which BackOffice features they can use. Edit existing employees to change their permissions or contact details, or deactivate employees to remove them from the Staff List and revoke their access to the Lightspeed Retail POS.
Adding employees
Add employees in BackOffice to grant them access to the register and optionally to BackOffice. With a unique register code, employees can clock in and out, run sales, and perform other cashier or manager functions.
Have questions about adding staff? Visit our BackOffice FAQ for help.
-
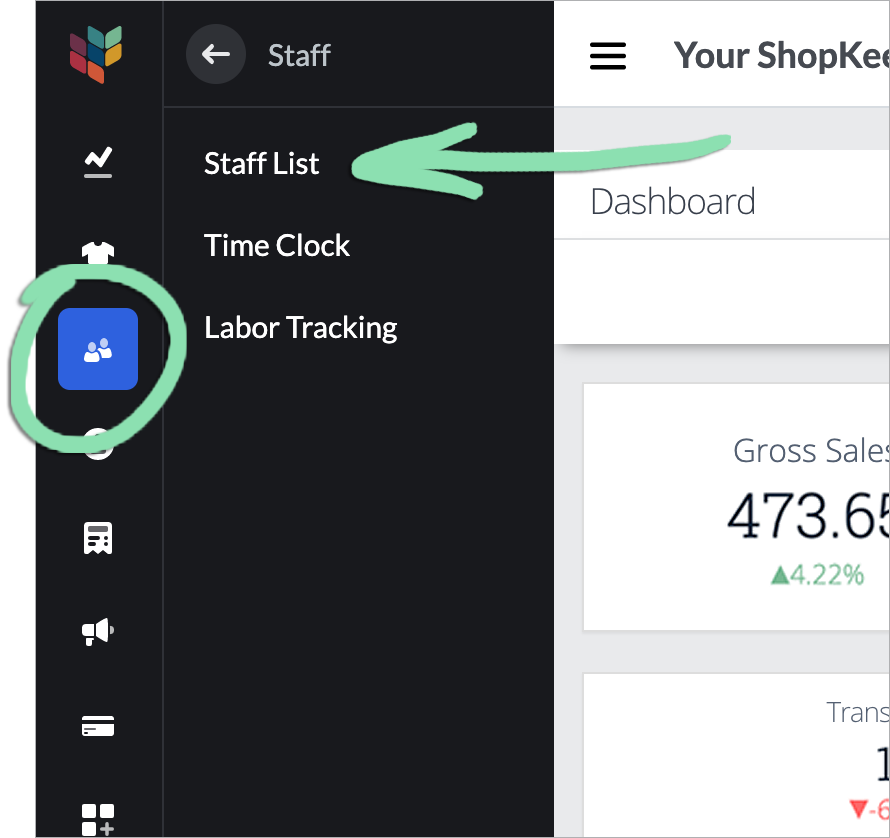
In BackOffice, click Staff, then select Staff List.
-
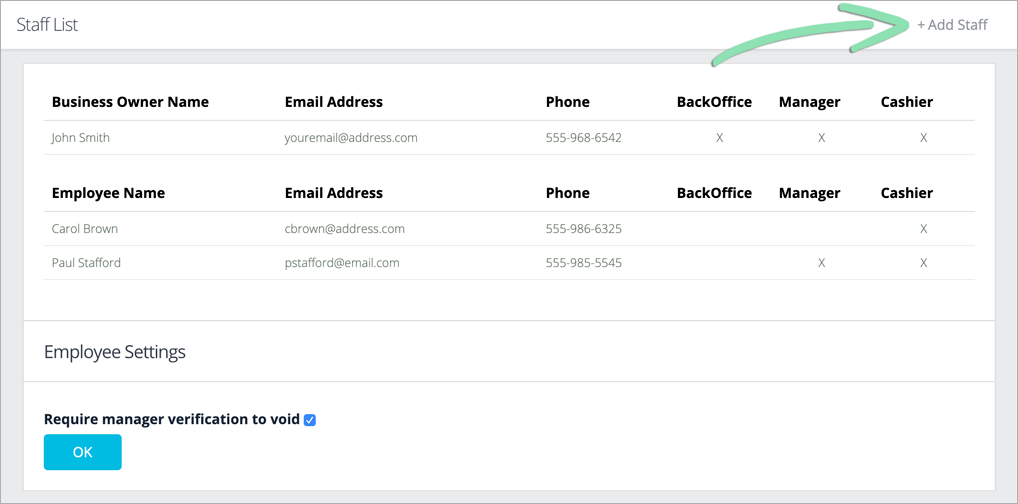
Click Add Staff to create a new employee.
-
Fill in the Employee Details and Register Access sections.
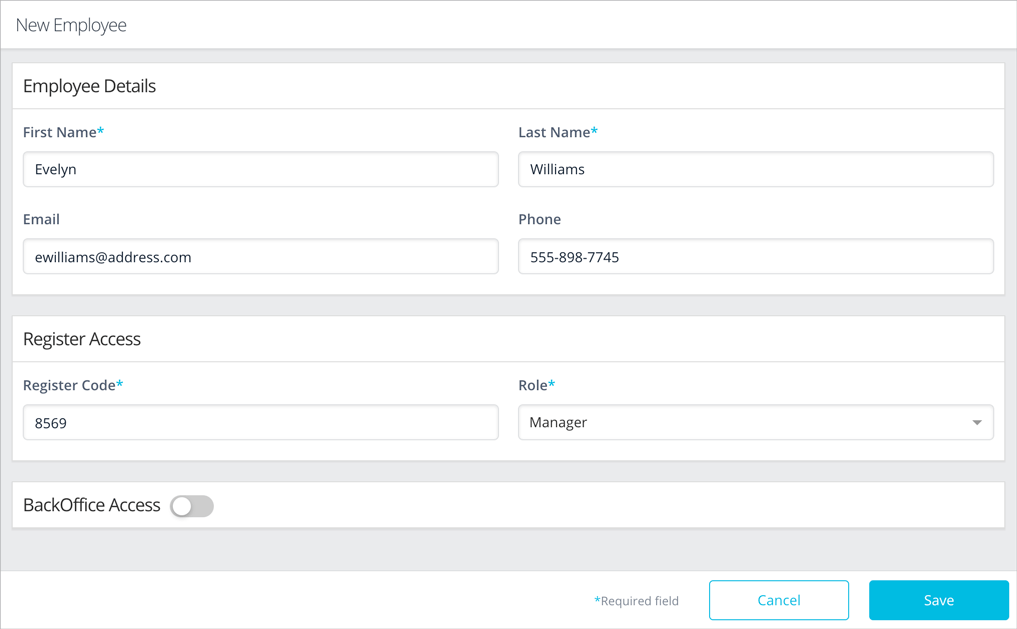
- First / Last Name: Name of the employee.
- Email (optional): Email address used to contact the employee.
- Phone (optional)| Phone number used to contact the employee.
- Register Code: 4-digit code that allows the employee to clock in and out and sign into the register.
- Role: Select Cashier or Manager. Cashiers can run sales, returns, and perform other cashier functions at the register. Managers can perform cashier functions and manager functions, such as opening the register shift and cash drawer.
-
(Optional) Give BackOffice access to the employee.
Employees with BackOffice access can also log into the Lightspeed Pay app and view all settings on the Setup screen of the Retail POS (S-Series) app.
-
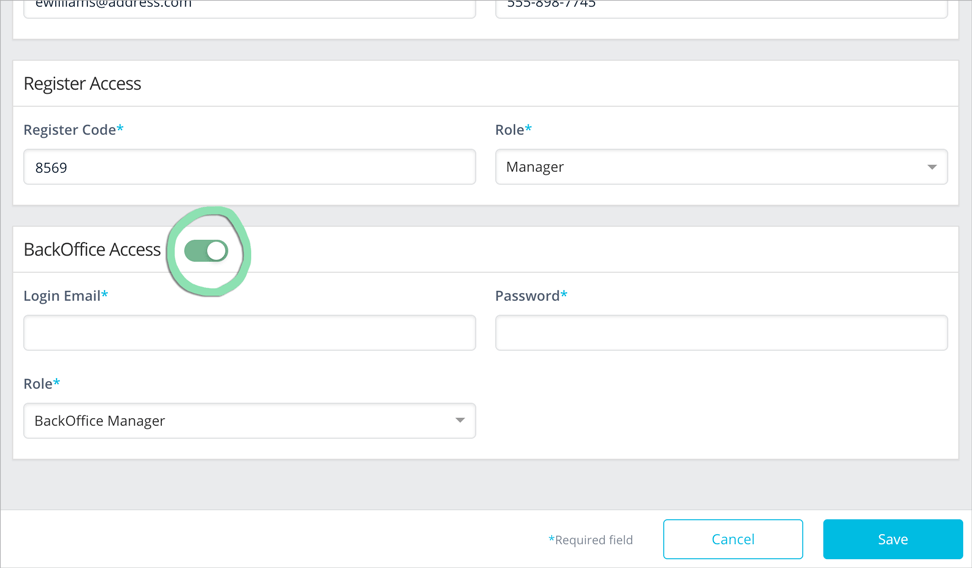
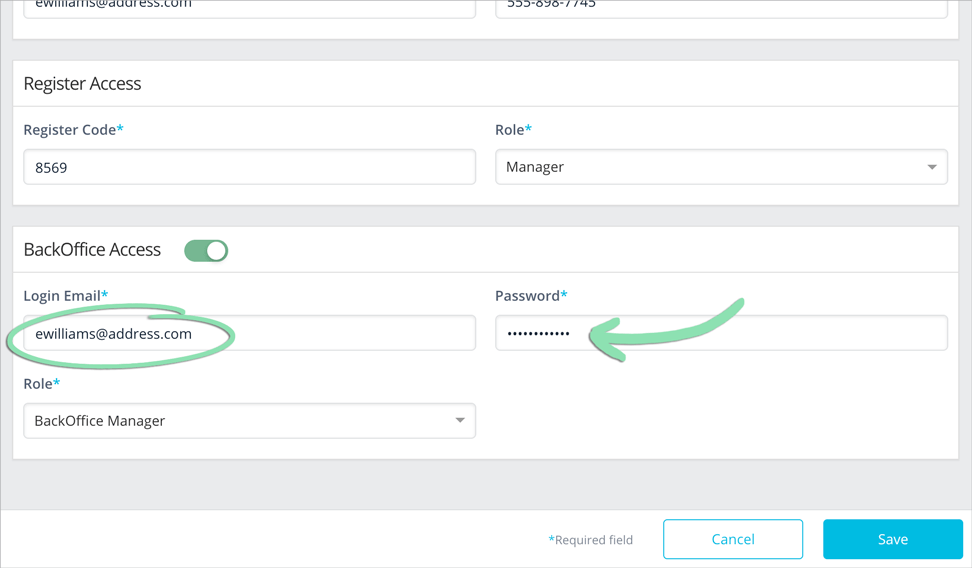
Toggle ‘BackOffice Access’ on.
-
Enter a ‘Login Email’ and ‘Password’.
The employee will use these credentials to sign into BackOffice.
-
-
Select a role with predetermined permissions or set up custom permissions to control what the employee can access in BackOffice.
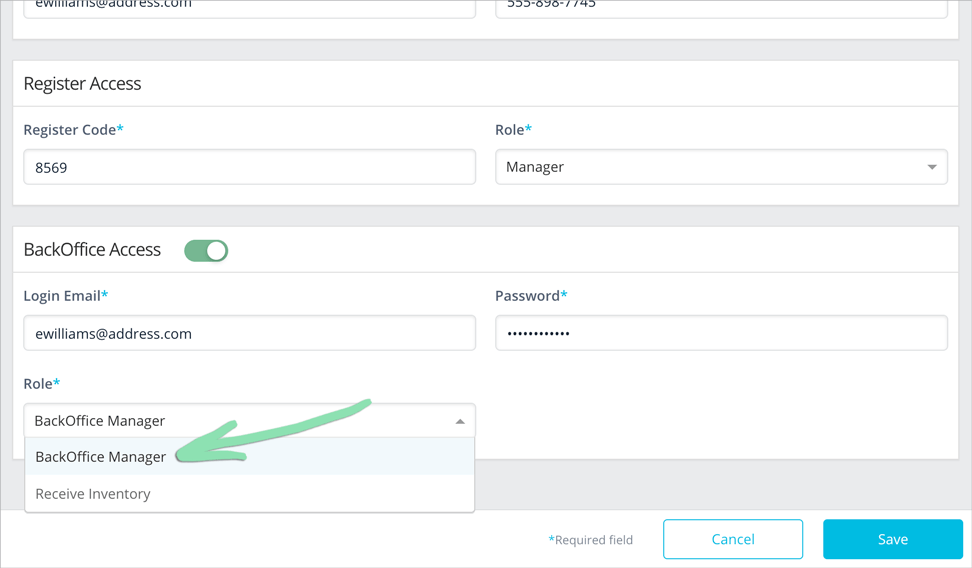
Depending on your current pricing package, there will be either a Role dropdown or a customizable Permission List. If there is a Role dropdown, select BackOffice Manager or Receive Inventory.
- BackOffice Manager: Employee will be able to access most BackOffice features and create and edit inventory items and item shortcuts in the Retail POS (S-Series) app.
-
Receive Inventory: Employee will be able to only add and receive inventory in BackOffice. Learn how Receive Inventory users experience BackOffice here.
-
If there is a Permission List, check or uncheck boxes to allow or deny the employee access to specific BackOffice features. Links to areas the employee cannot access will be hidden from the BackOffice navigation. Employees will be able to create and edit inventory items and item shortcuts in the Retail POS (S-Series) app if given the relevant permissions. Specific permissions can only be granted or revoked by the Business Owner or other employees with those permissions.
Don’t see the Permission List? Click Upgrade to upgrade your current pricing package to use this feature.
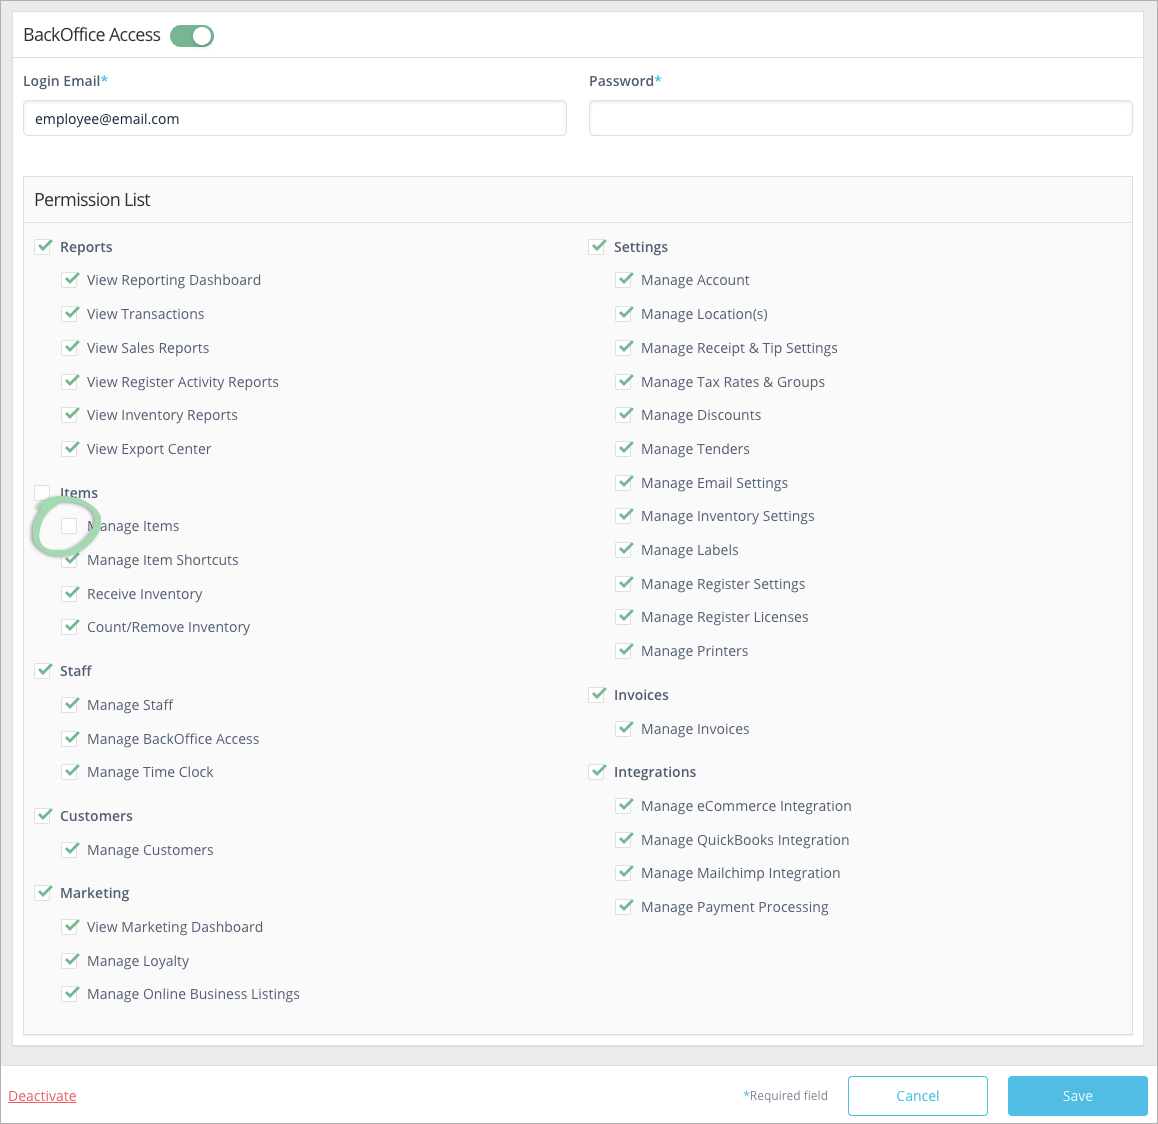
- Reports: Control which reports on the ‘Reports’ menu can be run. Click to learn what each permission in the ‘Reports’ section controls.
- Items: Control which features on the ‘Items’ menu can be accessed. Click to learn what each permission in the ‘Items’ section controls.
- Staff: Control which features on the ‘Staff’ menu can be accessed. Click to learn what each permission in the ‘Staff’ section controls.
- Customers: Control which features on the ‘Customers’ menu can be accessed. Click to learn what each permission in the ‘Customers’ section controls.
- Marketing: Control which features on the ‘Marketing’ menu can be accessed. Click to learn what each permission in the ‘Marketing’ section controls.
- Settings: Control which features on the ‘Settings’ menu can be accessed. Click to learn what each permission in the ‘Settings’ section controls.
- Invoices: Control if invoices can be viewed or edited. Invoices are only available to accounts on select pricing packages. Click to learn what each permission in the ‘Invoices’ section controls.
- Integrations: Control which features on the ‘Integrations’ menu can be accessed. Click to learn what each permission in the ‘Integrations’ section controls.
- Click Save to create the new employee.
Get updates on the iOS register to apply the changes.
If you receive an error, visit our Manager Functions Troubleshooting article for help.
Having issues adding staff? Check out our Staff Troubleshooting article for solutions.
Editing and deactivating employees
Edit an existing employee to change their register code, update their contact details, or modify their register or BackOffice permissions. If an employee leaves the business, deactivate them to delete them from the Staff List so they can no longer access the register or BackOffice.
-
In BackOffice, click Staff and select Staff List.
-
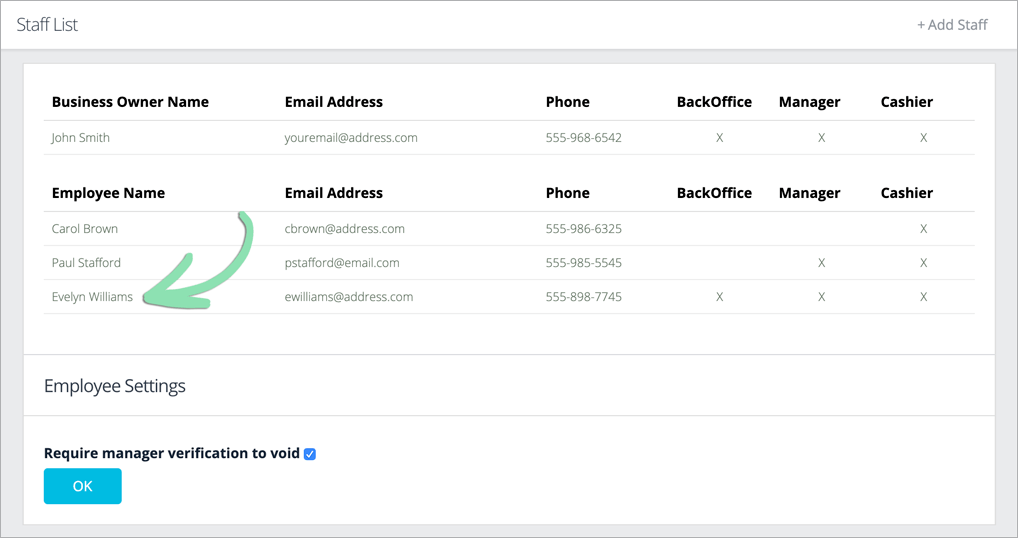
Select an existing employee to edit or deactivate.
If employees appear to be missing from the Staff List, visit our troubleshooting guide to learn why.
-
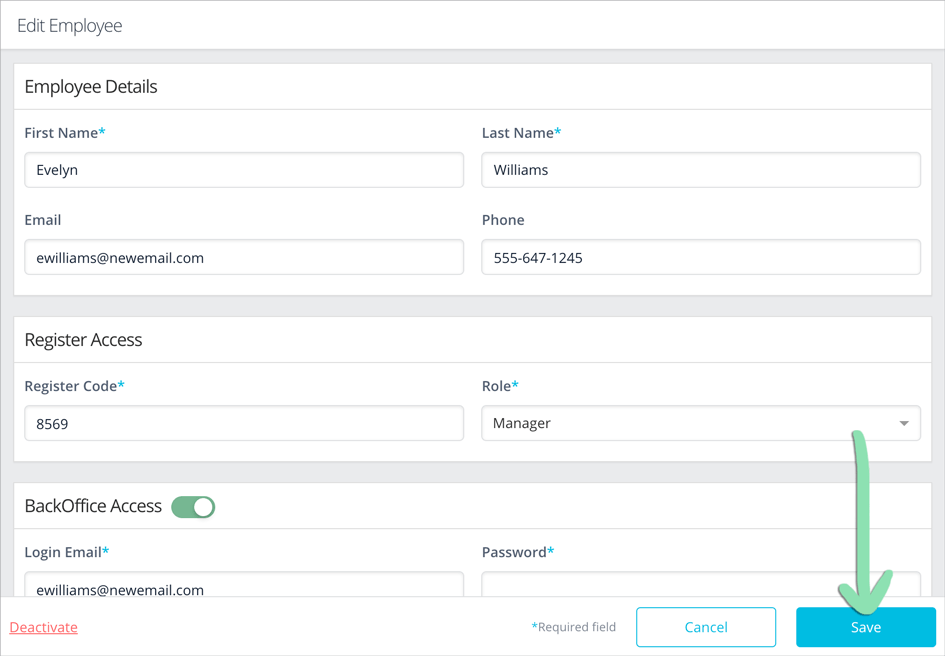
To edit the employee, update their details or permissions, then click Save to save changes.
Changing the name or email of an employee will also update this information in some historical reporting. To learn more, visit the article for a specific report from our BackOffice support page.
-
To deactivate the employee, click Deactivate, then select Continue to remove them from the Staff List.
Deactivated employees will not be able to sign into BackOffice and, after completing step 5 below, the Retail POS (S-Series) app. They will be automatically signed out of Lightspeed Pocket the next time they open the app. To revoke access to Lightspeed Pay, the employee must manually delete the app.


-
Get updates on the iOS register to apply the changes.
If you receive an error while getting updates, visit our troubleshooting guide for help.
Employee Settings
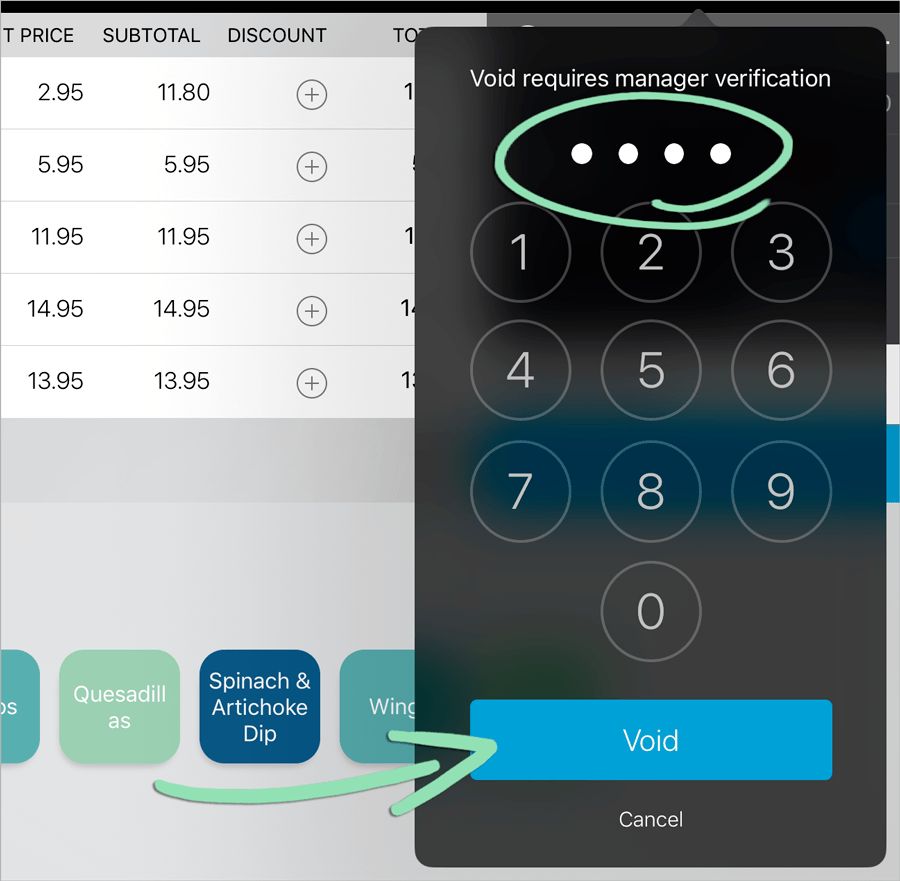
Restrict a cashier’s abilities by requiring manager verification to void saved sales at the register.
-
In BackOffice, click Staff and select Staff List.
- Check the box to require manager verification for voiding saved sales.
-
Click OK to save changes.

-
Get updates on the iOS register to apply the changes.
If you receive an error while getting updates, visit our troubleshooting guide for help.
A manager must now enter their register code when a cashier voids all or part of a saved sale.
Understanding employee privileges
An employee’s privileges at the register and in BackOffice depend on their role as defined on the Staff List. Let’s look at the different levels of employee access and permissions available in Lightspeed Retail.
BackOffice
There are multiple levels of BackOffice users, each with the ability to access and perform different actions.
Available BackOffice user types will vary depending on your current pricing package. To learn what types of users you can create, follow the steps above to add an employee.
Business Owner: The Business Owner login is the email address originally used to create the Lightspeed Retail account. The Business Owner can view every area of BackOffice and can Manage Items, Edit Shortcuts, and update Receipt & Tip Settings in the Retail POS (S-Series) app. The Business Owner can also sign into the Lightspeed Pocket and Lightspeed Pay mobile apps.
BackOffice Manager: BackOffice Managers are a type of BackOffice user set up by the Business Owner. BackOffice Managers can access most areas of BackOffice including: all Reports, Items, Staff*, and Customers menus, and the Marketing Dashboard.
BackOffice Managers can also access select options on the Settings menu including: Taxes, Discounts, Tenders, Inventory, Label Printing, Overtime Settings, General, and Printers.
*BackOffice Managers see a limited version of the Staff List and cannot access multi-location features. They can also create and edit inventory items and item shortcuts in the Retail POS (S-Series) app and sign into the Lightspeed Pocket and Lightspeed Pay mobile apps.
Receive Inventory
Receive Inventory Users are another type of BackOffice user set up by the Business Owner. They are able to use only specific inventory features in BackOffice. These users can access: Update Inventory – Add/Receive.
*Receive Inventory Users can also sign into the Lightspeed Pay mobile app.
Custom Permissions
For BackOffice users with custom permissions, the areas of BackOffice the employee will be able to access are chosen when adding them to the Staff List. At the register, these employees can access the Item List and Item Shortcuts page if they have the relevant permissions. Employees with custom permissions can also sign into the Lightspeed Pocket and Lightspeed Pay mobile apps. Learn about the specific permissions available for employees with custom permissions here.
Register
There are two types of register users: Cashiers and Register Managers.
BackOffice Managers and employees with the relevant custom permissions will be able to create and edit inventory items and item shortcuts in the Retail POS (S-Series) app.
Cashier
Assign a Register Code to an employee on the Staff List and select the ‘Cashier’ role so they can run sales at the register. Cashiers can view the New Sale and Saved Sales screens, access the Sales History screen, run a Register Shift Report, and perform other cashier functions.
Register Manager
Select the ‘Manager’ role while setting up an employee to allow them to perform manager functions at the register. Register Managers can open and close register shifts, process pay ins and payouts, and access all controls on the Main Menu.
What's next?
Using the time clock
Record clock punches at the register and run the Time Clock report to keep track of employee hours.
Labor tracking and overtime settings
Monitor each employee's overtime, double time, and total hours worked over a period.