Retail POS (S-Series) for
Retail Businesses
If you have not set up your BackOffice yet, visit part 1: BackOffice for Retail Businesses.
With BackOffice set up, you are ready to start using the register. In the sections that follow, you’ll learn how to sign in and out of the register, print receipts, run register shift reports, and more.
Clocking & Signing In / Out
Track your employees’ clock punches and hours worked by having them clock in when they start their shift. After clocking in, your staff will sign in to the register to begin running sales.
Clocking In & Out
Employees clock in at the start of their shift and clock out at the end to record clock punches so the Business Owner and BackOffice Managers can accurately track their hours worked in the BackOffice Time Clock report.
Clocking in and out requires an active internet connection. Without internet, clock punches will not be recorded or synced to BackOffice.
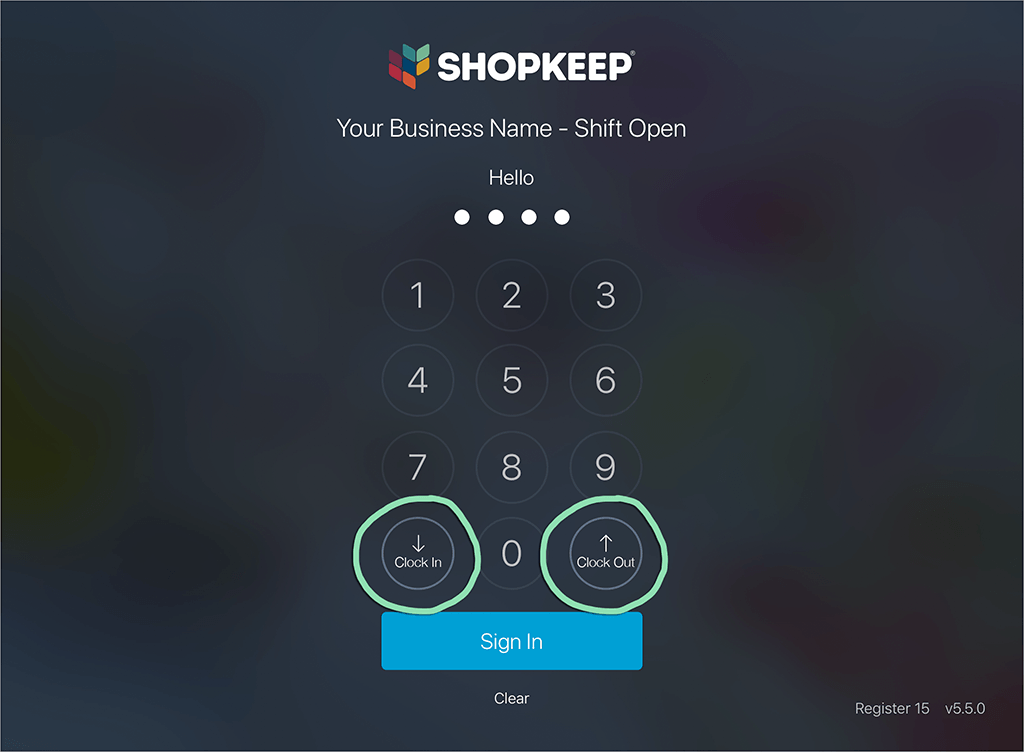
- On the sign in screen, enter your 4-digit register code.
- Tap 'Clock In' or 'Clock Out' to record a clock punch.
- Tap ‘OK’ to dismiss the clock punch notification or ‘Print’ to print a chit to a connected receipt printer confirming the punch.
- Employees must be clocked in to be able to clock out and vice versa.
- Don’t have a receipt printer? Take a screenshot or photo of the screen.
If a different clock punch notification appears, stay tuned as we slowly roll out this new experience for everyone.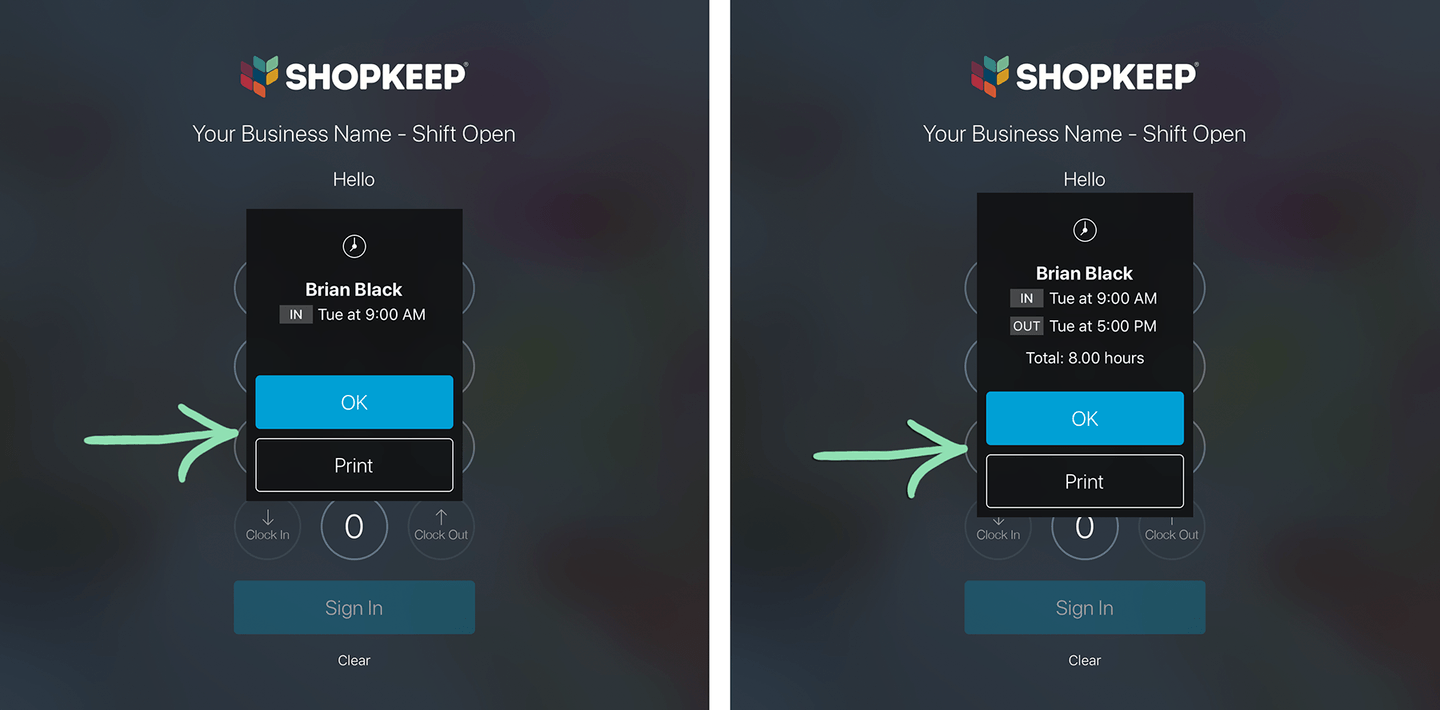
Visit the full Time Clock article to learn how to view and manage employee hours in BackOffice. Having issues clocking in or out? Check out our troubleshooting guide for help.
Signing In & Out
Signing in and out of the register keeps your register secure. When employees sign in under their own unique register code and sign out when they are done, you can accurately track everyone’s sales activity.
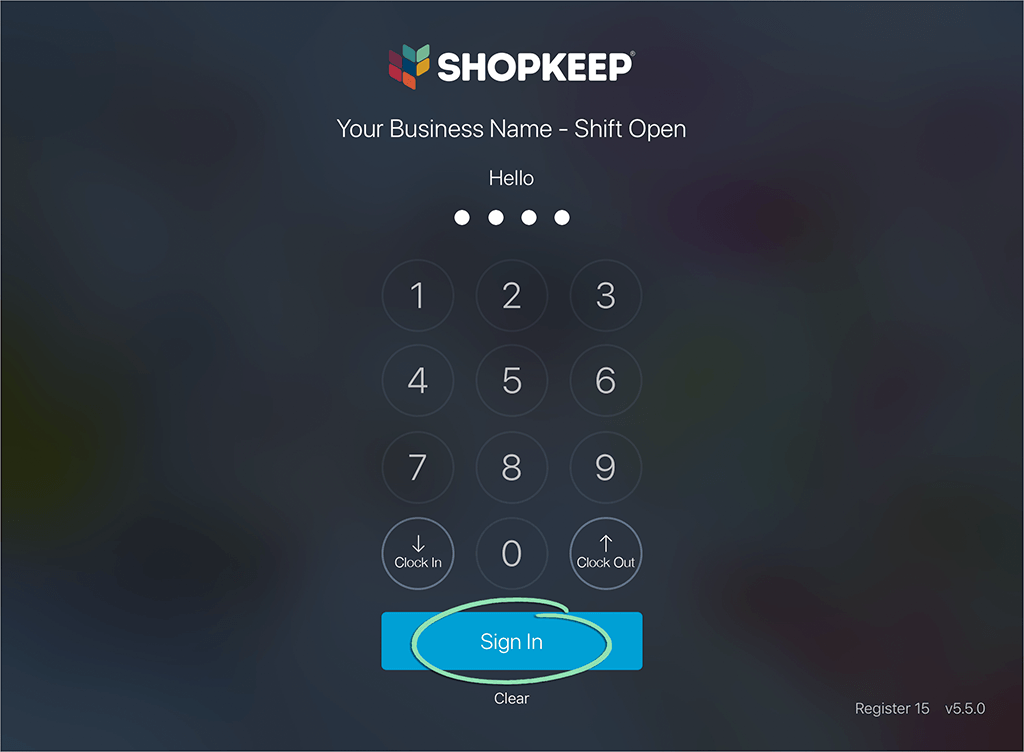
- On the sign in screen, enter your 4-digit register code.
- Tap 'Sign In' to access the register.
If you cannot sign in, visit our Login/Access Troubleshooting guide.
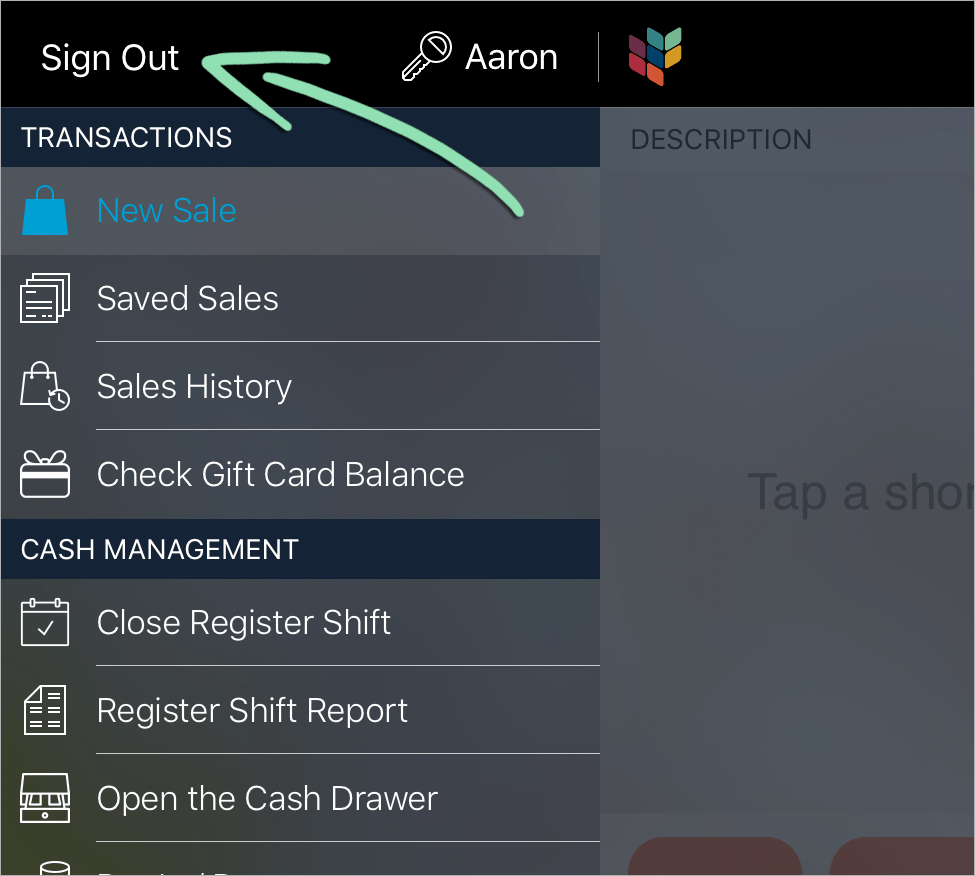
- To sign out, open the Main Menu and tap 'Sign Out'.
‘Sign Out’ is only available when more than 1 employee is set up in BackOffice.
Visit the complete Activate & Sign In article to learn more about signing in and out of the app.
Timed Auto Signout
Timed auto signout ensures that an employee does not stay signed in to the register if they forget to sign out. Auto signout automatically signs your register out after a preset amount of time.
For the Retail POS (S-Series) app for Android, learn how to enable auto signout here.
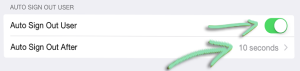
- Open the iPad's 'Settings' app.

- Scroll down the left side and select 'Retail (S)'.

- Tap the switch next to 'Auto Sign Out User' to toggle it on.
- Tap 'Auto Sign Out After' and choose how long before the user is signed out.
Visit the full Auto Signout article to learn how to sign out the Retail POS (S-Series) app after every transaction.
Receipts
When it comes to receipts, there are a few ways to get a customer their slip.
Printing Receipts
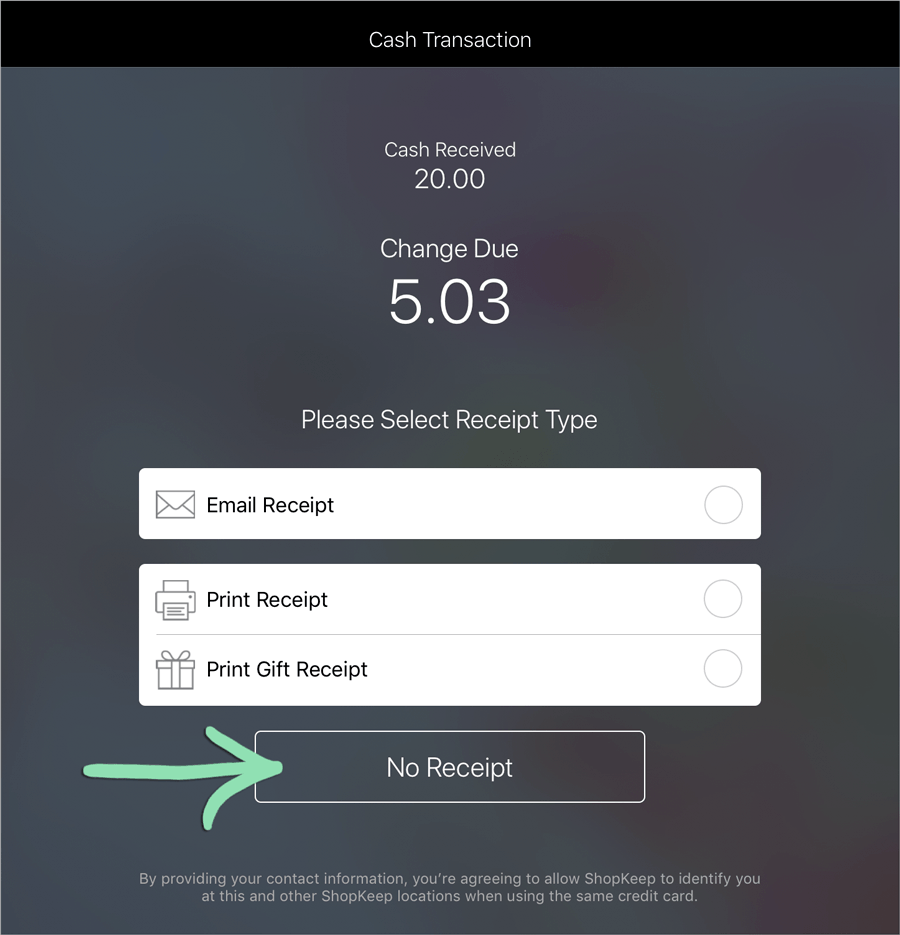
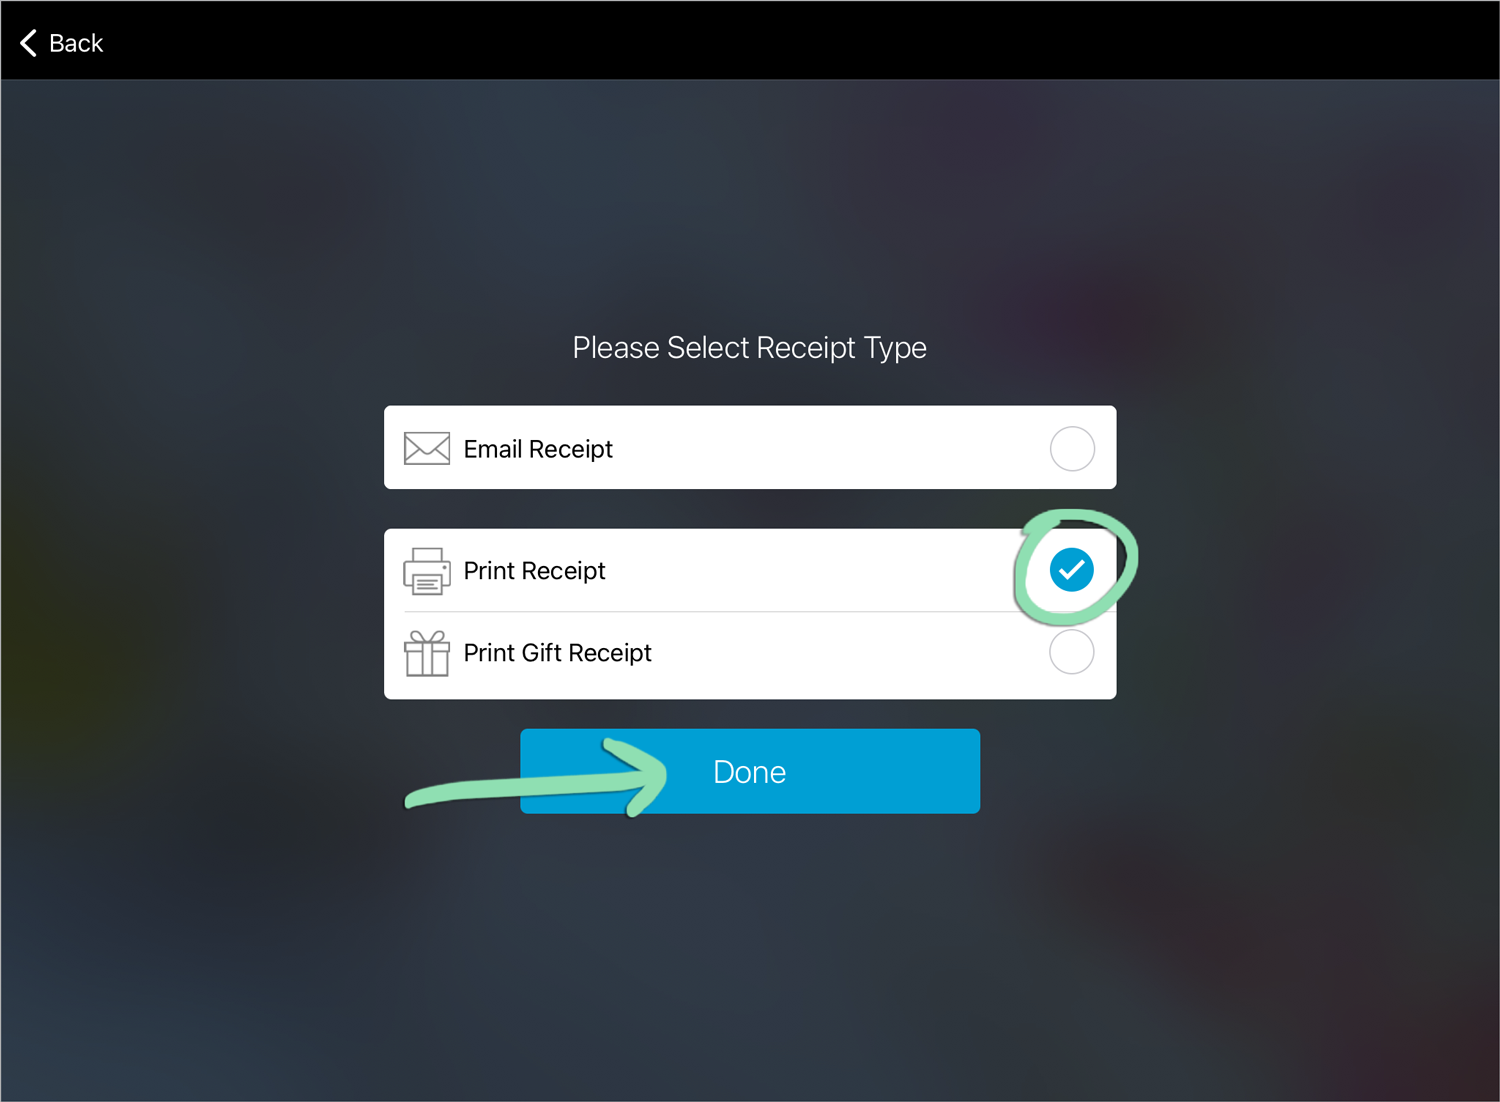
Choose whether to email the receipt, print it, or print a gift receipt after you ring up your customer.
- Ring up a sale or return.
-
Select a receipt option and tap ‘Done’ or tap 'No Receipt'.Email Receipt | Sends the receipt to an email address.
Print Receipt | Prints the receipt to your receipt printer.
Print Gift Receipt | Prints a copy of the receipt without prices.
No Receipt | Receipt is not printed or emailed.
If a receipt does not print, visit one of our Printer Troubleshooting guides.
Reprinting and Resending Receipts
If a customer needs an extra copy of a receipt, visit the ‘Sales History’ screen to reprint it or resend it via email. Resending email receipts is only possible in the Retail POS (S-Series) app for iOS for sales, but you can reprint receipts in the iOS and Android versions of the Retail POS (S-Series) app for sales and returns.
- On the Main Menu, tap 'Sales History'.

- Choose a transaction from the current register shift.
Or search for a transaction from a previous register shift.
- Follow the set of steps below for the iOS or Android version of the Retail POS (S-Series) app.Retail POS (S-Series) app for iOSa Tap the 3 dot menu.b To reprint or resend a sales receipt, select ‘Receipt Options’ from the menu. On the next screen, select ‘Email Receipt’, ‘Print Receipt’, or ‘Print Gift Receipt’, and tap ‘Done’.Gift receipts can only be printed for sales from the current register shift.

 c To reprint a return receipt, select ‘Reprint Receipt’ from the menu.
 Retail POS (S-Series) app for Androida Tap ‘Print Receipt’, or tap ‘Print Gift Receipt’ to print a receipt without prices.Gift receipts can only be printed for sales from the current register shift.
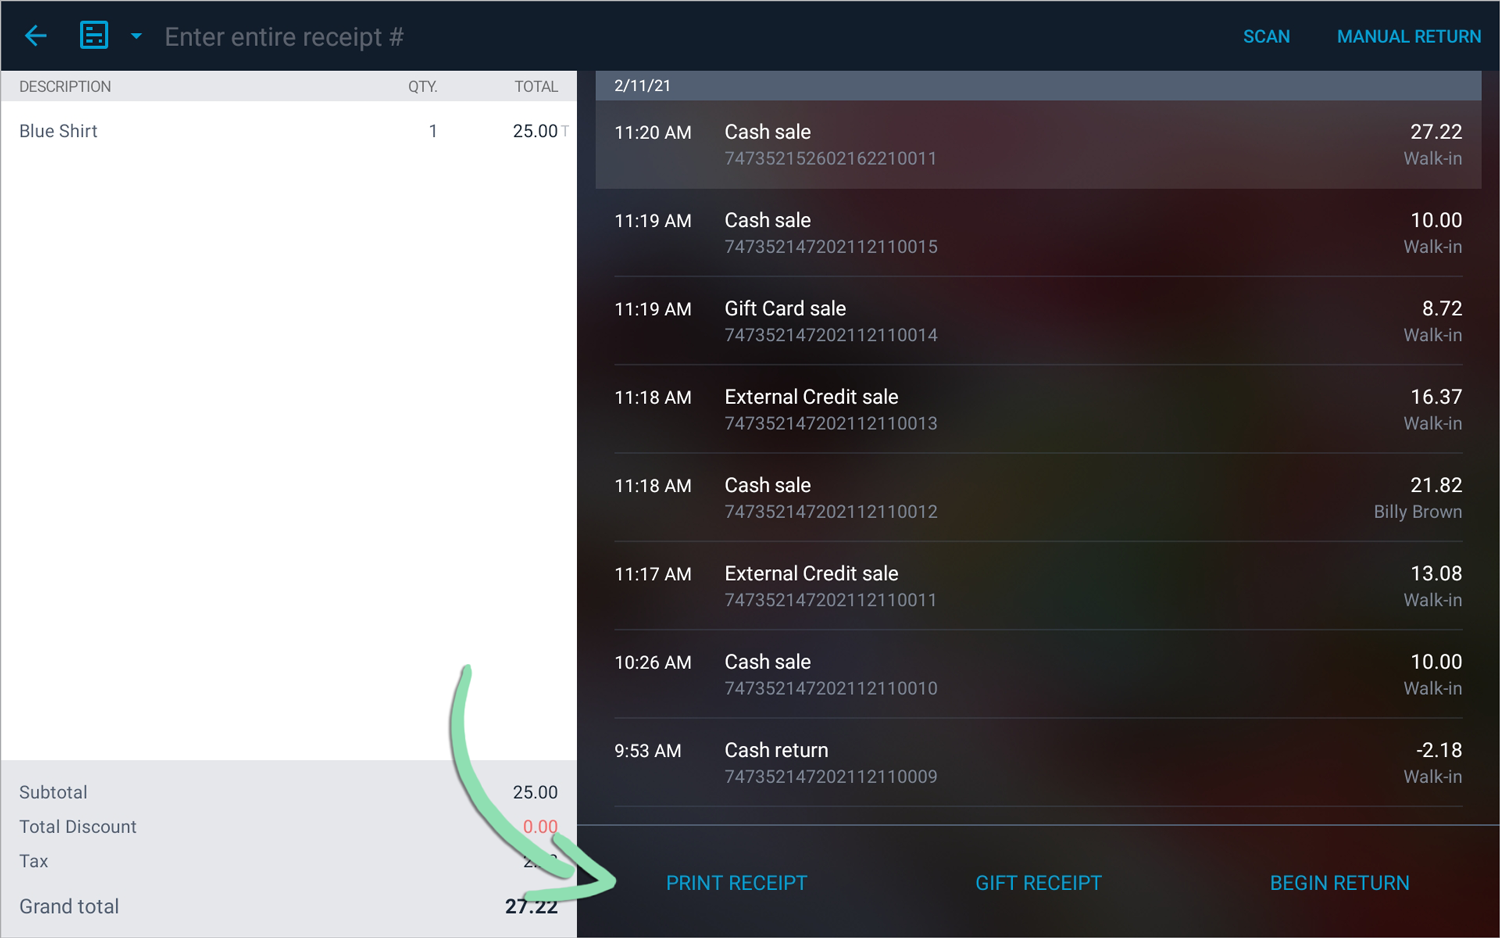
Register Shift Report
Run a register shift report to see the register shift’s total sales, returns, and other important tallies. Filter this report by employee to figure out how much commission to pay based on individual performance.
- On the Main Menu, tap 'Register Shift Report'.
- (Optional) Register managers can tap 'All Employees' and select an employee to view that individual employee's report.
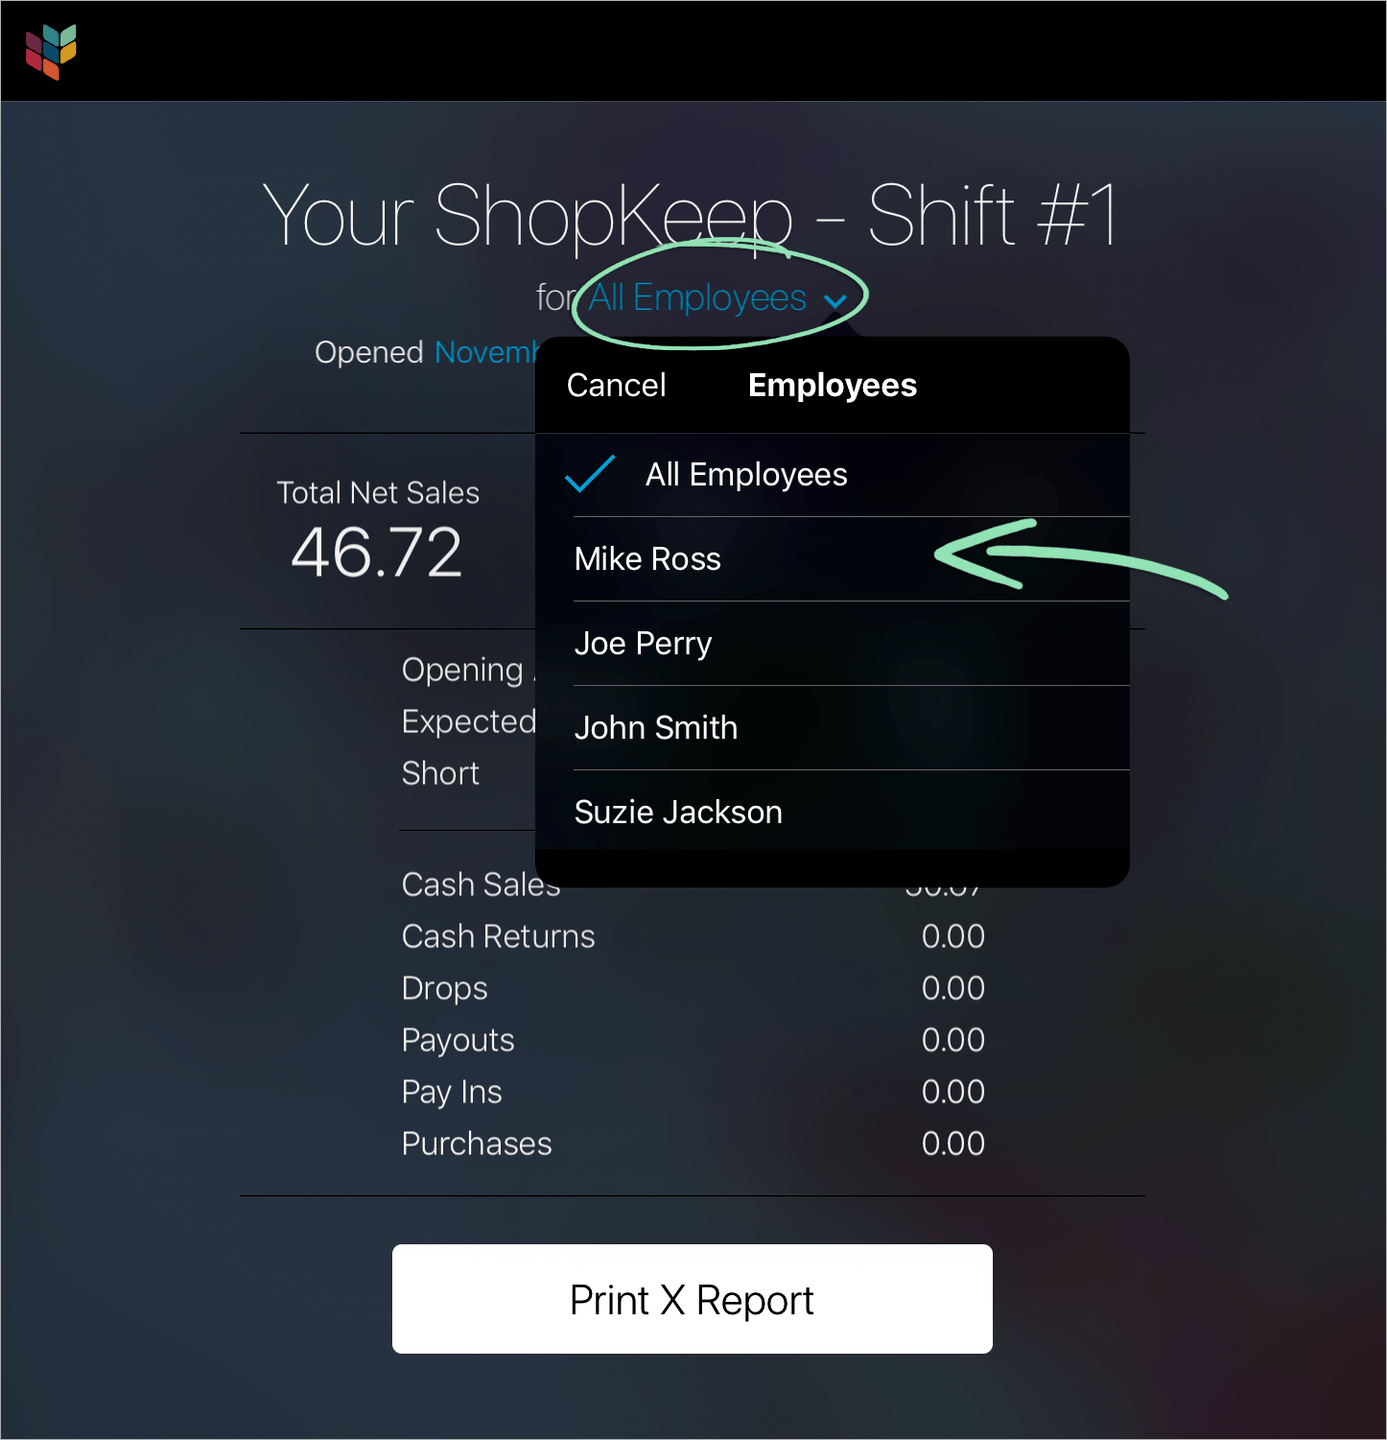
- Tap 'Print X Report' or 'Print Z Report' to print a copy to a receipt printer.
If the report does not print, visit one of our Printer Troubleshooting guides.
Visit the full X and Z Report article for descriptions of everything this report contains.
Additional Features
These are a few features that might be useful for your commission based retail store.
Adding Customers
Add customers to your customer list to email receipts, send marketing emails, and track purchases. After adding a new customer, they will be automatically tagged to the current sale in progress at the register.
- On the transaction screen, tap ‘Select Customer’ (iOS) or the customer icon (Android).
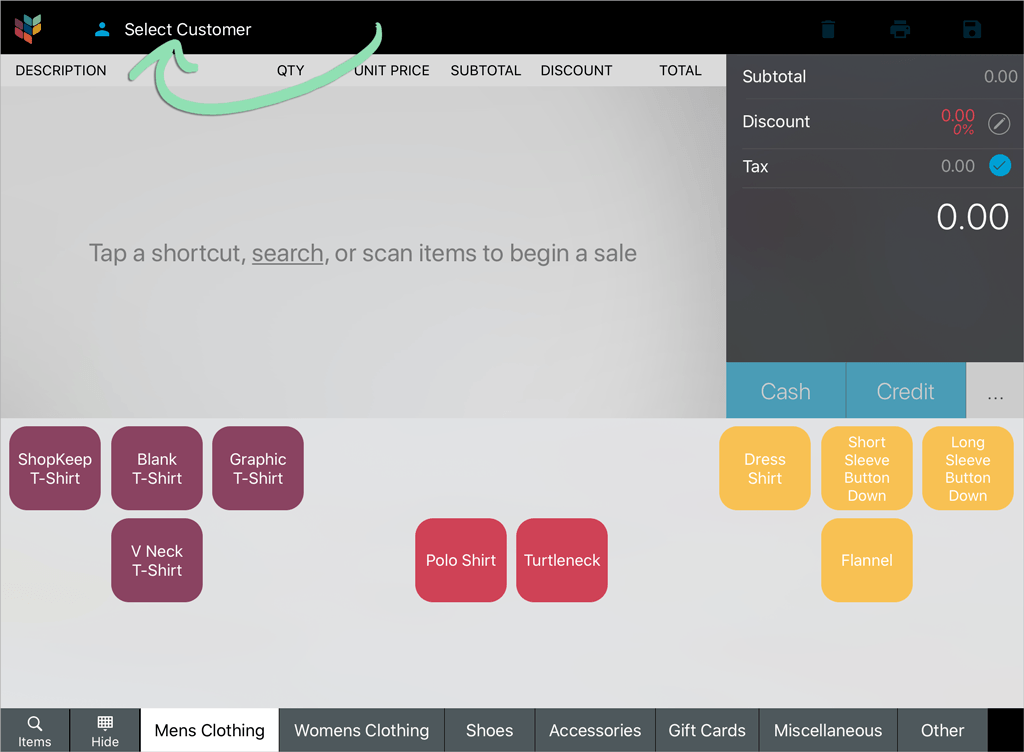
- Tap the ‘+’ to add a new customer.

- Fill in the customer's info and tap ‘Save’ (iOS) or the disk icon (Android).
At minimum, one of the following must be entered: first or last name, email address, or phone number.

After saving, the new customer will automatically be tagged to the current sale. Learn how to change the customer tagged to the sale here.

To learn how to manage customers in BackOffice, visit our full Manage Customers article.
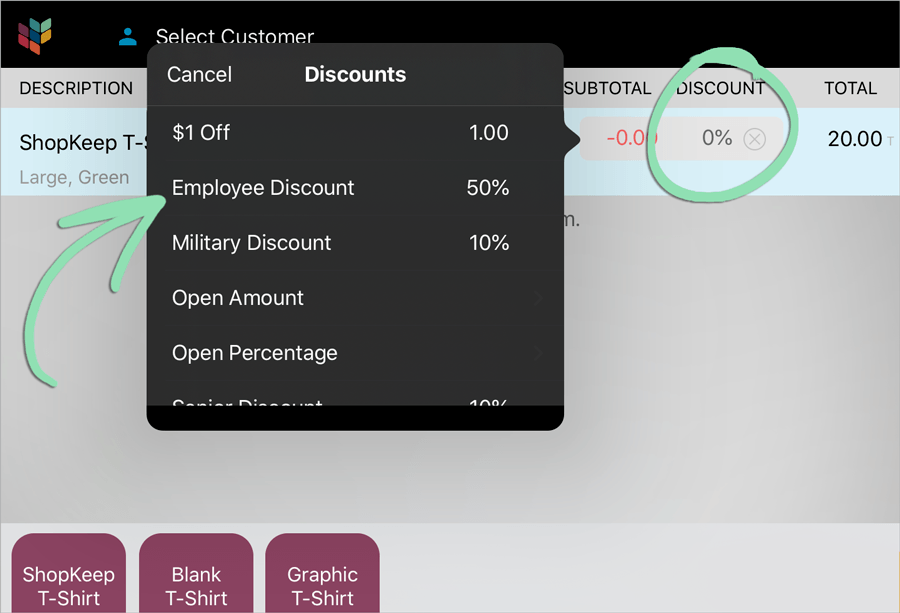
Applying Discounts
Apply discounts to reward your loyal customers, employees, sale items, and any other deductions.
- To discount an entire sale, tap 'Discount' and select a discount.

- To discount a specific item, tap the + next to an item and select a discount.
Visit the complete Discounts article to learn how to set up additional discounts.
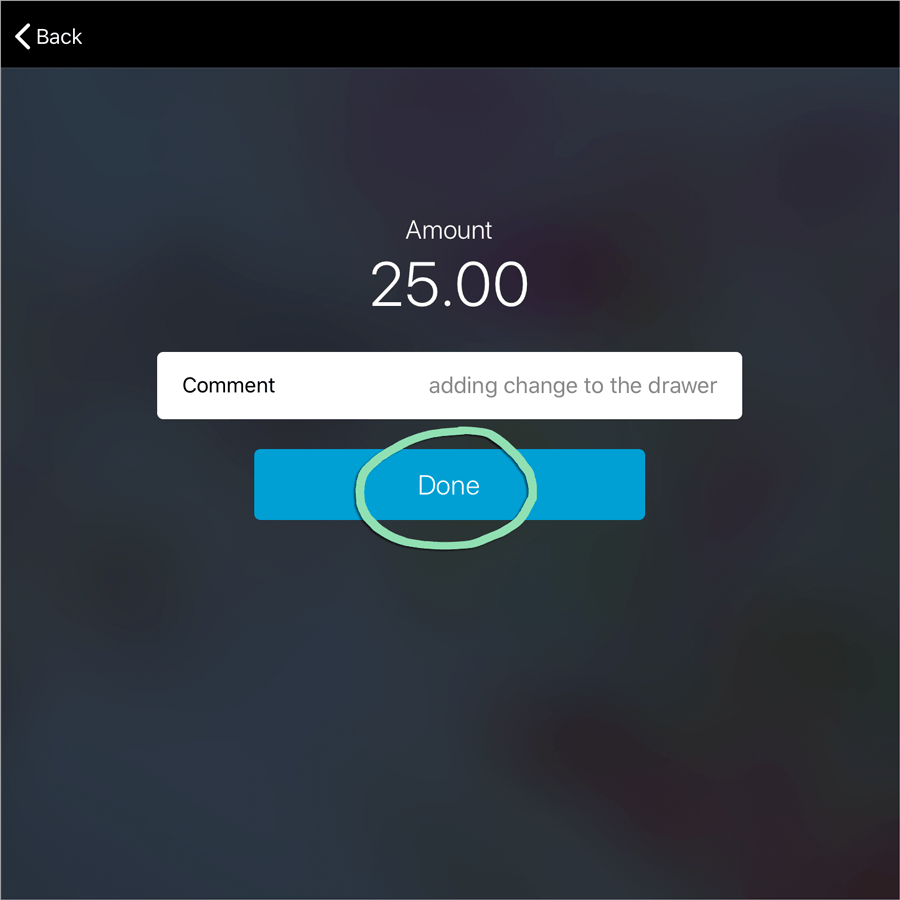
Pay Ins / Payouts
Perform a pay in or payout to balance the cash drawer if you need to add or remove money from the till while the register shift is open.
- Sign into the register as a register manager.
- On the Main Menu, tap 'Pay In / Payout'.
- Select a type of pay in or payout.

- Enter an amount for the pay in / payout and tap 'Continue'.

- Enter a comment (optional) and tap 'Done'.
Visit the full Pay Ins and Payouts article for a description of each type of pay in and payout.