Retail POS (S-Series)
for Quick-Service Restaurants
If you have not set up your BackOffice yet, visit part 1: BackOffice for Quick-Service Restaurants.
From ringing up orders to applying discounts, this guide covers important register functions used to run a quick-service restaurant, such as a café or fast food business.
Ring Up an Order
This section covers basic ordering skills. Learn to begin an order, select modifiers, and accept payment.
If you have any questions about ringing up orders, visit our iPad Register FAQ.
Start the Order
Every transaction, large or small, begins with the same few steps. Sign in to the register to start ringing up a customer’s order.
- Enter your register code and tap 'Sign In'.
If you can’t sign in, visit our Login / Access Troubleshooting guide for help.

- Tap a menu item shortcut to add that item to the sale.

- (Optional) Swipe left across an item and tap 'Delete' to remove it.
Or tap the trash can icon at the top to clear the entire screen.

To learn how to change item quantities and modify the order in other ways, visit our support article here.
Items with Modifiers
For items with modifiers, the cashier must make extra selections to tailor the menu item to a customer’s liking.
- Add an item with modifiers to the sale.
- Select some modifiers to customize the item.
If you have not yet set up modifiers, visit our BackOffice guide for help.
Single Choice Modifiers
These appear in named groups with the base option selected by default. Tap to choose a different option.
Add-ons and “NO” Options
These multiple choice modifiers are housed in a single ‘Options’ group. Tap to select or unselect as many as the customer wants.
- Tap 'Done' to confirm the selections.
- (Optional) Tap the line item to change the selected modifiers.

Wondering which modifiers are most popular? Visit the Modifiers support article to learn how to find out.
Complete the Sale
When a customer is ready to pay, select their payment tender and print or email a receipt to finish the sale.
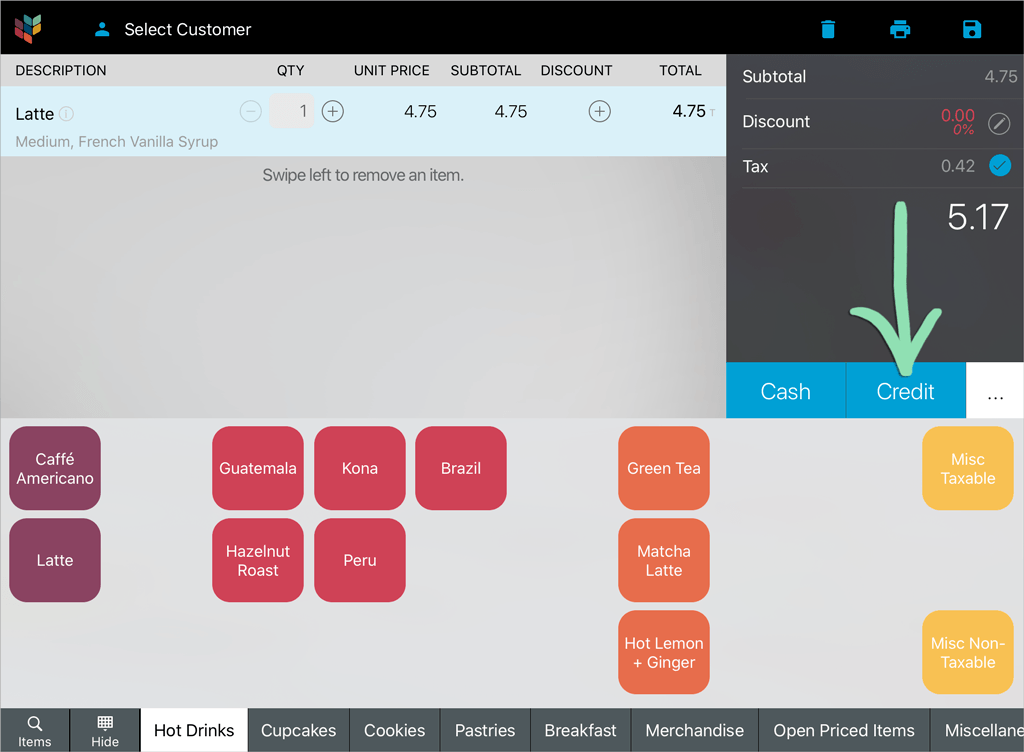
- Select the customer's payment tender.
Here we will use ‘Cash’.

- For 'Cash', enter the amount the customer hands you and tap ‘Calculate Change’.
Tender buttons below ‘Calculate Change’ update dynamically based on the total transaction amount if it is over $20. For example, a total of 28.23 will have the buttons 29.00, 30.00, and 40.00.

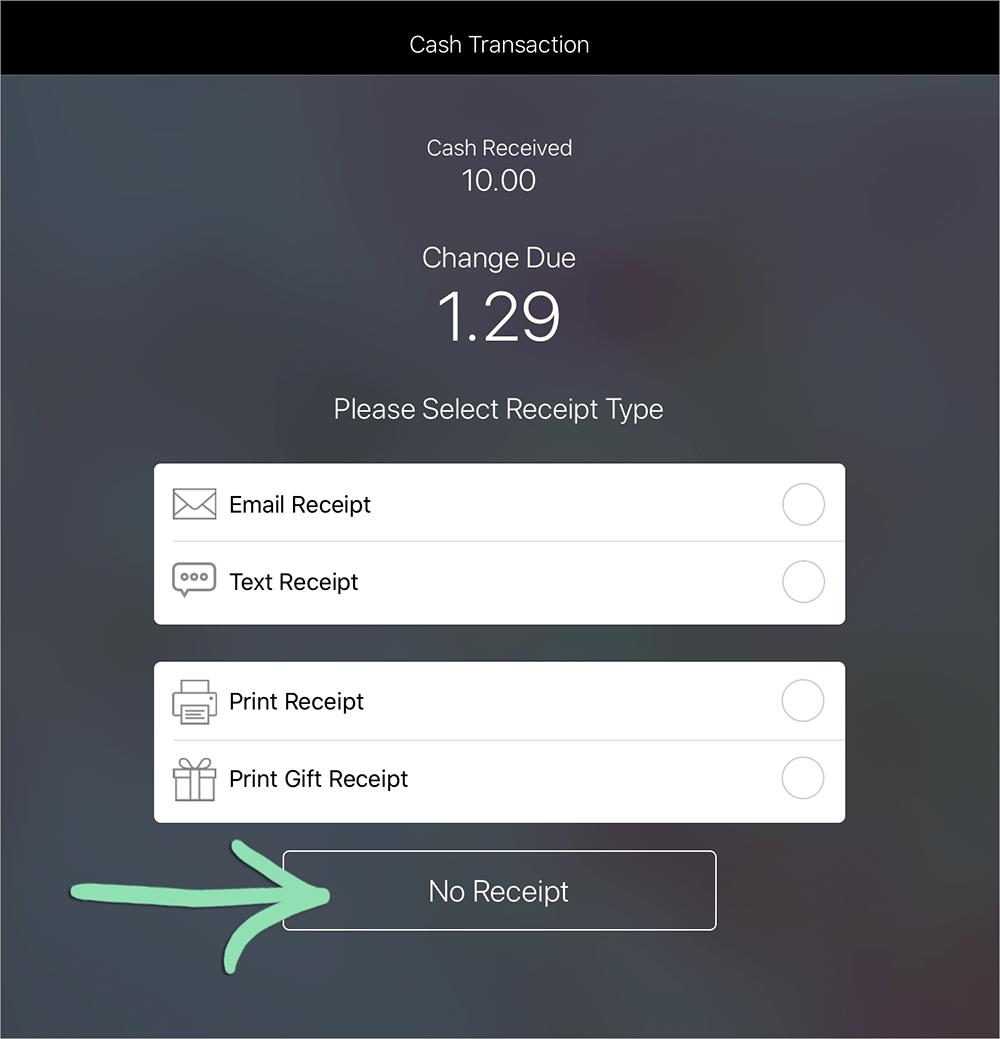
-
Give change (if necessary), then select a receipt option and tap ‘Done’, or tap 'No Receipt'.

Visit the Split Tender article to learn how to split the order total between multiple different tenders.
Tips & Gratuity
Customers enjoy the ease of leaving a tip on the register and businesses appreciate the simplicity of paying out tips from sales paid for with credit and gift cards to their staff.
Leave a Tip
Customers can leave a tip when paying by credit card, gift card, or Apple Pay. Make sure you’re set up to accept tips on the screen of the register as previously recommended.
If you do not have EMV payments enabled or are using a Clover All-in-One Credit Card Reader and Printer, your process will be different than the steps below. Visit one of the following articles for help:
- Select the customer's tender.a If paying with a credit card, tap ‘Credit’.b If paying with a gift card, tap ‘…’ then tap ‘Gift Card’.
- The customer selects a gratuity option or ‘No Tip’.
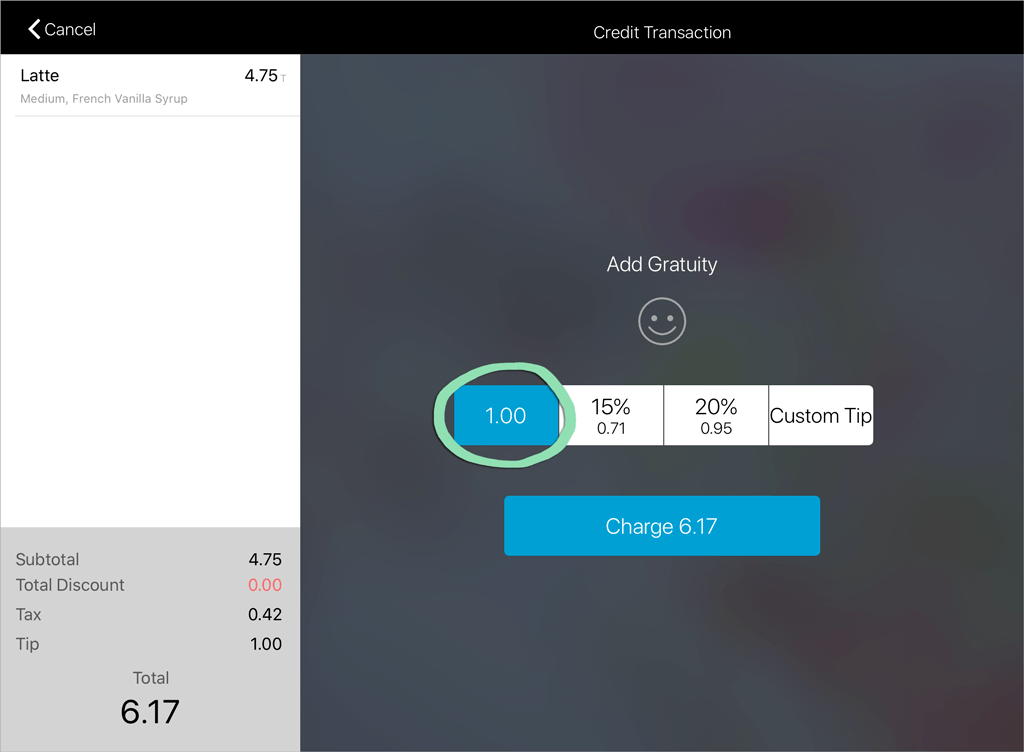
- The customer confirms the amount, then taps 'Charge'.
- The customer swipes, taps, or inserts their credit or gift card, or uses Apple Pay. Gift cards are swipe only.
Trouble reading the card? Visit our Credit Card Readers Troubleshooting guide.
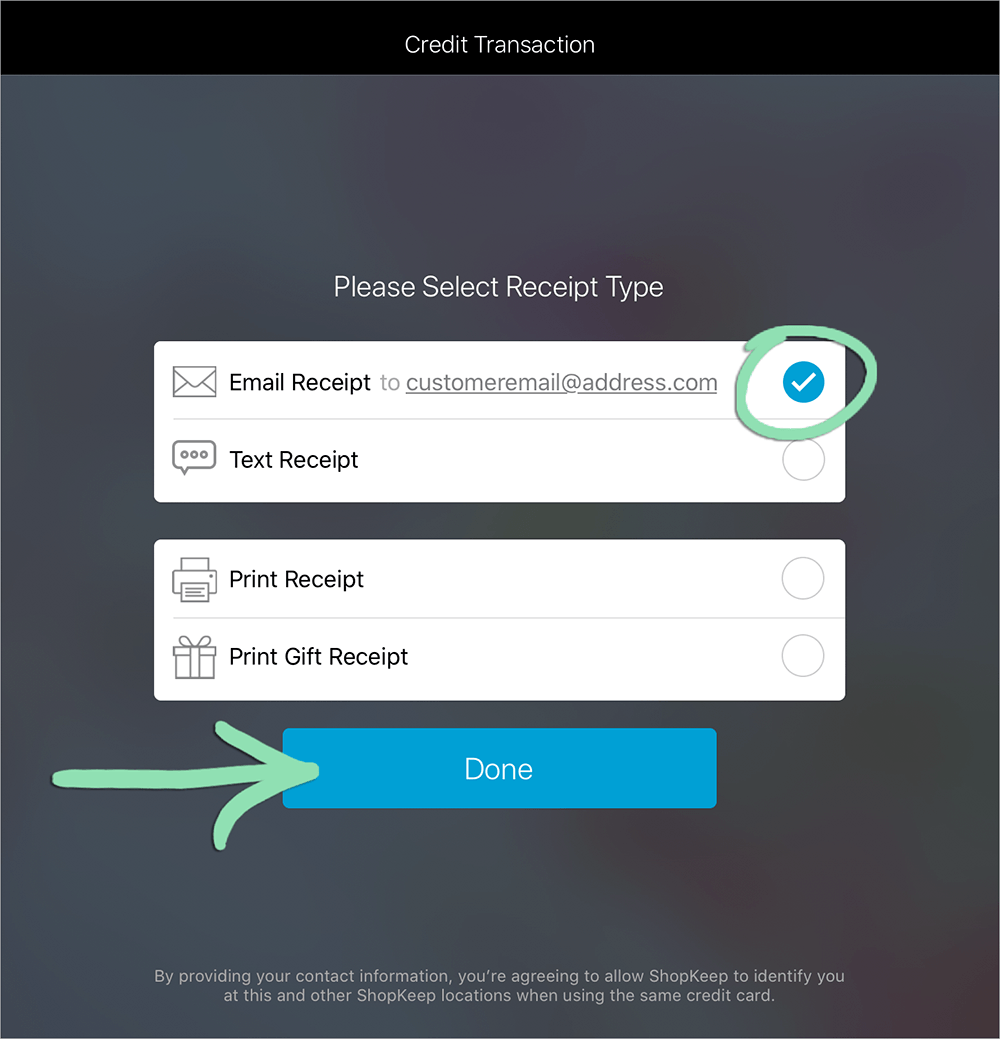
-
Select a receipt option and tap ‘Done’, or tap 'No Receipt'.

Check out the Tips and Gratuity article to learn about tipping on paper receipts.
Pay Out Gratuity
Do a single payout for all gratuity and split it evenly amongst your staff or check the register shift report to see how much each person accrued throughout the shift.
- Sign in to the register as a register manager.
- On the Main Menu, tap 'Pay In / Payout'.
- Choose 'Non-Cash Gratuity'.
Total gratuity for the current register shift is displayed. This total is unaffected by payouts performed.

- Enter an amount to pay out and tap 'Continue'.

- Enter a comment (optional) and tap 'Done'.

- Tap 'Open the Cash Drawer' to open the drawer and remove the cash.
To learn about other kinds of payouts, visit our Pay Ins & Payouts support article.
Discounts at the Register
You saw how to create custom discounts in our BackOffice guide. Now, learn how to apply a discount to an order at the register.
- Tap the discount button for a line item or the entire sale.
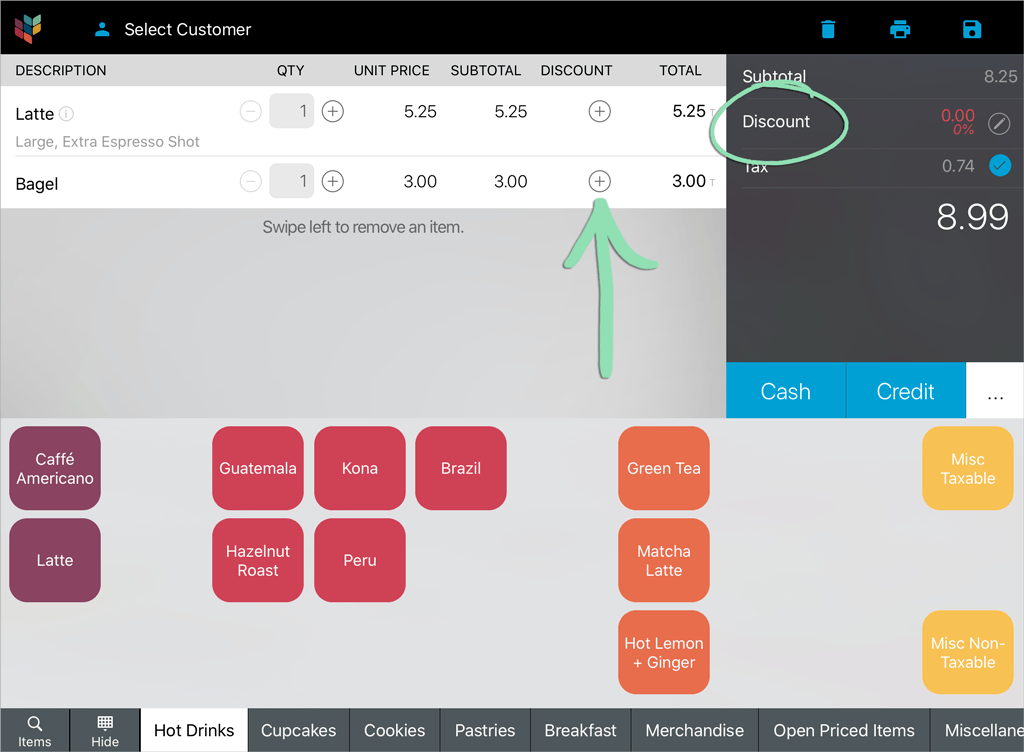
- Select a discount to apply.

- If the discount is open, enter an amount or percent and tap ‘Done’.

- For discounts requiring manager verification, have a manager enter their register code and tap ‘Verify’.

For more on discounts, both at the register and in BackOffice, visit our Discounts article.
Additional Settings
Here are a couple of settings handpicked to help make serving customers much more efficient.
For the Retail POS (S-Series) app for Android, access the settings below from the ‘Setup’ section of the register menu.
- Open the iPad's 'Settings' app.

- Scroll down on the left side and tap 'Retail (S)'.

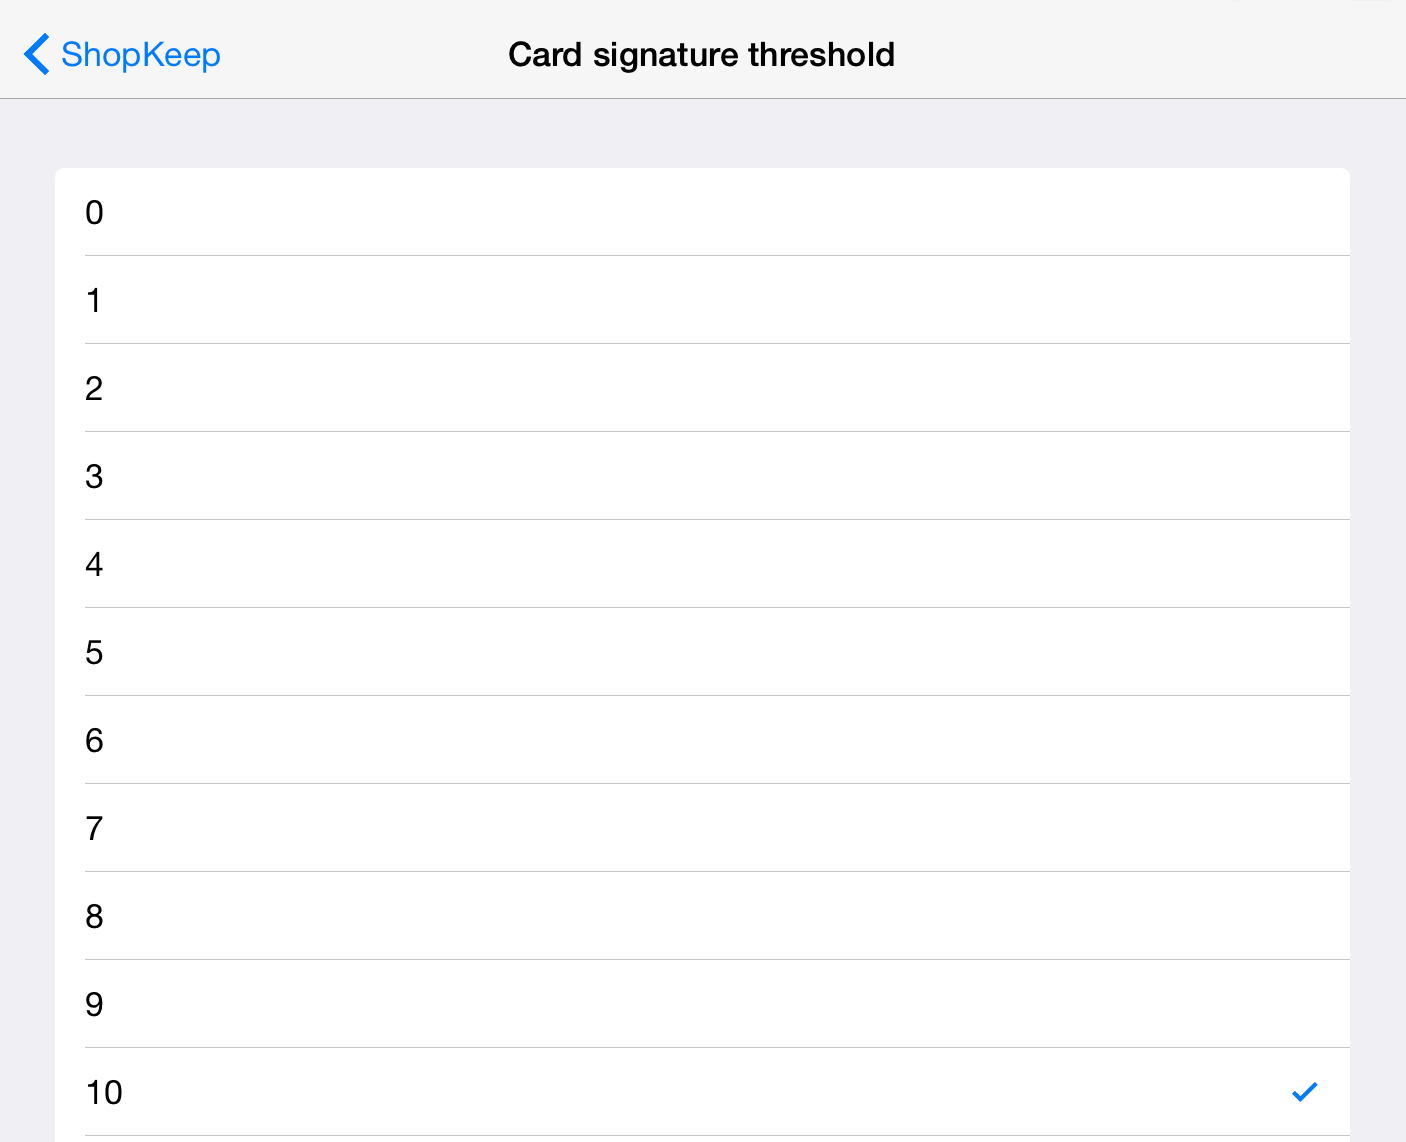
Card Signature Threshold
Set a signature threshold to streamline credit transactions. Sales that are under the amount you pick will not require a customer signature.
- Tap 'Card signature threshold'.

- Choose a value between 0 and 25.
Always Print or Email Receipt
Switch on an automatic receipt option so cashiers don’t have to manually make a receipt selection at the end of every transaction.
- Toggle the switches to set your preference.
Visit our iPad Settings for Retail POS (S-Series) article to learn about other Retail POS (S-Series) settings.