Clover Mini Troubleshooting
This guide focuses on solving issues that affect the Clover All-in-One Credit Card Reader and Printer. Having problems setting up, processing credit cards, or printing receipts? It’s all covered here.
Having trouble with the Retail POS (S-Series) on The Mini, built by Clover, visit this troubleshooting guide instead.
Setup Issues
This section deals with issues you may run into while setting up a Clover device for the first time.
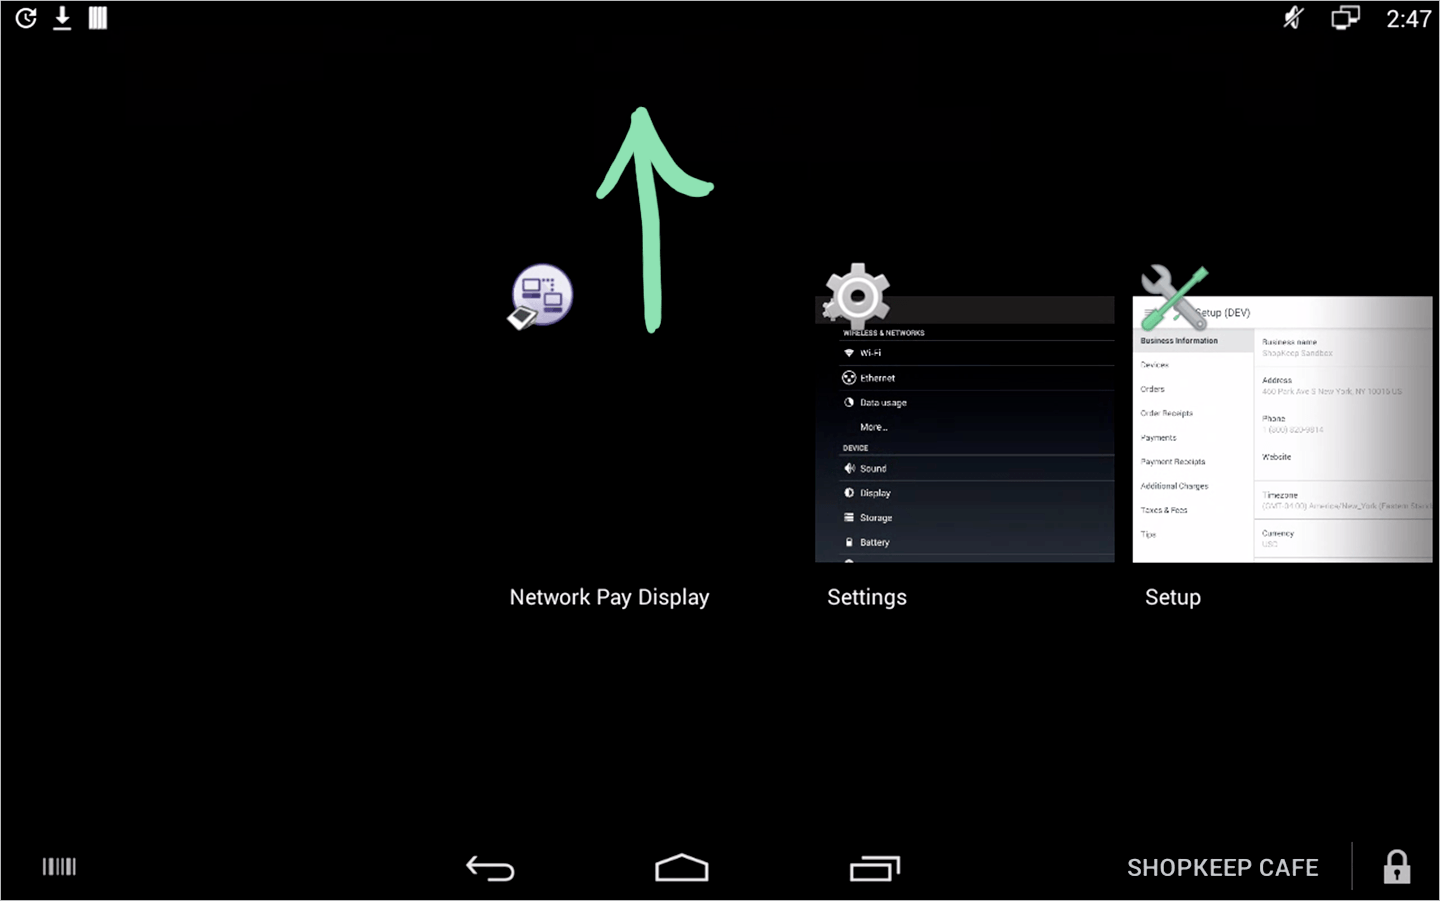
I cannot swipe between pages on my Clover device’s home screen and the Settings app is missing.
This issue can occur when a Clover device is left idle overnight. Follow the steps below to fix the problem.
- On the iPad, force quit the Retail POS (S-Series) app.
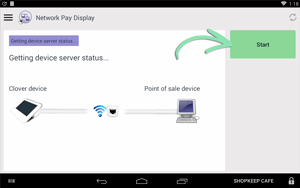
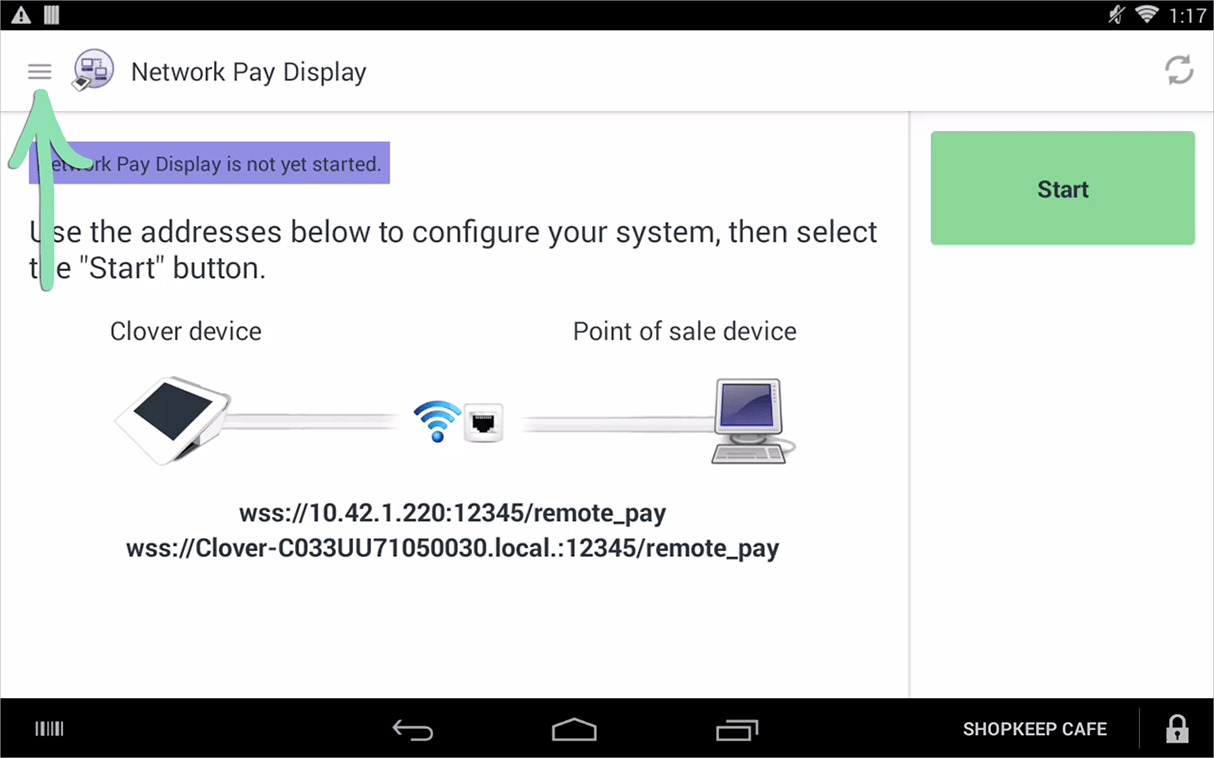
- On the Clover device, open the Network Pay Display app.
If Network Pay Display is on a page you can’t access, tap the overview button to select the app.

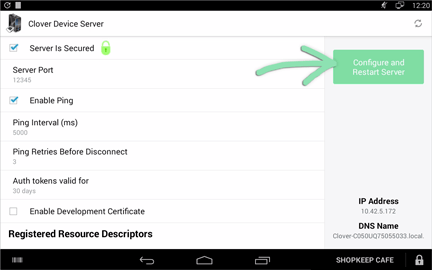
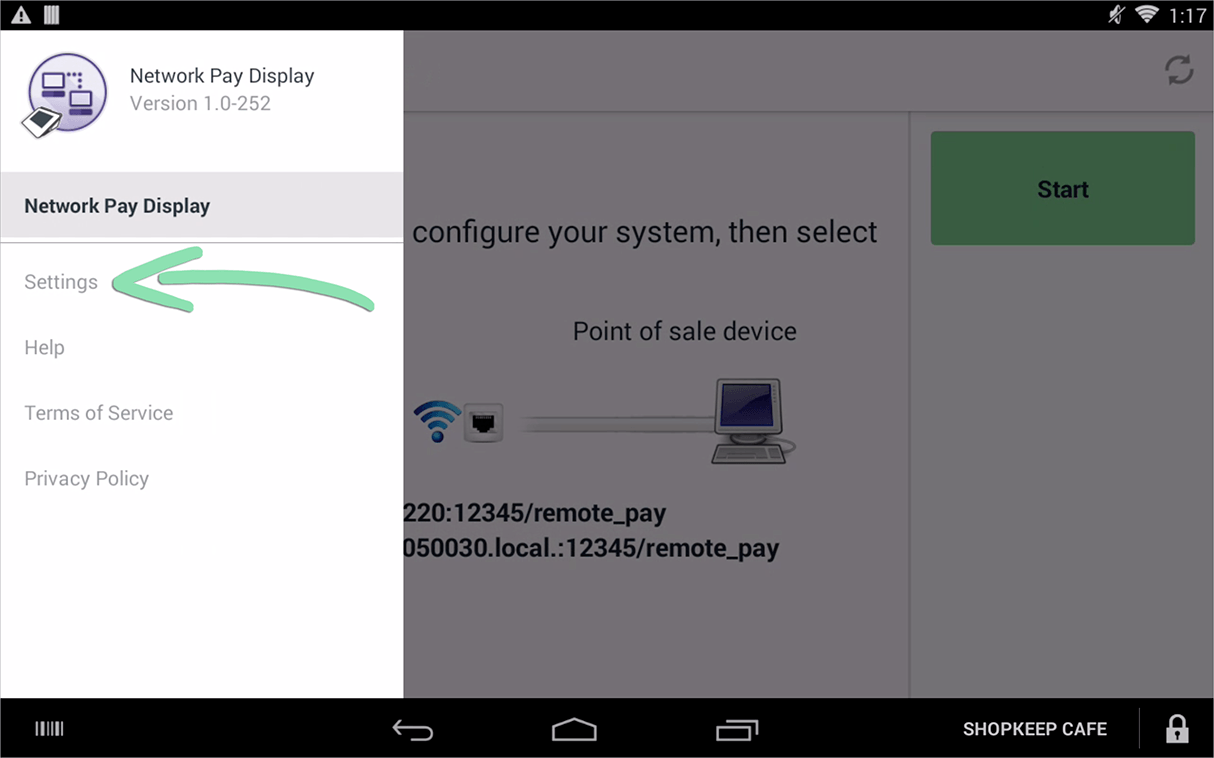
- Tap the menu button.

- Select 'Settings'.

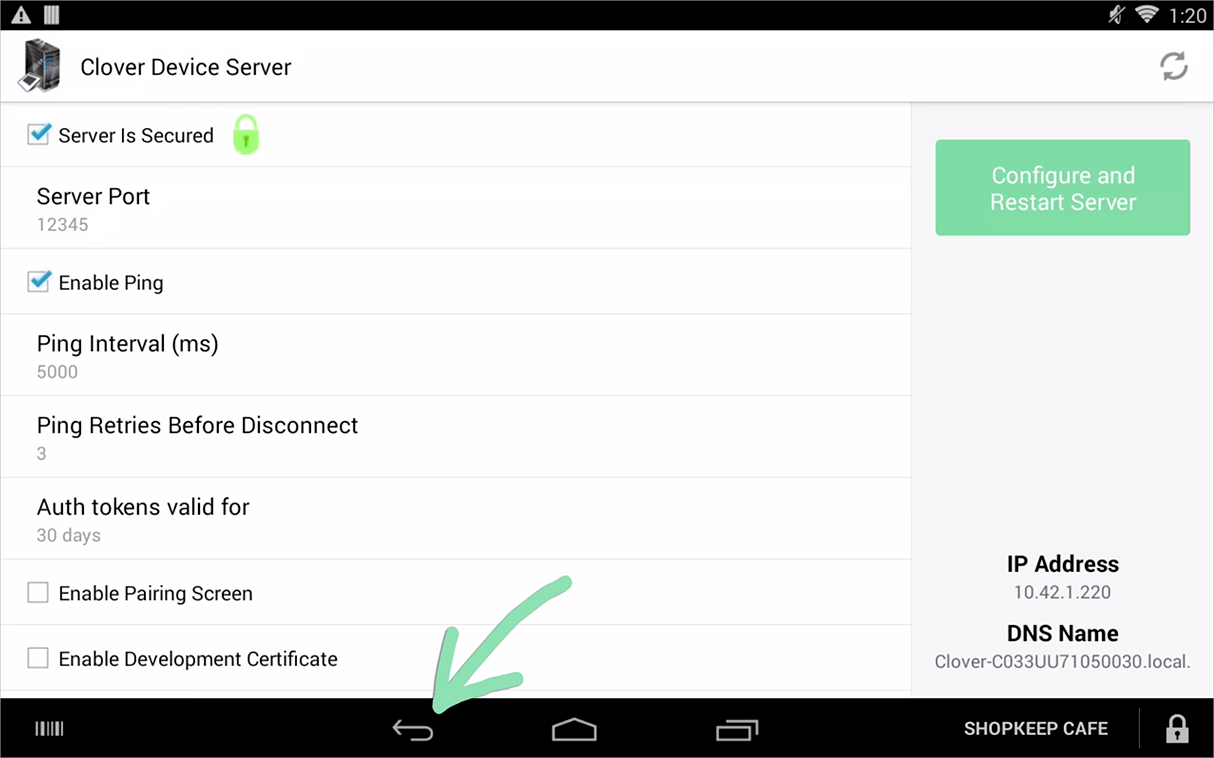
- Uncheck ‘Enable Development Certificate’.

- Tap ‘Configure and Restart Server’.
- Tap the back button.

- Tap ‘Start’.
- On the iPad, reopen the Retail POS (S-Series) app.
- On the Card Readers screen, tap the Clover device and wait for a checkmark to appear.

I rebooted my Clover device after it was idle overnight and it won’t connect to the register.
If you encounter this problem, follow the steps above to troubleshooting and resolve the issue.
My device is not powering on.
If the screen does not turn on after plugging the power cable into an outlet, the device is most likely not receiving power. After each step below, check to see if the problem is resolved.
- Unplug the power cable from the power adapter, then plug it back in.

- Unplug the power cable from the Hub, then plug it back in.
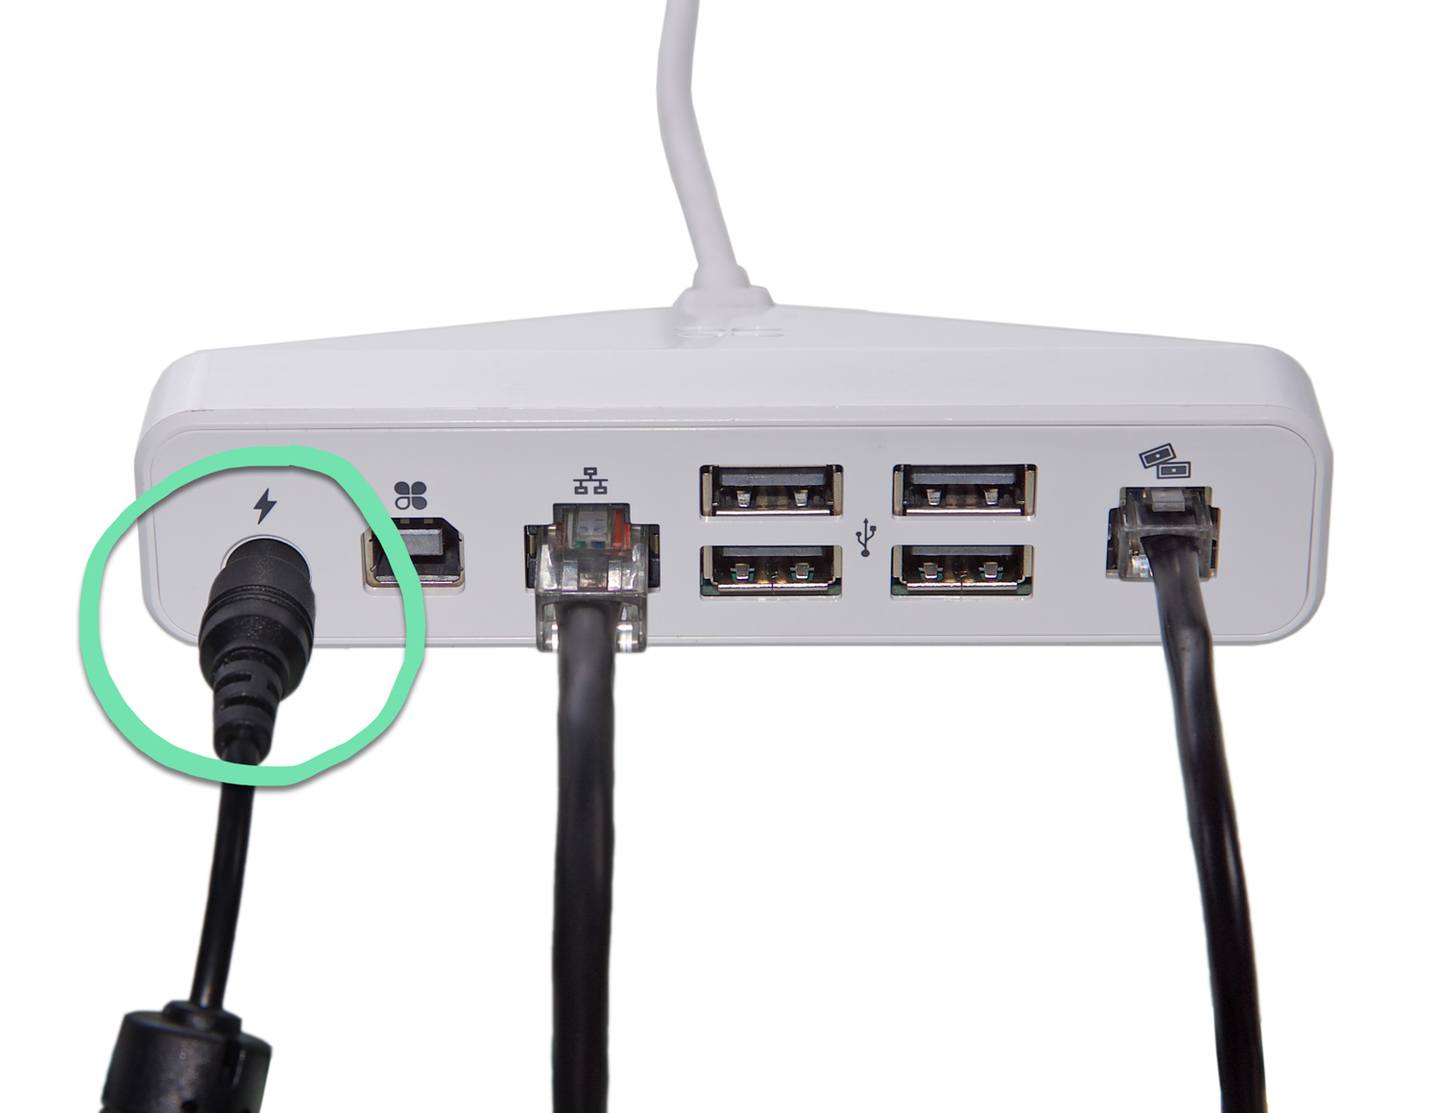
- Unplug the power cable from its power outlet, then plug it into a different power outlet.
Make sure to use a known working outlet.
- If a cash drawer is connected to the Hub, make sure the correct cable is in use.
- For APG cash drawers, the CD-101A cable is the only compatible cable. If a different cable is connected, the device will not power on. Purchase a new cable here, if necessary.
- For the Clover cash drawer, you must use the cable that came with the drawer.
- Make sure there are no cables plugged into the Hub's USB ports.
These ports are not designed to charge third-party devices, such as the iPad register. Instead, use the specific power adapter included with a device to charge it.
"You've entered the wrong password"
This error appears on the Clover device when you enter a Wi-Fi network’s password incorrectly.
- Look to see if you are connecting to the right network.
If you selected the wrong network, tap ‘Cancel’ and pick the correct one.

- Tap 'Try Again' and re-enter the network's password.
Be aware that Wi-Fi passwords are case-sensitive.
- If the problem persists, try to confirm the Wi-Fi password with someone.
I can’t locate the activation code email.
An activation code is required for device setup. If you cannot find the activation code email in your inbox, continue reading for help.
- Make sure you are checking the correct email account.
The code is sent directly to the Business Owner. Unless changed, this is the email address originally used to set up the Lightspeed Retail account.
- Check your spam folder as the email may have been incorrectly filed there.
- Still cannot find the activation email? Contact Customer Care.
"Invalid activation credentials"
This error appears when the wrong activation code is entered during setup.
- Check your email to verify the activation code.
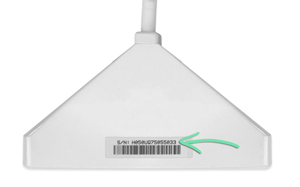
- If you have multiple Clover devices, make sure you entered the code assigned to that specific device.
Match the number on the bottom of the Hub with the ‘Device ID’ in each activation email.

- Re-enter the activation code.
The 'Integrated Hardware' screen does not list the Clover device.
This problem normally occurs if you skip part of the setup process. After each troubleshooting step below, check to see if the issue is resolved.
- On the Clover device, look to see if the Network Pay Display app is running.
A ‘Welcome’ screen displays when the app is open. If it is not open, tap to open the app.
- Check if the iPad is connected to the correct Wi-Fi network.
Open Settings, tap ‘Wi-Fi’, and see if the iPad is connected to the same network as the Clover device.
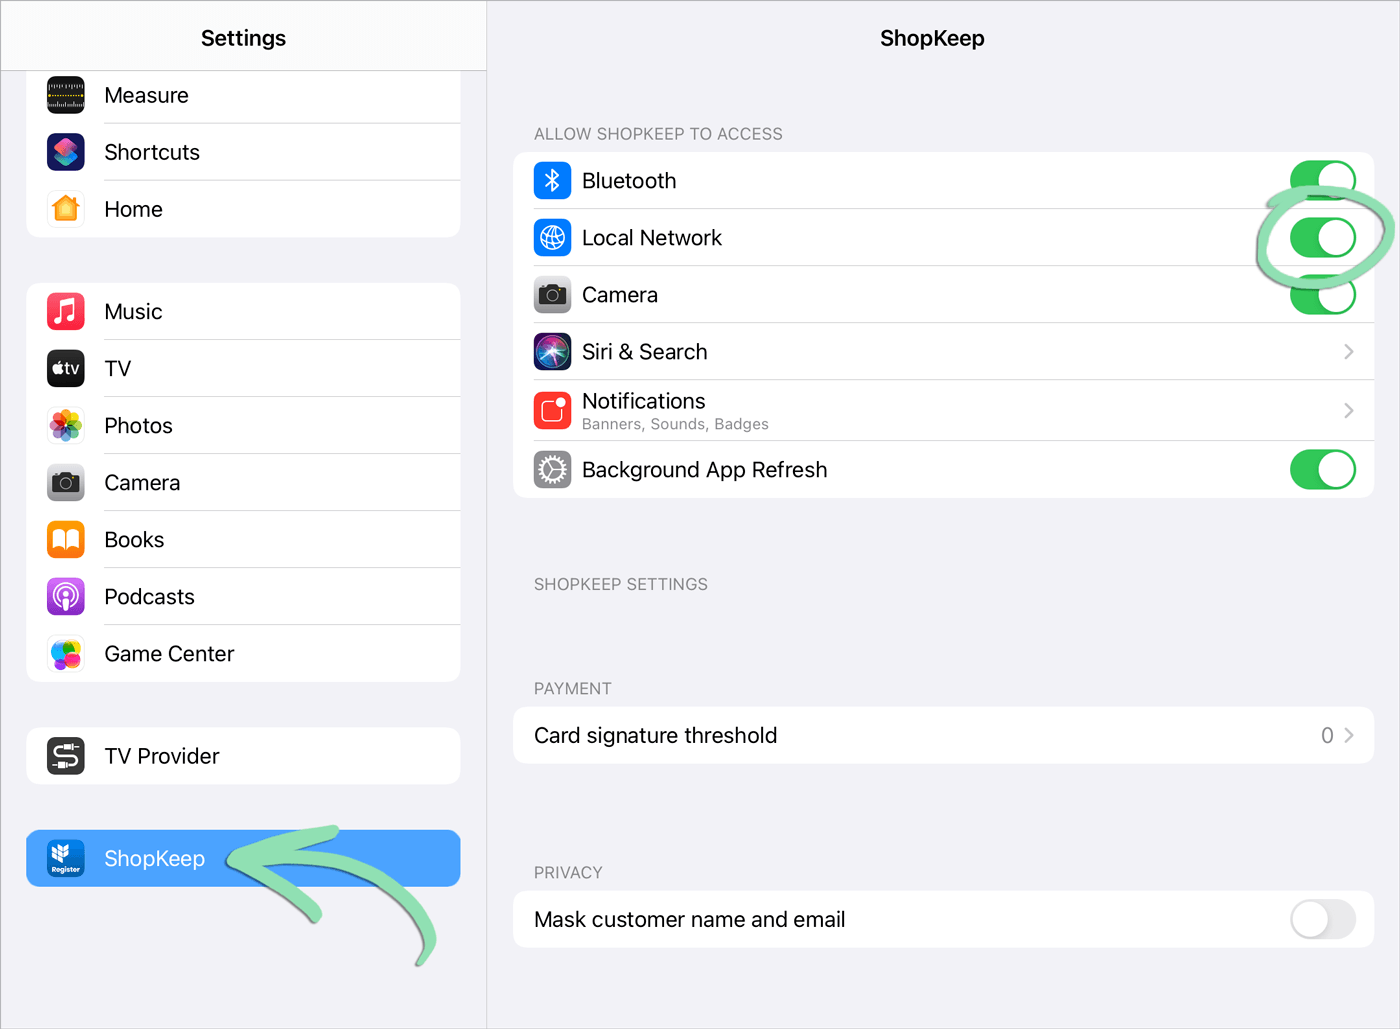
- In the iPad Settings app, tap ‘Retail (S)’, then enable local network access for the Retail POS (S-Series) app.
- Update the Retail POS (S-Series) app to the latest version.
Visit our Introduction to the iPad article to learn how to update the Retail POS (S-Series) app.
- In the Retail POS (S-Series) app, open the Main Menu and tap ‘Get Updates from BackOffice’, then ‘Get Updates’.
If the problem persists, follow the steps below to continue troubleshooting the issue.
- On the iPad, force quit the Retail POS (S-Series) app.
- Follow the steps here to exit the Network Pay Display app.
- Reopen the Network Pay Display app.
- On the iPad, reopen the Retail POS (S-Series) app.
I'm not receiving a pairing code in the Retail POS (S-Series) app.
If tapping the Clover device on the Card Readers screen does not produce a pairing code, follow the steps below to trust the installed certificate.
- In the iPad's Settings app, tap 'General' and select 'About'.

- Scroll to the bottom of the right side and tap 'Certificate Trust Settings'.

- Toggle on 'Clover Prod Terminal Server Root'.

- Tap 'Continue'.
- Follow steps 16 - 22 here to get a pairing code and continue with setup.
- If the problem persists, follow the steps here to update the Clover device certificate.
The Retail POS (S-Series) app keeps prompting me to install a certificate.
If the Retail POS (S-Series) app continuously asks you to install a certificate after following the steps in our setup guide or after updating to iOS 13, it means the Clover device certificate needs to be updated. Follow the steps below to learn how to resolve this issue.
- On the Clover device, open the Network Pay Display app.
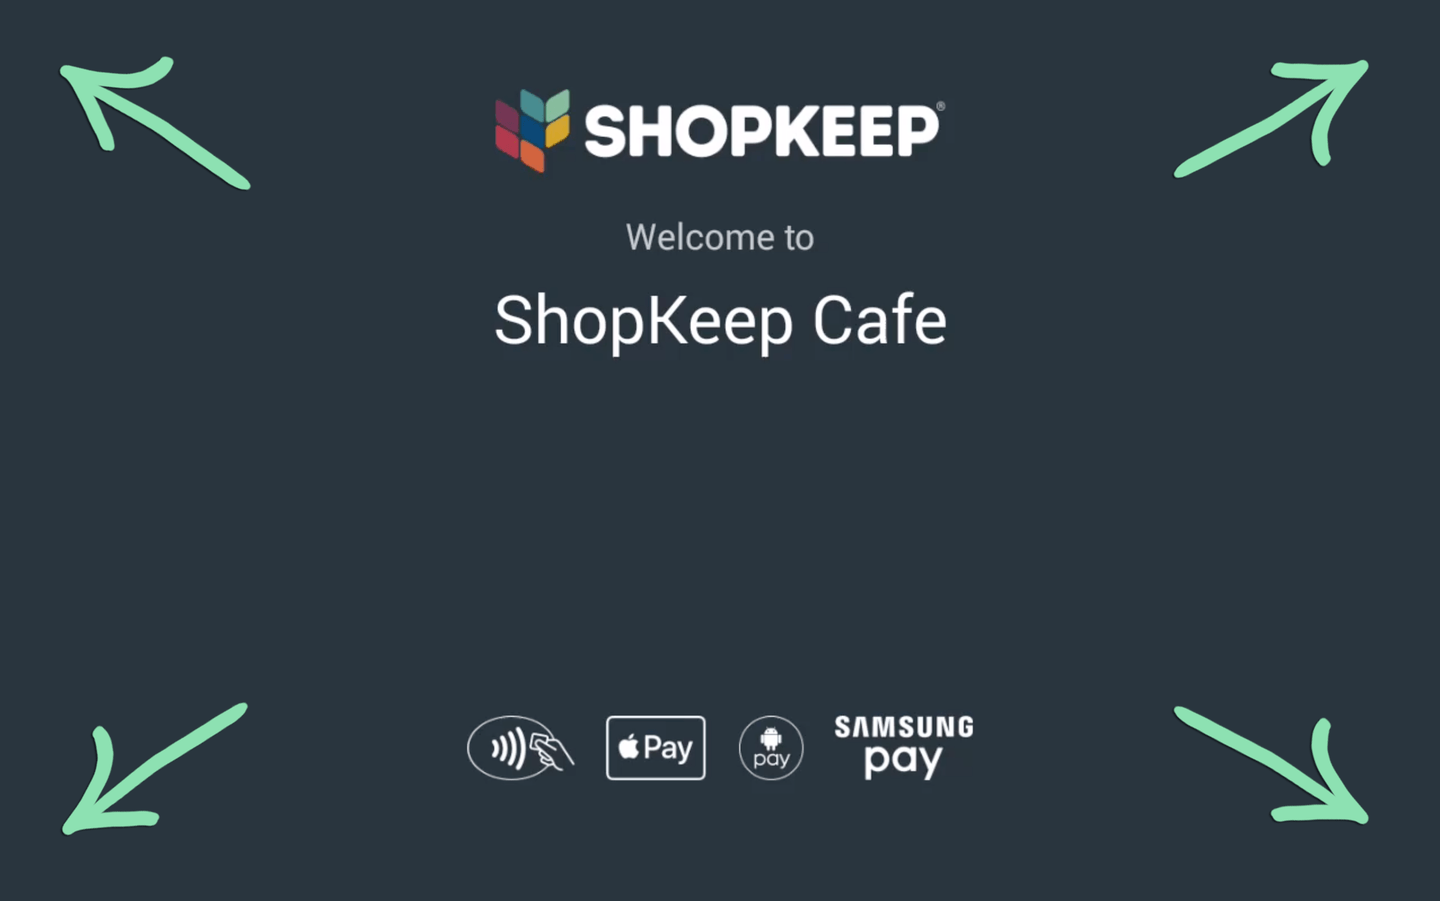
If the Clover device displays the ShopKeep ‘Welcome’ screen instead of the home screen shown below, follow the steps here to exit to the Network Pay Display app.

- Tap the menu button.
- Select ‘Settings’.
- Uncheck ‘Server is Secured’, then tap ‘Configure and Restart Server’.

- Enable ‘Server is Secured’, then tap ‘Configure and Restart Server’.

- Tap the back button to return to the main screen of the Network Pay Display app.
- Tap ‘Start’.

- If necessary, follow steps 16 - 22 here to connect the Clover Mini to the register.
I get a spinning gear or an X after I enter the pairing code.
A checkmark is needed to be able to use your Clover device. If you see a spinning gear or an X on the Integrated Hardware screen, it means there is a connectivity issue.
- In Integrated Hardware, tap 'Disconnect' on the Card Readers screen.

- Force quit the Retail POS (S-Series) app.
- Follow the steps here to exit the Network Pay Display app.
-
Tap the launcher button, then swipe your finger upward on the Network Pay Display app preview.

- Reopen the Network Pay Display app.
- On the iPad, reopen the Retail POS (S-Series) app.
- On the Card Readers screen, tap the Clover device and wait for a checkmark to appear.
If the Card Readers screen is blank, follow these troubleshooting steps to resolve the issue.
Credit Card Processing Issues
If you are unable to process credit cards with your Clover device, we can help. Find your issue in this section and follow the troubleshooting steps.
"The return has failed to process to the original card."
This error appears in Lightspeed Retail when you try to return a credit card sale made before you started using your Clover device.
- Complete the return to a different tender, such as Cash.
- If you must return the sale back to the original card, contact Customer Care.
"Card reader device disconnected" / "Transaction cancelled: device disconnected"
These errors appear on the iPad when it loses its connection to the Clover device. Most often, this happens because the iPad has automatically connected itself to a different network.
- Press the iPad’s Home button to exit the Retail POS (S-Series) app.
- Open Settings and tap 'Wi-Fi'.
- Make sure the iPad is connected to the correct network.
If not, switch to the correct one and follow these steps to forget all other networks.
- In the iPad Settings app, tap ‘Retail (S)’, then enable local network access for the Retail POS (S-Series) app.
- Reopen the Retail POS (S-Series) app and try the sale again.
If the problem persists, follow the steps below to continue troubleshooting the issue.
- Unplug your router from power, wait about 10 seconds, and plug it back in.
- Once the router is back online, check if the iPad is connected to the correct network.
- Reboot your Clover device.
"Transaction failed: invalid card"
This error appears on the Clover device’s screen if a customer swipes something other than a credit or debit card, like a gift card. It can also occur if the card’s magnetic strip is damaged.
- Tap 'OK' to dismiss the error.
- Have the customer swipe a valid credit or debit card.
- If the swipe fails again, manually enter the card information.
- If the card is an Integrated Gift Card, tender the sale as Gift Card and slide the card through the reader.
"Card declined"
If a “Card declined” error appears in the Retail POS (S-Series) app, it means the charge was refused by the customer’s bank.
- In the Retail POS (S-Series) app, tap 'Cancel' and tender the sale again.
- If declined again, have the customer contact their bank or finish the sale to a different tender.
“Unable to add tip”
This error occurs when you try to adjust a tip for an offline credit payment, but internet connectivity has not been restored to the register. Tips can only be adjusted when there is an active internet connection and the batch the transaction is from is still open.
- Read the error, then tap ‘No Tip’ to close the sale without a tip or ‘Back’ to try again.

- If you tapped ‘Back’ in the previous step, continue troubleshooting below:a Tap ‘Adjust Tip Later’.
 b Troubleshoot your internet connection.c When internet connectivity is restored, adjust the transaction’s tip.
I'm receiving a credit card processing error not listed on this page.
- Contact Customer Care for assistance.
I have not received money from my credit card transactions.
Deposits occur within 24-48 business hours of batch closure and, by default, most accounts batch out automatically every night. If you have not seen a deposit in several days, try manually closing your batch.
- Follow the steps here to exit the Network Pay Display app.
- Open the 'Closeout' app, then select the current batch.
- Tap 'Close Out All Devices'.

- Tap 'Close Out' to confirm.
- Tap the Home button to return to the Home screen.

- Reopen the Network Pay Display app to continue using the device with Lightspeed Retail.
Printer and Cash Drawer Issues
Look no further for help with issues affecting the Clover device’s printer or cash drawer connection.
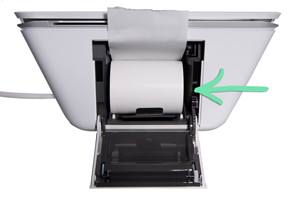
Receipts print blank.
The printer requires special thermal receipt paper. If you loaded regular paper, receipts will print out blank.
- Pull open the printer cover on the rear of the device.
- Check to see if you are using thermal receipt paper.
Thermal paper is shinier on one side and turns black when scratched.
- Make sure the paper is installed correctly.
Thermal paper only prints on one side. The paper must be loaded so it feeds up from the top of the roll.
 Not using thermal receipt paper? Purchase some from the Lightspeed Store.
"Receipt Not Printed"
This error appears in the Retail POS (S-Series) app when the printer runs out of paper or the paper is not properly loaded.
- Pull open the printer cover on the rear of the device.
- If there is no paper left, load a new roll.
- If there is paper left, check if it is loaded correctly.
The paper must be loaded so it feeds up from the top of the roll.
- Close the cover on the paper and reprint the receipt.
Not sure how to reprint a receipt? Visit our Using the Register article for help.
Suggested tips do not print on my receipts.
This issue occurs if the suggested tips setting is not enabled, the register needs to sync with BackOffice, or the Retail POS (S-Series) app is out of date.
- Visit receipt settings from BackOffice or the Retail POS (S-Series) app.
- From the ‘Tips and Signature’ tab, enable ‘Show tip suggestions on paper receipts’.
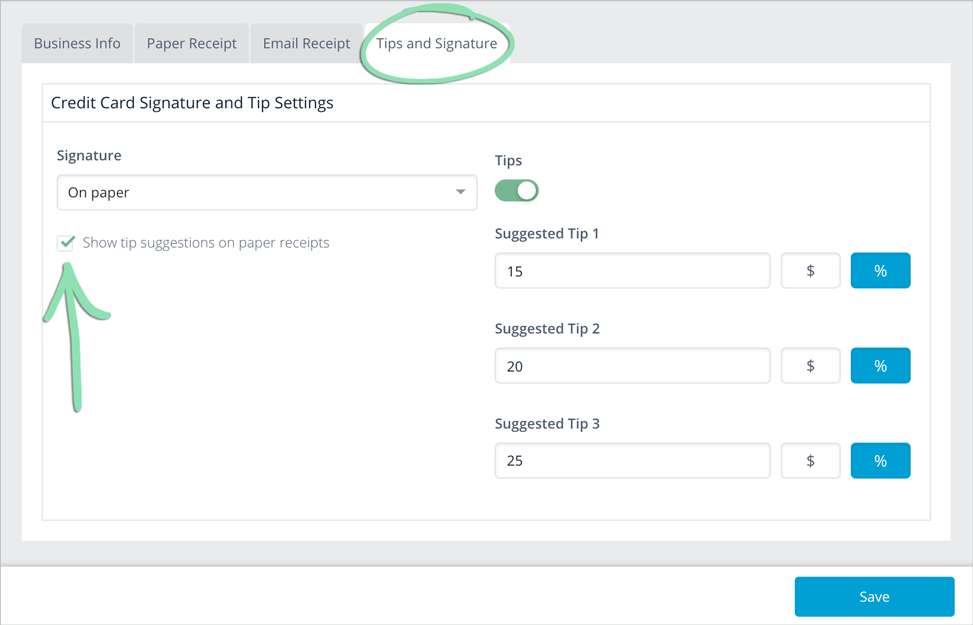
- Customize each tip’s value and type (‘$’ or ‘%’).
- Click ‘Save’.
- If updating tip settings from BackOffice, go to the register and Get Updates from BackOffice.
- If the problem persists, update the Retail POS (S-Series) app.
My business logo does not print on receipts.
This issue occurs if a logo has not been uploaded, the ‘Show Logo on Printed Receipt’ setting is not enabled, the register needs to sync with BackOffice, or the Retail POS (S-Series) app is out of date.
- Visit receipt settings from BackOffice or from the Retail POS (S-Series) app.
- From the ‘Business Info’ tab, check if a store logo is uploaded.
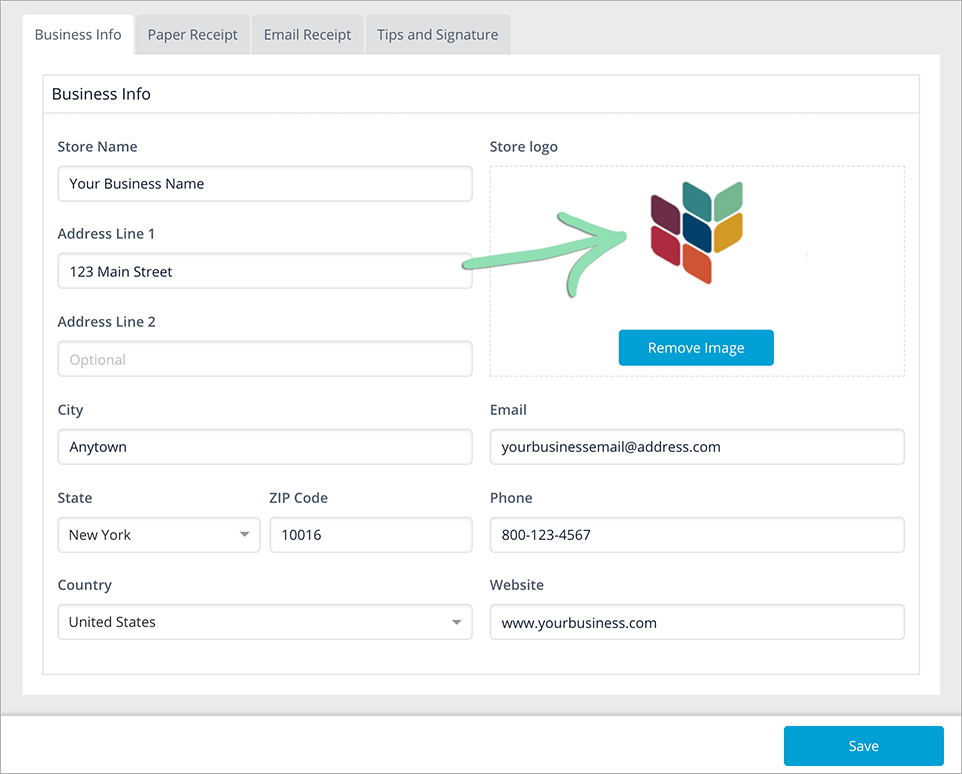
- If there is no logo, tap or ‘Choose Image’ to upload one.
We recommend following these tips to optimize the logo for printing.
- Click the ‘Paper Receipt’ tab.
- Enable ‘Show Logo on Printed Receipt’, then click ‘Save’.

- If updating receipt settings from BackOffice, go to the register and Get Updates from BackOffice.
- If the problem persists, update the Retail POS (S-Series) app.
My business logo on printed receipts looks different than my email receipt logo.
Logos printed on paper receipts look different than logos on email receipts due to the limitations of thermal printers. For best results, optimize your logo for printing, then upload that new version to update the logo used for paper receipts, email receipts, and invoices.
- Follow these tips to optimize your logo for paper receipts.
- Upload the new logo.
- On the register, open the Main Menu and tap ‘Get Updates from BackOffice’, then ‘Get Updates’.
The cash drawer does not open when I perform a sale or try to open the drawer.
This issue can occur for a variety of reasons. After each step below, check to see if the problem is resolved.
- If performing a sale, make sure you tendered it to Cash.
The drawer opens for Cash sales but not for other tenders, such as Credit.
- Check that the drawer's lock is in the vertical position (unlocked).
- Make sure the correct cash drawer cable is in use.
- For APG cash drawers, you must use the CD-101A cable. Purchase a new cable here, if necessary.
- For the Clover cash drawer, you must use the cable that came with the drawer.
- Disconnect the cash drawer cable from the Hub and the drawer, then reconnect it.
The cable’s larger end plugs into the bottom of the drawer, while the smaller end plugs into the Hub.
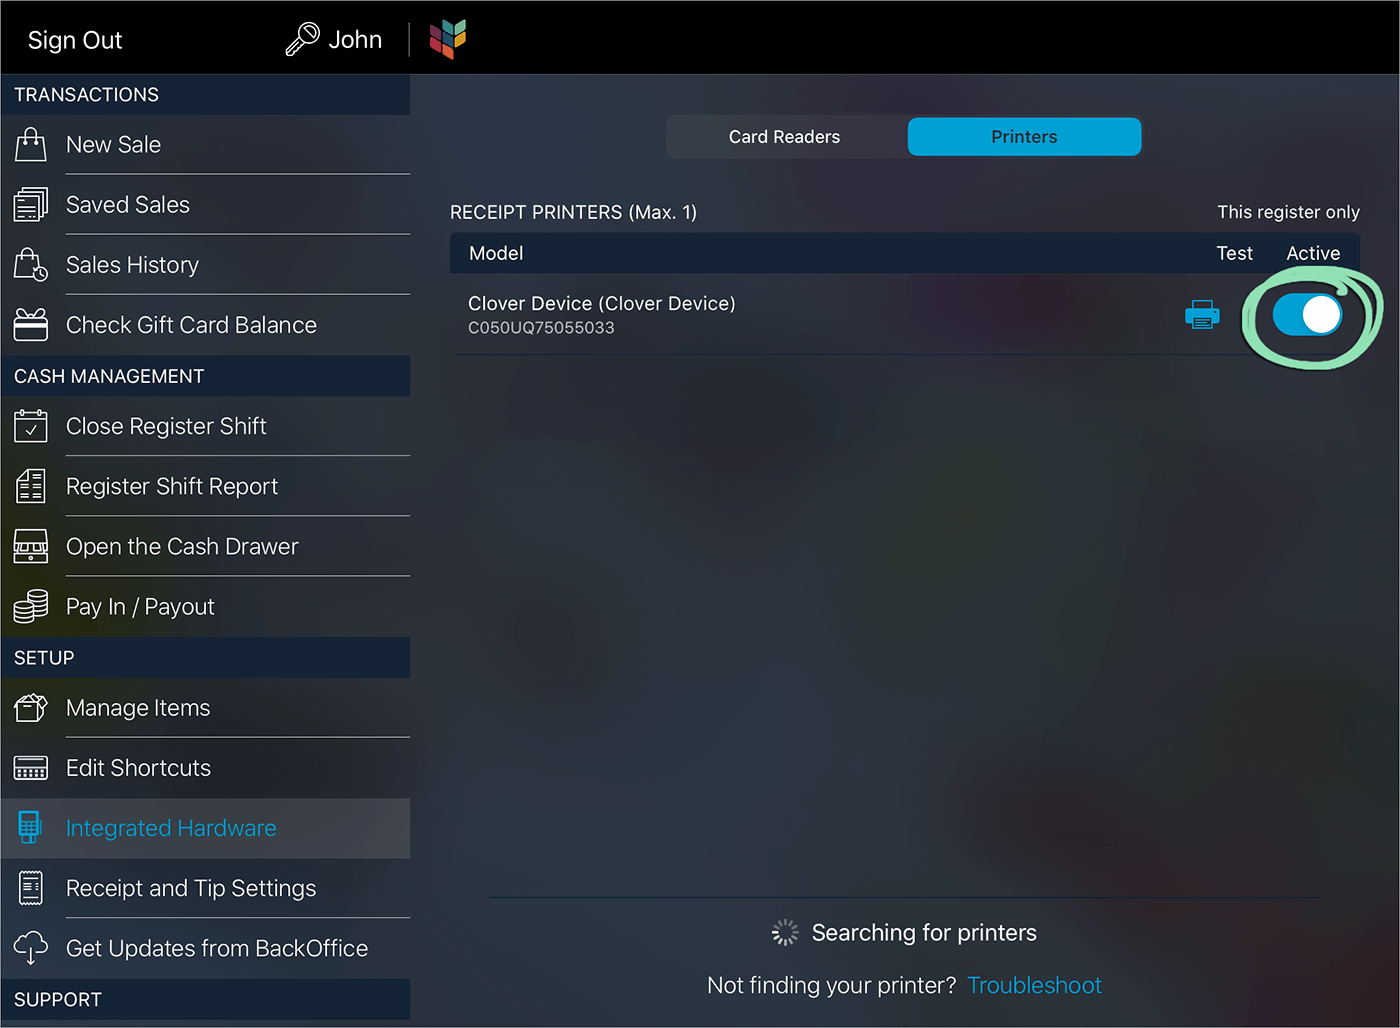
- Look to see if the receipt printer is enabled.
On the Retail POS (S-Series) appMain Menu, tap ‘Integrated Hardware’ and select ‘Printers’.


The switch next to the Clover device should be enabled. If it is not, tap to toggle it on.
Miscellaneous Issues
This last part covers miscellaneous issues unrelated to the sections above.
How do I clean the Clover Mini reader?
It is important to regularly clean your Clover Mini to maintain the quality of your device. Cleaning supplies can be found at an online retailer or purchased locally.
- Use card reader cleaning cards to clean the Clover Mini card reader.
- Prevent misprints and paper jams by cleaning the Clover Mini’s thermal printer with printer cleaning cards.
- Remove residue from your Clover mini screen with screen cleaning wipes.
The Clover Mini screen is frozen.
A frozen screen can indicate that the Clover Mini needs to be rebooted.
- To reboot your Clover, unplug your Clover device from its power outlet, then plug it back in.
- If after rebooting the Clover Mini the screen is still frozen, please contact Customer Care.
My iPad register does not charge while using the Clover Mini.
This issue occurs if you try to charge the iPad via the Clover device’s Hub or if there is a charging problem unrelated to the Clover device itself.
- Make sure the iPad’s charging cable is connected to the white power adapter included with the iPad.
The Hub’s USB ports are not designed to charge third-party devices.
- If the iPad appears to charge but its battery is draining, reduce the screen brightness.
Not sure how to do this? Visit Apple Support for help.
- Plug the iPad's power adapter into a different power outlet.
- If possible, connect a different Lightning cable to the iPad and its charger.
If the iPad does not charge, there may be a problem with the iPad or its charging adapter. Contact Apple for support.
The business name displayed on my device is incorrect.
The ‘Welcome’ screen displays the business name entered for your receipts in BackOffice. Follow the steps below to learn how to update it.
- Visit receipt settings from BackOffice or from the Retail POS (S-Series) app.
- From the 'Business Info' tab, enter the correct 'Store Name'.

- Click 'Save'.
- If updating the store name from BackOffice, go to the register and Get Updates from BackOffice.
The new store name takes effect on the Clover Mini after your next transaction.
I forgot my passcode.
Don’t worry, just get in touch and we will resolve the situation.
- Contact Customer Care to reset the passcode.
How do I exit the Network Pay Display app?
Exit the Network Pay Display app when required for troubleshooting or to access a different application on the Clover device, such as the Closeout app.
- On the Clover device, tap all 4 corners to exit the Network Pay Display app.
The corners must be tapped either simultaneously or one at a time in quick succession.
- If prompted, enter the Clover device’s passcode.
