Email Receipt Marketing — The How and Why of Digital Receipts
Email receipt marketing can be incredibly beneficial to your small business for a multitude of reasons.
And with ShopKeep, setting up these receipts is quick, easy, and painless. But before we get started with how to setup email receipts, let’s review why offering digital receipts can mean success for your marketing efforts.
It Helps with Acquisition and Remarketing
When a customer opts into receiving an email receipt, the email you collect from them and enter into your POS system is priceless. Not only do you now have a way to track what they purchase when they visit your store, but you’re also able to follow up with them immediately after their purchase. Email receipts might just seem like a dollar number sent via email, but they are so much more. Including a link to your website, information on upcoming promotions, and links to your social media accounts are all great ways to engage and delight your new (and returning) customers, while also leading to more sales for your business.
SEE ALSO: Increase Your Email Address Collection at the Point of Sale
It Improves Customer Experience
In the age of eCommerce, where anything and everything are available to you with just a simple click, offering an excellent customer experience has never been more crucial. One of the most important things customers are looking for in their shopping experience is convenience. If you can’t give that to them in your brick-and-mortar establishment, they can easily find it elsewhere.
Email receipts, however, help pinpoint a common pain point for many customers — losing their receipts. Though you might associate a customer hanging on to a receipt with their desire to possibly return merchandise, later on, this isn’t always the case. Very often, customers simply want to keep track of their expenses, be able to submit a receipt to their boss, or split costs with a friend or significant other. Making it easier for a customer to do any (or all of these) things will make them think more positively about their experience with your business.
Now let’s get you set up!
So now that you’ve learned a little about why email receipts should be part of any successful small business marketing mix, it’s time to learn how to setup email receipts in ShopKeep BackOffice.
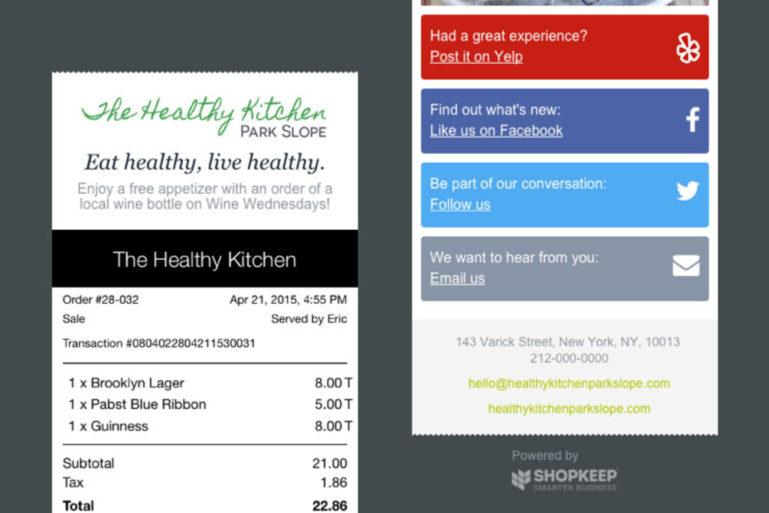
While you’re able to email receipts to customers without any setup, spending just a few minutes customizing your email receipts will lead to massive gains in effectiveness. Adding logos, promotional messages, and icons that link to your social media accounts will help drive your marketing efforts forward.
So let’s get started…
First, sign into your BackOffice. Click Settings on the left side menu and choose Receipts. Then, on the Email Receipt tab, upload your logo or put your website in the Logo URL field for when customers click on the image. Below, in the text boxes, take advantage of this space and add a heading and/or promotional message.
Further down the page, you can also add a banner — via inserting an image — to help advertise an upcoming promotion.

Make sure to enter links to your social media accounts, because you never want to miss out on a “Like” or a “Share.” And don’t forget to add an email address so new and loyal customers are able to easily contact you. Then push Save so all of your hard work doesn’t go to waste.
Next, on the lower left-hand corner of the screen, you’ll see the option to send a test email. Go ahead and send the receipt to yourself to make sure it arrives in your inbox as you intended. To the right of that button, you can also opt to View in browser. If both of these options look satisfactory to you, you’re now ready for a quick tutorial on how to send email receipts to customers.
SEE ALSO: How to Integrate Email Marketing Software with Your POS
From the transaction screen on your register app on the iPad, tap Walk-in in the upper right-hand corner to tag a customer to the sale. If you forget at this point, don’t worry. You can also do this at the end of sale. Then proceed through your checkout as you normally would. Check Email Receipt and then Done to finish the sale and send the receipt.
If you’ve followed these few steps successfully, you are now fully prepared to start offering your customers the option to receive email receipts. For a visual presentation of these steps, you can watch this handy ShopKeep Support video to walk you through the same process.
To explore how well your email receipt marketing efforts are going, go to the BackOffice and click the Marketing tab, then choose Marketing Dashboard. You’ll see an Email Receipt Interaction graph that will give you a breakdown of customer engagement and shows you how often the social media links on your receipts are being clicked.
SEE ALSO: The How and Why of MailChimp Integration
We hope this crash course on email receipt marketing has been helpful. If you still have questions or need help, leave us a comment below or email [email protected].

Want to try ShopKeep for yourself?
Just answer a few easy questions.
Need help finding the right point of sale?
Just complete the form. We’ll call you right back to explain how ShopKeep can work for you.
Hit the ground running.Sprinting, in fact!
Read our free, comprehensive guide, Small Business 101, to learn all you need to know about starting a thriving business.